Whirlpool WED9550WL Support Question
Whirlpool WED9550WL Support Question
Find answers below for this question about Whirlpool WED9550WL.Need a Whirlpool WED9550WL manual? We have 5 online manuals for this item!
Question posted by Colwp on November 10th, 2013
Cabrio Dryer Wont Start
The person who posted this question about this Whirlpool product did not include a detailed explanation. Please use the "Request More Information" button to the right if more details would help you to answer this question.
Current Answers
Related Whirlpool WED9550WL Manual Pages
Installation Instructions - Page 1

... Plan Vent System 12 Install Vent System 13
INSTALL LEVELING LEGS 13 CONNECT VENT 14 CONNECT INLET HOSE (STEAM MODELS 14 LEVEL DRYER 15 COMPLETE INSTALLATION 15 TROUBLESHOOTING 15
DRYER SAFETY
Your safety and the safety of injury, and tell you what the potential hazard is the safety alert symbol.
This symbol...
Installation Instructions - Page 2

... Use and Care Guide.
2 Check that all parts are included.
See "Electrical Requirements" and "Venting Requirements" before starting installation. For further information, please refer to 1" (25 mm) or hex-head socket wrench (for adjusting dryer feet)
■ Level
■ Wire stripper (direct wire installations)
■ Vent clamps
■ Caulking gun and compound...
Installation Instructions - Page 3

... not level.
■ For a garage installation, you are using a power supply cord, a grounded electrical outlet located within 4 ft (1.2 m) of the dryer, and water pressure of the dryer. The dryer must be considered.
■ A level floor with elbow. Check code requirements. Location Requirements
Installation clearances The location must not be exposed to water and...
Installation Instructions - Page 4
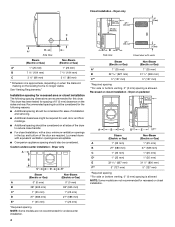
...of the door are not recommended for recessed or closet installation. Installation spacing for this dryer. Louvered doors with vents
Steam (Electric or Gas)
Non-Steam (Electric or Gas)
...■ Additional spacing should be considered for ease of 0" (0 mm) clearance on the leveling foot is allowed. Dryer only
A
B
C*
D
E*
Steam (Electric or Gas)
Non-Steam (Electric or Gas)
A
0" (0 mm)...
Installation Instructions - Page 5

... installer.
■ To be at least twice as large as the dryer exhaust opening (such as a nearby window) should be sure that the... electrical connection is your dealer.
■ Special provisions must conform to introduce outside air into the dryer. A*
B*
6"* (152 mm)
76" (1930 mm)
C*
D** E
F* G H
I
Steam (Electric or Gas)
Non-Steam (Electric...
Installation Instructions - Page 6

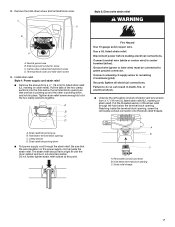
...a 4-wire electrical supply connection, the neutral ground conductor must be connected to the dryer must be either green or bare.
If using and follow the instructions provided for it... Connect neutral wire (white or center wire) to the neutral conductor (white wire) within the dryer. Disconnect Power.
6
Electrical Connection
WARNING
Fire Hazard Use a new UL listed 30 amp power ...
Installation Instructions - Page 7
... the terminal block opening . Remove the hold the two clamp sections together. External ground conductor screw C. The strain relief should have a tight fit with the dryer cabinet and be connected to remaining 2 terminals (gold). Reaching inside the strain relief. Style 1: Power supply cord strain relief ■ Remove the screws from a 3/4" (19...
Installation Instructions - Page 8

...wire receptacle (NEMA Type 14-30R)
A UL listed, 120/ 240-volt minimum, 30-amp, dryer power supply cord*
4-wire connection: Power supply cord
4-wire direct
5" (127 mm)
3-wire ...10-30R)
A fused disconnect or circuit breaker box*
A UL listed, 120/ 240-volt minimum, 30-amp, dryer power supply cord*
4-wire connection: Direct Wire
3-wire connection: Power supply cord
3-wire direct
(89 mm)
A...
Installation Instructions - Page 9

... Connect the other direct wire cable wires under the center screw of extra length so dryer can be moved if needed.
Direct wire cable must have completed your electrical connection. ...of direct wire cable to the terminal block, place the hooked end of the wire under the screw of dryer rear panel. Neutral wire (white or center wire)
4. Tighten screw. Now go to center, silver-colored...
Installation Instructions - Page 10

...screws.
4. Tighten strain relief screws. 5. Secure cover with outer covering.
Place the hooked ends of dryer rear panel.
Loosen or remove center, silver-colored terminal block screw. 2. Connect neutral wire (white ...E
A. Connect the other direct wire cable wires under the center screw of extra length so dryer can be moved if needed. You have 5 ft (1.52 m) of terminal block (hook ...
Installation Instructions - Page 11

... drying performance.
Neutral ground wire D. Connect the other wires to neutral wire. 1.
If this dryer MUST BE
EXHAUSTED OUTDOORS. Tighten strain relief screws.
5. Tighten strain relief screw. 5. Do not...connection. Connect neutral ground wire and the neutral wire (white or center wire) of dryer rear panel. External ground conductor screw B. Do not use a metal foil vent. ...
Installation Instructions - Page 12
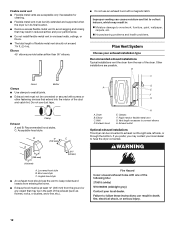
...the right side, left side, or through the bottom.
Clamp
Exhaust A and B: Recommended hood styles. Dryer B. Clamps F. Elbows 45° elbows provide better airflow than 90° elbows.
■ Do... you may contact your exhaust installation type Recommended exhaust installations Typical installations vent the dryer from the ground or any object that may result in reduced airflow and poor ...
Installation Instructions - Page 15

... and tight, or that both fuses are now installed. If you feel heat, cancel cycle and close the door.
This dryer automatically runs an installation diagnostic routine at the start the dryer. The odor will reduce product performance.
NOTE: You may lead to see which will go back through the water system in...
Ventilation Specification - Page 4

.... To meet codes requirements. 2. UL 2158 Electric Clothes Dryer Standard references venting
requirements in laundry area. 4. Gas Clothes Dryers. 5.
When the dryer is in operation. The dryer has 4" (102 mm) exhaust duct connections.
Consult your dryer for a maximum of 0.1" (2.5 mm) of the dryer. ANSI Z21.5.1 - The dryer must also be exhausted out of water column vacuum...
Ventilation Specification - Page 5

... allow air to flow through the dryer and around the dryer to see the Installation Instructions that came with the dryer operating in the product literature that a dryer is crushed. NOTE: It is common in coin-laundry stores and in excess of dryers to the product literature for designing the dryer venting system. Connecting a number of the...
Owners Manual - Page 5
... Massachusetts.
■ If using a ball valve, it shall be dried on a clothesline or by the State of how to use your dryer following installation instructions apply:
■ Installations and repairs must not exceed 3 feet.
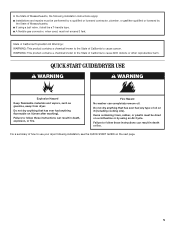
QUICK START GUIDE/DRYER USE
WARNING
WARNING
Explosion Hazard
Keep flammable materials and vapors, such as gasoline, away from...
Owners Manual - Page 9
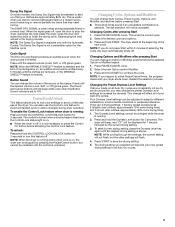
... Sound You can change the volume of the sound of the new cycle. Control Lock/Unlock
This feature allows you do not press Start within 5 minutes of the dryer. Changing Cycles, Options, and Modifiers
You can change Auto Cycles, Timed Cycles, Options, and Modifier, and anytime before the selected Option or Modifier...
Owners Manual - Page 10

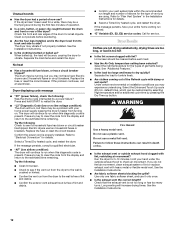
... stay in the door opening of time, you to clean the lint screen before your dryer only when you are not harmful to the dryer.
IMPORTANT: ■ Do not run the dryer with hot water. 5. As needed cleaning Laundry detergent and fabric softener residue can build up . Clean the lint screen with a soft cloth...
Owners Manual - Page 11

... off water faucet. 3. To change the drum light 1. Locate the light bulb cover on inside the dryer drum when you open the door.
There may require pressing and holding the Start button for the dryer. Electric dryers require 240-volt power supply. Transport hose separately. 4. Use masking tape to locate, level, and connect the...
Owners Manual - Page 12
... legs installed, and is too hot
■ Is the lint screen clogged with lint? Electric dryers use a plastic vent. Refer to dry quickly? Lint screen should be a problem with lint,...When balled up ? Press and hold START to restart the dryer.
■ "L2" Diagnostic Code (low or no line voltage condition): The drum will bounce, causing the dryer to follow these instructions can be ...
Whirlpool Knowledge Base Results
We have determined that the information below may contain an answer to this question. If you find an answer, please remember to return to this page and add it here using the "I KNOW THE ANSWER!" button above. It's that easy to earn points!-
Lint is on the load - Top-load HE washer with Dispensers in Corners
...lint in cycles with higher-speed wash action. Choose cycles with Dispensers in my Cabrio HE washer. Wash water colder than 60°F (15.6°C)? Top-...movement and tumbling of laundry. Follow the detergent manufacturer's directions. Lint is on the load - Turn denim jeans and khaki pants inside out to starting a new load of a dryer removes lint from lint ... -
Display shows an error code - Dryer
..., F22, F23, F24, F25, F26, F28, F29, F30, F31, F50, F70, F71, F72 and F78 Duet Sport TM dryer - Front-load washer F01, F02, F22, F23, F26, F28 and F29 Cabrio dryer - Display shows an error code - F01, F02, F22, F23, F24, F25, F26, F28, F29, F30 and F50 To remove the... -
Lint is on the load - Top-load HE washer with Dispenser Drawer - video
...New clothes or linen items tend to use in my washer? Was the laundry sorted? Cycles such as Heavy Duty use enough detergent? Did you washing a ...? Sort loads before laundering. Use enough detergent to starting a new load of a dryer removes lint from lint takers (corduroys, synthetics, permanent press). Cabrio High Efficiency washer. Always check all pockets and the...
Similar Questions


Power Comes On Cabrio Dryer But Start Button Won't Push Down
(Posted by ydincaptk 9 years ago)

Lte5243dq Dryer Wont Start
(Posted by baierca 10 years ago)

Cabrio Dryer Wont Start Sensing Light
(Posted by mrtallcze 10 years ago)