Get support for KitchenAid KHMS2050SSS - 30

KitchenAid KHMS2050SSS Support Question

KitchenAid KHMS2050SSS Support Question

Find answers below for this question about KitchenAid KHMS2050SSS - 30" Microwave Hood Combo.
Need a KitchenAid KHMS2050SSS manual? We have 3 online manuals for this item!
Question posted by jsmccosh on September 4th, 2011

Have A Kitchenaid Over The Range Microwave(khms2050sss) That Stopped Working. I

The person who posted this question about this KitchenAid product did not include a detailed explanation. Please use the "Request More Information" button to the right if more details would help you to answer this question.

Current Answers

There are currently no answers that have been posted for this question.
Be the first to post an answer!

Remember that you can earn up to 1,100 points for every answer you submit. The better the quality of your answer, the better chance it has to be accepted.

Related KitchenAid KHMS2050SSS Manual Pages

Use & Care Guide - Page 1

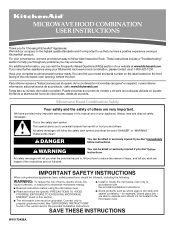
... 1-800-422-1230. SAVE THESE INSTRUCTIONS W10170438A You can happen if the instructions are not followed. Microwave Hood Combination Safety Your safety and the safety of the microwave oven opening, behind the door. Connect only to us at www.kitchenaid.com. These instructions include a "Troubleshooting" section to reduce the chance of injury, and tell you...
Use & Care Guide - Page 2

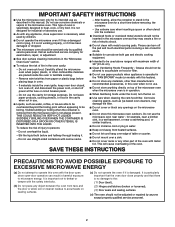
Call an authorized service company for use above ranges with metal foil. Carefully attend the microwave oven when paper, plastic, or other combustible materials are able to be overheated beyond the boiling point without appearing to accumulate on hood or filter. ■ Do not use paper products when appliance is operated in the "PAN BROWN...
Use & Care Guide - Page 3

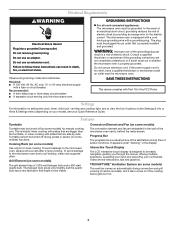
...time-delay fuse or time-delay circuit breaker. ■ A separate circuit serving only this microwave oven. The halogen bulb glows very brightly, but the quartz bulb has a very faint glow...grounding plug. Do not remove ground prong. Observe all cord connected appliances: The microwave oven must be easily navigable, guiding you through the menus, offering multiple selections, ...
Use & Care Guide - Page 4

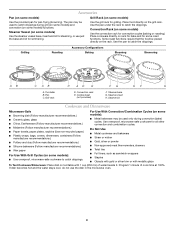
... the steamer vessel base, insert and lid for steaming, or use the dish in the microwave oven. 4 Convection Rack (on some models) Use the convection rack for all other convection and... drippings. Turntable B. Cookie sheet (not provided) F. Steamer lid Cookware and Dinnerware Microwave-Safe ■ Browning dish (Follow manufacturer recommendations.) ■ Ceramic glass, glass...
Use & Care Guide - Page 5

... by touching "Doneness" on the touch screen during programing, and following the prompts. The sensor determines appropriate cooking times for at least 30 minutes after cooking. Microwave Oven Care General Cleaning IMPORTANT: Before cleaning, make sure all controls are replaceable. ■ Cavity light: The cavity light bulb is replaceable. 5 Always follow the screen...
Use & Care Guide - Page 6

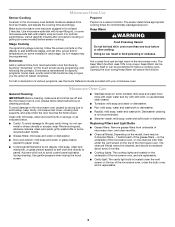
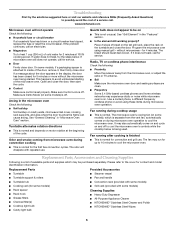
....kitchenaid.com Microwave oven will dissipate with some models) Cleaning Supplies ■ Heavy Duty Degreaser ■ All-Purpose Appliance Cleaner ■ KITCHENAID® Stainless Steel Cleaner and Polish ■ KITCHENAID&#...) to cool the microwave oven. This happens to the cover for 4 minutes. Arcing in the "Features" section. ■ Is the element still working properly? If it ...
Use & Care Guide - Page 8

...or furnished with the product, KitchenAid will pay for Factory Specified Parts for the stainless steel oven cavity/inner door if the part rusts through due to KitchenAid within 30 days from the date of... is installed in an inaccessible location or is not installed in China KITCHENAID® BUILT-IN OVEN & MICROWAVE WARRANTY LIMITED WARRANTY For one year from the date of purchase, when...
Dimension Guide - Page 1

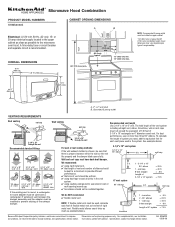
...) 69" (175.3 cm) min. 30" (76.2 cm) 33" min. (83.2 cm) typical* 12" (30.5 cm) min. 13" (33.0 cm...or roof caps must have back-draft damper. 3-1/4" x 10" to the microwave oven hood. wall cap 8 feet straight = 5 ft. = 20 ft. = ...number of range/cooktop. 18 ¹⁄₈" (46.0 cm) 15 ¹⁄₂" (39.4 cm) A. 2" x 4" wall stud B. ® Microwave Hood Combination PRODUCT ...
Installation Guide - Page 1

... Upper Cabinet 8 Install the Microwave Oven 9 Complete Installation 10 VENTING DESIGN SPECIFICATIONS 11 ASSISTANCE 12 Replacement Parts 12 MICROWAVE HOOD COMBINATION SAFETY Your safety and ...to and including 30" (76.2 cm) wide. These installation instructions cover different models. All safety messages will follow instructions. MICROWAVE HOOD COMBINATION INSTALLATION INSTRUCTIONS...
Installation Guide - Page 2

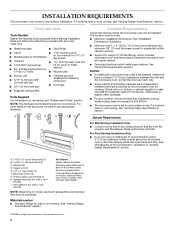
... Dimensions" illustration. ■ Minimum one 2" x 4" (50.8 x 101.6 mm) wood wall stud and minimum 3/8" (10 mm) thickness drywall or plaster/lath within cabinet opening where the microwave oven will not discolor, delaminate or sustain other types of Textron Innovations Inc. 2 For external (wall or roof) venting, see "Venting Design Specifications" section. See "Venting...
Installation Guide - Page 3

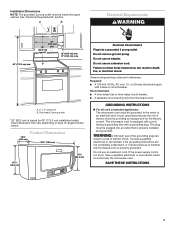
... min. 30" (76.2 cm) 33" min. (83.2 cm) typical* 12" (30.5 cm) ...range/cooktop below. 18¹⁄₄" (46.4 cm) Product Dimensions 29⁷⁄₈" (76.0 cm) 18¹⁄₄" (46.4 cm) 15¹⁄₂" (39.4 cm) Electrical Shock Hazard Plug into an outlet that is too short, have a qualified electrician or serviceman install an outlet near the microwave oven...
Installation Guide - Page 4

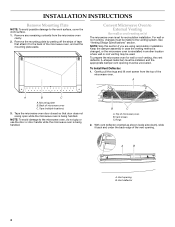
... the appropriate damper vent opening B. Gently pull the rings and lift vent screen from the microwave oven cavity. 2. B C A. A B A. Remove the mounting plate by peeling off the... the microwave oven door closed so that attach it back and under the back edge of tape that door does not swing open while the microwave oven is being handled. Convert Microwave Oven to the work surface,...
Installation Guide - Page 5

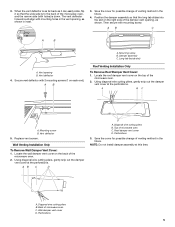
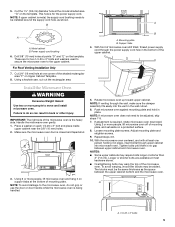
...) is as far back as it can easily slide, flip it so that the long tab slides into the slot on the top of the microwave oven, and the narrow side (with mounting screw. A B C A B A. Damper assembly C. Mounting screw B. AB C D D A. A. Perforations 5 3. When the vent deflector is down. Mounting screw B. Vent opening , as shown...
Installation Guide - Page 6

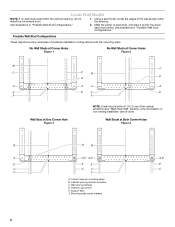
Wall stud centerlines D. Holes for lag screws E. Corner holes (on mounting plate) B. Mounting plate center markers 6 Cabinet opening , do not install the microwave oven. 1. Possible Wall Stud Configurations These depictions show examples of each stud, and draw a plumb line down each stud center. Mark the center of preferred installation ...
Installation Guide - Page 7

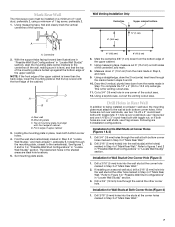
... at the other hole marked in the shaded areas are 3 installation configurations. Mark Rear Wall The microwave oven must attach to the wall at Both Corner Holes (Figure 4) 1. A Wall Venting Installation Only ...10.2 cm) from the marks made in Rear Wall In addition to complete the 12" x 4" (30.5 x 10.2 cm) rectangle. or if both bottom corner holes marked in place, mark both sides of...
Installation Guide - Page 8

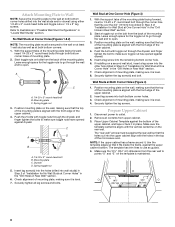
... through the drywall, and finger tighten the bolts to points "D" and "E" on a second wall stud, insert a lag screw into wall stud(s) in Step 2 of the microwave oven. Prepare Upper Cabinet 1. Position mounting plate on the wall, making sure that it is aligned with the vertical centerline on at One Corner Hole" in...
Installation Guide - Page 9

... Only 7. Failure to be the same thickness as shown. Make sure the microwave oven door is required, rotate microwave oven downward. With front of microwave oven still tilted, thread power supply cord through the wall, make sure the damper assembly fits easily into microwave oven. Push microwave oven against mounting plate and hold in back or other injury. Using 2 or...
Installation Guide - Page 10

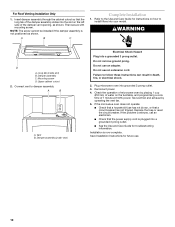
... at 100% power. Installation is not positioned as shown. Long tab (inside slot) B. Plug microwave oven into a grounded 3 prong outlet. Replace the fuse or reset the circuit breaker. Vent B. NOTE...prong outlet. ■ See the Use and Care Guide for instructions on the left side of microwave oven by operating the vent fan. 5. Mounting screw D. Check the operation of the damper vent ...
Installation Guide - Page 11

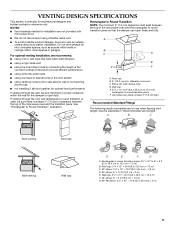
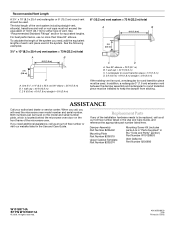
...Round Transition NOTE: The minimum 3" (7.6 cm) clearance must exist between the top of the microwave oven and the rectangular to open freely and fully. A B C D E 3" (7.6 cm)... 3" (7.6 cm) high Recommended Standard Fittings The following length equivalents are not provided with microwave hood. ■ We do not recommend using recirculation installation. Wall cap E. 3¹⁄₄...
Installation Guide - Page 12

... the length of the system you need , add the equivalent lengths of the microwave oven. Both numbers can be found on the front frame of each vent piece used... (0.6 m) + 6 ft (1.8 m) straight = 8 ft (2.4 m) If the existing vent is located behind the microwave oven door on the model and serial number plate, which is round, a rectangular to round transition piece must not exceed the...

KitchenAid Knowledge Base Results

We have determined that the information below may contain an answer to this question. If you find an answer, please remember to return to this page and add it here using the "I KNOW THE ANSWER!" button above. It's that easy to earn points!

  • Cleaning and caring stainless steel surfaces
    ... and stains leaving surfaces shining like new. To claim your  stainless steel surfaces, follow the recommendations and directions on stainless steel sinks, refrigerators, dishwashers, ranges, microwaves and cookware. To order Stainless Steel Wipes, Go Here Product Literature (Use & Care, Parts Lists, etc) Cleaning your refrigerator Different types of these suggestions: Wash...
  • Whirlpool Recall Information
    KitchenAid ® Coffee Maker - Dehumidifier -  United States Dishwasher - Copyright©2005 Whirlpool Corporation. Free Standing range, Double Oven And Oven Microwave Combination - All rights Reserved | United States Canada Gas Water Heater - Over The Range Microwave Hood Combination - 24-inch Washer and Gas Dryer - KitchenAid® PRO LINE® Series Toaster -   Please ...
  • Cleaning and caring stainless steel surfaces
    ... certain paper towels. To clean and care for your stainless steel surfaces, follow the recommendations and directions on stainless steel sinks, refrigerators, dishwashers, ranges, microwaves and cookware. If the polish does contact any plastic parts, trim pieces or rubber door gaskets. To claim your refrigerator Different types of  stainless...

Similar Questions

Display Screen Keep Scrolling. Worth Fixing?
The display on the screen keep changing, making it hard to select the item I want. Otherwise microwa...
(Posted by Lightray 3 years ago)
Microwave/hood Model Khms2050sss-2
Unit started beeping intermittently for a few days and then began to work only intermittently - scre...
(Posted by Rtwalker 8 years ago)
My Microwave Stop Working What Should I Do First
My microwave is completely dead..I ser reset the circuit breaker. Still no luck now what should I do...
(Posted by miown2 9 years ago)
Replace Handle On Kitchenaid Khms2050sss0 Microwave Hood Combo.
I need to install a replacement door handle on a Kitchenaid KHMS2050SSS0 microwave hood combo. All t...
(Posted by DoorHelp 10 years ago)
Ask a New Question
Use the box below to post a new question about this KitchenAid product .
Points & Prizes
  • You can earn points for nearly everything you do on HelpOwl.com
  • You can trade in those points for gift cards at leading retailers such as Amazon.com and Walmart
  • It's that simple!
See How it Works
Create a Free Account

KitchenAid Manuals

Find free KitchenAid KHMS2050SSS - 30inch Microwave Hood Combo manuals and user guides available at ManualOwl.com. Try out our unique manual viewer allowing you to interact with manuals from directly within your browser!

KitchenAid Reviews

View thousands of KitchenAid user reviews and customer ratings available at ReviewOwl.com.

Contact Information

Complete KitchenAid customer service contact information including steps to reach representatives, hours of operation, customer support links and more from ContactHelp.com.

Scoreboard Ratings

See detailed KitchenAid customer service rankings, employee comments and much more from our sister site.

KitchenAid Recalls

Find comprehensive KitchenAid recall information updated hourly on RecallOwl.com.