
Hitachi 51M200 Support Question
Hitachi 51M200 Support Question
Find answers below for this question about Hitachi 51M200.Need a Hitachi 51M200 manual? We have 1 online manual for this item!
Question posted by davinjenn on August 9th, 2011
Connecting My Dish Network
I am tring to connect a coax cable to rear panel. I have to have tv on ch 60. I have no cable box at this location. I am the 2nd user off of a single box. I am using the UHF signal for remote. Please help. What do I need to make this happen.
Current Answers
Related Hitachi 51M200 Manual Pages
Owners Guide - Page 1

PROJECTION MONITOR
Operating Guide for 51M200, 65M200, 51M200A
IMPORTANT SAFETY INSTRUCTIONS 2-3 FIRST TIME USE ...4-19 THE REMOTE CONTROL 20-30 ON-SCREEN DISPLAY...31-52 CARE OF YOUR ASPECT PROJECTION MONITOR AND REMOTE CONTROL 53 USEFUL INFORMATION ...54-57 INDEX ...58
Owners Guide - Page 2
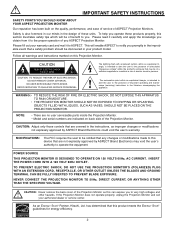
... on this can expose you ASPECT Projection Monitor. CAUTION: Adjust only those controls that may void the user's authority to persons.
NEVER CONNECT THE PROJECTION MONITOR TO 50Hz, DIRECT CURRENT, OR... Hitachi, Ltd. To help you obtain from it to very high voltages and other hazards.
NOTE:
• There are no user serviceable parts inside the Projection Monitor. • Model ...
Owners Guide - Page 9
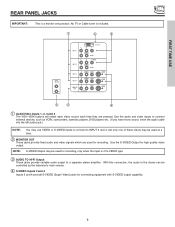
... select each video source each time they are used for connecting equipment with S-VIDEO output capability.
9 No TV or Cable tuner is of these inputs may be used for high quality video
output.
FIRST TIME USE
REAR PANEL JACKS
IMPORTANT:
This is a monitor only product. Use the S-VIDEO Output for recording. With this connection, the audio to a separate stereo amplifier.
Owners Guide - Page 10
...'s
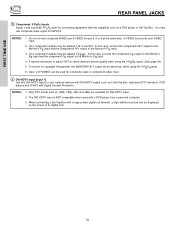
4. NOTES:
1.
Only DTV format such as a DVD player or Set Top Box. NOTES:
1. It may use composite video signal for DVI-HDTV input.
2.
FIRST TIME USE
REAR PANEL JACKS
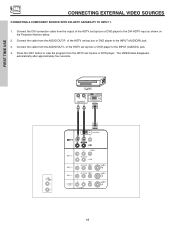
ቦ Component: Y-PBPR Inputs
Inputs 1 and 2 provide Y-PBPR jacks for connecting equipment with this case, connect the components B-Y output to the Monitor's PB input and the components R-Y output to...
Owners Guide - Page 11
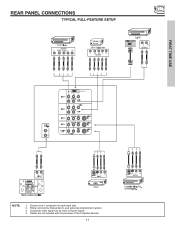
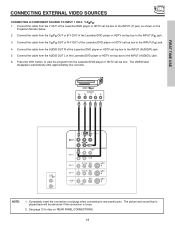
FIRST TIME USE
REAR PANEL CONNECTIONS
TYPICAL FULL-FEATURE SETUP
DVD Player
OUTPUT Y PB/CB PR/CR L R
HDTV Set-Top Box
Y PBOUTPPRUT L R
D-VHS
DIGITAL OUTPUT
LR OUTPUT...
Stereo SystemAmplifier
NOTE:
1. Composite video signal can be input to each input jack. 2. Connect only 1 component to Input2~Input5. 4. Cables are not included with the purchase of this Projection Monitor.
11
S-VIDEO V L R...
Owners Guide - Page 12
... video connection if your cables. • You may use composite video signal for Input 2~Input 5. • It may be labeled Y, B-Y, and R-Y. In this case, connect the components CB output to the Monitor's PB input and the components CR output to the Monitor's PR input. • Your component outputs may be used .
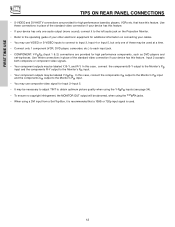
12 FIRST TIME USE
TIPS ON REAR PANEL CONNECTIONS...
Owners Guide - Page 13

FIRST TIME USE
CONNECTING EXTERNAL AUDIO DEVICES
To control the audio level of the Projection Monitor.
13 REAR PANEL OF PROJECTION MONITOR
AUDIO TO HI-FI
L
R
INPUT 1 INPUT 2 INPUT 3
DVI-HDTV
PR
PB
Y
R (MONO)/L AUDIO
PR
PB... the audio amplifier lower and adjust the sound using the remote control of an external audio amplifier with the remote control, connect the system as shown below.
Owners Guide - Page 15
Connect the cable from the AUDIO OUT of the VCR or the laserdisc player to view the program from the...
VCR
15 Connect the cable from the VIDEO OUT of the VCR or the laserdisc player to the INPUT (MONO)/L(AUDIO) jack. 3. Press the VID4 button to the INPUT (VIDEO) jack, as shown on the Projection Monitor below.
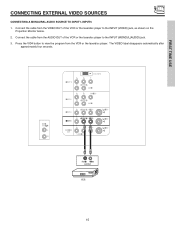
2. FIRST TIME USE
CONNECTING EXTERNAL VIDEO SOURCES
CONNECTING A MONAURAL ...
Owners Guide - Page 16
... the laserdisc player to the INPUT (AUDIO/L) jack.
4. The VIDEO label disappears automatically after approximately four seconds. Connect the cable from the AUDIO OUT L of the VCR or the laserdisc player to rear panel jacks.
FIRST TIME USE
AUDIO TO HI-FI
L R
INPUT 1 INPUT 2 INPUT 3
DVI-HDTV
PR
PB
Y
R (MONO)/L AUDIO
PR
PB
Y/VIDEO
R (MONO...
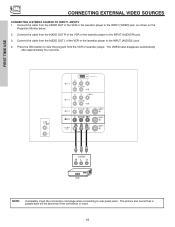
Owners Guide - Page 17
The VIDEO label disappears automatically after approximately four seconds. Press the VID4 button to rear panel jacks. The picture and sound that is played back will be abnormal if the connection is loose.
17 FIRST TIME USE
AUDIO TO HI-FI
L
R
INPUT 1 INPUT 2 INPUT 3
DVI-HDTV
PR
PB
Y
R (MONO)/L AUDIO
PR
PB
Y/VIDEO
R (MONO)/L AUDIO...
Owners Guide - Page 18
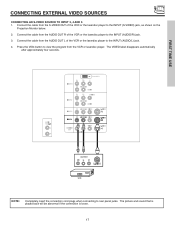
... input as shown on the Projection Monitor below.
2. FIRST TIME USE
D-VHS
LR OUTPUT
DIGITAL OUTPUT
AUDIO TO HI-FI
L
R
INPUT 1 INPUT 2
DVI-HDTV
PR
PB
Y
R (MONO)/L AUDIO
PB
Y/VIDEO
R (MONO)/L AUDIO
INPUT 3
R (MONO)/L VIDEO
S-VIDEO
INPUT 4
R (MONO)/L VIDEO
S-VIDEO
MONITOR OUT
R
L VIDEO
AUDIO
S-VIDEO
18 Connect the cable from the AUDIO OUT L of...
Owners Guide - Page 19
... on the
Projection Monitor below. 2. Connect the cable from the Laserdisc/DVD player or HDTV set top box to the INPUT (PR) jack. 4. FIRST TIME USE
CONNECTING EXTERNAL VIDEO SOURCES
CONNECTING A COMPONENT ... connection cord plugs when connecting to the INPUT (Y) jack, as shown on REAR PANEL CONNECTIONS.
19 Connect the cable from the Y OUT of the Laserdisc/DVD player or HDTV set top box ...
Owners Guide - Page 20
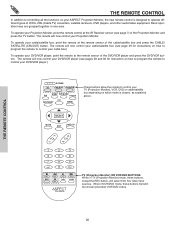
... the chosen precoded VCR/DVD codes.
20 DAY/NIGHT
MENU
These buttons allow the remote to control your TV (Projection Monitor), VCR, DVD or cable/satellite
box depending on how to program the remote to control your cable box.)
To operate your cable/satellite box, point the remote at the remote sensor of the cable/satellite box and press the CABLE/ SATELLITE (CBL/SAT) button.
Owners Guide - Page 22
...; ▲ ▲
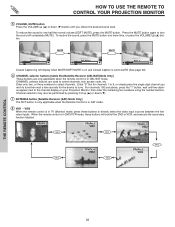
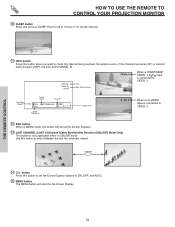
HOW TO USE THE REMOTE TO CONTROL YOUR PROJECTION MONITOR
ቦ VOLUME, MUTE button Press the VOLUME up (̆) or down (̄) button until two dashes appear next to the channel display on and Closed Caption is set to AUTO (See page 52).
ቧ CHANNEL selector buttons [Cable Box/Satellite Receiver (CBL/SAT...
Owners Guide - Page 24
... REMOTE CONTROL
24 HOW TO USE THE REMOTE TO CONTROL YOUR PROJECTION MONITOR
ቫ SLEEP button
Show and set the Closed Caption options to ON, OFF, and AUTO.
ቱ MENU button
The MENU button will exit all On-Screen Displays.
ቯ LAST CHANNEL (LAST CH) button [Cable Box/Satellite Receiver (CBL/SAT) Mode Only]
This button is connected...
Owners Guide - Page 29
...DAY/NIGHT
MENU
SELECT
MUTE
EXIT
LAST CH
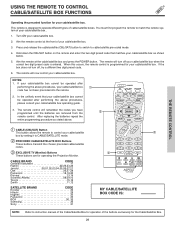
ቢ CABLE (CBL/SAT) Button
This button allows the remote to control your cable/satellite box by setting it to match the remote system of cable/satellite boxes.
USING THE REMOTE TO CONTROL CABLE/SATELLITE BOX FUNCTIONS
THE REMOTE CONTROL
Operating the precoded function for your cable/satellite box. In the unlikely event that matches...
Owners Guide - Page 36
... 60 fields like video.
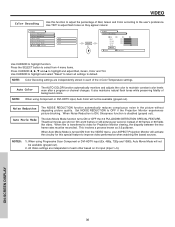
All Video settings are independent of each of the 4 Color Temperature settings.
Use CURSOR... user's preference. The Auto Movie Mode function turns ON or OFF the 3:2 PULLDOWN DETECTION SPECIAL FEATURE.
NOTE: When using Progressive... of Red, Green and Color according to OFF if the Projection Monitor experiences picture blocking. When Auto Movie Mode is turned ...
Owners Guide - Page 51

... this feature to watch 4:3 signal with gray side bar. Use for both sets of the Projection Monitor's picture tubes when watching 4:3 signal, Black Side Panel is cancelled at Power OFF.... Vision Signal Y-PBPR from HDTV Set-Top Box. NOTES: 1.
Standard Definition Television or DVD (Digital Versatile Disc Player) Y-CBCR. High Definition Television - Set Virtual HD
Use this color...
Owners Guide - Page 54
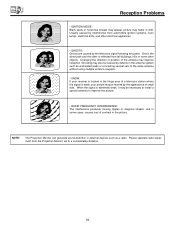
... or position of contrast in the fringe area of a television station where the signal is weak, your receiver is located in the picture. NOTE:
The Projection Monitor can generate sound distortion in external devices such as unshielded leads or connecting several sets to the same antenna without using multiple antenna couplers.
• SNOW: If your picture...
Owners Guide - Page 56
...Refer to rear panel at the back of the Projection Monitor
&#...in.) (mm)
• Weight (lbs.) (kg.)
51M200 51M200A 50 1/4 1,275.0
48 3/4 1,239.0
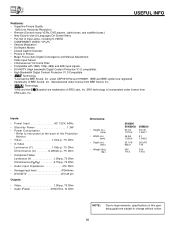
25...USEFUL INFO
Features:
• Superfine Picture Quality
1280 Line Horizontal Resolution
• Remote (Controls many VCRs, DVD players, cable boxes, and satellite boxes.)
• New Easy-to-Use...720p, 480p and 480i input signals.
• DVI-HDTV (...
Similar Questions

Hitachi - 65 M 200. - How Do I Connect Coax. Cable From My Cable Co. To This T
Trying to set up from cable - need the steps to get through the process
Trying to set up from cable - need the steps to get through the process
(Posted by Rdjones60 9 years ago)


Hooking Up Laptop To Hitachi 51m200
I would like to know if it is possible to connect my Acer Aspire laptop to my Hitachi 51M200. If so,...
I would like to know if it is possible to connect my Acer Aspire laptop to my Hitachi 51M200. If so,...
(Posted by roxy8285 10 years ago)

51m200, With Comcast Remote
I have a Hitachi 51m200 and a comcast remote.. i need the codes thank
I have a Hitachi 51m200 and a comcast remote.. i need the codes thank
(Posted by silverbackhaze 11 years ago)

Projection Television Screen Won't Project
Once the Projection television turned on the redlight comes on but nothing comes on screen. Is it th...
Once the Projection television turned on the redlight comes on but nothing comes on screen. Is it th...
(Posted by Charpentiernicholas 11 years ago)