Dell Precision T5500 Support Question
Dell Precision T5500 Support Question
Find answers below for this question about Dell Precision T5500.Need a Dell Precision T5500 manual? We have 3 online manuals for this item!
Question posted by WIZAparv on December 13th, 2013
How To Take Our Removable Dell Precision Hard Drive
The person who posted this question about this Dell product did not include a detailed explanation. Please use the "Request More Information" button to the right if more details would help you to answer this question.
Current Answers
Related Dell Precision T5500 Manual Pages
Replacing the Hard-Drive Tray - Page 1
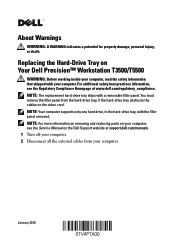
... on your computer.
NOTE: For more information on removing and replacing parts on the Dell Support website at support.dell.com/manuals. 1 Turn off your computer. 2 Disconnect all the external cables from the hard-drive tray, if the hard-drive tray obstructs the cables on Your Dell Precision™ Workstation T3500/T5500
WARNING: Before working inside your computer, read the...
Replacing the Hard-Drive Tray - Page 4
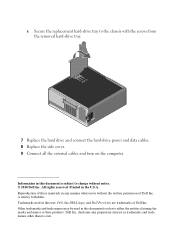
... text: Dell, the DELL logo, and Dell Precision are trademarks of these materials in any proprietary interest in the U.S.A. Trademarks used in this document is strictly forbidden. All rights reserved. disclaims any manner whatsoever without notice. © 2010 Dell Inc.
c Secure the replacement hard-drive tray to the chassis with the screws from the removed hard-drive tray...
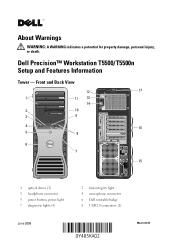
Setup and Features Information Tech Sheet - Page 1
...
9
4
16
5
8
6 7
15
1 optical drives (2) 3 headphone connector 5 power button, power light 7 diagnostic lights (4)
June 2009
2 link integrity light 4 microphone connector 6 Dell rotatable badge 8 USB 2.0 connectors (2)
Model: DCTA About Warnings
WARNING: A WARNING indicates a potential for property damage, personal injury, or death. Dell Precision™ Workstation T5500/T5500n Setup and...
Service Manual - Page 5
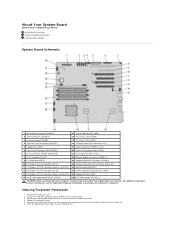
...Dell Precision™ T5500 Service Manual System Board Schematic Clearing Forgotten Passwords Clearing CMOS Settings
System Board Schematic
1 Main Power Connector (POWER1)
15 Type A USB Port (INT_USB2)
2 SATA Connectors (SATA0-4)
16 CPU Riser 2 (CPU2_RSR2)
3 Password Jumper (PSWD)
17 CPU Riser 1 (CPU_RSR1)
4 Hard Drive... Passwords
1. Remove the computer cover. 2. Remove the 2-pin...
Service Manual - Page 7
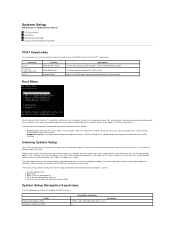
... (e.g., floppy, CD-ROM, or hard drive). The upper-right corner of the screen. and right-arrow keys, or +/- < > System Setup
Dell Precision™ T5500 Service Manual
POST Keystrokes Boot Menu ...to the Utility Partition. This feature offers a quick and convenient method with previous Dell Precision™ workstation platforms, your computer, such as white type on -screen instructions ...
Service Manual - Page 9
... you see the Windows desktop. NOTE: The Dell Diagnostics software works only ...Dell Diagnostics From Your Hard Drive
1.
When the boot device list appears, highlight Onboard or USB CD-ROM Drive and press . 4. Starting the Dell Diagnostics From the Drivers and Utilities Disc
1. Start the Dell Diagnostics from either your computer. Diagnostics
Dell Precision™ T5500 Service Manual
Dell...
Service Manual - Page 14
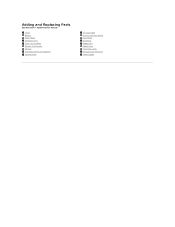
Adding and Replacing Parts
Dell Precision™ T5500 Service Manual
Cover Battery Drives Bezel Hard Drive Tray Front Fan Assembly Memory Card Reader Memory Dual Processor Riser (Optional) System Board
I/O Data Cable Chassis Intrusion Switch Front Bezel Hard Drive Floppy Drive Optical Drive Expansion Cards Heat Sink and Processor Power Supply
Service Manual - Page 15

... slots) NOTE: Support for two full height, full length graphics cards using the PCIe x16 graphics card slot. Specifications
Dell Precision™ T5500/T5500n Service Manual Processors System Information Memory Video Audio Expansion Bus
Drives Connectors Controls and Lights Power Physical Environmental
NOTE: Offerings may vary by region. For more information regarding the configuration...
Service Manual - Page 22
... in Before Working Inside Your Computer. 2. Remove the computer cover.
3. Press and hold the sliding-plate lever toward the base of the computer to release the drives bezel. For additional safety best practices information, see the Regulatory Compliance Homepage at www.dell.com/regulatory_compliance.
Hard-drive Bezel
Dell Precision™ T5500 Service Manual WARNING: Before working inside...
Service Manual - Page 28
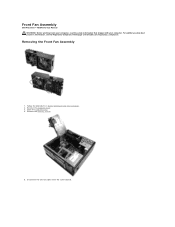
... cover. 3. Disconnect the two fan cables from the system board.
Removing the Front Fan Assembly
1. Remove the memory shroud.
5. Front Fan Assembly
Dell Precision™ T5500 Service Manual WARNING: Before working inside your computer, read the safety information that shipped with your computer. Open the hard drive tray. 4. Follow the procedures in Before Working Inside Your Computer...
Service Manual - Page 31

....
Follow the procedures in Before Working Inside Your Computer. 2. Remove the computer cover. 3. Remove the floppy drive from the back of the floppy drive. 6. Place the floppy drive in the computer. Remove the drives bezel. 5. Remove the front bezel. 4. Floppy Drive
Dell Precision™ T5500 Service Manual
WARNING: Before working inside your computer, read the...
Service Manual - Page 32

Hard Drives
Dell Precision™ T5500 Service Manual WARNING: Before working inside your computer, read the safety information that shipped with your computer. For additional safety best practices information, see the Regulatory Compliance Homepage at www.dell.com/regulatory_compliance. Follow the procedures in Before Working Inside Your Computer. 2. Removing the Hard Drives
1. Disconnect ...
Service Manual - Page 34

Repeat these steps for any other installed hard drives. Lift the two blue hard drive release tabs. 7. Remove the first hard drive assembly from the computer. 6.
Service Manual - Page 36
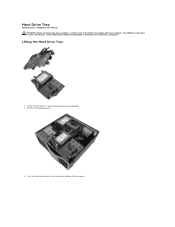
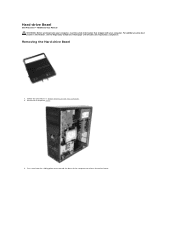
... safety best practices information, see the Regulatory Compliance Homepage at www.dell.com/regulatory_compliance. Press the hard drive release lever toward the bottom of the computer. Hard Drive Tray
Dell Precision™ T5500 Service Manual WARNING: Before working inside your computer, read the safety information that shipped with your computer. Remove the computer cover.
. 3. Lifting the...
Service Manual - Page 43
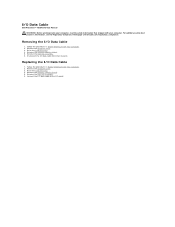
...Disconnect the I/O data cable from the I /O Data Cable
1. Replacing the I /O panel. Remove the memory module shroud. 5. Connect the I/O data cable to the I /O Data Cable
1. Removing the I /O panel. Remove the computer cover. 3. Raise the hard drive tray. 4. I/O Data Cable
Dell Precision™ T5500 Service Manual
WARNING: Before working inside your computer, read the safety information...
Service Manual - Page 44
...options (see the Regulatory Compliance Homepage at www.dell.com/regulatory_compliance. Memory modules are removed from the computer.
Remove the computer cover. 3. Follow the procedures in.... Lift the hard drive tray.
4.
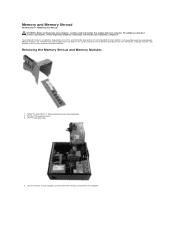
For additional safety best practices information, see Dual Processor Riser (Optional)). Memory and Memory Shroud
Dell Precision™ T5500 Service Manual WARNING...
Service Manual - Page 47
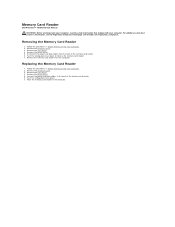
...For additional safety best practices information, see the Regulatory Compliance Homepage at www.dell.com/regulatory_compliance. Removing the Memory Card Reader
1. Remove the memory card reader from the back of the memory card reader. 6. Remove the drives bezel. 5.
Memory Card Reader
Dell Precision™ T5500 Service Manual
WARNING: Before working inside your computer, read the safety...
Service Manual - Page 48

For additional safety best practices information, see the Regulatory Compliance Homepage at www.dell.com/regulatory_compliance. Remove the computer cover.
3. Disconnect the power cable from the back of the optical drive. Optical Drive
Dell Precision™ T5500 Service Manual WARNING: Before working inside your computer, read the safety information that shipped with your computer.
Follow ...
Service Manual - Page 52

... www.dell.com/regulatory_compliance. Loosen the four captive screws on the heat sink.
Follow the procedures in Before Working Inside Your Computer. 2. Heat Sink and Processor
Dell Precision™ T5500 Service Manual WARNING: Before working inside your computer, read the safety information that shipped with your computer. Removing the Heat Sink and Processor
1. Open the hard drive...
Service Manual - Page 69
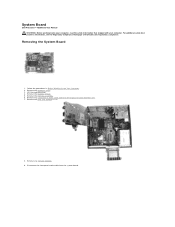
...see the Regulatory Compliance Homepage at www.dell.com/regulatory_compliance. Lift the hard drive tray. 4. Remove the heat sink and processor.
8. Remove the front fan assembly. 6. Remove any expansion or video cards and raise the expansion card retention arm. 7.
Remove any memory modules. 9. System Board
Dell Precision™ T5500 Service Manual WARNING: Before working inside your...
Similar Questions


How To Remove Main Hard Drive In Dell Precision T5500
(Posted by mattara 10 years ago)

Removing The Hard Drive
How do I remove the hard drive in a Dell Dimension 2400 Series
How do I remove the hard drive in a Dell Dimension 2400 Series
(Posted by lonewolfcustom52 10 years ago)


Removing The Hard Drive From A Dell Optiplex Gx520
This is a mechanical problem -- I need to remove the hard drive, but something is preventing this.
This is a mechanical problem -- I need to remove the hard drive, but something is preventing this.
(Posted by hpayson 11 years ago)