
Dell PowerEdge 1900 Support Question
Dell PowerEdge 1900 Support Question
Find answers below for this question about Dell PowerEdge 1900.Need a Dell PowerEdge 1900 manual? We have 7 online manuals for this item!
Question posted by lbolgr on August 20th, 2013
How Do I Check Memory On Power Edge 1900
The person who posted this question about this Dell product did not include a detailed explanation. Please use the "Request More Information" button to the right if more details would help you to answer this question.
Current Answers
Related Dell PowerEdge 1900 Manual Pages
Getting Started Guide - Page 12
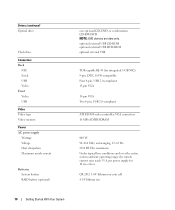
...and over the entire system ambient operating range, the inrush current may reach 55 A per power supply for integrated 1-GB NIC) 9-pin, DTE, 16550-compatible Four 4-pin, USB 2.0-...drive
Connectors Back
NIC Serial USB Video Front Video USB
Video Video type Video memory
Power AC power supply
Wattage Voltage Heat dissipation Maximum inrush current
Batteries System battery RAID battery (optional...
Hardware Owner's Manual (PDF) - Page 6
...System
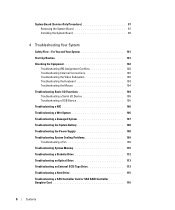
Safety First-For You and Your System 101 Start-Up Routine 101 Checking the Equipment 102
Troubleshooting IRQ Assignment Conflicts 102 Troubleshooting External Connections 102 ... the System Battery 108 Troubleshooting the Power Supply 108 Troubleshooting System Cooling Problems 109 Troubleshooting a Fan 109 Troubleshooting System Memory 110 Troubleshooting a Diskette Drive 112 ...
Hardware Owner's Manual (PDF) - Page 18
...on page 118. processor initialization error. supply is
cleared using either Server
Assistant or the BMC Management
Utility. Power supply voltage is in an
Microprocessors" on page 109. See
"... system BIOS has reported a See "Getting Help" on page 108.
machine check error. specified power Supply" on page 131. Specified processor is missing or See "Troubleshooting the
bad...
Hardware Owner's Manual (PDF) - Page 22
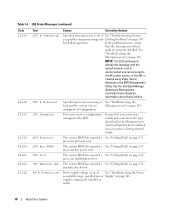
Check the SEL for ...code on the LCD can display sequentially
on page 155.
Table 1-4.
See "Troubleshooting System Memory" on page 92. I1910 Intrusion
System cover has been removed.
In contrast, you ... if multiple related errors occur. I1912 SEL Full
System Event Log is a failing power supply.
22
About Your System Clear the log by LCD Status Messages
When a single...
Hardware Owner's Manual (PDF) - Page 23
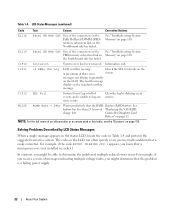
...memory modules are not the Ensure that all memory modules are
module(s).
wait approximately ten seconds, reconnect the power cable, and restart the system.
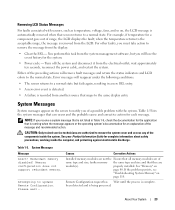
System Messages
Message Alert!
faulty memory... See "Memory" on
page 110. About Your System
23 You perform this task from the system management software, but fails again, resulting in Table 1-5, check the documentation...
Hardware Owner's Manual (PDF) - Page 77

...need not be removed prior to cool before handling them. NOTICE: Never remove the memory cooling shroud without first powering down . See "Opening the System" on page 48. 3 To remove the cooling... on the shroud by the card edges and avoid touching the DIMM components.
See your Product Information Guide for some time after the system has been powered down the system. Overheating of the...
Hardware Owner's Manual (PDF) - Page 83
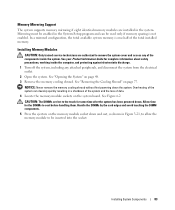
... Information Guide for some time after the system has been powered down. See "Removing the Cooling Shroud" on the system board. Handle the DIMMs by the card edges and avoid touching the DIMM components.
5 Press the ejectors on page 48. 3 Remove the memory cooling shroud. CAUTION: The DIMMs are installed in the system...
Hardware Owner's Manual (PDF) - Page 84

...the main System Setup screen. The system should have memory modules installed.
8 Repeat step 3 through step 7 of this procedure to lock the memory module into the socket. Installing and Removing a Memory Module 1
2
3
4
1 memory module 4 alignment key
2 memory module socket ejectors (2)
3 socket
6 Align the memory module's edge connector with the alignment key on the ejectors with your...
Hardware Owner's Manual (PDF) - Page 85
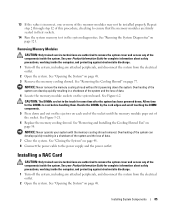
... checking to ensure that the memory modules are firmly seated in their sockets.
14 Run the system memory test in the system diagnostics. Repeat step 2 through step 12 of the memory ...Removing the Cooling Shroud" on page 48. 3 Remove the memory cooling shroud. NOTICE: Never remove the memory cooling shroud without first powering down . Overheating of the system can develop quickly resulting in...
Hardware Owner's Manual (PDF) - Page 98

...board upward and use the system board handles to the touch for some time after the system has been powered down. See "Replacing a Processor" on page 88.
17 To remove the system board:
a Lift up... system chassis. See Figure 3-28.
Handle the DIMMs by the card edges and avoid touching the DIMM components.
15 Remove the memory modules. Slide the system board toward the back of the system, then...
Hardware Owner's Manual (PDF) - Page 100
...wall and then carefully push the bracket into place.
3 Reconnect the power cables to the expansion cards. 16 Close the system.
See "...8 Reinstall the expansion-bay bracket:
a Align the expansion-bay bracket with the memory cooling shroud removed.
c Slide the system board tray toward the back of the ...edge of the chassis until the latch on page 53 15 Reconnect all expansion cards...
Hardware Owner's Manual (PDF) - Page 103
...an expansion card with a working properly. • Video memory is not resolved, see "Getting Help" on page 131. See "Using Server Administrator Diagnostics" on page 121. To verify that the... Your System
103 Action 1 Check the system and power connections to either the front or rear video connector.
If the problem is faulty. See "Using Server Administrator Diagnostics" on page 121...
Hardware Owner's Manual (PDF) - Page 107
... components are properly installed:
• Expansion cards • Power supplies • Fans • Processors and heat sinks • Memory modules 3 Ensure that you
removed. Action CAUTION: Only trained...thoroughly for complete information about safety precautions, working inside the system. See "Using Server Administrator Diagnostics" on page 48. 5 Run the system board tests in the system...
Hardware Owner's Manual (PDF) - Page 108

...the system board.
Troubleshooting the System Battery
Problem • System message indicates a problem with a new power supply. See "Using the System Setup Program" on page 33. 2 Turn off for long periods ...battery. See "Replacing the System Battery" on page 51. Action 1 Check the power cable connections to the electrical outlet and turn on page 131. If the system seems to...
Hardware Owner's Manual (PDF) - Page 110
... not appear, continue to step 11.
3 Enter the System Setup program and check the system memory setting. Action CAUTION: Only trained service technicians are authorized to remove the system ...on page 48. For the identification number of memory installed matches the system memory setting, go to the next step.
See "Using Server Administrator Diagnostics" on page 121. 2 Turn on the...
Hardware Owner's Manual (PDF) - Page 156
... server using a remote access controller.
See also memory ...power button and power indicator. Additional directories that allows the processor to running in -line memory module. Direct memory access.
Electromagnetic interference. DVD -
The part of translating Internet domain names, such as memory...checking and correction.
cm - A comprehensive set of groups and attributes that are...
Hardware Owner's Manual (PDF) - Page 159

...its contents when you turn off your system.
Read-only memory. Examples of providing data redundancy. RAID on a video display. NVRAM -
Power distribution unit. A text file, usually shipped with a ...grid array. A way of data.
Glossary
159 You must usually be revised to servers and storage systems in protected mode. protected mode - pixel - Pixels are prohibited...
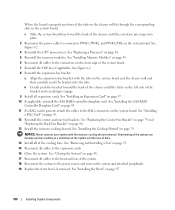
Installing a SATA Optical Drive - Page 3

...system cover. See your Hardware Owner's Manual.
5 Disconnect the data and power cables from the electrical outlet.
2 Remove the bezel. c Release the spring... drive.
See "Opening the System" in your Hardware Owner's Manual.
4 PowerEdge 1950 systems only: Disconnect and remove the SAS controller daughter card.
See "Removing...PowerEdge™ systems to remove the system cover and access any ...
Installing a SATA Optical Drive - Page 9

... the Cooling Shroud" in your Hardware Owner's Manual.
6 Replace the fans in your Hardware Owner's Manual.
11 Reconnect the system to power and turn on the system backplane. PowerEdge 2900 and 1900
1 If the mounting screws are not attached to the drive, install them now.
2 Align the mounting screws with the bay slide...
Installing a SATA Optical Drive - Page 10

...controller daughter card.
9 Close the system. Figure 1-5. See "Closing the System" in a PowerEdge 2900 or 1900
3
2
4
5 1
1 optical drive 3 SATA data cable 5 SATA power connector on SAS
backplane (PowerEdge 2900 only)
2 SATA power cable 4 SATA connector on system board
8 Reconnect the cables to power and turn on the system and attached peripherals.
10
Installing a SATA Optical Drive
Similar Questions

Where I Can Get Power Consumption Details Of My Dell Power Edge R620 Server
Product detailsDell Power Edge R620 Server 4 Years oldHow much power my server consumption at high u...
Product detailsDell Power Edge R620 Server 4 Years oldHow much power my server consumption at high u...
(Posted by unnam 3 years ago)


How To Find Model Number For Dell Power Edge Ecm01 Like 1900 Or 2900
(Posted by JULNYARKO 10 years ago)

What Is The Voltage On The Power Edge T105? T100 & Poweredge 2900?
(Posted by Romeoland 12 years ago)