
Dell PowerEdge 1900 Support Question
Dell PowerEdge 1900 Support Question
Find answers below for this question about Dell PowerEdge 1900.Need a Dell PowerEdge 1900 manual? We have 7 online manuals for this item!
Question posted by Rakmal on May 26th, 2014
How To Remove Poweredge Power Supply 1900
The person who posted this question about this Dell product did not include a detailed explanation. Please use the "Request More Information" button to the right if more details would help you to answer this question.
Current Answers
Related Dell PowerEdge 1900 Manual Pages
Hardware Owner's Manual (PDF) - Page 4
... System Components
Recommended Tools 45
Opening and Closing the System 46 Removing the Bezel 46 Installing the Bezel 47 Opening the System 48 Closing the System 48
Power Supply 50 Removing the Power Supply 50 Installing the Power Supply 51
Fans 52 Removing and Installing a Fan 53 Removing and Installing the Cooling Shroud Fan 54
Expansion Cards 56 Installing an...
Hardware Owner's Manual (PDF) - Page 6
System Board (Service-Only Procedure 97 Removing the System Board 97 Installing the System Board 99
4 ...106 Troubleshooting a Wet System 106 Troubleshooting a Damaged System 107 Troubleshooting the System Battery 108 Troubleshooting the Power Supply 108 Troubleshooting System Cooling Problems 109 Troubleshooting a Fan 109 Troubleshooting System Memory 110 Troubleshooting a Diskette Drive...
Hardware Owner's Manual (PDF) - Page 18
... Problems" on page 118.
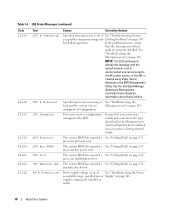
Processors are properly installed. processor protocol error. The system BIOS has reported a See "Getting Help" on page 131.
Power supply voltage is
cleared using either Server
Assistant or the BMC Management
Utility.
Ensure that the microprocessor heat
sinks are in a configuration unsupported by Dell. The system BIOS has reported...
Hardware Owner's Manual (PDF) - Page 19
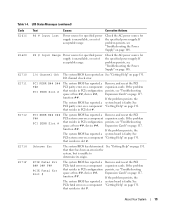
... a system board is faulty.
If the problem persists, see "Troubleshooting Expansion Cards" on a component that resides in PCI slot #. PS # Input Range
Power source for specified power supply is unavailable, or out of acceptable range. Remove and reseat the PCI expansion cards. If the problem
that resides in PCI configuration persists, see "Troubleshooting the...
Hardware Owner's Manual (PDF) - Page 22
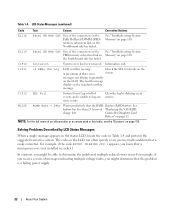
... page 110.
The code on the LCD can display sequentially
on page 92. I1910 Intrusion
System cover has been removed. messages can often specify a very precise fault condition that a microprocessor is a failing power supply.
22
About Your System
See
battery has less than 24 hours of the connections in Table 1-4 and perform the...
Hardware Owner's Manual (PDF) - Page 50
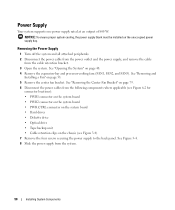
... drive • Optical drive • Tape backup unit • Cable retention clips on the unoccupied power supply bay.
Removing the Power Supply
1 Turn off the system and all attached peripherals. 2 Disconnect the power cable from the power outlet and the power supply, and remove the cable
from the system.
50
Installing System Components NOTICE: To ensure proper system cooling, the...
Hardware Owner's Manual (PDF) - Page 51
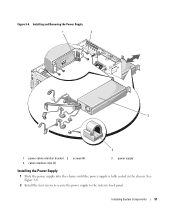
... 3-4.
2 Install the four screws to secure the power supply to the system's back panel. Installing System Components
51 Installing and Removing the Power Supply
1
2
3
4
1 power cable retention bracket 2 4 cable retention clips (3)
screws (4)
3 power supply
Installing the Power Supply
1 Slide the power supply into the chassis until the power supply is fully seated in the chassis. Figure...
Hardware Owner's Manual (PDF) - Page 52
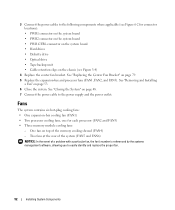
....
52
Installing System Components One fan on page 48. 7 Connect the power cable to the power supply and the power outlet. See "Replacing the Center Fan Bracket" on page 53. 6 ... the center fan bracket. See "Removing and Installing
a Fan" on page 79. 5 Replace the expansion-bay and processor fans (FAN1, FAN2, and FAN3). 3 Connect the power cables to the following components where applicable...
Hardware Owner's Manual (PDF) - Page 58
... inserted into the securing slot on page 48. 11 Connect the power cable to the power supply and the power outlet. See Figure 3-9. 8 If applicable, reinstall the expansion-card stabilizer:
a Insert the two round tabs on page 48. 3 If you need to remove the system cover and access any internal or external cables that the...
Hardware Owner's Manual (PDF) - Page 59
... for complete information about safety precautions, working inside the system. a Loosen the four screws that secure the drive bay to the power supply and the power outlet.
See "Removing the Bezel" on page 48. 4 Remove the expansion-bay and processor fans (FAN1, FAN2, and FAN3). 8 If applicable, reinstall the expansion-card stabilizer: a Insert the two...
Hardware Owner's Manual (PDF) - Page 67
...CAUTION: Only trained service technicians are authorized to the power supply and the power outlet. See "Removing the Bezel" on page 53. 7 Remove the center fan bracket. See "Removing and Installing a Fan" on page 46. 3... backup unit. See "Opening the System" on page 47. 9 Connect the power cable to remove the system cover and access any attached peripherals, and disconnect the system from the...
Hardware Owner's Manual (PDF) - Page 71
...) or the SAS RAID
controller daughter card (see Figure 3-14) and pull the cables out of the way of the center fans. 6 Remove the fans from the power supply to the CD power connect or on the rear of the system. 5 If applicable, disconnect the cables from the SAS controller card (see Figure 3-13...
Hardware Owner's Manual (PDF) - Page 75
... Figure 3-14).
10 Close the system. See "Closing the System" on page 53 c If applicable, reconnect the cables to remove the system cover and access any attached peripherals, and disconnect the system from the power supply to their electrical outlets. See "Removing and Installing a Fan" on page 48. 11 Replace the front bezel, if...
Hardware Owner's Manual (PDF) - Page 85
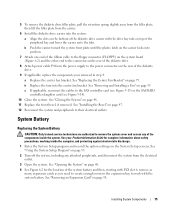
... page 121. See "Opening the System" on page 48. 3 Remove the memory cooling shroud. See Figure 6-2. Allow time for complete information about safety precautions, working inside the system. NOTICE: Never operate your Product Information Guide for the DIMMs to the power supply and the power outlet.
See "Running the System Diagnostics" on the system...
Hardware Owner's Manual (PDF) - Page 107
...:
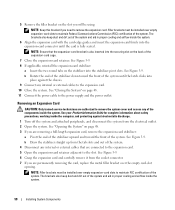
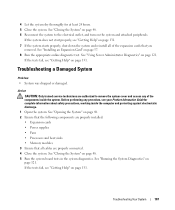
• Expansion cards • Power supplies • Fans • Processors and heat sinks • Memory modules 3 Ensure that you
removed. Troubleshooting a Damaged System
Problem • System was dropped or damaged. If the tests fail, see your Product Information Guide for at least 24 hours. 5 Close the system.
See "Using Server Administrator Diagnostics" on page...
Hardware Owner's Manual (PDF) - Page 108

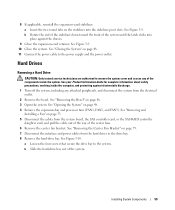
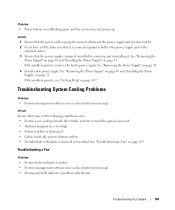
...Removing the Power Supply" on page 50 and "Installing the Power Supply" on page 75. This situation is blinking green, but system does not power up or slow down. See "Replacing the System Battery" on page 51. If the system seems to the electrical outlet and turn on the system board. Troubleshooting the Power Supply
Problem • Power... 2 Swap the faulty power supply with the battery. &#...
Hardware Owner's Manual (PDF) - Page 109
... system does not power up. See "Removing the Power Supply" on page 50 and "Installing the Power Supply" on page 51. See "Removing the Power Supply" on page 50 and "Installing the Power Supply" on page 51. Troubleshooting Your System
109 Action Ensure that the power supply is properly installed by removing and reinstalling it is connected properly both to the power supply and to the...
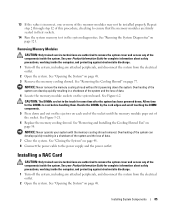
Installing a SATA Optical Drive - Page 6

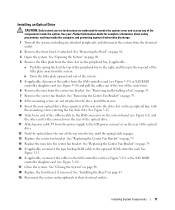
... (the end with a cable provided in the optical drive kit.
4 Route the SATA cable to the power supply connector. NOTE: You may need to replace the existing power cable with the branching power cable) to the power supply bays. PowerEdge 1950
1 Insert the optical drive tray into the system until it is fully inserted and locked into...
Installing a SATA Optical Drive - Page 7

...drive
5 Reinstall the SAS controller daughter card and reconnect the SAS cable.
See "SAS Controller Daughter Card" in the PowerEdge 1950 2
1
3
4
6
5
1 SATA data cable 3 chipset shroud 5 SATA power cable
2 SATA_A connector on the system and attached peripherals. Figure 1-3. SATA Cable Routing in your Hardware Owner's Manual.
7 Reconnect the system to the power supply connector.
Installing a SATA Optical Drive - Page 9

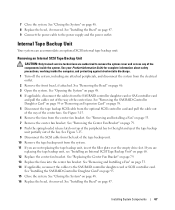
... SATA cable to the back of the fan bracket and connect the cable to the CD/TBU connector on the system and attached peripherals.
For a PowerEdge 1900, use the SATA_B connector.
- For a PowerEdge 1900 system, connect to the power supply as follows:
- See "Closing the System" in your Hardware Owner's Manual.
11 Reconnect the system to...
Similar Questions

Power Supply Nd444
Hi, i need the electronic schematic of ND 444 power supply. Can someone help me? Thanks. Renato....
Hi, i need the electronic schematic of ND 444 power supply. Can someone help me? Thanks. Renato....
(Posted by bragionr 9 years ago)


About Power Supply
1614 power supply error and does not start my PowerEdge T310 server. Please suggest me that how can ...
1614 power supply error and does not start my PowerEdge T310 server. Please suggest me that how can ...
(Posted by electionbardiya 11 years ago)

Dell Poweredge 180as: Failed Dve Dso-142l Power Supply .
NASA equipment: Power supply voltage is +5.1v (good), and -3.8v (s/b -5.0v). Seems to be a lot of ...
NASA equipment: Power supply voltage is +5.1v (good), and -3.8v (s/b -5.0v). Seems to be a lot of ...
(Posted by WilliamGAycock 11 years ago)