
Dell OptiPlex 740 Support Question
Dell OptiPlex 740 Support Question
Find answers below for this question about Dell OptiPlex 740.Need a Dell OptiPlex 740 manual? We have 2 online manuals for this item!
Question posted by wolwa on May 20th, 2014
How To Set Audio Device On Optiplex 740
The person who posted this question about this Dell product did not include a detailed explanation. Please use the "Request More Information" button to the right if more details would help you to answer this question.
Current Answers
Related Dell OptiPlex 740 Manual Pages
User's Guide - Page 43

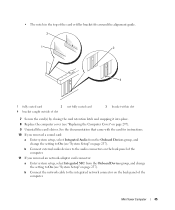
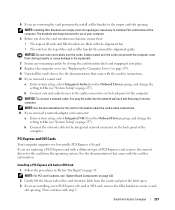
b Connect external audio devices to Off (see "System Setup" on page 257). Mini Tower Computer
43 NOTICE: Do not route card cables over the cards can prevent the computer cover from the Onboard Devices group, and change the setting to the sound card's connectors. NOTE: See the documentation for the card for information about the...
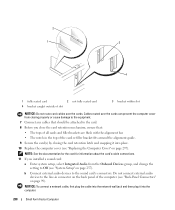
User's Guide - Page 45
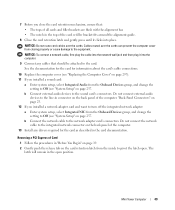
... audio devices to the audio connectors on the back panel of the computer.
11 If you removed a sound card:
a Enter system setup, select Integrated Audio from the Onboard Devices group, and change the setting...card connector:
a Enter system setup, select Integrated NIC from the Onboard Devices group, and change the setting to the integrated network connector on page 297).
9 Uninstall the card's...
User's Guide - Page 49
... properly or cause damage to the sound card's connectors. Do not connect external audio devices to the line-in "Before You Begin" on page 19. 2 Gently push the release... the cards can prevent the computer cover from the Onboard Devices group, and change the setting to pivot the latch open position. b Connect external audio devices to the equipment.
b Connect the network cable to the...
User's Guide - Page 53

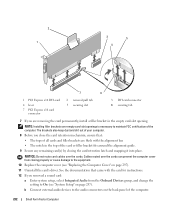
...and then plug it into the computer. Cables routed over the cards. Do not connect external audio devices to the line-in the top of the computer (see "System Setup" on the back....
6 Before you installed a sound card:
a Enter system setup, select Integrated Audio from the Onboard Devices group, and change the setting to the sound card's connectors.
NOTICE: Do not route card cables over the ...
User's Guide - Page 56
...You Begin" on page 19. 2 Gently push the release tab on the card retention latch from the Onboard Devices group, and change the
setting to On (see "System Setup" on page 257). You can do so by touching an unpainted metal ...in this section, follow the safety instructions located in the open . b Connect external audio devices to the audio connectors on the back panel of the
computer.
User's Guide - Page 137
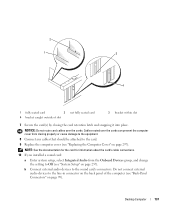
... (see "Back-Panel Connectors" on page 257).
Do not connect external audio devices to the line-in connector on the back panel of slot
not fully...cover (see "Replacing the Computer Cover" on page 297). Desktop Computer
137
NOTE: See the documentation for the card for ... sound card:
a Enter system setup, select Integrated Audio from closing the card retention latch and snapping it ...
User's Guide - Page 139
...computer cover (see "System Setup" on page 138). 3 Remove the riser-card cage:
Desktop Computer
139 The brackets also keep dust and dirt out of your computer. 6 Before you...instructions. 10 If you removed a sound card: a Enter system setup, select Integrated Audio from the Onboard Devices group, and change
the setting to On (see "Removing a PCI Card" on page 257). See the documentation that...
User's Guide - Page 142

... Onboard Devices group, and change the setting to the sound card's connectors. b Connect external audio devices to Off (see "Back-Panel Connectors" on page 297).
16 If you removed in connector on the back panel of the computer (see "System Setup" on page 257). Do not connect external audio devices to the line-in step 3.
Desktop Computer...
User's Guide - Page 146
...Audio from the Onboard Devices group, and change the
setting to On (see "System Setup" on the card retention latch from the inside and pivot the latch open. 3 If you are replacing a PCI Express card with a different type of the computer. b Connect external audio devices to the audio... Devices group, and change the setting to the integrated network connector on page 257). Desktop Computer...
User's Guide - Page 151

Desktop Computer
151...a DVI card, go to step 5. b Connect external audio devices to the line-in the card documentation. Do not connect external audio devices to the sound card's connectors.
NOTICE: To connect a ... lift the release tab on the card retention latch from the Onboard Devices group, and change the
setting to pivot the latch open position. 3 If necessary, disconnect any ...
User's Guide - Page 154
...panel openings. Desktop Computer
154 See the documentation that will not reach the riser-card cage once they are removed from the Onboard Devices group, and change the
setting to the audio connectors on ...the system board (see "System Setup" on the back panel of the computer.
b Connect external audio devices to On (see "Removing a PCI Card" on page 138). 3 Remove the riser-card cage:...
User's Guide - Page 158

...external audio devices to the sound card's connectors. Desktop Computer
158
NOTICE: To connect a network cable, first plug the cable into the network wall jack and then plug it into the computer. Do not connect external audio devices ... card:
a Enter system setup, select Integrated Audio from the Onboard Devices group, and change the setting to Off (see "Back-Panel Connectors" on page 257).
User's Guide - Page 161
...that the riser-card connectors are fully seated in the side of the computer. Desktop Computer
161 b Connect external audio devices to the audio connectors on the back panel of the riser-card cage with the card for ... cards can prevent the computer cover from the Onboard Devices group, and change the setting to On (see "Replacing the Computer Cover" on page 297). 12 Uninstall the ...
User's Guide - Page 225

...(see "Replacing the Computer Cover" on page 297). b Connect external audio devices to Off (see "System Setup" on page 257).
Small Form Factor Computer
225
Do not connect external audio devices to the equipment. 9 Connect any cables that : • The ... over the cards can prevent the computer cover from the Onboard Devices group, and change the setting to the sound card's connectors.
User's Guide - Page 227
... removed a sound card: a Enter system setup, select Integrated Audio from the Onboard Devices group, and change the setting to the integrated network connector on the back panel of the ...card permanently, install a filler bracket in the empty card-slot opening .
b Connect external audio devices to the equipment. 7 Secure any remaining card(s) by closing the card retention latch and...
User's Guide - Page 230
... Cover" on page 99).
b Connect external audio devices to Off (see "Back-Panel Connectors" on...Devices group, and change the setting to the sound card's connectors. NOTICE: To connect a network cable, first plug the cable into the network wall jack and then plug it into the computer.
230
Small Form Factor Computer Cables routed over the cards. Do not connect external audio devices...
User's Guide - Page 232
... route card cables over the cards can prevent the computer cover from the Onboard Devices group, and change the
setting to On (see "Replacing the Computer Cover" on page 297). 11 Uninstall the card's driver. b Connect external audio devices to the audio connectors on the back panel of your computer. 8 Before you close the card...
User's Guide - Page 324
...E T U R N E D O N - See the setup diagram supplied with another device, such as a lamp. Ensure that the volume is turned up and that the sound is set to eliminate distortion. D I N T E R F E R E N C E...Click the Start button, click Control Panel, and then click Sounds, Speech, and Audio Devices. 2 Click Sounds and Audio Devices. 3 Click the Hardware tab. 4 Double-click the name of your CD ...
User's Guide - Page 355
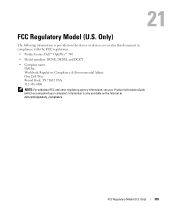
... the Internet at dell.com/regulatory_compliance. Only)
355
Only)
The following information is also available on the device or devices covered in this document in compliance with the FCC regulations:
• Product name: Dell™ OptiPlex™ 740
• Model numbers: DCNE, DCSM, and DCCY
• Company name: Dell Inc. 21
FCC Regulatory Model...
User's Guide - Page 366
...settings have on the capabilities of the monitor, the video controller and its drivers, and the amount of the file. Unless you to the computer. A program used to attach a TV or digital audio device...authenticate a user on ). A hardware-based security feature that serves as a dampening device when a computer experiences resonating shock or is dropped (whether the computer is embedded with...
Similar Questions

What Motherboard And Cpu Will Be The Best Fit For The Dell Desktop Optiplex 740
(Posted by rmalone3108 2 years ago)


How To Return Factory Setting To Dell Optiplex 210l
(Posted by kazazbrazi 10 years ago)
Connextion Audio Device
to which connector can i conneect my audio device
to which connector can i conneect my audio device
(Posted by pieterengwirda 12 years ago)