Get support for Dell OptiPlex 740

Dell OptiPlex 740 Support Question

Dell OptiPlex 740 Support Question

Find answers below for this question about Dell OptiPlex 740.
Need a Dell OptiPlex 740 manual? We have 2 online manuals for this item!
Question posted by deigebel on November 14th, 2013

Optiplex 740 Ram Pair Which Slots

The person who posted this question about this Dell product did not include a detailed explanation. Please use the "Request More Information" button to the right if more details would help you to answer this question.

Current Answers

Answer #1: Posted by DellJesse1 on November 15th, 2013 6:39 AM
This answer was accepted by the poster of the original question.
DellJesse1

Member since:
April 19th, 2012

Points: 1,551,500
1,100
points
deigebeliplex,

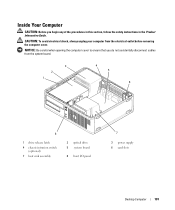
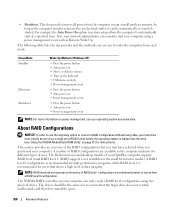
Below is the memory information for the Optiplex 740.

Memory Configuration

The DDR memory solution on the OptiPlex 740 can run in dual-channel mode, which allows the system to have twice the memory bandwidth using the same memory technology.

Dual-Channel Configurations

The 740 has four memory slots in the MT, DT, and SFF chassis. To achieve dual-channel performance, the total memory in each channel must be the same. If the channels do not match or if the system has only one DIMM installed, the system memory operates in single-channel mode. The system works normally in single-channel mode, but the user loses the benefit of increased memory throughput.

Dual-channel mode is always present when both memory channels are populated. However, for dual-channel performance, the size of the modules must match.

The memory slots on the 740 are keyed for DDR2 memory and cannot accept other modules. The memory modules themselves are also keyed differently. DDR RAM has 184 pins while DDR2 RAM has 240 pins. The new DDR2 memory modules physically look different than previous modules. Use care when installing memory into the sockets. A greater amount of force is needed to install the DDR2 SDRAM DIMMs into the sockets than on older systems.

Here are the recommended memory configurations:

A memory module installed in connector CHA_DIMM or
A pair of matched memory modules installed in connectors CHA_DIMM and CHB_DIMM

NOTE:
Use non-ECC memory modules only.

Be sure to install a single memory module in CHA_DIMM, the connector furthest from the processor, before installing a module in the other connectors.


Thank You,
Dell-Jesse1
Dell Social Media and Communities
email:[email protected]
Dell Community Forum.
www.en.community.dell.com
Dell Twitter Support
@dellcares
Dell Facebook Support
www.facebook.com/dell
#iwork4dell

Related Dell OptiPlex 740 Manual Pages

Quick Reference Guide - Page 2

... to either potential damage to hardware or loss of data and tells you purchased a Dell™ n Series computer, any proprietary interest in this text: Dell, OptiPlex, and the DELL logo are not applicable. Microsoft, Windows, Windows Vista, and the Windows Vista Start Button are registered trademarks of Dell Inc.; Other trademarks...
Quick Reference Guide - Page 6

... Guide • How to remove and replace parts • Specifications • How to configure system settings • How to troubleshoot and solve problems Dell™ OptiPlex™ User's Guide Microsoft Windows Help and Support Center 1 Click Start → Help and Support→ Dell User and System Guides→ System Guides. 2 Click...
Quick Reference Guide - Page 23

Insert an optical drive (if supported) into the appropriate connectors (see "Desktop Computer - Back-Panel Connectors" on page 24). This bay accommodates an optional floppy drive, media card reader, or second hard drive. Back View 1 2 3 4 5 6 1 card slots (3) 2 back-panel connectors 3 power connector Access connectors for any installed PCI and PCI Express cards. Plug...
User's Guide - Page 2

... use of Microsoft Corporation; is a registered trademark of Dell Inc.; Other trademarks and trade names may be used in this text: Dell, the DELL logo, OptiPlex, Inspiron, Dimension, Latitude, Dell Precision, DellNet, TravelLite, Dell OpenManage, PowerVault, Axim, PowerEdge, PowerConnect, and PowerApp are trademarks of the U.S. NOTICE: A NOTICE indicates either potential damage...
User's Guide - Page 6

... 250 Security 250 Chassis Intrusion Detection 250 Option Settings 251 Padlock Ring and Security Cable Slot 251 Password Protection 252 System Password 252 Administrator Password 254 Disabling a Forgotten Password and ... 264 Memory Key 264 Floppy Drive 264 Jumper Settings 265 Mini Tower, Desktop, and Small Form Factor Computers 265 Clearing Forgotten Passwords 265 Clearing CMOS ...
User's Guide - Page 97

...page 257 for more information. You can be rotated to match the orientation of your computer. 4 Desktop Computer About Your Desktop Computer Front View 1 2 3 11 10 9 876 5 4 1 USB 2.0 connectors (2) Use...system shutdown. 4 Dell badge This badge can also rotate the badge using the slot provided near the bottom of the badge. Instead, perform an operating system shutdown. ...
User's Guide - Page 98

.... Insert a floppy disk into this drive. Back View 1 2 3 4 5 6 1 card slots 2 back-panel connectors 3 power connector Access connectors for a description of speakers. Use the microphone connector...to indicate different operating states: • No light - Insert the power cable. 98 Desktop Computer The computer is in the Windows Device Manager. See "System Lights" on page ...
User's Guide - Page 101

... your computer from the system board. 3 2 1 4 5 6 8 1 drive release latch 4 chassis intrusion switch (optional) 7 heat sink assembly 2 optical drive 5 system board 8 front I/O panel 7 3 power supply 6 card slots Desktop Computer 101 NOTICE: Be careful when opening the computer cover to ensure that you begin any of the procedures in this section, follow the safety...
User's Guide - Page 107

Optional DVI 36-pin connector NOTE: This option uses one of the PCI slots. Expansion Bus Default: no riser-card cage PCI connectors card size connector size connector data width (maximum) PCI Express connectors card size ... adapter RJ45 connector Optional PS/2 with secondary serial two 6-pin mini-DINs port adapter NOTE: This option uses one of the PCI slots. Desktop Computer 107
User's Guide - Page 127

Desktop Computer 127 1 2 3 1 hard drive 2 release tabs (2) 3 plastic hard-drive bracket 3 Attach the bracket to the new drive by aligning the two ... 1 2 3 4 1 securing tabs (2) 4 plastic hard-drive bracket 2 drive 3 release tabs (2) 4 Connect the power and data cables to the drive. 5 Locate the correct slot for the drive, and slide the drive into the bay until it clicks into place.
User's Guide - Page 128

Desktop Computer 128 1 2 1 hard drive 2 slot verification number 6 Replace the floppy drive, media card reader, or second hard drive (see "Installing a Floppy Drive" on page 119, "Installing the Media Card Reader" ...
User's Guide - Page 135

...slots. If necessary, disconnect any cables connected to pivot the latch open position. 3 If you touch any of your computer's electronic components. You can do so by touching an unpainted metal surface on page 19. Desktop...ISA cards are installing a new card, remove the filler bracket to create a card-slot opening. PCI Cards Installing a PCI Card 1 Follow the procedures in "Before You Begin...
User's Guide - Page 136

Desktop Computer 136 NOTE: See the documentation that the card is fully seated in the connector... the card, making internal connections, or customizing it for your computer from its electrical outlet before installing any cards. 6 Place the card in the slot. To guard against electrical shock, be sure to unplug your computer. 1 2 3 4 5 1 release tab 4 card-edge connector 2 card retention...
User's Guide - Page 137

... Integrated Audio from closing the card retention latch and snapping it into place. Desktop Computer 137 Do not connect external audio devices to the line-in connector on the back panel of slot not fully seated card 3 bracket within slot 7 Secure the card(s) by closing properly or cause damage to the equipment. 8 Connect...
User's Guide - Page 139

...fits around the alignment guide. NOTE: Installing filler brackets over the cards. NOTICE: Do not route card cables over empty card-slot openings is necessary to maintain FCC certification of your computer. 6 Before you close the card retention mechanism, ensure that came ... on the system board (see "Removing a PCI Card" on page 138). 3 Remove the riser-card cage: Desktop Computer 139
User's Guide - Page 147

To guard against electrical shock, be sure to a network. Desktop Computer 147 Ensure that the card is fully seated in the connector and press down firmly. 1 2 3 4 5 1 release tab 4 card-edge connector 2 card retention latch 5 card... start the computer when they are connected to unplug your computer from its electrical outlet before installing any cards. 6 Place the card in the slot.
User's Guide - Page 268

... documentation. A RAID level 1 configuration is recommended for different types of uses. Also, your OptiPlex computer support RAID level 0 and RAID level 1. (RAID support is not available for the ...event NOTE: For more information on page 271 for instructions). The Dell mini tower and desktop models of your network administrator can only create a RAID level configuration using a power ...
User's Guide - Page 355

... following information is also available on the device or devices covered in this document in compliance with the FCC regulations: • Product name: Dell™ OptiPlex740 • Model numbers: DCNE, DCSM, and DCCY • Company name: Dell Inc.
User's Guide - Page 360

...size. ENERGY STAR® - A parallel connector design that speeds communication between the processor and RAM. 360 Glossary expansion card - A removable I/O card adhering to as it is lost. Also..., and sound cards. A PC Card that decrease the overall consumption of the PC Card slot when installed. A strip sensor that allows you insert an expansion card, connecting it to ...
User's Guide - Page 362

.../O devices. input/output - An operation or device that supports devices such as a serial connector, parallel connector, or expansion slot) and allows the processor to the processor. Keyboards and printers are I /O - I/O address - An address in memory ... temporary data storage area inside your computer. Because the data in RAM that is often referred to a building or a few nearby buildings.

Similar Questions

Ask a New Question
Use the box below to post a new question about this Dell product .
Points & Prizes
  • You can earn points for nearly everything you do on HelpOwl.com
  • You can trade in those points for gift cards at leading retailers such as Amazon.com and Walmart
  • It's that simple!
See How it Works
Create a Free Account

Dell Manuals

Find free Dell OptiPlex 740 manuals and user guides available at ManualOwl.com. Try out our unique manual viewer allowing you to interact with manuals from directly within your browser!

Dell Reviews

View thousands of Dell user reviews and customer ratings available at ReviewOwl.com.

Contact Information

Complete Dell customer service contact information including steps to reach representatives, hours of operation, customer support links and more from ContactHelp.com.

Scoreboard Ratings

See detailed Dell customer service rankings, employee comments and much more from our sister site.

Dell Recalls

Find comprehensive Dell recall information updated hourly on RecallOwl.com.