Dell INSPIRON 15 Support Question
Dell INSPIRON 15 Support Question
Find answers below for this question about Dell INSPIRON 15 - Laptop Notebook PC: Intel Pentium Dual Core T4200.Need a Dell INSPIRON 15 manual? We have 2 online manuals for this item!
Question posted by chavezrose7 on January 19th, 2016
Remove Bios Password
remove bios password on inspiron 3520 laptop
Current Answers
Answer #1: Posted by TommyKervz on January 19th, 2016 2:18 AM
TommyKervz

Member since:
January 10th, 2013 Points: 17,776,833

Member since:
January 10th, 2013 Points: 17,776,833
Follow the instructions on this video https://www.youtube.com/watch?v=570dqxytJEQ. Se other suggested solutions here...
Answer #2: Posted by DellJesse1 on January 25th, 2016 8:04 AM
DellJesse1

Member since:
April 19th, 2012 Points: 1,551,500
Member since:
April 19th, 2012 Points: 1,551,500
chavezrose7,
You will need to call Dell Support for them to provide bios reset information. They will verify ownership and then provide you with reset information.
Thank You,
Dell-Jesse1
Dell Social Media and Communities
email:[email protected]
Dell Community Forum.
www.en.community.dell.com
Dell Twitter Support
@dellcares
Dell Facebook Support
www.facebook.com/dell
#iwork4dell
Related Dell INSPIRON 15 Manual Pages
Owners Manual - Page 3
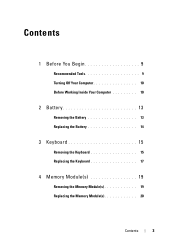
Contents
1 Before You Begin 9
Recommended Tools 9
Turning Off Your Computer 10
Before Working Inside Your Computer 10
2 Battery 13
Removing the Battery 13
Replacing the Battery 14
3 Keyboard 15
Removing the Keyboard 15
Replacing the Keyboard 17
4 Memory Module(s 19
Removing the Memory Module(s 19
Replacing the Memory Module(s 20
Contents
3
Owners Manual - Page 4
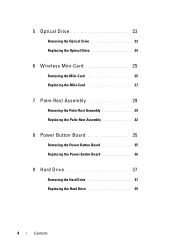
... Drive 23
Replacing the Optical Drive 24
6 Wireless Mini-Card 25
Removing the Mini-Card 25
Replacing the Mini-Card 27
7 Palm-Rest Assembly 29
Removing the Palm-Rest Assembly 29
Replacing the Palm-Rest Assembly 32
8 Power Button Board 35
Removing the Power Button Board 35
Replacing the Power Button Board 36...
Owners Manual - Page 5
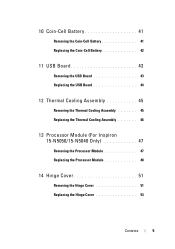
... the USB Board 44
12 Thermal Cooling Assembly 45
Removing the Thermal Cooling Assembly 45
Replacing the Thermal Cooling Assembly 46
13 Processor Module (For Inspiron
15-N5050/15-N5040 Only 47
Removing the Processor Module 47
Replacing the Processor Module 48
14 Hinge Cover 51
Removing the Hinge Cover 51
Replacing the Hinge Cover 53...
Owners Manual - Page 6
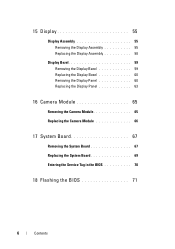
... Display Bezel 60
Removing the Display Panel 60
Replacing the Display Panel 63
16 Camera Module 65
Removing the Camera Module 65
Replacing the Camera Module 66
17 System Board 67
Removing the System Board 67
Replacing the System Board 69
Entering the Service Tag in the BIOS 70
18 Flashing the BIOS 71
6
Contents
Owners Manual - Page 9
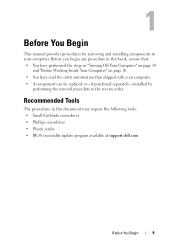
... the following tools: • Small flat-blade screwdriver • Phillips screwdriver • Plastic scribe • BIOS executable update program available at support.dell.com
Before You Begin
9 1
Before You Begin
This manual provides procedures for removing and installing components in the reverse order.
Recommended Tools
The procedures in this book, ensure that...
Owners Manual - Page 11
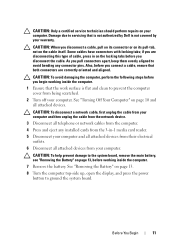
... that is not authorized by Dell is flat and clean to the system board, remove the main battery, see "Removing the Battery" on page 13, before you disconnect the cable.
Damage due to ...2 Turn off your computer. Before You Begin
11
Also, before working inside the computer.
7 Remove the battery.
See "Removing the Battery" on page 13. 8 Turn the computer top-side up, open the display, and...
Owners Manual - Page 13
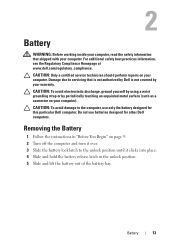
... a connector on your warranty. Damage due to the unlock position until it over.
3 Slide the battery lock latch to servicing that shipped with your computer. Removing the Battery
1 Follow the instructions in "Before You Begin" on your computer. Battery
13
CAUTION: To avoid electrostatic discharge, ground yourself by using a wrist grounding...
Owners Manual - Page 15

...-consuming to the palm rest and ease the keyboard up until it clears off the palm rest.
Be careful when removing and handling the keyboard. 3 Turn the computer over and open the display as far as a connector on page .... CAUTION: The keycaps on page 13, before working inside the computer. Keyboard
15 CAUTION: To help prevent damage to servicing that shipped with your computer). See...
Owners Manual - Page 16
1
2
3
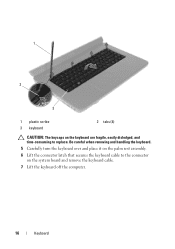
1 plastic scribe 3 keyboard
2 tabs (4)
CAUTION: The keycaps on the system board and remove the keyboard cable. 7 Lift the keyboard off the computer.
16
Keyboard Be careful when removing and handling the keyboard. 5 Carefully turn the keyboard over and place it on the palm rest assembly. 6 Lift the connector latch that secures the keyboard...
Owners Manual - Page 19
... metal surface (such as a connector on your
computer warranty.
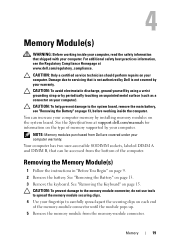
See "Removing the Keyboard" on page 9. 2 Remove the battery. CAUTION: To help prevent damage to servicing that can increase your computer. Removing the Memory Module(s)
1 Follow the instructions in "Before You Begin" on page 15. NOTE: Memory modules purchased from Dell are covered under your...
Owners Manual - Page 20
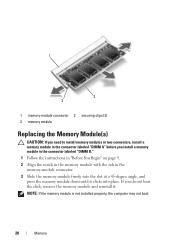
...: If you need to install memory modules in two connectors, install a memory module in the connector labeled "DIMM A" before you do not hear the click, remove the memory module and reinstall it clicks into place. If you install a memory module in the connector labeled "DIMM B." 1 Follow the instructions in "Before You...
Owners Manual - Page 23
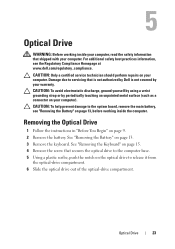
... the main battery, see the Regulatory Compliance Homepage at www.dell.com/regulatory_compliance. See "Removing the Battery" on page 9.
2 Remove the battery. CAUTION: Only a certified service technician should perform repairs on your computer).
See "Removing the Keyboard" on page 15.
4 Remove the screw that secures the optical drive to the computer base.
5 Using a plastic scribe...
Owners Manual - Page 25
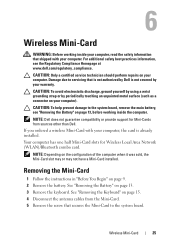
... or by periodically touching an unpainted metal surface (such as a connector on page 15.
4 Disconnect the antenna cables from sources other than Dell. Your computer has one half Mini-Card slots for Mini-Cards from the Mini-Card.
5 Remove the screw that is not authorized by your computer. Wireless Mini-Card
25...
Owners Manual - Page 27
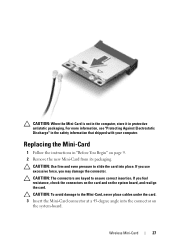
...-Card connector at a 45-degree angle into place. If you use
excessive force, you feel resistance, check the connectors on the card and on page 9.
2 Remove the new Mini-Card from its packaging. CAUTION: The connectors are keyed to ensure correct insertion. Wireless Mini-Card
27
Owners Manual - Page 29
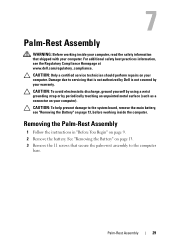
... your computer, read the safety information that shipped with your computer.
Damage due to servicing that secure the palm-rest assembly to the system board, remove the main battery, see the Regulatory Compliance Homepage at www.dell.com/regulatory_compliance.
For additional safety best practices information, see...
Owners Manual - Page 30
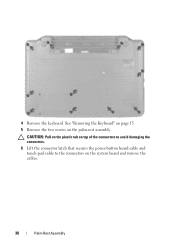
See "Removing the Keyboard" on page 15. 5 Remove the two screws on the system board and remove the cables.
30
Palm-Rest Assembly
CAUTION: Pull on the plastic tab on top of the connectors to avoid damaging the connectors. 6 Lift the connector latch that secures the power-button board cable and touch-pad cable to the connectors on the palm-rest assembly. 4 Remove the keyboard.
Owners Manual - Page 32
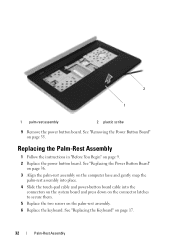
...on the system board and press down on the connector latches to secure them.
5 Replace the two screws on page 35. See "Removing the Power Button Board" on the palm-rest assembly.
6 Replace the keyboard.
See "Replacing the Keyboard" on page 9. 2 Replace... in "Before You Begin" on page 17.
32
Palm-Rest Assembly 2
1
1 palm-rest assembly
2 plastic scribe
9 Remove the power button board.
Owners Manual - Page 35

...ground yourself by using a wrist grounding strap or by your computer). Power Button Board
35 See "Removing the Battery" on page 13).
3 Follow the instructions from the palm rest. 8
Power Button ...8 in "Before You Begin" on your computer. For additional safety best practices information, see "Removing the Battery" on your warranty.
CAUTION: To help prevent damage to the palm rest. 6 ...
Owners Manual - Page 37
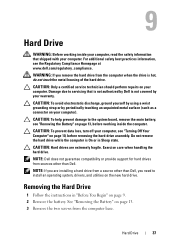
...drive.
Hard Drive
37 CAUTION: To help prevent damage to the system board, remove the main battery, see "Removing the Battery" on your computer. NOTE: Dell does not guarantee compatibility or provide...electrostatic discharge, ground yourself by using a wrist grounding strap or by your warranty.
Do not remove the hard drive while the computer is hot, do not touch the metal housing of the ...
Owners Manual - Page 70
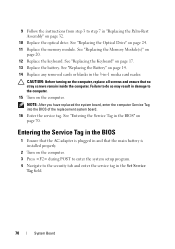
See "Replacing the Keyboard" on page 14. 14 Replace any removed cards or blanks in the 3-in-1 media card reader. See "Replacing the Battery...Press during POST to enter the system setup program. 4 Navigate to the computer. 15 Turn on
page 20. 12 Replace the keyboard. See "Entering the Service Tag in the BIOS" on page 24. 11 Replace the memory module. See "Replacing the Optical Drive...
Similar Questions

How Do You Get A Password Locked Inspiron 15 N5030
(Posted by joseSogets 10 years ago)

How To Restart In Safe Mode Intel Pentium Laptop
(Posted by Hunkatagui 10 years ago)

Where Can I Find The Wireless Switch For My Dell Inspiron Intel Pentium 1750?
(Posted by catwi 10 years ago)

My Laptop Jst Got Locked Up..nt Accepting Password...what To Do..??
dell inspiron lappy,intel i3 processor,i installed the windows 7 n then restarted it,and since then ...
dell inspiron lappy,intel i3 processor,i installed the windows 7 n then restarted it,and since then ...
(Posted by deepikayadav4192 11 years ago)
Can Not Remember Dell Windows 7 Login Password
How can I recover the password or created a new one?
How can I recover the password or created a new one?
(Posted by leogreen 11 years ago)