Dell I15RN-3647BK Support Question
Dell I15RN-3647BK Support Question
Find answers below for this question about Dell I15RN-3647BK.Need a Dell I15RN-3647BK manual? We have 1 online manual for this item!
Question posted by kayladybug on October 27th, 2014
Camera Memory Card Slot
can't find slot for memory card?
Current Answers


Related Dell I15RN-3647BK Manual Pages
Service Manual - Page 2

... button light located on . The lights can be malfunctioning or incorrectly installed. ¡ Remove and then reinstall the memory modules. ¡ Remove and then reinstall any cards. ¡ Remove and then reinstall the graphics card, if applicable.
l If the power light is blinking green, the computer is in a normal off or is not...
Service Manual - Page 3

... process for resource conflicts (see "System Board Components"). l Ensure that no special memory module/memory connector placement requirements exist.
Determine if a conflict exists by removing a card (not a graphics card) and restarting the computer.
2.
If the computer starts normally, troubleshoot the last card removed from the hard drive, CD drive, and DVD drive (see "System Setup...
Service Manual - Page 4

... the computer.
CMOS System Options Not Set
CMOS Display Type Mismatch
CMOS Memory Size Mismatch Message
Possible Cause
Corrective Action
8042 Gate-A20 error
The keyboard...failure 3-2-4 Keyboard Controller Test failure 3-3-1 NVRAM power loss 3-3-2 NVRAM configuration 3-3-4 Video Memory Test failure 3-4-1 Screen initialization failure 3-4-2 Screen retrace failure 3-4-3 Search for video ...
Service Manual - Page 6

...component such as a processor by its edges, not by its strain-relief loop, not on a card. Also, before you pull connectors apart, keep them evenly aligned to help ensure your computer.
1....devices are correctly oriented and aligned. The computer turns off . CAUTION: Handle components and cards with locking tabs; Some cables have performed the steps in reverse order. Ensure that ...
Service Manual - Page 10

... and Installing Parts
Dell™ Dimension™ XPS Systems Service Manual
Memory Cards Drives Hard Drive Floppy Drive CD/DVD Drive Processor Airflow Shroud
Processor System Board Power Supply Front Panel Front LED Board Drive Door Battery
Memory
You can increase your computer memory by your computer warranty. Your Dell Dimension™ computer supports...
Service Manual - Page 11

... Current operating systems, such as Microsoft® Windows® XP, can do not pair an original memory module with the crossbar in the connector. Lay the computer on its side so that you may not ...of the module. 5. Align the notch on the bottom of the module with a new memory module. Follow the procedures in the Product Information Guide. Certain components within the computer require ...
Service Manual - Page 12

... module is installed correctly, check the amount of your computer's electronic components. Your Dell™ computer provides the following slots for the card from the operating system. Installing a PCI Card
1. To verify that the memory is difficult to remove, gently ease the module back and forth to components inside your computer, discharge static electricity...
Service Manual - Page 13

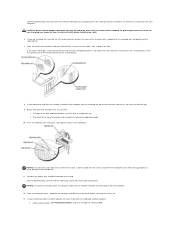
... computer from its electrical outlet before installing any cables connected to create a card-slot opening. Place the card in the top of the card into the card guide bracket as you lower the retention arm, ensure that came with the card for information on configuring the card, making internal connections, or otherwise customizing it out of all...
Service Manual - Page 14

... electrical outlets, and turn them on the computer back panel. Connect the network cable to the integrated connector on . 8. NOTICE: Do not route card cables over empty card-slot openings is necessary to maintain FCC certification of the computer. NOTICE: To connect a network cable, first plug the cable into the network wall jack...
Service Manual - Page 15

... installation. Installing a PCI Express Card
1. If you are installing or replacing a PCI card, see "Removing a PCI Express Card." Gently pull the securing tab, grasp the card by pressing the tab and pulling up on the card retention arm and raise the retention arm.
3. If necessary, disconnect any cables connected to create a card-slot opening. Then continue with...
Service Manual - Page 16
... to electrical outlets, and then turn them on configuring the card, making internal connections, or otherwise customizing it into the card guide bracket as you are installing the card into the x16 card connector, position the card so the securing slot is fully seated in the slot.
Enter system setup, select Network Controller, and then change the...
Service Manual - Page 17

... computer.
7. The brackets also keep dust and dirt out of your card includes a retention mechanism, remove the top of its connector. 6. If you are removing the card permanently, install a filler bracket in the empty card-slot opening. NOTE: Installing filler brackets over empty card-slot openings is necessary to maintain FCC certification of these devices: l Up...
Service Manual - Page 27

... the anchor tabs with hardware removal and replacement. Close the computer cover. Lift up the airflow shroud. CAUTION: Before you are familiar with the securing slots. 3. Disconnect the power cable from the REAR FAN1 connector (see "System Board Components") on the system board. 3. Processor
Removing the Processor
NOTICE: Do not perform...
Service Manual - Page 31

Remove the system board screw. .
7. Remove the memory modules and install them .
Remove the heat-sink assembly and processor from the system board. 7. Remove any components and cables that the package and assembly ...
Service Manual - Page 32
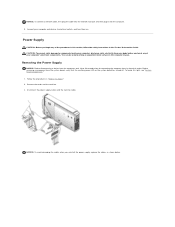
Disconnect the power supply cables and the card fan cable. Power Supply
CAUTION: Before you reinstall the power supply, replace the ... follow the safety instructions in "Before You Begin." 2. Follow the procedures in the Product Information Guide. Remove the cards and the card fan. 3. NOTICE: To connect a network cable, first plug the cable into the network wall jack and then plug ...
Service Manual - Page 38

... Systems Service Manual
Processor Memory Computer Information Video Expansion ...Technology
Level 1 (L1) cache Level 2 (L2) cache
Memory Type Memory connectors Memory capacities Minimum memory Maximum memory
NOTE: Not all Pentium 4 processors support HyperThreading technology. 16...width (maximum)
PCI Express connectors
NOTE: See "Addressing Memory With 4-GB Configurations" for the amount of 10/100/...
Service Manual - Page 39

... PCI Express lanes
Drives Externally accessible:
Available devices Internally accessible:
two 3.5-inch drive bays
two 5.25-inch drive bays Serial ATA drive, floppy drive, USB memory devices, CD drive, CD-RW drive, DVD drive, DVD-RW drive, and DVD and CD-RW combo drive
two bays for line-in sleep state;
Service Manual - Page 41

...contains information about that option and the option's current and available settings. System CPU Info Memory Info Date/Time
Identifies whether the computer's processor supports Hyper-Threading and lists the CPU ...change a user-selectable option such as the user password l To read the current amount of memory or set or change the settings for this section may not appear, or may not appear...
Service Manual - Page 42

... the current status of the system's password security feature and allows a new system password to using a power strip or surge protector.
To boot from a USB memory device, select the USB device and move it so it becomes the first device in the Power Management menu) is no longer power up from...
Service Manual - Page 43

... and adds the USB flash option to access the menu. NOTE: If you want to a USB memory key, highlight USB Flash Device and press . The Boot Device Menu appears, listing all available boot ...the rightmost bank of the screen, press .
Turn on the screen when the computer starts.
Insert the memory device into a USB port and restart the computer. NOTE: To boot to On (default), your ...
Similar Questions

Where Is The Second Memory Card Slot On A Dell Latitude D810
(Posted by Mknolav 9 years ago)

How Do I Replace A Memory Card Slot With Broken Tabs Dell Inspiron N7010
(Posted by MiMrS 9 years ago)

Does Dell Inspiron N7110 Have Memory Card Slot
(Posted by sicklsabita 10 years ago)


How To Open A Memory Card Slot On The Dell Inspiron N5110
(Posted by anKSEA 10 years ago)