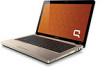
Compaq Presario CQ62-a00 Support Question
Compaq Presario CQ62-a00 Support Question
Find answers below for this question about Compaq Presario CQ62-a00 - Notebook PC.Need a Compaq Presario CQ62-a00 manual? We have 4 online manuals for this item!
Question posted by sayed62466 on October 18th, 2012
My Laptop Compac Cq-60 Button Are Broken How I Can Repair Or Replace
The person who posted this question about this Compaq product did not include a detailed explanation. Please use the "Request More Information" button to the right if more details would help you to answer this question.
Current Answers
Related Compaq Presario CQ62-a00 Manual Pages
Resolving Start Up and No Boot Problems Checklist - Page 1
... reset If memory or hard drive components were replaced, reinstall original components Remove memory modules and replace one-at the notebook, contact HP for technical assistance
Symptom: LEDs ...all CD/DVDs, SD cards, USB devices, peripherals and do not glow when power button is pressed, there is no power available to original condition. Perform a Hard Reset
1.... battery. HP Notebook PCs -
Compaq Presario CQ62 Notebook PC and HP G62 Notebook PC - Maintenance and Service Guide - Page 7
... identification ...6 Identifying the hardware ...6 Top components ...7 TouchPad ...7 Lights ...8 Button and speakers ...9 Keys ...10 Display ...11 Right-side components ...12 Left...27 Miscellaneous parts ...29 Sequential part number listing ...30
4 Removal and replacement procedures ...35 Preliminary replacement requirements 35 Tools required ...35 Service considerations ...35 Plastic parts ...35 ...
Compaq Presario CQ62 Notebook PC and HP G62 Notebook PC - Maintenance and Service Guide - Page 8
... Workstation guidelines 38 Equipment guidelines 39
Component replacement procedures 40 Serial number ...40 Computer feet ...41 Battery ...42 Hard drive ...43 Optical drive ...46 WLAN module ...48 Memory module ...50 RTC battery ...51 Keyboard ...53 Top cover ...56 Speaker assembly ...59 Power button board ...61 TouchPad button board ...62 Modem module ...63 USB...
Compaq Presario CQ62 Notebook PC and HP G62 Notebook PC - Maintenance and Service Guide - Page 30
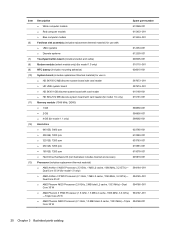
...
● Red computer models
615433-001
● Blue computer models
615434-001
Fan/heat sink assembly (includes replacement thermal material) for use with:
● UMA systems
612354-001
● Discrete systems
612355-001
Touchpad button board (includes bracket and cable)
606005-001
Modem module (select models only) (for model 1.0 only)
510110-001...
Compaq Presario CQ62 Notebook PC and HP G62 Notebook PC - Maintenance and Service Guide - Page 39
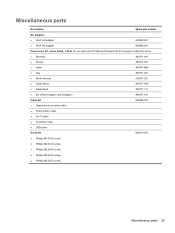
...609940-001
Power cord, AC, 3 wire, black, 1.83-m (for use with both HP G62 and Presario CQ 62 computer models) for use in:
● Denmark
490371-081
● Europe
490371-021
● ...Kingdom and Singapore
490371-031
Cable Kit
606009-001
● Optical drive connector cable
● Power button cable
● RJ-11 cable
● TouchPad cable
● USB cable
Screw kit
606010-...
Compaq Presario CQ62 Notebook PC and HP G62 Notebook PC - Maintenance and Service Guide - Page 68

... connector (1), speaker cable (2), touchpad ZIF connector (3), and touchpad button ZIF connector (4).
7. NOTE: The TouchPad is glued to install the switch cover.
58 Chapter 4 Removal and replacement procedures Lift the rear edge of the top cover (1) until the top cover disengages from the base enclosure. Remove the top cover (2). Reverse this procedure ...
Compaq Presario CQ62 Notebook PC and HP G62 Notebook PC - Maintenance and Service Guide - Page 70

Reverse this procedure to install the speaker assembly. 60 Chapter 4 Removal and replacement procedures
Compaq Presario CQ62 Notebook PC and HP G62 Notebook PC - Maintenance and Service Guide - Page 71

...down through the operating system. 2.
Disconnect all external devices connected to install the power button board. Reverse this procedure to the computer. 3. Hard drive (see Top cover on... power button board: 1. Component replacement procedures 61 Remove the battery (see Optical drive on page 42). 5. Remove the Phillips PM2.0×3.0 screw (1) that secures the power button board ...
Compaq Presario CQ62 Notebook PC and HP G62 Notebook PC - Maintenance and Service Guide - Page 72

... cover upside down the computer. Reverse the above procedure to the computer.
3. Disconnect all external devices connected to reassemble and install the TouchPad button board. 62 Chapter 4 Removal and replacement procedures Keyboard (see Hard drive on page 43)
b. Remove the four Phillips PM2.0×3.0 screws (1) that secure the TouchPad bracket to the...
Compaq Presario CQ62 Notebook PC and HP G62 Notebook PC - Maintenance and Service Guide - Page 115
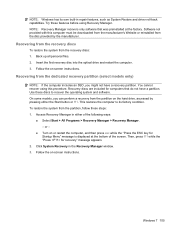
...
● Turn on the hard drive, accessed by the manufacturer. Click System Recovery in repair features, such as System Restore and driver roll-back capabilities.
Recovering from the recovery discs:...this procedure. Back up all personal files. 2. Access Recovery Manager in either the Start button or f11. Then, press f11 while the "Press for computers that was preinstalled at ...
Compaq Presario CQ62 Notebook PC and HP G62 Notebook PC - Maintenance and Service Guide - Page 133

...external monitor 13 HDMI 13
product description 4 USB 12, 13 power button board removal 61 spare part number 61 power button, identifying 9 power connector cable removal 67 spare part number 23, ...discs 100, 101 Recovery Manager 100, 104 recovery partition 100 recovery, system 104 removal/replacement
preliminaries 35 procedures 40 restore points 104 restoring default settings 85 RJ-11 (modem) jack...
Compaq Presario CQ62 Notebook PC and HP G62 Notebook PC - Maintenance and Service Guide - Page 134
... information 86, 90 system recovery 104 system resources 99 system restore points 100, 104
T thermal paste,
replacement 79, 80 tools required 35 top cover
removal 56 spare part number 19, 56 TouchPad buttons 7 identifying 7 removal 62 TouchPad button board spare part number 62 TouchPad zone identifying 7 transporting guidelines 38
U Universal Serial Bus (USB...
Notebook PC User Guide - Windows 7 - Page 7

... the battery 58 Step 2: Disable Hibernation and Sleep 59 Step 3: Discharge the battery 60 Step 4: Fully recharge the battery 60 Step 5: Reenable Hibernation and Sleep 61 Conserving battery power 61 Storing a battery ...61 Disposing of a used battery 62 Replacing the battery ...62 Switching between graphics modes (select models only 63 Shutting down the...
Notebook PC User Guide - Windows 7 - Page 25
...operating system controls
Some operating systems also offer a way to a network, manage wireless networks, and diagnose and repair network problems. To access the Network and Sharing Center, select Start > Control Panel > Network and Internet .... 2. Using wireless devices 15 Click the Help button. Using HP Wireless Assistant
A wireless device can be turned on or off using Wireless Assistant.
Notebook PC User Guide - Windows 7 - Page 74

...computer under any of the following conditions: ● When you need to replace the battery or access components inside the computer ● When you are ...Disconnect the computer from external power for an extended period Although you can shut down the computer with the power button, the recommended procedure is to a USB port ● When the computer will be unused and disconnected from ...
Notebook PC User Guide - Windows 7 - Page 91

...the computer upside down the computer before removing the hard drive from the computer. 7. Replacing the hard drive 81 With the hard drive bay toward you are not sure whether ... the computer on a flat surface. 6. Replacing the hard drive
CAUTION: To prevent information loss or an unresponsive system: Shut down on by pressing the power button. Disconnect all external devices connected to the...
Notebook PC User Guide - Windows 7 - Page 98

... sure that you are not sure whether the computer is located on by pressing the power button. To add or replace a memory module: 1. Save your work. 2. Shut down on a flat surface. ... a memory module. Loosen the memory module compartment screws (1).
88 Chapter 8 Adding or replacing a memory module The memory capacity of static electricity by touching a grounded metal object. Before...
Notebook PC User Guide - Windows 7 - Page 105

...Refer to perform, and then reenable the firewall. Antivirus software can detect most cases, repair any damage they have caused. It is preinstalled on the computer. Instructions for using ... in the Search box in most viruses, destroy them to computer viruses. The software includes 60 days of all incoming and outgoing traffic. To view and access Norton Internet Security, select ...
Notebook PC User Guide - Windows 7 - Page 121

... (select models only) on -screen instructions. Use these discs to its own built-in repair features, such as you use HP Recovery Manager to recover your operating system and software. ... Access Recovery Manager in the Recovery Manager window. 3. Click System Recovery in either the Start button or f11.
Back up . Recovery discs have been included for recovery" message is displayed on ...
Notebook PC User Guide - Windows 7 - Page 122
...58 conserving power 61 discharging 57 disposing 62 inserting 55 low battery levels 57 recharging 60 removing 55 replacing 62 storing 61 battery bay, identifying 8 Battery Check 54 battery power 54 battery release... device 13, 19 Bluetooth label 12 boot options 101 boot order 101
112 Index
button sound 101 buttons
power 4 TouchPad 2 TouchPad off indicator 28 TouchPad right/left 28
C cables
LAN...
Similar Questions

Hp Laptop Presario Cq62 Windows 7 Home Premium Does Not Boot Up
(Posted by DOzomb 10 years ago)


Compaq Presario Cq62 Will Not Boot
(Posted by ssolgal 10 years ago)

How Do I Repair/replace The Touchpad?
(Posted by Termn8or 11 years ago)

Have E?a Preserio Cq-60. How Do You Swap Out The Dvd Drive For The Floppy Driv
(Posted by frank55535 13 years ago)