Compaq Presario CQ5600 Support Question
Compaq Presario CQ5600 Support Question
Find answers below for this question about Compaq Presario CQ5600 - Desktop PC.Need a Compaq Presario CQ5600 manual? We have 11 online manuals for this item!
Question posted by usergirl on January 16th, 2015
How To Rest Admistrative Password Or Power On Password On Compaq Presatio Cq56
I brough a compaq presario cq56 laptop with a unknown administrative password or power on password. How can I remove or reset thos password to use the computer?
Current Answers
Answer #1: Posted by TheWiz on January 17th, 2015 7:51 AM
TheWiz

Member since:
October 13th, 2011 Points: 25,383,424

Member since:
October 13th, 2011 Points: 25,383,424
Related Compaq Presario CQ5600 Manual Pages
Upgrading and Servicing Guide - Page 4

... sharp edges inside the computer.
IMPORTANT: Computer features may damage your computer or be used with the power cord attached or power applied. Removing and Replacing the Front Bezel CAUTION: Static electricity can be injured from the spinning fan blades.
Removing and Replacing the Front Bezel
10-15 MINUTES
Before you open the cover with...
Upgrading and Servicing Guide - Page 5
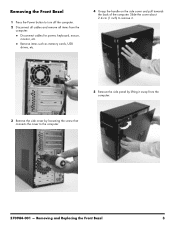
... and pull towards the back of the computer. Removing the Front Bezel
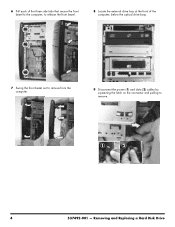
1 Press the Power button to turn off the computer. 2 Disconnect all cables and remove all items from the computer.
3 Remove the side cover by loosening the screw that connects the cover to remove it.
5 Remove the side panel by lifting it away from the...
Upgrading and Servicing Guide - Page 7
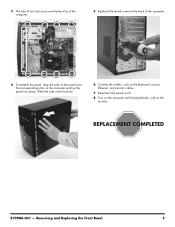
3 The tabs fit into place. Removing and Replacing the Front Bezel
5 Slide the side cover forward.
6 Connect the cables, such as the keyboard, mouse, Ethernet, and monitor cables.
7 Reconnect the power cord.
8 Turn on the computer and lay the panel into slots and over the front lip of the computer.
5 Reattach the thumb...
Upgrading and Servicing Guide - Page 10

... Phillips screwdriver
Flathead screwdrivers A flathead screwdriver can damage the electronic components inside the computer. Removing and Replacing an Optical Disc Drive You may vary by touching the metal cage of the computer before touching...static electricity by model.
2
537491-001 -
IMPORTANT: Computer features may damage your computer or be used with the power cord attached or...
Upgrading and Servicing Guide - Page 11
... the cover to turn off the computer. 2 Disconnect all cables and remove all items from the
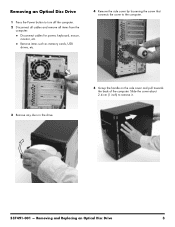
computer: Disconnect cables for power, keyboard, mouse, monitor, etc. Removing and Replacing an Optical Disc Drive
3 Removing an Optical Disc Drive
1 Press the Power button to the computer.
3 Remove any discs in the drive.
5 Grasp the handle on the side...
Upgrading and Servicing Guide - Page 13
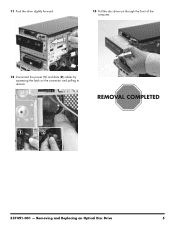
11 Push the drive slightly forward.
13 Pull the disc drive out through the front of the computer.
12 Disconnect the power (1) and data (2) cables by squeezing the latch on the connector and pulling to remove.
1
2
537491-001 - Removing and Replacing an Optical Disc Drive
5
Upgrading and Servicing Guide - Page 14
..., and leading edges.
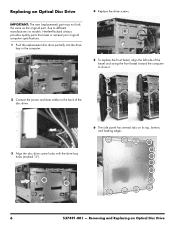
3 Align the disc drive screw holes with the drive bay holes (marked "2").
6
537491-001 - Removing and Replacing an Optical Disc Drive Replacing an Optical Disc Drive
IMPORTANT: The new (replacement) part may not look the same as... bezel and swing the front bezel toward the computer to close it.
2 Connect the power and data cables to different manufacturers or models.
Upgrading and Servicing Guide - Page 15

... over the corresponding slots on the computer and all peripherals, such as the keyboard, mouse, Ethernet, and monitor cables.
11 Reconnect the power cord.
12 Turn on the computer. Removing and Replacing an Optical Disc Drive
7 Slide the side cover forward.
10 Connect the cables, such as the monitor.
13 Verify the...
Upgrading and Servicing Guide - Page 18
...electronic components inside the computer.
IMPORTANT: Computer features may damage your computer or be used with the power cord attached or power applied.
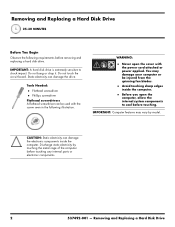
Discharge static electricity by model. Do not touch the circuit board. Avoid ...the metal cage of the computer before removing and replacing a hard disk drive.
IMPORTANT: A hard disk drive is extremely sensitive to cool...
Upgrading and Servicing Guide - Page 19
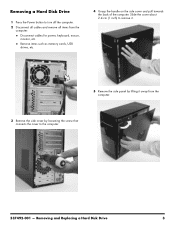
... side cover by loosening the screw that connects the cover to turn off the computer. 2 Disconnect all cables and remove all items from the
computer: Disconnect cables for power, keyboard, mouse, monitor, etc. Remove items such as memory cards, USB drives, etc.
4 Grasp the handle on the side cover and pull towards the...
Upgrading and Servicing Guide - Page 20
... the front bezel.
8 Locate the external drive bay at the front of the computer, below the optical drive bays.
7 Swing the front bezel out to remove from the computer.
9 Disconnect the power (1) and data (2) cables by squeezing the latch on the connector and pulling to...
Upgrading and Servicing Guide - Page 22
....
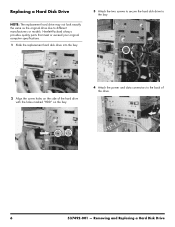
2 Align the screw holes on the side of the hard drive with the holes marked "HDD" on the bay.
4 Attach the power and data connectors to different manufacturers or models. Removing and Replacing a Hard Disk Drive Replacing a Hard Disk Drive
NOTE: The replacement hard drive may not look exactly the same as...
Upgrading and Servicing Guide - Page 24
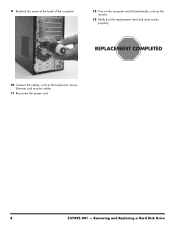
9 Reattach the screw at the back of the computer.
12 Turn on the computer and all peripherals, such as the monitor.
13 Verify that the replacement hard disk drive works properly.
10 Connect the cables, such as the keyboard, mouse, Ethernet, and monitor cables.
11 Reconnect the power cord.
8
537492-001 - Removing and Replacing a Hard Disk Drive
Upgrading and Servicing Guide - Page 26
... static electricity by model.
2
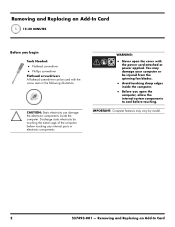
537493-001 - Avoid touching sharp edges inside the computer. IMPORTANT: Computer features may damage your computer or be used with the power cord attached or power applied. Removing and Replacing an Add-In Card You may vary by touching the metal cage of the computer before touching. WARNING:
Never open...
Upgrading and Servicing Guide - Page 27

....
4 Grasp the handle on the side cover and pull towards the back of the computer. Removing an Add-In Card
1 Press the Power button to the computer.
537493-001 - Slide the cover about 2.4 cm (1 inch) to remove it.
5 Remove the side panel by loosening the screw that connects the cover to turn off the...
Upgrading and Servicing Guide - Page 32
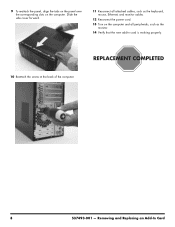
... on the panel over the corresponding slots on the computer and all peripherals, such as the keyboard, mouse, Ethernet, and monitor cables.
12 Reconnect the power cord.
13 Turn on the computer. Removing and Replacing an Add-In Card
Upgrading and Servicing Guide - Page 33

Removing and Replacing a Power Supply
Upgrading and Servicing Guide - Page 38

15 Set the computer upright.
18 Pull the power supply back and tilt it out of the computer.
16 Detach the four screws that connect the power supply to the computer.
17 Use a screwdriver to press the latch at the bottom of the power supply to release it.
6
573607-001 - Removing and Replacing a Power Supply
Getting Started Guide - Page 5
... Start button, click Control Panel, and then click System
computer hardware and
and Security. software issues.
● Find links to use the Microsoft® Windows® 7 operating system.
● Find Windows 7 password information. If the guide is not available there, visit www.hp.com/support
ENWW
1 Limited Warranty and Support Guide or...
Getting Started Guide - Page 7
...information
Administrator password
Computer viruses
Antivirus software
The free trial antivirus software that is specifically labeled as well.
Unauthorized access to data and ongoing threats to a power surge... a modem or telephone connection, protect the computer by using surge protection with your computer can detect most viruses, remove them, and, in most cases, repair damage caused ...
Similar Questions

Maximum Storage Capacity
What is the maximum storage capacity for a Compaq Presario laptop cq56 AMD?
What is the maximum storage capacity for a Compaq Presario laptop cq56 AMD?
(Posted by drrogerbrowne 2 years ago)

Presario Cq56 Will Power On But Is A Blank Screen ?
Purely how / what can I try to see if I can get screen back on ?
Purely how / what can I try to see if I can get screen back on ?
(Posted by Alisonjbarker 9 years ago)

Can A Power Supply For A Dc7800 Be Used In A Dc7100?
(Posted by hviel22b 9 years ago)

Need Information About The Compaq Presario Cq5000.
need to know the memory ram. system type. internal IP adress. external Ip adress.
need to know the memory ram. system type. internal IP adress. external Ip adress.
(Posted by blackwellgina 10 years ago)
My Compaq Presario Cq56 Has A Black Screen And Will Not Boot Caps Light Blinks A
(Posted by doctor7111 10 years ago)