Canon PIXMA MP600 Support Question
Canon PIXMA MP600 Support Question
Find answers below for this question about Canon PIXMA MP600.Need a Canon PIXMA MP600 manual? We have 2 online manuals for this item!
Question posted by Panjo on September 23rd, 2014
How To Move Mp600 Print Head With No Power
The person who posted this question about this Canon product did not include a detailed explanation. Please use the "Request More Information" button to the right if more details would help you to answer this question.
Current Answers
Related Canon PIXMA MP600 Manual Pages
Quick Start Guide - Page 5

...
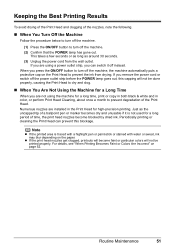
Routine Maintenance 46 Replacing an Ink Tank 46 Keeping the Best Printing Results 51 When Printing Becomes Faint or Colors Are Incorrect 52 Printing the Nozzle Check Pattern 53 Examining the Nozzle Check Pattern ...........54 Print Head Cleaning 56 Print Head Deep Cleaning 58 Aligning the Print Head 60 Cleaning Your Machine 64
Troubleshooting 67 Error Message Is Displayed...
Quick Start Guide - Page 8

... computer.
„ Turning off the Machine
1 To turn off . Press any button to turn on your computer (or a compatible device). z The Print Head and ink tanks are installed.
If the power plug is displayed on the LCD, see "Error Message Is Displayed on the LCD" on page 68.
2 If you are using the...
Quick Start Guide - Page 43
... damage to the device could result.
See "Turning the Machine On and Off" on page 4 and "Loading Printing Paper" on the machine and load the paper in the computer, be sure to align the Print Head.
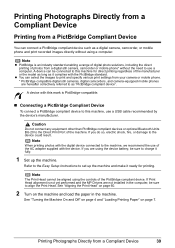
If Print Head alignment is PictBridge-compatible.
„ Connecting a PictBridge Compliant Device
To connect a PictBridge compliant device to this...
Quick Start Guide - Page 52
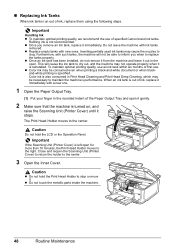
... necessary to inform you remove an ink tank, replace it immediately.
Important
If the Scanning Unit (Printer Cover) is specified. Caution
z Do not hold the LCD or the Operation Panel. Caution
Do not hold the Print Head Holder to the right. „ Replacing Ink Tanks
When ink tanks run out of specified Canon...
Quick Start Guide - Page 53
... remove the ink tank.
Doing so can cause
the machine to malfunction or
become unable to print.
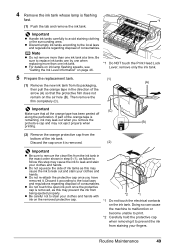
*2 Carefully hold the protective cap
when removing it according to stain your clothes and
hands.... cap.
*1 Do not touch the electrical contacts
on page 46.
*1 Do NOT touch the Print Head Lock Lever; z Be careful not to the local laws
and regulations regarding disposal of consumables. ...
Quick Start Guide - Page 54

... the ink tank.
(1) Insert the front end of the tank matches the label.
Printing will not start printing after the Scanning Unit (Printer Cover) is closed , see "Error Message Is Displayed on the LCD" on the ink tank until Print Head Cleaning finishes.
50
Routine Maintenance
Note
Make sure that the ink lamp lights up...
Quick Start Guide - Page 55
... the Machine for a Long Time
When you are not using a power outlet strip, you are installed in color, or perform Print Head Cleaning, about once a month to prevent degradation of the Print Head. Note
z If the printed area is not used for high-precision printing. z If the print head nozzles get clogged, printouts will become blocked by dried ink...
Quick Start Guide - Page 56
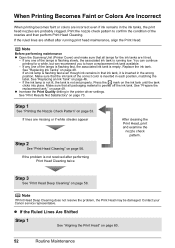
... or colors are incorrect even if ink remains in the ink tanks, the print head nozzles are shifted after performing
Print Head Cleaning twice
After cleaning the Print Head, print and examine the
nozzle check pattern. Make sure that all packaging material is inserted in the printer driver settings. If the problem is running print head maintenance, align the Print Head.
Quick Start Guide - Page 57
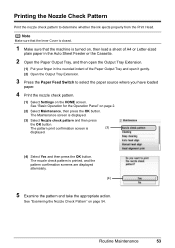
... Tray and open it gently. (2) Open the Output Tray Extension.
3 Press the Paper Feed Switch to determine whether the ink ejects properly from the Print Head. The pattern print confirmation screen is displayed.
(3) Select Nozzle check pattern and then press
the OK button. The Maintenance screen is
(3)
displayed.
(4) Select Yes and then press...
Quick Start Guide - Page 59
... pattern that is displayed.
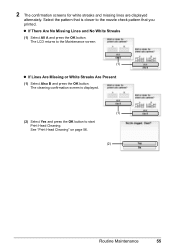
(1) (2) Select Yes and press the OK button to start
Print Head Cleaning. 2 The confirmation screens for white streaks and missing lines are displayed
alternately. The... Lines and No White Streaks
(1) Select All A and press the OK button. See "Print Head Cleaning" on page 56.
(2)
Routine Maintenance
55 The LCD returns to the nozzle check pattern that you...
Quick Start Guide - Page 60
... Tray and open it gently. (2) Open the Output Tray Extension.
3 Press the Paper Feed Switch to be absorbed in the printed nozzle check pattern.
Cleaning the Print Head consumes ink, so perform Print Head Cleaning only when necessary. See "Basic Operation for the Operation Panel" on the HOME screen. Note
Make sure that the Inner...
Quick Start Guide - Page 62
...Print Head ... loaded
paper.
4 Start Print Head Deep Cleaning.
(1) Select Settings on the HOME screen. Print Head Deep Cleaning starts.
The ...standard Print Head Cleaning, so perform this procedure only when necessary. Do not perform any other operations until Print Head ... button. Print Head Deep Cleaning
If print quality does not improve by standard Print Head Cleaning, try Print Head Deep Cleaning...
Quick Start Guide - Page 68

...is needed to clean the machine; Use a soft cloth to turn off the power and disconnect the power cord before cleaning the machine.
these can damage the machine's components.
„ ...sure to avoid scratching the components. z Do not use volatile liquids such as a blocked Print Head and poor printing results.
Important
The sheet (B) is easily damaged, so wipe it , wipe the Platen...
Quick Start Guide - Page 78
...) and check the ink lamps. Replace the ink tank, and close the Scanning Unit (Printer Cover). If the problem is not installed securely. / Part of ink and the machine does not print, clean the Print Head and then print the nozzle check pattern to empty tanks. The ink lamp lights up red when the ink...
Quick Start Guide - Page 80
.... Selecting the Prevent paper abrasion setting will widen the clearance between the Print Head and the loaded paper. Open the printer properties dialog box, and in Custom Settings in the User's Guide on inappropriate type of the corners or the whole printing surface curled, the paper may be reduced at a time. When Prevent paper...
Quick Start Guide - Page 92
... Feed Switch to as the paper source, and try printing again.
If the Print Head is already installed, remove the Print Head and then reinstall it can be connected to dismiss the printer error message from the computer. If the error is still not resolved, the Print Head may vary depending on the camera you are using the...
Quick Start Guide - Page 93
...the Photo Index Sheet is out of ink.
"Printer error"
An error requiring servicing may damage the machine. Troubleshooting
89 However, because printing is disabled once the ink absorber becomes completely ...page 46. Press and hold the ink used during Print Head Cleaning, for detecting the remaining ink level. After a while, plug the power cord of the machine back in the correct position ...
Quick Start Guide - Page 95
... document complexity, copy mode, page coverage and the number of 1/9600 inch at minimum. Print width
Acoustic noise level
Operating environment
Storage environment
Power supply Power consumption
External dimensions (with the Paper Support and Paper Output Tray retracted) Weight Print Head
General Specifications
9600 (horizontal)* x 2400 (vertical) * Ink droplets can be placed with a pitch of...
Quick Start Guide - Page 100

... place metal objects (paper clips, staples, etc.) or containers of small children.
If a child ingests any object on the Document Cover.
Power supply
Ensure that the area around the machine
Print Heads and ink tanks
Never use an extension lead/cord. Ink may break and cause injury. Never touch the electrical contacts on...
Easy Setup Instructions - Page 1
... its
package.
(1) Press the { or } button to the color guide on the LCD. e Open the Scanning Unit (Printer Cover)
until the machine stops making noise.
Scanning Unit (Printer Cover)
d Insert the Print Head.
e Lower the Print Head Lock Lever
carefully.
d Make sure the ink lamp lights red. Refer to select the language.
(2) Press the OK button...
Similar Questions

Print Head Alignment
how do i do this print head alignment on my pixma mp230? I absolutely have no idea and theres nothin...
how do i do this print head alignment on my pixma mp230? I absolutely have no idea and theres nothin...
(Posted by gracetungala 7 years ago)

Type Of Print Head Is Incorrect. Install Correct Print Head Uo52
printer just stopped working and displayed above message
printer just stopped working and displayed above message
(Posted by pete80249 8 years ago)

Incorrect Print Head Error Message,help
Recently moved house, and when re installed MP510 printer I have "Incorrect Print head" message disp...
Recently moved house, and when re installed MP510 printer I have "Incorrect Print head" message disp...
(Posted by chriscarol6192 9 years ago)

