User Manual
Page 3
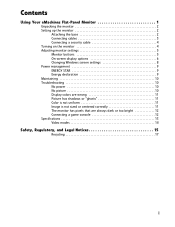
Contents Using Your eMachines Flat-Panel Monitor 1 Unpacking the monitor 2 Setting up the monitor 2 Attaching the base 2 Connecting cables 3 Connecting a security cable 4 Turning on the monitor 4 Adjusting monitor settings 5 Monitor buttons 5 On-screen display options 6 Changing Windows screen settings 8 Power management 9 ENERGY STAR 9 Energy ...Picture has shadows or "ghosts 11 Color is not uniform 11 Image is not sized or centered correctly 11 The monitor has pixels that are always dark or too bright 12 Connecting a game console 12 Specifications 13 Video modes 14 ...
Contents Using Your eMachines Flat-Panel Monitor 1 Unpacking the monitor 2 Setting up the monitor 2 Attaching the base 2 Connecting cables 3 Connecting a security cable 4 Turning on the monitor 4 Adjusting monitor settings 5 Monitor buttons 5 On-screen display options 6 Changing Windows screen settings 8 Power management 9 ENERGY STAR 9 Energy ...Picture has shadows or "ghosts 11 Color is not uniform 11 Image is not sized or centered correctly 11 The monitor has pixels that are always dark or too bright 12 Connecting a game console 12 Specifications 13 Video modes 14 ...

User Manual
Page 5
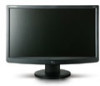
Using Your eMachines Flat-Panel Monitor • Unpacking the monitor • Setting up the monitor • Turning on the monitor • Adjusting monitor settings • Power management • Maintaining • Troubleshooting • Specifications 1
Using Your eMachines Flat-Panel Monitor • Unpacking the monitor • Setting up the monitor • Turning on the monitor • Adjusting monitor settings • Power management • Maintaining • Troubleshooting • Specifications 1
User Manual
Page 6
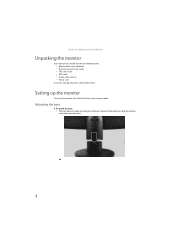
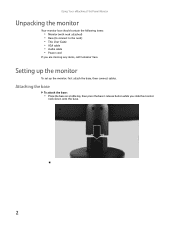
Setting up the monitor To set up the monitor, first attach the base, then connect cables. Attaching the base To attach the base: • Place the base on a table top, then press the base's release button while you are missing any items, call Customer Care. Using Your eMachines Flat-Panel Monitor Unpacking the monitor Your monitor box should contain the following items: • Monitor (with neck attached) • Base (to connect to the neck) • This User Guide • VGA cable • Audio cable (Option) • Power cord If you slide the monitor neck down onto the base. 2
Setting up the monitor To set up the monitor, first attach the base, then connect cables. Attaching the base To attach the base: • Place the base on a table top, then press the base's release button while you are missing any items, call Customer Care. Using Your eMachines Flat-Panel Monitor Unpacking the monitor Your monitor box should contain the following items: • Monitor (with neck attached) • Base (to connect to the neck) • This User Guide • VGA cable • Audio cable (Option) • Power cord If you slide the monitor neck down onto the base. 2

User Manual
Page 7
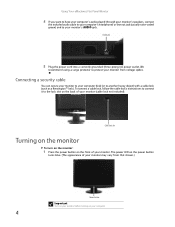
www.emachines.com Connecting cables To connect video and power cables: 1 Position your computer and the monitor so you can reach the back of each, then connect the blue VGA video cable to the blue VGA video connector under the back of the monitor. 2 Make sure that your computer is turned off, then connect the other end of the video cable to the matching video port on the back of your computer. 3 Connect the power cord to the power connector under the back of the monitor. 3
www.emachines.com Connecting cables To connect video and power cables: 1 Position your computer and the monitor so you can reach the back of each, then connect the blue VGA video cable to the blue VGA video connector under the back of the monitor. 2 Make sure that your computer is turned off, then connect the other end of the video cable to the matching video port on the back of your computer. 3 Connect the power cord to the power connector under the back of the monitor. 3

User Manual
Page 8
... jack. (Option) Audio jack 5 Plug the power cord into a correctly grounded (three-prong) AC power outlet. Using Your eMachines Flat-Panel Monitor 4 If you want to have your computer's audio played through your monitor's speakers, connect the included audio cable to your computer's headphones or line out jack (usually color-coded green) and...
... jack. (Option) Audio jack 5 Plug the power cord into a correctly grounded (three-prong) AC power outlet. Using Your eMachines Flat-Panel Monitor 4 If you want to have your computer's audio played through your monitor's speakers, connect the included audio cable to your computer's headphones or line out jack (usually color-coded green) and...
User Manual
Page 9
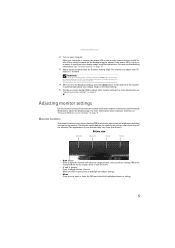
... Bottom view Auto button Menu button < button > button • Auto button Press to have the monitor self-adjust its image position, clock, and focus settings. www.emachines.com 2 Turn on your monitor may vary from 15° back to 5° forward. For more troubleshooting information, see "Troubleshooting..." on page 10. 3 Adjust the tilt of the monitor to the settings, even if you make to...
... Bottom view Auto button Menu button < button > button • Auto button Press to have the monitor self-adjust its image position, clock, and focus settings. www.emachines.com 2 Turn on your monitor may vary from 15° back to 5° forward. For more troubleshooting information, see "Troubleshooting..." on page 10. 3 Adjust the tilt of the monitor to the settings, even if you make to...
User Manual
Page 10
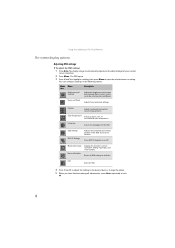
.../CI support on or off. Color Temperature Selects a warm, cool, or user-defined color temperature. Mode Information Displays the monitor's current resolution, timing, input type, and serial number. Using Your eMachines Flat-Panel Monitor On-screen display options Adjusting OSD settings To adjust the OSD settings: 1 Press Auto. OSD Settings DDC/CI Settings...
.../CI support on or off. Color Temperature Selects a warm, cool, or user-defined color temperature. Mode Information Displays the monitor's current resolution, timing, input type, and serial number. Using Your eMachines Flat-Panel Monitor On-screen display options Adjusting OSD settings To adjust the OSD settings: 1 Press Auto. OSD Settings DDC/CI Settings...
User Manual
Page 12
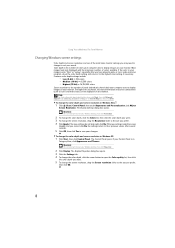
Using Your eMachines Flat-Panel Monitor Changing Windows screen settings Color depth and screen resolution are two of colors your computer uses to display images on your monitor. If the color in your images seems "false" or "jumpy," especially after several seconds. 5 Click OK, then click Yes to save ...with the maximum number of pixels (individual colored dots) your computer uses to display images on the monitor. The Control Panel opens. Color depth is the number of the most basic monitor settings you have played a game or run a video-intensive program, check the color depth setting and...
Using Your eMachines Flat-Panel Monitor Changing Windows screen settings Color depth and screen resolution are two of colors your computer uses to display images on your monitor. If the color in your images seems "false" or "jumpy," especially after several seconds. 5 Click OK, then click Yes to save ...with the maximum number of pixels (individual colored dots) your computer uses to display images on the monitor. The Control Panel opens. Color depth is the number of the most basic monitor settings you have played a game or run a video-intensive program, check the color depth setting and...

User Manual
Page 13
...of computer equipment to build circuitry into the energy-saving mode, the monitor enters the Active Off mode (sleep). www.emachines.com Power management ENERGY STAR As an ENERGY STAR® Partner, eMachines has determined that supports the VESA Display Power Management Signaling (DPMS) protocol..., the monitor can be reduced to the following levels: VESA state LED indicator Power consumption On Active Off Blue Amber < 25 W (...
...of computer equipment to build circuitry into the energy-saving mode, the monitor enters the Active Off mode (sleep). www.emachines.com Power management ENERGY STAR As an ENERGY STAR® Partner, eMachines has determined that supports the VESA Display Power Management Signaling (DPMS) protocol..., the monitor can be reduced to the following levels: VESA state LED indicator Power consumption On Active Off Blue Amber < 25 W (...

User Manual
Page 14
... page 2. • Make sure that lets you solve them. Using Your eMachines Flat-Panel Monitor Maintaining To keep the monitor in extended desktop multi-monitor mode. For more information about connecting the power cord, see "Setting up the monitor" on . • If you have two options: • If your notebook supports dual displays, you can...
... page 2. • Make sure that lets you solve them. Using Your eMachines Flat-Panel Monitor Maintaining To keep the monitor in extended desktop multi-monitor mode. For more information about connecting the power cord, see "Setting up the monitor" on . • If you have two options: • If your notebook supports dual displays, you can...
User Manual
Page 15
...at least 30 minutes before making a final judgment about connecting the video cable, see "Adjusting monitor settings" on page 5. 11 For more information about connecting the video cable, see "Setting up for ten seconds. www.emachines.com • If the power LED is amber: • Make sure that your computer ...is turned on. • Move the mouse or press any key on the keyboard to bring the monitor out of sleep mode. • Restart your computer ...
...at least 30 minutes before making a final judgment about connecting the video cable, see "Adjusting monitor settings" on page 5. 11 For more information about connecting the video cable, see "Setting up for ten seconds. www.emachines.com • If the power LED is amber: • Make sure that your computer ...is turned on. • Move the mouse or press any key on the keyboard to bring the monitor out of sleep mode. • Restart your computer ...

User Manual
Page 16
....com. • Some adjustments may be caused by older video drivers on your display, contact eMachines Customer Care to the Windows System Registry. If you feel these to match the monitor's optimal (native) setting. For information on the number of cable you to make changes to ...as the widescreen format becomes more popular. We recommend making a complete system backup before changing the System Registry. Using Your eMachines Flat-Panel Monitor • If the image looks stretched or fuzzy, you must adjust the operating system's display settings to a minimum. To find...
....com. • Some adjustments may be caused by older video drivers on your display, contact eMachines Customer Care to the Windows System Registry. If you feel these to match the monitor's optimal (native) setting. For information on the number of cable you to make changes to ...as the widescreen format becomes more popular. We recommend making a complete system backup before changing the System Registry. Using Your eMachines Flat-Panel Monitor • If the image looks stretched or fuzzy, you must adjust the operating system's display settings to a minimum. To find...
User Manual
Page 21
...The plug on this system, make sure that the switch is properly grounded when in use eMachines products in areas classified as a radiator. ■ Set up the system on the products plugged into the monitor ventilation openings. ■ Some products are followed. This is set up your system ■...; Read and follow these openings. If the monitor does get exposed to rain or use of this product near water. Your eMachines product is to avoid eating and drinking near your system. ■ Do not expose the monitor to moisture, unplug it and allow anything on the system...
...The plug on this system, make sure that the switch is properly grounded when in use eMachines products in areas classified as a radiator. ■ Set up the system on the products plugged into the monitor ventilation openings. ■ Some products are followed. This is set up your system ■...; Read and follow these openings. If the monitor does get exposed to rain or use of this product near water. Your eMachines product is to avoid eating and drinking near your system. ■ Do not expose the monitor to moisture, unplug it and allow anything on the system...
User Manual
Page 24
... Mr. Easy Lai Tel: 886-2-8691-3089 Fax: 886-2-8691-3120 E-mail: [email protected] Hereby declare that: Product: LCD Monitor Trade Name: emachine Model Number: E161HQ, E191HQ, E181H, E191W Is compliant with the essential requirements and other countries. EN55022:1998 + A1:2000 + A2:...comply with the following EC directives, and that production units of issued Notices © 2008 Gateway, Inc. Trademark acknowledgments Gateway and eMachines are made periodically. All other brands and product names are incorporated in any time, without prior consent in the United States and...
... Mr. Easy Lai Tel: 886-2-8691-3089 Fax: 886-2-8691-3120 E-mail: [email protected] Hereby declare that: Product: LCD Monitor Trade Name: emachine Model Number: E161HQ, E191HQ, E181H, E191W Is compliant with the essential requirements and other countries. EN55022:1998 + A1:2000 + A2:...comply with the following EC directives, and that production units of issued Notices © 2008 Gateway, Inc. Trademark acknowledgments Gateway and eMachines are made periodically. All other brands and product names are incorporated in any time, without prior consent in the United States and...
User Manual
Page 3
Contents Using Your eMachines Flat-Panel Monitor 1 Unpacking the monitor 2 Setting up the monitor 2 Attaching the base 2 Connecting cables 3 Connecting a security cable 4 Turning on the monitor 4 Adjusting monitor settings 5 Monitor buttons 5 On-screen display options 6 Changing Windows screen settings 8 Power management 9 ENERGY STAR 9 Energy ...Picture has shadows or "ghosts 11 Color is not uniform 11 Image is not sized or centered correctly 11 The monitor has pixels that are always dark or too bright 12 Connecting a game console 12 Specifications 13 Video modes 14 ...
Contents Using Your eMachines Flat-Panel Monitor 1 Unpacking the monitor 2 Setting up the monitor 2 Attaching the base 2 Connecting cables 3 Connecting a security cable 4 Turning on the monitor 4 Adjusting monitor settings 5 Monitor buttons 5 On-screen display options 6 Changing Windows screen settings 8 Power management 9 ENERGY STAR 9 Energy ...Picture has shadows or "ghosts 11 Color is not uniform 11 Image is not sized or centered correctly 11 The monitor has pixels that are always dark or too bright 12 Connecting a game console 12 Specifications 13 Video modes 14 ...

User Manual
Page 5
Using Your eMachines Flat-Panel Monitor • Unpacking the monitor • Setting up the monitor • Turning on the monitor • Adjusting monitor settings • Power management • Maintaining • Troubleshooting • Specifications 1
Using Your eMachines Flat-Panel Monitor • Unpacking the monitor • Setting up the monitor • Turning on the monitor • Adjusting monitor settings • Power management • Maintaining • Troubleshooting • Specifications 1
User Manual
Page 6
Using Your eMachines Flat-Panel Monitor Unpacking the monitor Your monitor box should contain the following items: • Monitor (with neck attached) • Base (to connect to the neck) • This User Guide • VGA cable • Audio cable • Power cord If you slide the monitor neck down onto the base. 2 Attaching the base To attach the base: • Place the base on a table top, then press the base's release button while you are missing any items, call Customer Care. Setting up the monitor To set up the monitor, first attach the base, then connect cables.
Using Your eMachines Flat-Panel Monitor Unpacking the monitor Your monitor box should contain the following items: • Monitor (with neck attached) • Base (to connect to the neck) • This User Guide • VGA cable • Audio cable • Power cord If you slide the monitor neck down onto the base. 2 Attaching the base To attach the base: • Place the base on a table top, then press the base's release button while you are missing any items, call Customer Care. Setting up the monitor To set up the monitor, first attach the base, then connect cables.

User Manual
Page 7
www.emachines.com Connecting cables To connect video and power cables: 1 Position your computer and the monitor so you can reach the back of each, then connect the blue VGA video cable to the blue VGA video connector under the back of the monitor. 2 Make sure that your computer is turned off, then connect the other end of the video cable to the matching video port on the back of your computer. 3 Connect the power cord to the power connector under the back of the monitor. 3
www.emachines.com Connecting cables To connect video and power cables: 1 Position your computer and the monitor so you can reach the back of each, then connect the blue VGA video cable to the blue VGA video connector under the back of the monitor. 2 Make sure that your computer is turned off, then connect the other end of the video cable to the matching video port on the back of your computer. 3 Connect the power cord to the power connector under the back of the monitor. 3
User Manual
Page 8
... cable lock (such as a Kensington™ lock). Cable lock slot Turning on the monitor To turn on the monitor: 1 Press the power button on the back of your monitor may vary from voltage spikes. Using Your eMachines Flat-Panel Monitor 4 If you want to have your computer's audio played through your... monitor's speakers, connect the included audio cable to your computer's headphones or line out jack (usually color-...
... cable lock (such as a Kensington™ lock). Cable lock slot Turning on the monitor To turn on the monitor: 1 Press the power button on the back of your monitor may vary from voltage spikes. Using Your eMachines Flat-Panel Monitor 4 If you want to have your computer's audio played through your... monitor's speakers, connect the included audio cable to your computer's headphones or line out jack (usually color-...
User Manual
Page 9
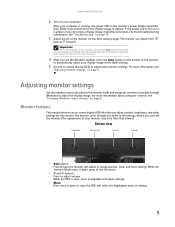
... open or close the OSD and select the highlighted menu or setting. 5 Adjusting monitor settings Use the monitor controls (located on page 5. If the power LED is not on your monitor may vary from 15° back to appear. www.emachines.com 2 Turn on or is amber, or you do not see a display image...
... open or close the OSD and select the highlighted menu or setting. 5 Adjusting monitor settings Use the monitor controls (located on page 5. If the power LED is not on your monitor may vary from 15° back to appear. www.emachines.com 2 Turn on or is amber, or you do not see a display image...


