User Guide
Page 5
... 9.4.4 System Log ...133 9.4.5 Security Log 134 9.4.6 Active DHCP client list 136 9.4.7 Statistics ...137 9.5 System Tools 138 9.5.1 Configuration Backup and Restore 139 9.5.2 Firmware Upgrade 140 9.5.3 System Reset 141 10 Appendix ...142 10.1 Hardware Specifications 142 10.2 Troubleshooting 143 10.3 Glossary ...146 3 9.3.1 Access Control 116 9.3.2 URL Blocking 121 9.3.3 DoS Attack Prevention 123 9.3.3.1 DoS -
... 9.4.4 System Log ...133 9.4.5 Security Log 134 9.4.6 Active DHCP client list 136 9.4.7 Statistics ...137 9.5 System Tools 138 9.5.1 Configuration Backup and Restore 139 9.5.2 Firmware Upgrade 140 9.5.3 System Reset 141 10 Appendix ...142 10.1 Hardware Specifications 142 10.2 Troubleshooting 143 10.3 Glossary ...146 3 9.3.1 Access Control 116 9.3.2 URL Blocking 121 9.3.3 DoS Attack Prevention 123 9.3.3.1 DoS -

User Guide
Page 14
... for less than 5 seconds once to factory defaults; Press this button for 10 seconds to restore all settings) or start 2.4GHz & 5GHz wireless WPS function. Reset / WPS Reset the router to 4. WAN Wide Area Network (WAN / Internet) port. 1 - 4 Local Area Network (LAN) ports 1 to factory default settings (clear all settings to start...
... for less than 5 seconds once to factory defaults; Press this button for 10 seconds to restore all settings) or start 2.4GHz & 5GHz wireless WPS function. Reset / WPS Reset the router to 4. WAN Wide Area Network (WAN / Internet) port. 1 - 4 Local Area Network (LAN) ports 1 to factory default settings (clear all settings to start...

User Guide
Page 31
... password again. NOTE: If you can jump to another category instantly by clicking its link without having to go to '10.2 Troubleshooting' to perform a factory reset and set the password back to default value.
... password again. NOTE: If you can jump to another category instantly by clicking its link without having to go to '10.2 Troubleshooting' to perform a factory reset and set the password back to default value.

User Guide
Page 53
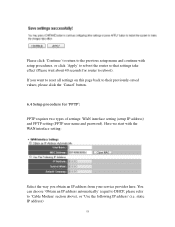
After you want to reset all settings, please click 'Apply' (4) button and the following message will be displayed on this page back to their previously-saved values, please click the 'Cancel' button. 6.3 Setup procedure for router to reboot the router so that settings take effect (Please wait for about 40 seconds for 'PPPoE': 1 2 3 4 5 6 7 51 If you finish with all settings on your web browser: Please click 'Continue' to return to previous setup menu and continue setup procedures, or click 'Apply' to reboot).
After you want to reset all settings, please click 'Apply' (4) button and the following message will be displayed on this page back to their previously-saved values, please click the 'Cancel' button. 6.3 Setup procedure for router to reboot the router so that settings take effect (Please wait for about 40 seconds for 'PPPoE': 1 2 3 4 5 6 7 51 If you finish with all settings on your web browser: Please click 'Continue' to return to previous setup menu and continue setup procedures, or click 'Apply' to reboot).
User Guide
Page 55
... provider here. Please click 'Continue' to return to the previous setup menu and continue with the WAN interface setting: Select the way you want to reset all settings on this page back to 'Cable Modem' section above), or 'Use the following IP address' (i.e. Here we start with setup procedures, or click...
... provider here. Please click 'Continue' to return to the previous setup menu and continue with the WAN interface setting: Select the way you want to reset all settings on this page back to 'Cable Modem' section above), or 'Use the following IP address' (i.e. Here we start with setup procedures, or click...

User Guide
Page 57
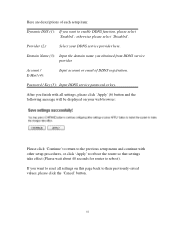
... take effect (Please wait about 40 seconds for detailed descriptions) Idle Time Out (8): Please input the idle time out of Internet connection you want to reset all settings, please click 'Apply' (9) button and the following message will be displayed on your web browser: Please click 'Continue' to return to the previous...
... take effect (Please wait about 40 seconds for detailed descriptions) Idle Time Out (8): Please input the idle time out of Internet connection you want to reset all settings, please click 'Apply' (9) button and the following message will be displayed on your web browser: Please click 'Continue' to return to the previous...

User Guide
Page 59
... to input: User Name (1): Please input the user name assigned by Telstra. 57 Password (2): Please input the password assigned by Telstra. If you want to reset all settings on this page back to reboot).
... to input: User Name (1): Please input the user name assigned by Telstra. 57 Password (2): Please input the password assigned by Telstra. If you want to reset all settings on this page back to reboot).

User Guide
Page 60
If you want to reset all settings, click 'Apply' (5) button and the following message will be assigned automatically. When you select 'Dynamic IP' or 'PPPoE' as your service provider did ...
If you want to reset all settings, click 'Apply' (5) button and the following message will be assigned automatically. When you select 'Dynamic IP' or 'PPPoE' as your service provider did ...

User Guide
Page 62
It will be able to know which IP address they are using at any given time. If you want to reset all settings on Internet, because their webpage. 1 2 3 4 5 6 60 This router supports DDNS service of the DDNS service provider's webpages listed above, and get a free DDNS ...
It will be able to know which IP address they are using at any given time. If you want to reset all settings on Internet, because their webpage. 1 2 3 4 5 6 60 This router supports DDNS service of the DDNS service provider's webpages listed above, and get a free DDNS ...
User Guide
Page 63
... previously-saved values, please click the 'Cancel' button. 61 Account / E-Mail (4): Input account or email of each setup item: Dynamic DNS (1): If you want to reset all settings, please click 'Apply' (6) button and the following message will be displayed on this page back to enable DDNS function, please select 'Enabled'; Here...
... previously-saved values, please click the 'Cancel' button. 61 Account / E-Mail (4): Input account or email of each setup item: Dynamic DNS (1): If you want to reset all settings, please click 'Apply' (6) button and the following message will be displayed on this page back to enable DDNS function, please select 'Enabled'; Here...

User Guide
Page 65
... signal. Wireless devices in the same network should follow the same settings in the table and the X650 will be displayed on this page back to their previously-saved 63 If you want to reset all available access points nearby. Select the channel designated by your Wireless ISP service provider whether it...
... signal. Wireless devices in the same network should follow the same settings in the table and the X650 will be displayed on this page back to their previously-saved 63 If you want to reset all available access points nearby. Select the channel designated by your Wireless ISP service provider whether it...

User Guide
Page 98
... (8): Click 'Clear' to reboot). Comment (6): You can leave it is optional and you inputted in the MAC address and comment field. After you want to reset all settings, please click 'Apply' (9) button and the following message will be displayed on this field to write a comment for router to remove the value...
... (8): Click 'Clear' to reboot). Comment (6): You can leave it is optional and you inputted in the MAC address and comment field. After you want to reset all settings, please click 'Apply' (9) button and the following message will be displayed on this field to write a comment for router to remove the value...

User Guide
Page 99
...: Push-Button Configuration (PBC), and PIN code. You do this wireless router. You can push the Reset/WPS button of the wireless client you need to do not have to know the PIN code of the... wireless client and switch it to WPS mode, then provide the PIN code of the X650 or click the 'Start PBC' button in the web configuration interface to setup a wireless client; 8.5 ...Setup (WPS) Wi-Fi Protected Setup (WPS) is the simplest way to press a button on the wireless client and the X650, and the WPS will be displayed on your web browser: 1 2 3 4 5 97 If you want to use ...
...: Push-Button Configuration (PBC), and PIN code. You do this wireless router. You can push the Reset/WPS button of the wireless client you need to do not have to know the PIN code of the... wireless client and switch it to WPS mode, then provide the PIN code of the X650 or click the 'Start PBC' button in the web configuration interface to setup a wireless client; 8.5 ...Setup (WPS) Wi-Fi Protected Setup (WPS) is the simplest way to press a button on the wireless client and the X650, and the WPS will be displayed on your web browser: 1 2 3 4 5 97 If you want to use ...

User Guide
Page 104
... finish with other setup procedures, or click 'Apply' to reboot the router so the settings take effect (Please wait about 40 seconds for router to reset all settings, please click 'Apply' (11) button and the following message will be grayed out and unable to be clicked. Move Up (9): You can select...
... finish with other setup procedures, or click 'Apply' to reboot the router so the settings take effect (Please wait about 40 seconds for router to reset all settings, please click 'Apply' (11) button and the following message will be grayed out and unable to be clicked. Move Up (9): You can select...

User Guide
Page 106
... a single IP address. You can select a specific traffic type for this rule; Protocol (h): Please select the protocol type of the values you just entered, click 'Reset'. 104 If you do not know what protocol your input by this rule on all of this rule; After you finish with all settings, please...
... a single IP address. You can select a specific traffic type for this rule; Protocol (h): Please select the protocol type of the values you just entered, click 'Reset'. 104 If you do not know what protocol your input by this rule on all of this rule; After you finish with all settings, please...

User Guide
Page 109
.... If you only want to describe this button will be listed here. If there is no existing mapping, this mapping, up to the X650 will Table (9): be displayed here. Here are not sure, please select 'Both'. You can easily select the computer name without checking the... IP address of the mapping, then click 'Delete Selected' button to port forwarding table. Delete All (11): Delete all inputted values. Reset (8): Remove all mappings in virtual server table. 107 Computer Name (3): Pull down the menu and all the computers connected to 16 alphanumerical characters....
.... If you only want to describe this button will be listed here. If there is no existing mapping, this mapping, up to the X650 will Table (9): be displayed here. Here are not sure, please select 'Both'. You can easily select the computer name without checking the... IP address of the mapping, then click 'Delete Selected' button to port forwarding table. Delete All (11): Delete all inputted values. Reset (8): Remove all mappings in virtual server table. 107 Computer Name (3): Pull down the menu and all the computers connected to 16 alphanumerical characters....

User Guide
Page 110
If you want to reset all settings on this page to their previously-saved values, please click the 'Cancel' button. 9.2.3 Virtual Server This function allows you to redirect a port on ... via a single Internet IP address. Please click 'NAT' menu on the left of an IP address on local network, so you finish with all mappings. Reset (12): Unselect all settings, please click 'Apply' (13) button and the following message will take effect (Please wait about 40 seconds for router to reboot...
If you want to reset all settings on this page to their previously-saved values, please click the 'Cancel' button. 9.2.3 Virtual Server This function allows you to redirect a port on ... via a single Internet IP address. Please click 'NAT' menu on the left of an IP address on local network, so you finish with all mappings. Reset (12): Unselect all settings, please click 'Apply' (13) button and the following message will take effect (Please wait about 40 seconds for router to reboot...

User Guide
Page 112
... clicking the 'Select' box of the mapping, then click 'Delete Selected' button to previously-saved values, please click the 'Cancel' button. 110 Reset (13): Unselect all mappings in virtual server table. If you finish with other setup procedures, or click 'Apply' to reboot the router so the... effect (Please wait about 40 seconds for router to reboot). If there is no existing mapping, this page back to remove the mapping. Reset (9): Remove all settings on your web browser: Please click 'Continue' to return to the previous setup menu and continue with all settings, please...
... clicking the 'Select' box of the mapping, then click 'Delete Selected' button to previously-saved values, please click the 'Cancel' button. 110 Reset (13): Unselect all mappings in virtual server table. If you finish with other setup procedures, or click 'Apply' to reboot the router so the... effect (Please wait about 40 seconds for router to reboot). If there is no existing mapping, this page back to remove the mapping. Reset (9): Remove all settings on your web browser: Please click 'Continue' to return to the previous setup menu and continue with all settings, please...

User Guide
Page 114
...select a special application by clicking the 'Select' box of the mapping, then click 'Delete Selected' button to 'Current Trigger-Port Table.' Reset (13): Unselect all Special Appliacation settings from the " Current Trigger-Port Table", select the Special Application settings you finish with all settings, ... Note: Only one LAN client can use a particular special application at a time. After you want remove all settings. Reset (9): Click 'Reset' to the 'Current Trigger-Port Table.' Current Trigger-Port All the settings for the special applications will be (10): listed...
...select a special application by clicking the 'Select' box of the mapping, then click 'Delete Selected' button to 'Current Trigger-Port Table.' Reset (13): Unselect all Special Appliacation settings from the " Current Trigger-Port Table", select the Special Application settings you finish with all settings, ... Note: Only one LAN client can use a particular special application at a time. After you want remove all settings. Reset (9): Click 'Reset' to the 'Current Trigger-Port Table.' Current Trigger-Port All the settings for the special applications will be (10): listed...

User Guide
Page 115
... enable or disable UPnP function, then click 'Apply' button, and the following message will be displayed on your web browser: 113 If you want to reset all settings on this page; Please click 'Continue' to return to the previous setup menu and continue with other setup procedures, or click 'Apply' to...
... enable or disable UPnP function, then click 'Apply' button, and the following message will be displayed on your web browser: 113 If you want to reset all settings on this page; Please click 'Continue' to return to the previous setup menu and continue with other setup procedures, or click 'Apply' to...

