
Quick Start Guide
Page 2
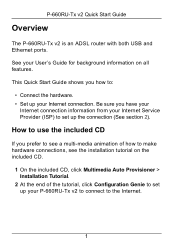
..., click Multimedia Auto Provisioner > Installation Tutorial. 2 At the end of the tutorial, click Configuration Genie to set up the connection (See section 2). Be sure you prefer to see a multi-media animation of how to set up your P-660RU-Tx v2 to connect to : • Connect the hardware. • Set up your Internet connection...
..., click Multimedia Auto Provisioner > Installation Tutorial. 2 At the end of the tutorial, click Configuration Genie to set up the connection (See section 2). Be sure you prefer to see a multi-media animation of how to set up your P-660RU-Tx v2 to connect to : • Connect the hardware. • Set up your Internet connection...
Quick Start Guide
Page 3
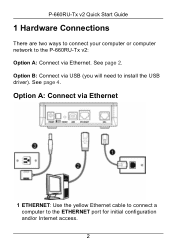
Option B: Connect via Ethernet 1 ETHERNET: Use the yellow Ethernet cable to connect a computer to the ETHERNET port for initial configuration and/or Internet access. 2 See page 2. See page 4. Option A: Connect via USB (you will need to the P-660RU-Tx v2: Option A: Connect via Ethernet. P-660RU-Tx v2 Quick Start Guide 1 Hardware Connections There are two ways to connect your computer or computer network to install the USB driver).
Option B: Connect via Ethernet 1 ETHERNET: Use the yellow Ethernet cable to connect a computer to the ETHERNET port for initial configuration and/or Internet access. 2 See page 2. See page 4. Option A: Connect via USB (you will need to the P-660RU-Tx v2: Option A: Connect via Ethernet. P-660RU-Tx v2 Quick Start Guide 1 Hardware Connections There are two ways to connect your computer or computer network to install the USB driver).
Quick Start Guide
Page 11
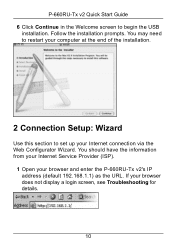
Follow the installation prompts. You should have the information from your Internet Service Provider (ISP). 1 Open your browser does not display a login screen, see Troubleshooting for details. 10 You may need to restart your computer at the end of the installation. 2 Connection Setup: Wizard Use this section to begin the USB installation. If your browser and enter the P-660RU-Tx v2's IP address (default 192.168.1.1) as the URL. P-660RU-Tx v2 Quick Start Guide 6 Click Continue in the Welcome screen to set up your Internet connection via the Web Configurator Wizard.
Follow the installation prompts. You should have the information from your Internet Service Provider (ISP). 1 Open your browser does not display a login screen, see Troubleshooting for details. 10 You may need to restart your computer at the end of the installation. 2 Connection Setup: Wizard Use this section to begin the USB installation. If your browser and enter the P-660RU-Tx v2's IP address (default 192.168.1.1) as the URL. P-660RU-Tx v2 Quick Start Guide 6 Click Continue in the Welcome screen to set up your Internet connection via the Web Configurator Wizard.
Quick Start Guide
Page 13
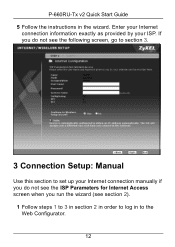
P-660RU-Tx v2 Quick Start Guide 5 Follow the instructions in to log in the wizard. Enter your Internet connection information exactly as provided by your Internet connection manually if you do not see section 2). 1 Follow steps 1 to 3 in section 2 in order to the Web Configurator. 12 If you do not see the ISP Parameters for Internet Access screen when you run the wizard (see the following screen, go to section 3. 3 Connection Setup: Manual Use this section to set up your ISP.
P-660RU-Tx v2 Quick Start Guide 5 Follow the instructions in to log in the wizard. Enter your Internet connection information exactly as provided by your Internet connection manually if you do not see section 2). 1 Follow steps 1 to 3 in section 2 in order to the Web Configurator. 12 If you do not see the ISP Parameters for Internet Access screen when you run the wizard (see the following screen, go to section 3. 3 Connection Setup: Manual Use this section to set up your ISP.
Quick Start Guide
Page 16
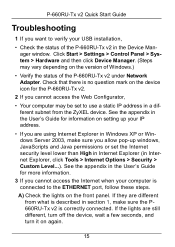
...these steps. If the lights are different from the ZyXEL device. A) Check the lights on the version of Windows.) • Verify the status of the P-660RU-Tx v2 in Internet Explorer, click Tools > Internet Options > Security > Custom Level...). P-660RU-Tx v2 Quick Start Guide Troubleshooting 1 If you want to verify... in a different subnet from what is described in section 1, make sure the P660RU-Tx v2 is no question mark on the device icon for more information. 3 If you cannot access the Web Configurator, • Your computer may vary depending on the front panel. Check that there is ...
...these steps. If the lights are different from the ZyXEL device. A) Check the lights on the version of Windows.) • Verify the status of the P-660RU-Tx v2 in Internet Explorer, click Tools > Internet Options > Security > Custom Level...). P-660RU-Tx v2 Quick Start Guide Troubleshooting 1 If you want to verify... in a different subnet from what is described in section 1, make sure the P660RU-Tx v2 is no question mark on the device icon for more information. 3 If you cannot access the Web Configurator, • Your computer may vary depending on the front panel. Check that there is ...
Quick Start Guide
Page 17
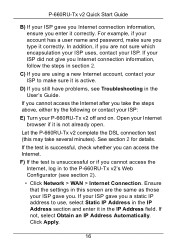
...information, ensure you enter it correctly. See section 2 for details. Ensure that the settings in to the P-660RU-Tx v2's Web Configurator (see Troubleshooting in section 2. Click Apply. 16 Let the P-660RU-Tx v2 complete the DSL connection test (this screen are the same as those your ISP gave you. In addition, if... you cannot access the Internet, log in this may take the steps above, either try the following or contact your ISP: E) Turn your P-660RU-Tx v2 off and on. C) If you are not sure which encapsulation your ISP uses, contact your ISP. If not, select Obtain an IP Address ...
...information, ensure you enter it correctly. See section 2 for details. Ensure that the settings in to the P-660RU-Tx v2's Web Configurator (see Troubleshooting in section 2. Click Apply. 16 Let the P-660RU-Tx v2 complete the DSL connection test (this screen are the same as those your ISP gave you. In addition, if... you cannot access the Internet, log in this may take the steps above, either try the following or contact your ISP: E) Turn your P-660RU-Tx v2 off and on. C) If you are not sure which encapsulation your ISP uses, contact your ISP. If not, select Obtain an IP Address ...


