
Quick Start Guide
Page 8
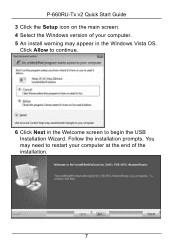
Click Allow to begin the USB Installation Wizard. P-660RU-Tx v2 Quick Start Guide 3 Click the Setup icon on the main screen. 4 Select the Windows version of the installation. 7 You may need to restart your computer at the end of your computer. 5 An install warning may appear in the Welcome screen to continue. 6 Click Next in the Windows Vista OS. Follow the installation prompts.
Click Allow to begin the USB Installation Wizard. P-660RU-Tx v2 Quick Start Guide 3 Click the Setup icon on the main screen. 4 Select the Windows version of the installation. 7 You may need to restart your computer at the end of your computer. 5 An install warning may appear in the Welcome screen to continue. 6 Click Next in the Windows Vista OS. Follow the installation prompts.
Quick Start Guide
Page 11
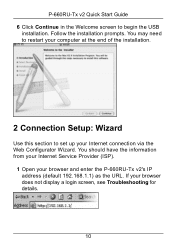
Follow the installation prompts. You should have the information from your Internet Service Provider (ISP). 1 Open your browser does not display a login screen, see Troubleshooting for details. 10 If your browser and enter the P-660RU-Tx v2's IP address (default 192.168.1.1) as the URL. You may need to restart your computer at the end of the installation. 2 Connection Setup: Wizard Use this section to begin the USB installation. P-660RU-Tx v2 Quick Start Guide 6 Click Continue in the Welcome screen to set up your Internet connection via the Web Configurator Wizard.
Follow the installation prompts. You should have the information from your Internet Service Provider (ISP). 1 Open your browser does not display a login screen, see Troubleshooting for details. 10 If your browser and enter the P-660RU-Tx v2's IP address (default 192.168.1.1) as the URL. You may need to restart your computer at the end of the installation. 2 Connection Setup: Wizard Use this section to begin the USB installation. P-660RU-Tx v2 Quick Start Guide 6 Click Continue in the Welcome screen to set up your Internet connection via the Web Configurator Wizard.
Quick Start Guide
Page 12
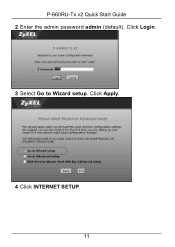
P-660RU-Tx v2 Quick Start Guide 2 Enter the admin password admin (default). Click Login. 3 Select Go to Wizard setup. Click Apply. 4 Click INTERNET SETUP. 11
P-660RU-Tx v2 Quick Start Guide 2 Enter the admin password admin (default). Click Login. 3 Select Go to Wizard setup. Click Apply. 4 Click INTERNET SETUP. 11
Quick Start Guide
Page 13
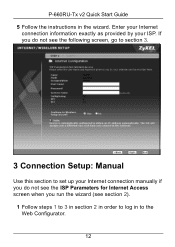
Enter your Internet connection information exactly as provided by your Internet connection manually if you do not see the ISP Parameters for Internet Access screen when you do not see section 2). 1 Follow steps 1 to 3 in section 2 in order to log in the wizard. If you run the wizard (see the following screen, go to section 3. 3 Connection Setup: Manual Use this section to set up your ISP. P-660RU-Tx v2 Quick Start Guide 5 Follow the instructions in to the Web Configurator. 12
Enter your Internet connection information exactly as provided by your Internet connection manually if you do not see the ISP Parameters for Internet Access screen when you do not see section 2). 1 Follow steps 1 to 3 in section 2 in order to log in the wizard. If you run the wizard (see the following screen, go to section 3. 3 Connection Setup: Manual Use this section to set up your ISP. P-660RU-Tx v2 Quick Start Guide 5 Follow the instructions in to the Web Configurator. 12
Quick Start Guide
Page 14
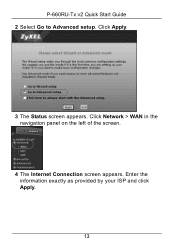
P-660RU-Tx v2 Quick Start Guide 2 Select Go to Advanced setup. Click Apply. 3 The Status screen appears. Enter the information exactly as provided by your ISP and click Apply. 13 Click Network > WAN in the navigation panel on the left of the screen. 4 The Internet Connection screen appears.
P-660RU-Tx v2 Quick Start Guide 2 Select Go to Advanced setup. Click Apply. 3 The Status screen appears. Enter the information exactly as provided by your ISP and click Apply. 13 Click Network > WAN in the navigation panel on the left of the screen. 4 The Internet Connection screen appears.

Quick Start Guide
Page 18
...• Click the wizard icon ( ). Check whether you can access the Internet. If you want to access the P-660RU-Tx v2 again, you wish to www.zyxel.com. 2 Select your Internet Service Provider. Run the Internet Setup wizard again. Viewing Your Product's Certifications 1 Go to view from this page. 17 Click LAN > DHCP...that DHCP is not selected. If you still cannot access the Internet, contact your product from the drop-down list box on the ZyXEL home page to go to None. Run the Internet Setup wizard again. P-660RU-Tx v2 Quick Start Guide • Click the wizard icon ( ).
...• Click the wizard icon ( ). Check whether you can access the Internet. If you want to access the P-660RU-Tx v2 again, you wish to www.zyxel.com. 2 Select your Internet Service Provider. Run the Internet Setup wizard again. Viewing Your Product's Certifications 1 Go to view from this page. 17 Click LAN > DHCP...that DHCP is not selected. If you still cannot access the Internet, contact your product from the drop-down list box on the ZyXEL home page to go to None. Run the Internet Setup wizard again. P-660RU-Tx v2 Quick Start Guide • Click the wizard icon ( ).
