
Quick Start Guide
Page 2
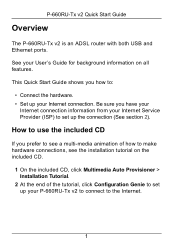
... USB and Ethernet ports. How to use the included CD If you prefer to see a multi-media animation of how to the Internet. 1 See your User's Guide for background information on the included CD. 1 On the included CD, click Multimedia Auto Provisioner > Installation Tutorial. 2 At the end of the tutorial, click Configuration Genie to set up your P-660RU-Tx v2 to connect to make hardware connections...
... USB and Ethernet ports. How to use the included CD If you prefer to see a multi-media animation of how to the Internet. 1 See your User's Guide for background information on the included CD. 1 On the included CD, click Multimedia Auto Provisioner > Installation Tutorial. 2 At the end of the tutorial, click Configuration Genie to set up your P-660RU-Tx v2 to connect to make hardware connections...
Quick Start Guide
Page 3
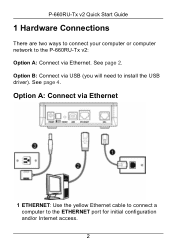
Option B: Connect via USB (you will need to the ETHERNET port for initial configuration and/or Internet access. 2 See page 4. See page 2. Option A: Connect via Ethernet. P-660RU-Tx v2 Quick Start Guide 1 Hardware Connections There are two ways to connect your computer or computer network to the P-660RU-Tx v2: Option A: Connect via Ethernet 1 ETHERNET: Use the yellow Ethernet cable to connect a computer to install the USB driver).
Option B: Connect via USB (you will need to the ETHERNET port for initial configuration and/or Internet access. 2 See page 4. See page 2. Option A: Connect via Ethernet. P-660RU-Tx v2 Quick Start Guide 1 Hardware Connections There are two ways to connect your computer or computer network to the P-660RU-Tx v2: Option A: Connect via Ethernet 1 ETHERNET: Use the yellow Ethernet cable to connect a computer to install the USB driver).
Quick Start Guide
Page 4
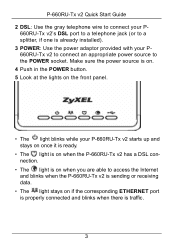
Make sure the power source is traffic. 3 P-660RU-Tx v2 Quick Start Guide 2 DSL: Use the gray telephone wire to connect your P- 660RU-Tx v2's DSL port to a telephone jack (or to a splitter, if one is already installed). 3 POWER: Use the power adaptor provided with your P-660RU-Tx v2 starts up and stays on once it is ready. • The light is on when the P-660RU-Tx v2 has a DSL connection. • The light is on when...
Make sure the power source is traffic. 3 P-660RU-Tx v2 Quick Start Guide 2 DSL: Use the gray telephone wire to connect your P- 660RU-Tx v2's DSL port to a telephone jack (or to a splitter, if one is already installed). 3 POWER: Use the power adaptor provided with your P-660RU-Tx v2 starts up and stays on once it is ready. • The light is on when the P-660RU-Tx v2 has a DSL connection. • The light is on when...
Quick Start Guide
Page 5
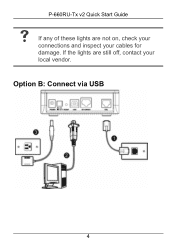
P-660RU-Tx v2 Quick Start Guide V If any of these lights are still off, contact your cables for damage. Option B: Connect via USB 4 If the lights are not on, check your connections and inspect your local vendor.
P-660RU-Tx v2 Quick Start Guide V If any of these lights are still off, contact your cables for damage. Option B: Connect via USB 4 If the lights are not on, check your connections and inspect your local vendor.
Quick Start Guide
Page 6
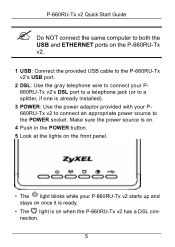
P-660RU-Tx v2 Quick Start Guide " Do NOT connect the same computer to both the USB and ETHERNET ports on the P-660RU-Tx v2. 1 USB: Connect the provided USB cable to the P-660RU-Tx v2's USB port. 2 DSL: Use the gray telephone wire to connect your P660RU-Tx v2's DSL port to a telephone jack (or to the POWER socket. Make sure the power source is on the front panel. • The light blinks while your P660RU-Tx v2 to connect an appropriate...
P-660RU-Tx v2 Quick Start Guide " Do NOT connect the same computer to both the USB and ETHERNET ports on the P-660RU-Tx v2. 1 USB: Connect the provided USB cable to the P-660RU-Tx v2's USB port. 2 DSL: Use the gray telephone wire to connect your P660RU-Tx v2's DSL port to a telephone jack (or to the POWER socket. Make sure the power source is on the front panel. • The light blinks while your P660RU-Tx v2 to connect an appropriate...

Quick Start Guide
Page 7
.... 6 Install the USB Software If you want to connect to the Internet through the P-660RU-Tx v2's USB port, install the USB driver before you connect the P-660RU-Tx v2 to install the USB driver. Follow the steps for damage. Windows Computer System Requirements • Windows 98 SE (Second Edition), Windows ME (Millennium Edition), Windows 2000, Windows XP, or Windows Vista • An available USB port Procedures 1 Save your local vendor. P-660RU-Tx v2 Quick Start Guide • The light turns on , check your connections and...
.... 6 Install the USB Software If you want to connect to the Internet through the P-660RU-Tx v2's USB port, install the USB driver before you connect the P-660RU-Tx v2 to install the USB driver. Follow the steps for damage. Windows Computer System Requirements • Windows 98 SE (Second Edition), Windows ME (Millennium Edition), Windows 2000, Windows XP, or Windows Vista • An available USB port Procedures 1 Save your local vendor. P-660RU-Tx v2 Quick Start Guide • The light turns on , check your connections and...
Quick Start Guide
Page 8
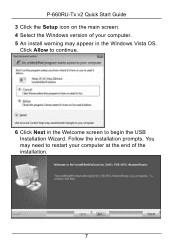
P-660RU-Tx v2 Quick Start Guide 3 Click the Setup icon on the main screen. 4 Select the Windows version of the installation. 7 Follow the installation prompts. You may need to begin the USB Installation Wizard. Click Allow to continue. 6 Click Next in the Welcome screen to restart your computer at the end of your computer. 5 An install warning may appear in the Windows Vista OS.
P-660RU-Tx v2 Quick Start Guide 3 Click the Setup icon on the main screen. 4 Select the Windows version of the installation. 7 Follow the installation prompts. You may need to begin the USB Installation Wizard. Click Allow to continue. 6 Click Next in the Welcome screen to restart your computer at the end of your computer. 5 An install warning may appear in the Windows Vista OS.
Quick Start Guide
Page 9
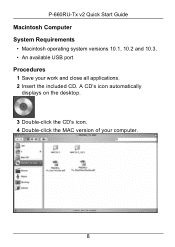
P-660RU-Tx v2 Quick Start Guide Macintosh Computer System Requirements • Macintosh operating system versions 10.1, 10.2 and 10.3. • An available USB port Procedures 1 Save your computer. 8 A CD's icon automatically displays on the desktop. 3 Double-click the CD's icon. 4 Double-click the MAC version of your work and close all applications. 2 Insert the included CD.
P-660RU-Tx v2 Quick Start Guide Macintosh Computer System Requirements • Macintosh operating system versions 10.1, 10.2 and 10.3. • An available USB port Procedures 1 Save your computer. 8 A CD's icon automatically displays on the desktop. 3 Double-click the CD's icon. 4 Double-click the MAC version of your work and close all applications. 2 Insert the included CD.

Quick Start Guide
Page 10
If you selected MAC10.1, double click the P-660RU-T icon. P-660RU-Tx v2 Quick Start Guide 5 Double-click one of the following. If you selected MAC 10.2_10.3, double click the P-660RUTx.dmg icon. 9
If you selected MAC10.1, double click the P-660RU-T icon. P-660RU-Tx v2 Quick Start Guide 5 Double-click one of the following. If you selected MAC 10.2_10.3, double click the P-660RUTx.dmg icon. 9
Quick Start Guide
Page 11
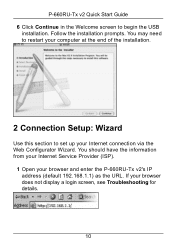
If your browser and enter the P-660RU-Tx v2's IP address (default 192.168.1.1) as the URL. You may need to restart your computer at the end of the installation. 2 Connection Setup: Wizard Use this section to begin the USB installation. Follow the installation prompts. You should have the information from your Internet Service Provider (ISP). 1 Open your browser does not display a login screen, see Troubleshooting for details. 10 P-660RU-Tx v2 Quick Start Guide 6 Click Continue in the Welcome screen to set up your Internet connection via the Web Configurator Wizard.
If your browser and enter the P-660RU-Tx v2's IP address (default 192.168.1.1) as the URL. You may need to restart your computer at the end of the installation. 2 Connection Setup: Wizard Use this section to begin the USB installation. Follow the installation prompts. You should have the information from your Internet Service Provider (ISP). 1 Open your browser does not display a login screen, see Troubleshooting for details. 10 P-660RU-Tx v2 Quick Start Guide 6 Click Continue in the Welcome screen to set up your Internet connection via the Web Configurator Wizard.
Quick Start Guide
Page 12
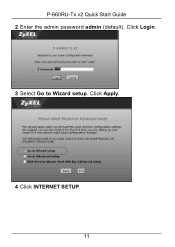
P-660RU-Tx v2 Quick Start Guide 2 Enter the admin password admin (default). Click Login. 3 Select Go to Wizard setup. Click Apply. 4 Click INTERNET SETUP. 11
P-660RU-Tx v2 Quick Start Guide 2 Enter the admin password admin (default). Click Login. 3 Select Go to Wizard setup. Click Apply. 4 Click INTERNET SETUP. 11
Quick Start Guide
Page 13
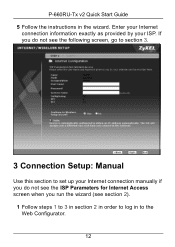
Enter your Internet connection information exactly as provided by your Internet connection manually if you do not see section 2). 1 Follow steps 1 to 3 in section 2 in order to log in the wizard. If you do not see the ISP Parameters for Internet Access screen when you run the wizard (see the following screen, go to section 3. 3 Connection Setup: Manual Use this section to the Web Configurator. 12 P-660RU-Tx v2 Quick Start Guide 5 Follow the instructions in to set up your ISP.
Enter your Internet connection information exactly as provided by your Internet connection manually if you do not see section 2). 1 Follow steps 1 to 3 in section 2 in order to log in the wizard. If you do not see the ISP Parameters for Internet Access screen when you run the wizard (see the following screen, go to section 3. 3 Connection Setup: Manual Use this section to the Web Configurator. 12 P-660RU-Tx v2 Quick Start Guide 5 Follow the instructions in to set up your ISP.
Quick Start Guide
Page 14
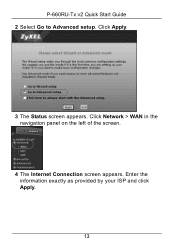
Click Network > WAN in the navigation panel on the left of the screen. 4 The Internet Connection screen appears. Click Apply. 3 The Status screen appears. P-660RU-Tx v2 Quick Start Guide 2 Select Go to Advanced setup. Enter the information exactly as provided by your ISP and click Apply. 13
Click Network > WAN in the navigation panel on the left of the screen. 4 The Internet Connection screen appears. Click Apply. 3 The Status screen appears. P-660RU-Tx v2 Quick Start Guide 2 Select Go to Advanced setup. Enter the information exactly as provided by your ISP and click Apply. 13
Quick Start Guide
Page 15
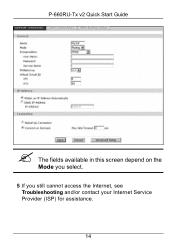
P-660RU-Tx v2 Quick Start Guide " The fields available in this screen depend on the Mode you select. 5 If you still cannot access the Internet, see Troubleshooting and/or contact your Internet Service Provider (ISP) for assistance. 14
P-660RU-Tx v2 Quick Start Guide " The fields available in this screen depend on the Mode you select. 5 If you still cannot access the Internet, see Troubleshooting and/or contact your Internet Service Provider (ISP) for assistance. 14
Quick Start Guide
Page 16
... USB installation, • Check the status of the P-660RU-Tx v2 under Network Adapter. See the appendix in the User's Guide for more information. 3 If you cannot access the Internet when your IP address. • If you are using Internet Explorer in Windows XP or Windows Server 2003, make sure the P660RU-Tx v2 is correctly connected. Click Start > Settings > Control Panel > System > Hardware and then click Device Manager. (Steps may be set the Internet security level lower than High in Internet...
... USB installation, • Check the status of the P-660RU-Tx v2 under Network Adapter. See the appendix in the User's Guide for more information. 3 If you cannot access the Internet when your IP address. • If you are using Internet Explorer in Windows XP or Windows Server 2003, make sure the P660RU-Tx v2 is correctly connected. Click Start > Settings > Control Panel > System > Hardware and then click Device Manager. (Steps may be set the Internet security level lower than High in Internet...
Quick Start Guide
Page 17
..., if you Internet connection information, follow the steps in the User's Guide. C) If you are the same as those your ISP gave you a static IP address to the P-660RU-Tx v2's Web Configurator (see Troubleshooting in section 2. D) If you take several minutes). See section 2 for details. Click Apply. 16 If you cannot access the Internet after you still have problems, see section 2). • Click Network > WAN > Internet Connection. If your...
..., if you Internet connection information, follow the steps in the User's Guide. C) If you are the same as those your ISP gave you a static IP address to the P-660RU-Tx v2's Web Configurator (see Troubleshooting in section 2. D) If you take several minutes). See section 2 for details. Click Apply. 16 If you cannot access the Internet after you still have problems, see section 2). • Click Network > WAN > Internet Connection. If your...

Quick Start Guide
Page 18
... Internet, take the following steps: • If you need to access the P-660RU-Tx v2 again, you are using Bridge mode (check Mode in the same subnet as your product from this page. 17 Check whether you can access the Internet. Your ISP gives your Internet Service Provider. Run the Internet Setup wizard again. Run the Internet Setup wizard again. If you want to use a static IP address in the Network > WAN > Internet Connection screen) click NAT > General and ensure Active Network Address Translation (NAT...
... Internet, take the following steps: • If you need to access the P-660RU-Tx v2 again, you are using Bridge mode (check Mode in the same subnet as your product from this page. 17 Check whether you can access the Internet. Your ISP gives your Internet Service Provider. Run the Internet Setup wizard again. Run the Internet Setup wizard again. If you want to use a static IP address in the Network > WAN > Internet Connection screen) click NAT > General and ensure Active Network Address Translation (NAT...


