
User Guide
Page 3
Contents Overview Contents Overview User's Guide ...13 Getting to Know Your Router ...15 ...19 Connection Wizard ...21 Introducing the Web Configurator ...31 Monitor ...37 Router Modes ...43 Easy Mode ...45 Router Mode ...57 Access Point Mode ...65 Tutorials ...73 Technical Reference ...81 Wireless LAN ...83 WAN ...99 LAN ...109 DHCP Server ...113 Network Address... ...123 Static Route ...125 Firewall ...129 Content Filter ...133 Bandwidth Management ...137 Remote Management ...145 Universal Plug-and-Play (UPnP) ...147 Maintenance ...155 Troubleshooting ...165 NBG6503 User's Guide 3
Contents Overview Contents Overview User's Guide ...13 Getting to Know Your Router ...15 ...19 Connection Wizard ...21 Introducing the Web Configurator ...31 Monitor ...37 Router Modes ...43 Easy Mode ...45 Router Mode ...57 Access Point Mode ...65 Tutorials ...73 Technical Reference ...81 Wireless LAN ...83 WAN ...99 LAN ...109 DHCP Server ...113 Network Address... ...123 Static Route ...125 Firewall ...129 Content Filter ...133 Bandwidth Management ...137 Remote Management ...145 Universal Plug-and-Play (UPnP) ...147 Maintenance ...155 Troubleshooting ...165 NBG6503 User's Guide 3

User Guide
Page 5
...Table of Contents ...5 Part I: User's Guide 13 Chapter 1 Getting to Know Your Router...15 1.1 Overview ...15 1.2 Applications ...15 1.3 Ways to Manage the Router ...15 1.4 Good Habits for Managing the Router 16 1.5 LEDs ...17 1.6 The WPS Button ...18 1.7 Wall Mounting ...18 ...19...22 2.3.1 Connection Type: DHCP ...23 2.3.2 Connection Type: Static IP ...23 2.3.3 Connection Type: PPPoE ...24 2.3.4 Connection Type: PPTP ...25 2.4 Router Password ...27 2.5 Wireless Security ...27 2.5.1 Wireless Security: No Security 27 2.5.2 Wireless Security: WPA-PSK/WPA2-PSK 28 Chapter 3 Introducing the Web...
...Table of Contents ...5 Part I: User's Guide 13 Chapter 1 Getting to Know Your Router...15 1.1 Overview ...15 1.2 Applications ...15 1.3 Ways to Manage the Router ...15 1.4 Good Habits for Managing the Router 16 1.5 LEDs ...17 1.6 The WPS Button ...18 1.7 Wall Mounting ...18 ...19...22 2.3.1 Connection Type: DHCP ...23 2.3.2 Connection Type: Static IP ...23 2.3.3 Connection Type: PPPoE ...24 2.3.4 Connection Type: PPTP ...25 2.4 Router Password ...27 2.5 Wireless Security ...27 2.5.1 Wireless Security: No Security 27 2.5.2 Wireless Security: WPA-PSK/WPA2-PSK 28 Chapter 3 Introducing the Web...
User Guide
Page 6
Table of Contents 3.3 Resetting the Router ...35 3.3.1 Procedure to Use the Reset Button 35 Chapter 4 Monitor...37 4.1 Overview ...... ...39 4.5 DHCP Table ...39 4.6 Packet Statistics ...40 4.7 WLAN 2.4G Station Status ...41 4.8 WLAN 5G Station Status ...41 Chapter 5 Router Modes...43 5.1 Overview ...43 5.1.1 Web Configurator Modes ...43 5.1.2 Device Modes ...43 Chapter 6 Easy Mode ...45 6.1 Overview ...45 6.2 What......52 6.6.6 Wireless Security ...52 6.6.7 WPS ...54 6.7 Status Screen in Easy Mode ...55 Chapter 7 Router Mode...57 7.1 Overview ...57 7.2 What You Can Do ...57 7.3 Status Screen ...58...
Table of Contents 3.3 Resetting the Router ...35 3.3.1 Procedure to Use the Reset Button 35 Chapter 4 Monitor...37 4.1 Overview ...... ...39 4.5 DHCP Table ...39 4.6 Packet Statistics ...40 4.7 WLAN 2.4G Station Status ...41 4.8 WLAN 5G Station Status ...41 Chapter 5 Router Modes...43 5.1 Overview ...43 5.1.1 Web Configurator Modes ...43 5.1.2 Device Modes ...43 Chapter 6 Easy Mode ...45 6.1 Overview ...45 6.2 What......52 6.6.6 Wireless Security ...52 6.6.7 WPS ...54 6.7 Status Screen in Easy Mode ...55 Chapter 7 Router Mode...57 7.1 Overview ...57 7.2 What You Can Do ...57 7.3 Status Screen ...58...

User Guide
Page 7
... of Contents 7.3.1 Navigation Panel ...61 Chapter 8 Access Point Mode...65 8.1 Overview ...65 8.2 What You Can Do ...65 8.3 What You Need to Know ...65 8.3.1 Setting your Router to AP Mode 66 8.3.2 Accessing the Web Configurator in Access Point Mode 66 8.3.3 Configuring your WLAN, Bandwidth Management and Maintenance Settings 67 8.4 AP Mode Status... LAN Advanced Screen ...91 10.7 Quality of Service (QoS) Screen ...93 10.8 WPS Screen ...94 10.9 WPS Station Screen ...95 10.10 Scheduling Screen ...96 NBG6503 User's Guide 7
... of Contents 7.3.1 Navigation Panel ...61 Chapter 8 Access Point Mode...65 8.1 Overview ...65 8.2 What You Can Do ...65 8.3 What You Need to Know ...65 8.3.1 Setting your Router to AP Mode 66 8.3.2 Accessing the Web Configurator in Access Point Mode 66 8.3.3 Configuring your WLAN, Bandwidth Management and Maintenance Settings 67 8.4 AP Mode Status... LAN Advanced Screen ...91 10.7 Quality of Service (QoS) Screen ...93 10.8 WPS Screen ...94 10.9 WPS Station Screen ...95 10.10 Scheduling Screen ...96 NBG6503 User's Guide 7
User Guide
Page 10
... OP Mode Screen ...163 Chapter 23 Troubleshooting...165 23.1 Power, Hardware Connections, and LEDs 165 23.2 Router Access and Login ...166 23.3 Internet Access ...167 23.4 Resetting the Router to Its Factory Defaults 169 23.5 Wireless Router/AP Troubleshooting 169 Appendix A IP Addresses and Subnetting 171 Appendix B Setting Up Your Computer's IP Address...
... OP Mode Screen ...163 Chapter 23 Troubleshooting...165 23.1 Power, Hardware Connections, and LEDs 165 23.2 Router Access and Login ...166 23.3 Internet Access ...167 23.4 Resetting the Router to Its Factory Defaults 169 23.5 Wireless Router/AP Troubleshooting 169 Appendix A IP Addresses and Subnetting 171 Appendix B Setting Up Your Computer's IP Address...

User Guide
Page 15
... Internet access. 1.3 Ways to mobile users. This is recommended for everyday management of the following networks using a (supported) web browser. • Wireless switch. NBG6503 User's Guide 15 The Router upgrades the speed of services such as Voice over the Internet (VoIP). 1.2 Applications Your can communicate with your network. A range of your network...
... Internet access. 1.3 Ways to mobile users. This is recommended for everyday management of the following networks using a (supported) web browser. • Wireless switch. NBG6503 User's Guide 15 The Router upgrades the speed of services such as Voice over the Internet (VoIP). 1.2 Applications Your can communicate with your network. A range of your network...

User Guide
Page 16
If you forget your last configuration. 16 NBG6503 User's Guide If you backed up the configuration (and make the Router more secure and to manage the Router more effectively. • Change the password. Use a password that's not easy to guess and that consists of different types of characters, such ... know how to restore it in a safe place. • Back up an earlier configuration file, you would not have to reset the Router to its factory default settings. Restoring an earlier working configuration may be useful if the device becomes unstable or even crashes. You could simply ...
If you forget your last configuration. 16 NBG6503 User's Guide If you backed up the configuration (and make the Router more secure and to manage the Router more effectively. • Change the password. Use a password that's not easy to guess and that consists of different types of characters, such ... know how to restore it in a safe place. • Back up an earlier configuration file, you would not have to reset the Router to its factory default settings. Restoring an earlier working configuration may be useful if the device becomes unstable or even crashes. You could simply ...

User Guide
Page 17
...1-4 WLAN 5 GHz Green Green Green On Blinking Off On Blinking Off On Blinking Off The Router has a successful 10/100MB WAN connection. The LAN is not ready or has failed. NBG6503 User's Guide 17 Table 1 Front Panel LEDs and WPS Button LED COLOR STATUS DESCRIPTION POWER ...Green On Off The Router is not receiving power. The Router is receiving power and functioning properly. The WAN connection is sending...
...1-4 WLAN 5 GHz Green Green Green On Blinking Off On Blinking Off On Blinking Off The Router has a successful 10/100MB WAN connection. The LAN is not ready or has failed. NBG6503 User's Guide 17 Table 1 Front Panel LEDs and WPS Button LED COLOR STATUS DESCRIPTION POWER ...Green On Off The Router is not receiving power. The Router is receiving power and functioning properly. The WAN connection is sending...

User Guide
Page 18
...ready or has failed. 1.6 The WPS Button Your Router supports WiFi Protected Setup (WPS), which is activated on the wall at the appropriate distance apart for the screws. 18 NBG6503 User's Guide Chapter 1 Getting to Know Your Router Table 1 Front Panel LEDs and WPS Button (continued...) LED COLOR STATUS DESCRIPTION WLAN 2.4 GHz Green On The Router is ready, but is enabled. Then, the two ...
...ready or has failed. 1.6 The WPS Button Your Router supports WiFi Protected Setup (WPS), which is activated on the wall at the appropriate distance apart for the screws. 18 NBG6503 User's Guide Chapter 1 Getting to Know Your Router Table 1 Front Panel LEDs and WPS Button (continued...) LED COLOR STATUS DESCRIPTION WLAN 2.4 GHz Green On The Router is ready, but is enabled. Then, the two ...

User Guide
Page 19
Chapter 1 3 If using screw anchors, use a screwdriver to hold the weight of the Router with the connection cables. 5 Align the holes on the back of the Router with the screws on the screws. Figure 2 Wall Mounting Example NBG6503 User's Guide 19 Do not insert the screws all the way in - leave a small gap of... into the wall. If not using screw anchors, drill two holes for the screw anchors into the wall. leave a gap of about 0.5 cm. Hang the Router on the wall.
Chapter 1 3 If using screw anchors, use a screwdriver to hold the weight of the Router with the connection cables. 5 Align the holes on the back of the Router with the screws on the screws. Figure 2 Wall Mounting Example NBG6503 User's Guide 19 Do not insert the screws all the way in - leave a small gap of... into the wall. If not using screw anchors, drill two holes for the screw anchors into the wall. leave a gap of about 0.5 cm. Hang the Router on the wall.
User Guide
Page 21
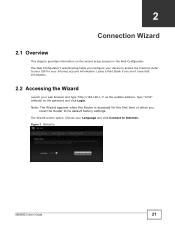
Leave a field blank if you reset the Router to access the Internet. Choose your device to its default factory settings. Type "1234" (default) as the website address. The Wizard screen opens. CHAPTER 2 Connection ... information on the wizard setup screens in the Web Configurator. Note: The Wizard appears when the Router is accessed for your web browser and type "http://192.168.1.1" as the password and click Login. Figure 3 Welcome NBG6503 User's Guide 21 The Web Configurator's wizard setup helps you configure your Language and click...
Leave a field blank if you reset the Router to access the Internet. Choose your device to its default factory settings. Type "1234" (default) as the website address. The Wizard screen opens. CHAPTER 2 Connection ... information on the wizard setup screens in the Web Configurator. Note: The Wizard appears when the Router is accessed for your web browser and type "http://192.168.1.1" as the password and click Login. Figure 3 Welcome NBG6503 User's Guide 21 The Web Configurator's wizard setup helps you configure your Language and click...

User Guide
Page 22
...Point Protocol over Ethernet) option for a dial-up connection, and your ISP to make sure you an IP address and/or subnet mask. 22 NBG6503 User's Guide PPPoE Select the PPPoE (Point-to -Point Tunneling Protocol) option for a dial-up and running. They are using. Figure 4... If you get an error message, check your computer. Enter the details provided by your Internet connection type. Figure 5 Internet Connection Type Your Router detects the following screen depends on your Internet Service Provider (ISP) in the fields (if any). Chapter 2 Connection Wizard 2.3 Connect to detect...
...Point Protocol over Ethernet) option for a dial-up connection, and your ISP to make sure you an IP address and/or subnet mask. 22 NBG6503 User's Guide PPPoE Select the PPPoE (Point-to -Point Tunneling Protocol) option for a dial-up and running. They are using. Figure 4... If you get an error message, check your computer. Enter the details provided by your Internet connection type. Figure 5 Internet Connection Type Your Router detects the following screen depends on your Internet Service Provider (ISP) in the fields (if any). Chapter 2 Connection Wizard 2.3 Connect to detect...

User Guide
Page 24
...and the ISP/carrier, as dynamic service selection. Figure 8 Internet Connection Type: PPPoE 24 NBG6503 User's Guide Primary DNS DNS (Domain Name System) is extremely important because without saving. The Router uses a system DNS server (in the order you can access it requires no specific ... network services, a function known as it . By implementing PPPoE directly on the Router (rather than individual computers), the computers on the LAN do not need PPPoE software installed, since the Router does that works with existing access control systems (for DDNS and the time server....
...and the ISP/carrier, as dynamic service selection. Figure 8 Internet Connection Type: PPPoE 24 NBG6503 User's Guide Primary DNS DNS (Domain Name System) is extremely important because without saving. The Router uses a system DNS server (in the order you can access it requires no specific ... network services, a function known as it . By implementing PPPoE directly on the Router (rather than individual computers), the computers on the LAN do not need PPPoE software installed, since the Router does that works with existing access control systems (for DDNS and the time server....

User Guide
Page 25
... radio button, provided by your ISP to you a fixed IP address. User Name Type the user name given to give the Router a fixed, unique IP address. PPTP supports on PPTP. NBG6503 User's Guide 25 Chapter 2 Connection Wizard The following table describes the fields in this to the previous screen. Table 5 Internet Connection... a PPP connection and the PPTP parameters for a dial-up connection. Exit Click this screen. Password Type the password associated with the user name above. The Router supports one PPTP server connection at any given time.
... radio button, provided by your ISP to you a fixed IP address. User Name Type the user name given to give the Router a fixed, unique IP address. PPTP supports on PPTP. NBG6503 User's Guide 25 Chapter 2 Connection Wizard The following table describes the fields in this to the previous screen. Table 5 Internet Connection... a PPP connection and the PPTP parameters for a dial-up connection. Exit Click this screen. Password Type the password associated with the user name above. The Router supports one PPTP server connection at any given time.

User Guide
Page 26
... you have entered the correct information provided by your ISP. 26 NBG6503 User's Guide Password Type the password associated with the User Name above. The Router connects to the previous screen. PPTP Subnet Mask Type the subnet mask assigned to give the Router a fixed, unique IP address. PPTP Server IP Type the server...
... you have entered the correct information provided by your ISP. 26 NBG6503 User's Guide Password Type the password associated with the User Name above. The Router connects to the previous screen. PPTP Subnet Mask Type the subnet mask assigned to give the Router a fixed, unique IP address. PPTP Server IP Type the server...

User Guide
Page 27
... Wireless Security screen to let wireless devices within range access your Router in the following screen. Chapter 2 Connection Wizard 2.4 Router Password Change the login password in the following screen. Figure 11 Router Password 2.5 Wireless Security Configure Wireless Settings. Enter the new password... and retype it to proceed with the Wireless Security screen. The fields that show up depend on your wireless network. Figure 12 Wireless Security: No Security NBG6503 User's Guide...
... Wireless Security screen to let wireless devices within range access your Router in the following screen. Chapter 2 Connection Wizard 2.4 Router Password Change the login password in the following screen. Figure 11 Router Password 2.5 Wireless Security Configure Wireless Settings. Enter the new password... and retype it to proceed with the Wireless Security screen. The fields that show up depend on your wireless network. Figure 12 Wireless Security: No Security NBG6503 User's Guide...

User Guide
Page 28
...that is accessible to close the wizard screen without saving. Wireless Network Name (SSID) Security mode Choose 2.4G Hz to access the network. 28 NBG6503 User's Guide Click this field on your Router, your wireless network. Select a Security level from the drop-down list box. If you change this field on the... Router, make sure all wireless stations use the same SSID in the Wireless Security screen to set the security setting for the wireless 2.4G band. ...
...that is accessible to close the wizard screen without saving. Wireless Network Name (SSID) Security mode Choose 2.4G Hz to access the network. 28 NBG6503 User's Guide Click this field on your Router, your wireless network. Select a Security level from the drop-down list box. If you change this field on the... Router, make sure all wireless stations use the same SSID in the Wireless Security screen to set the security setting for the wireless 2.4G band. ...

User Guide
Page 29
Congratulations! Then turn it back on your Router. You have typed all information correctly. NBG6503 User's Guide 29 You can also click GO to open the Easy Mode Web Configurator of the Router's LAN ports, check your wireless clients support WPA-PSK or WPA2-PSK ...the password to configure a Pre-Shared Key. Back Click this to continue. Open a web browser, such as Internet Explorer, to visit your Router and access the Internet. Chapter 2 Connection Wizard Table 8 Wireless Security: WPA-PSK/WPA2-PSK (continued) LABEL DESCRIPTION Security mode Select a Security...
Congratulations! Then turn it back on your Router. You have typed all information correctly. NBG6503 User's Guide 29 You can also click GO to open the Easy Mode Web Configurator of the Router's LAN ports, check your wireless clients support WPA-PSK or WPA2-PSK ...the password to configure a Pre-Shared Key. Back Click this to continue. Open a web browser, such as Internet Explorer, to visit your Router and access the Internet. Chapter 2 Connection Wizard Table 8 Wireless Security: WPA-PSK/WPA2-PSK (continued) LABEL DESCRIPTION Security mode Select a Security...

User Guide
Page 31
... 1024 by default). The recommended screen resolution is properly connected and prepare your computer or computer network to connect to the Router (refer to the Quick Start Guide). 2 Launch your device. Refer to the Troubleshooting chapter (Chapter 23 on page 21...browser. 3 Type "http://192.168.1.1" as the website address. NBG6503 User's Guide 31 CHAPTER 3 Introducing the Web Configurator 3.1 Overview This chapter describes how to access the Router Web Configurator and provides an overview of the Router via Internet browser. Use Internet Explorer 6.0 and later or Netscape ...
... 1024 by default). The recommended screen resolution is properly connected and prepare your computer or computer network to connect to the Router (refer to the Quick Start Guide). 2 Launch your device. Refer to the Troubleshooting chapter (Chapter 23 on page 21...browser. 3 Type "http://192.168.1.1" as the website address. NBG6503 User's Guide 31 CHAPTER 3 Introducing the Web Configurator 3.1 Overview This chapter describes how to access the Router Web Configurator and provides an overview of the Router via Internet browser. Use Internet Explorer 6.0 and later or Netscape ...

User Guide
Page 33
...language to go to Chapter 22 on page 155 to the Easy mode Web Configurator in the Administrator Inactivity Timer field expires (default five minutes; NBG6503 User's Guide 33 Note: The management session automatically times out when the time period set in that language and click Login. go to change... the password this time. Simply log back into the Router if this happens. 3.2.3 Home Screen If you have previously logged into the Web Configurator but did not click Logout, you do not want ...
...language to go to Chapter 22 on page 155 to the Easy mode Web Configurator in the Administrator Inactivity Timer field expires (default five minutes; NBG6503 User's Guide 33 Note: The management session automatically times out when the time period set in that language and click Login. go to change... the password this time. Simply log back into the Router if this happens. 3.2.3 Home Screen If you have previously logged into the Web Configurator but did not click Logout, you do not want ...


