
User Guide
Page 11
... Habits for Managing the Switch 22 Chapter 2 Hardware Installation and Connection 23 2.1 Freestanding Installation ...23 2.2 Mounting the Switch on a Rack 24 2.2.1 Rack-mounted Installation Requirements 24 2.2.2 Attaching the Mounting Brackets to the Switch 24 2.2.3 Mounting the Switch on a Rack 25 Chapter 3 Hardware Overview...27 3.1 Front Panel ...27 3.1.1 Ethernet Ports ...28 3.1.2 Mini-GBIC Slots...
... Habits for Managing the Switch 22 Chapter 2 Hardware Installation and Connection 23 2.1 Freestanding Installation ...23 2.2 Mounting the Switch on a Rack 24 2.2.1 Rack-mounted Installation Requirements 24 2.2.2 Attaching the Mounting Brackets to the Switch 24 2.2.3 Mounting the Switch on a Rack 25 Chapter 3 Hardware Overview...27 3.1 Front Panel ...27 3.1.1 Ethernet Ports ...28 3.1.2 Mini-GBIC Slots...
User Guide
Page 12
... Login ...35 4.3.1 Smart Mode ...36 4.3.2 The Advanced Main Screen 40 4.3.3 The Navigation Panel 40 4.3.4 Change Your Password 42 4.4 Saving Your Configuration 43 4.5 Switch Lockout ...43 4.6 Resetting the Switch ...43 4.7 Logging Out of the Web Configurator 44 Chapter 5 System ...45 5.1 System Screen ...45 Chapter 6 General Settings ...47 6.1 What You Can Do ...47... MAC Settings ...52 7.5 MAC Table ...53 Chapter 8 Port Mirroring ...55 8.1 Port Mirroring Settings ...55 Chapter 9 Port Settings...57 9.1 Port Settings ...57 9.1.1 Auto Negotiation ...57 12 GS1510 Series User's Guide
... Login ...35 4.3.1 Smart Mode ...36 4.3.2 The Advanced Main Screen 40 4.3.3 The Navigation Panel 40 4.3.4 Change Your Password 42 4.4 Saving Your Configuration 43 4.5 Switch Lockout ...43 4.6 Resetting the Switch ...43 4.7 Logging Out of the Web Configurator 44 Chapter 5 System ...45 5.1 System Screen ...45 Chapter 6 General Settings ...47 6.1 What You Can Do ...47... MAC Settings ...52 7.5 MAC Table ...53 Chapter 8 Port Mirroring ...55 8.1 Port Mirroring Settings ...55 Chapter 9 Port Settings...57 9.1 Port Settings ...57 9.1.1 Auto Negotiation ...57 12 GS1510 Series User's Guide
User Guide
Page 22
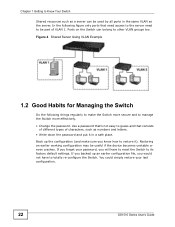
... types of VLAN 1. Ports on the Switch can be useful if the device becomes unstable or even crashes. If you forget your last configuration. 22 GS1510 Series User's Guide Restoring an earlier working configuration may be used by all ports in a safe place. If you backed up the configuration (and make... resources such as numbers and letters. • Write down the password and put it ). You could simply restore your password, you would not have to reset the Switch to totally re-configure the Switch.
... types of VLAN 1. Ports on the Switch can be useful if the device becomes unstable or even crashes. If you forget your last configuration. 22 GS1510 Series User's Guide Restoring an earlier working configuration may be used by all ports in a safe place. If you backed up the configuration (and make... resources such as numbers and letters. • Write down the password and put it ). You could simply restore your password, you would not have to reset the Switch to totally re-configure the Switch.
User Guide
Page 30
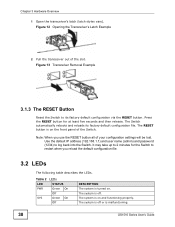
...panel of the Switch. Chapter 3 Hardware Overview 1 Open the transceiver's latch (latch styles vary). Press the RESET button for the Switch to restart when you use the RESET button all of the slot. The RESET button is off . The system is on . It may take up to 2 minutes for at least five... seconds and then release. The system is off or is on and functioning properly. The system is malfunctioning. 30 GS1510 Series User's Guide...
...panel of the Switch. Chapter 3 Hardware Overview 1 Open the transceiver's latch (latch styles vary). Press the RESET button for the Switch to restart when you use the RESET button all of the slot. The RESET button is off . The system is on . It may take up to 2 minutes for at least five... seconds and then release. The system is off or is on and functioning properly. The system is malfunctioning. 30 GS1510 Series User's Guide...
User Guide
Page 43
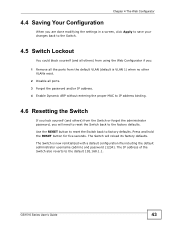
... 2 Disable all ports. 3 Forget the password and/or IP address. 4 Enable Dynamic ARP without entering the proper MAC to IP address binding. 4.6 Resetting the Switch If you lock yourself (and others) from the Switch or forget the administrator password, you : 1 Remove all others) from using the Web... Configurator if you will reload its factory defaults. The Switch will need to reset the Switch back to the factory defaults. Press and hold the RESET button for five seconds. GS1510 Series User's Guide 43 The IP address of the Switch also reverts to factory defaults. Chapter...
... 2 Disable all ports. 3 Forget the password and/or IP address. 4 Enable Dynamic ARP without entering the proper MAC to IP address binding. 4.6 Resetting the Switch If you lock yourself (and others) from the Switch or forget the administrator password, you : 1 Remove all others) from using the Web... Configurator if you will reload its factory defaults. The Switch will need to reset the Switch back to the factory defaults. Press and hold the RESET button for five seconds. GS1510 Series User's Guide 43 The IP address of the Switch also reverts to factory defaults. Chapter...
User Guide
Page 66
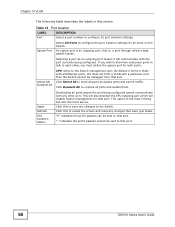
...you must define the egress port for both ports. Click Select All to configure its port isolation settings. Click Deselect All to that port. 66 GS1510 Series User's Guide "V" indicates the port's packets can be sent to unmark all Ethernet ports. "-" indicates the port's packets cannot be managed...all ports on the Switch. This will also deselect the CPU outgoing port which a data packet leaves. Click this to reload the screen and reset any changes to each other port. An egress port is an outgoing port, that port. This option is , a port through which will ...
...you must define the egress port for both ports. Click Select All to configure its port isolation settings. Click Deselect All to that port. 66 GS1510 Series User's Guide "V" indicates the port's packets can be sent to unmark all Ethernet ports. "-" indicates the port's packets cannot be managed...all ports on the Switch. This will also deselect the CPU outgoing port which a data packet leaves. Click this to reload the screen and reset any changes to each other port. An egress port is an outgoing port, that port. This option is , a port through which will ...
User Guide
Page 67
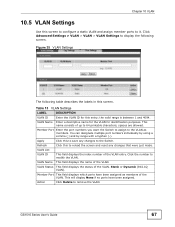
VLAN Name Enter a descriptive name for the VLAN for this to reload the screen and reset any changes to the Switch. Refresh Click this entry; GS1510 Series User's Guide 67 Click Advanced Settings > VLAN > VLAN > VLAN Settings to display the following table describes the labels in this to the VLAN as ...
VLAN Name Enter a descriptive name for the VLAN for this to reload the screen and reset any changes to the Switch. Refresh Click this entry; GS1510 Series User's Guide 67 Click Advanced Settings > VLAN > VLAN > VLAN Settings to display the following table describes the labels in this to the VLAN as ...
User Guide
Page 68
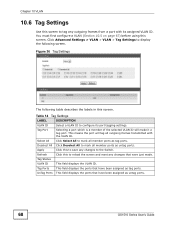
... that have been assigned as tag ports. You must first configure a VLAN (Section 10.5 on page 67) before using this to reload the screen and reset any changes that were just made. Tag Status VLAN ID This field displays the VLAN ID. This means the port will make it a tag port... will tag all outgoing frames transmitted with its port tagging settings. Select All Click Select All to mark all member ports as untag ports. 68 GS1510 Series User's Guide Figure 36 Tag Settings The following screen. Chapter 10 VLAN 10.6 Tag Settings Use this screen to tag any outgoing frames from...
... that have been assigned as tag ports. You must first configure a VLAN (Section 10.5 on page 67) before using this to reload the screen and reset any changes that were just made. Tag Status VLAN ID This field displays the VLAN ID. This means the port will make it a tag port... will tag all outgoing frames transmitted with its port tagging settings. Select All Click Select All to mark all member ports as untag ports. 68 GS1510 Series User's Guide Figure 36 Tag Settings The following screen. Chapter 10 VLAN 10.6 Tag Settings Use this screen to tag any outgoing frames from...
User Guide
Page 69
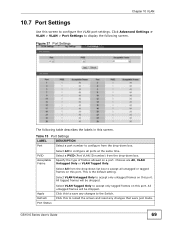
Select a PVID (Port VLAN ID number) from the drop-down box. Select All from the drop-down box. GS1510 Series User's Guide 69 PVID Acceptable Frame Select All to configure all untagged or tagged frames on this port. This is the default setting. Select ... drop-down list box to accept all ports at the same time. Chapter 10 VLAN 10.7 Port Settings Use this to reload the screen and reset any changes to the Switch. Apply Refresh Port Status Select VLAN Tagged Only to accept only tagged frames on a port.
Select a PVID (Port VLAN ID number) from the drop-down box. Select All from the drop-down box. GS1510 Series User's Guide 69 PVID Acceptable Frame Select All to configure all untagged or tagged frames on this port. This is the default setting. Select ... drop-down list box to accept all ports at the same time. Chapter 10 VLAN 10.7 Port Settings Use this to reload the screen and reset any changes to the Switch. Apply Refresh Port Status Select VLAN Tagged Only to accept only tagged frames on a port.
User Guide
Page 72
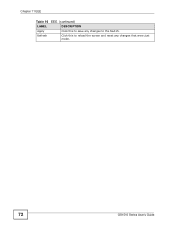
Refresh Click this to the Switch. Chapter 11 EEE Table 16 EEE (continued) LABEL DESCRIPTION Apply Click this to reload the screen and reset any changes to save any changes that were just made. 72 GS1510 Series User's Guide
Refresh Click this to the Switch. Chapter 11 EEE Table 16 EEE (continued) LABEL DESCRIPTION Apply Click this to reload the screen and reset any changes to save any changes that were just made. 72 GS1510 Series User's Guide
User Guide
Page 90
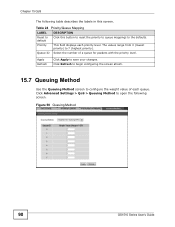
Priority This field displays each queue. Figure 50 Queuing Method 90 GS1510 Series User's Guide Click Advanced Settings > QoS > Queuing Method to open the following table describes the labels in this button to reset the priority to queue mappings to the defaults. Queue ID Select the number of each ... default Click this screen. Chapter 15 QoS The following screen. The values range from 0 (lowest priority) to save your changes. Table 24 Priority/Queue Mapping LABEL DESCRIPTION Reset to configure the weight value of a queue for packets with the priority level.
Priority This field displays each queue. Figure 50 Queuing Method 90 GS1510 Series User's Guide Click Advanced Settings > QoS > Queuing Method to open the following table describes the labels in this button to reset the priority to queue mappings to the defaults. Queue ID Select the number of each ... default Click this screen. Chapter 15 QoS The following screen. The values range from 0 (lowest priority) to save your changes. Table 24 Priority/Queue Mapping LABEL DESCRIPTION Reset to configure the weight value of a queue for packets with the priority level.
User Guide
Page 108
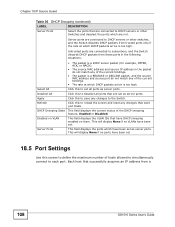
... VLAN This field displays the VLAN IDs that have been set all ports that are set . Deselect All Click this to reload the screen and reset any changes to the Switch. Each host that successfully acquires an IP address from these ports in the following situations: • The packet is a DHCP.... • The rate at which DHCP packets arrive is too high. Untrusted ports are connected to subscribers, and the Switch discards DHCP packets from a 108 GS1510 Series User's Guide
... VLAN This field displays the VLAN IDs that have been set all ports that are set . Deselect All Click this to reload the screen and reset any changes to the Switch. Each host that successfully acquires an IP address from these ports in the following situations: • The packet is a DHCP.... • The rate at which DHCP packets arrive is too high. Untrusted ports are connected to subscribers, and the Switch discards DHCP packets from a 108 GS1510 Series User's Guide
User Guide
Page 109
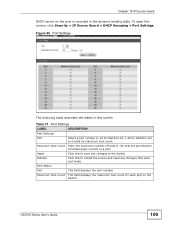
... is recorded in this to reload the screen and reset any changes to modify its maximum host count. Port Status Port This field displays the port number. Maximum Host Count This field displays the maximum host count for GS1510-24) to the Switch. Apply Click this screen, click... Security > IP Source Guard > DHCP Snooping > Port Settings. Refresh Click this screen. Chapter 18 IP Source Guard DHCP server on the Switch. GS1510 Series User's Guide 109 Figure 56 Port...
... is recorded in this to reload the screen and reset any changes to modify its maximum host count. Port Status Port This field displays the port number. Maximum Host Count This field displays the maximum host count for GS1510-24) to the Switch. Apply Click this screen, click... Security > IP Source Guard > DHCP Snooping > Port Settings. Refresh Click this screen. Chapter 18 IP Source Guard DHCP server on the Switch. GS1510 Series User's Guide 109 Figure 56 Port...
User Guide
Page 111
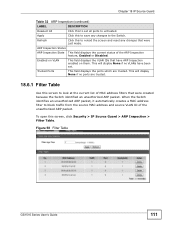
Figure 58 Filter Table GS1510 Series User's Guide 111 Enabled on VLAN This field displays the VLAN IDs that were just made. Trusted Ports This field displays the ports which ... from the source MAC address and source VLAN ID of the ARP Inspection feature, Enabled or Disabled. Refresh Click this to reload the screen and reset any changes to the Switch. This will display None if no ports are trusted. To open this screen, click Security > IP Source Guard > ARP Inspection...
Figure 58 Filter Table GS1510 Series User's Guide 111 Enabled on VLAN This field displays the VLAN IDs that were just made. Trusted Ports This field displays the ports which ... from the source MAC address and source VLAN ID of the ARP Inspection feature, Enabled or Disabled. Refresh Click this to reload the screen and reset any changes to the Switch. This will display None if no ports are trusted. To open this screen, click Security > IP Source Guard > ARP Inspection...
User Guide
Page 112
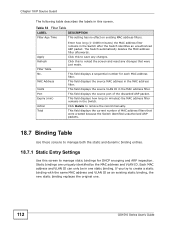
... filter remains in the Switch after the Switch identifies an unauthorized ARP packet. Each MAC address and VLAN ID can only be in one . 112 GS1510 Series User's Guide Click Delete to create a static binding with the same MAC address and VLAN ID as an existing static binding, the new static....7 Binding Table Use these screens to manage both the static and dynamic binding entries. 18.7.1 Static Entry Settings Use this to reload the screen and reset any changes. Table 33 Filter Table LABEL DESCRIPTION Filter Age Time This setting has no effect on existing MAC address filters.
... filter remains in the Switch after the Switch identifies an unauthorized ARP packet. Each MAC address and VLAN ID can only be in one . 112 GS1510 Series User's Guide Click Delete to create a static binding with the same MAC address and VLAN ID as an existing static binding, the new static....7 Binding Table Use these screens to manage both the static and dynamic binding entries. 18.7.1 Static Entry Settings Use this to reload the screen and reset any changes. Table 33 Filter Table LABEL DESCRIPTION Filter Age Time This setting has no effect on existing MAC address filters.
User Guide
Page 113
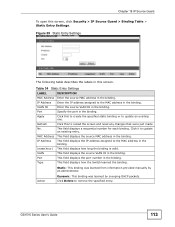
... this to the MAC address in the binding. IP Address This field displays the IP address assigned to reload the screen and reset any changes that were just made. No. GS1510 Series User's Guide 113 VLAN This field displays the source VLAN ID in the binding. Chapter 18 IP Source Guard To...
... this to the MAC address in the binding. IP Address This field displays the IP address assigned to reload the screen and reset any changes that were just made. No. GS1510 Series User's Guide 113 VLAN This field displays the source VLAN ID in the binding. Chapter 18 IP Source Guard To...
User Guide
Page 119
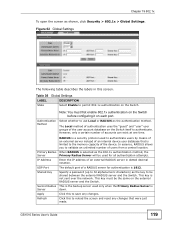
...internal device user database that were just made. Refresh Click this to save any changes that is limited to reload the screen and reset any changes. Figure 62 Global Settings The following table describes the labels in dotted decimal notation. The Local method of authentication uses ...itself to be shared between the external RADIUS server and the Switch. However, only a certain number of users from a central location. GS1510 Series User's Guide 119 Authentication Method Select whether to use Local or RADIUS as the key to authenticate. Primary Radius When RADIUS is ...
...internal device user database that were just made. Refresh Click this to save any changes that is limited to reload the screen and reset any changes. Figure 62 Global Settings The following table describes the labels in dotted decimal notation. The Local method of authentication uses ...itself to be shared between the external RADIUS server and the Switch. However, only a certain number of users from a central location. GS1510 Series User's Guide 119 Authentication Method Select whether to use Local or RADIUS as the key to authenticate. Primary Radius When RADIUS is ...
User Guide
Page 121
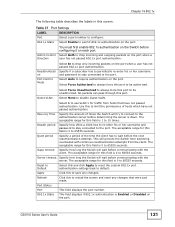
... require authentication on each port. No packets can pass through this to limit the permissions of hosts which have not passed authentication. Use this port. Reset to Default Select this port to be unauthorized. Table 37 Port Settings LABEL DESCRIPTION Port Select a port number to configure. 802.1x State Select Enable... 802.1x authentication is 0 to 65535 seconds. Quiet period Specify a period of times the Switch will wait before determining the server is 1 to 10 times. GS1510 Series User's Guide 121
... require authentication on each port. No packets can pass through this to limit the permissions of hosts which have not passed authentication. Use this port. Reset to Default Select this port to be unauthorized. Table 37 Port Settings LABEL DESCRIPTION Port Select a port number to configure. 802.1x State Select Enable... 802.1x authentication is 0 to 65535 seconds. Quiet period Specify a period of times the Switch will wait before determining the server is 1 to 10 times. GS1510 Series User's Guide 121
User Guide
Page 126
... 1812. This will only be used when the Local method of the device. State Use this Radius Server will see before accessing the Internet. 126 GS1510 Series User's Guide The Local method of authentication uses the user and guest user groups of users from a central location. Radius Server When RADIUS is... to the memory capacity of authentication has been selected. All Port State Use this screen to authenticate. Refresh Click this to reload the screen and reset any changes.
... 1812. This will only be used when the Local method of the device. State Use this Radius Server will see before accessing the Internet. 126 GS1510 Series User's Guide The Local method of authentication uses the user and guest user groups of users from a central location. Radius Server When RADIUS is... to the memory capacity of authentication has been selected. All Port State Use this screen to authenticate. Refresh Click this to reload the screen and reset any changes.

User Guide
Page 128
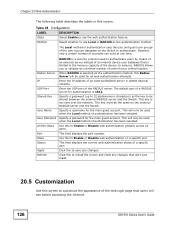
Apply Click this to save any changes that were made. Reset Click this to reset any changes. Preview Click this to update the demonstration of the Background or pick one from the swatch palette icon. Chapter 20 Web Authentication Table 39 Customization (continued) LABEL DESCRIPTION Color Enter the HTML code for the color of the login page. 128 GS1510 Series User's Guide
Apply Click this to save any changes that were made. Reset Click this to reset any changes. Preview Click this to update the demonstration of the Background or pick one from the swatch palette icon. Chapter 20 Web Authentication Table 39 Customization (continued) LABEL DESCRIPTION Color Enter the HTML code for the color of the login page. 128 GS1510 Series User's Guide


