
User Guide
Page 5
GS1510 Series User's Guide 5 Warnings tell you about things that could harm you to type one of measurement may need to as the "Switch", the "device", ... to get to that screen. • Units of the predefined choices. • A right angle bracket ( > ) within a screen name denotes a mouse click. Syntax Conventions • The GS1510-16/GS1510-24 may denote "1000000" or "1048576" and so on. • "e.g.," is a shorthand for "for instance", and "i.e.," means "that is denoted by square brackets and uppercase text...
GS1510 Series User's Guide 5 Warnings tell you about things that could harm you to type one of measurement may need to as the "Switch", the "device", ... to get to that screen. • Units of the predefined choices. • A right angle bracket ( > ) within a screen name denotes a mouse click. Syntax Conventions • The GS1510-16/GS1510-24 may denote "1000000" or "1048576" and so on. • "e.g.," is a shorthand for "for instance", and "i.e.," means "that is denoted by square brackets and uppercase text...
User Guide
Page 11
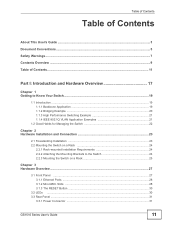
... Habits for Managing the Switch 22 Chapter 2 Hardware Installation and Connection 23 2.1 Freestanding Installation ...23 2.2 Mounting the Switch on a Rack 24 2.2.1 Rack-mounted Installation Requirements 24 2.2.2 Attaching the Mounting Brackets to the Switch 24 2.2.3 Mounting the Switch on a Rack 25 Chapter 3 Hardware Overview...27 3.1 Front Panel ...27 3.1.1 Ethernet Ports ...28 3.1.2 Mini-GBIC Slots...
... Habits for Managing the Switch 22 Chapter 2 Hardware Installation and Connection 23 2.1 Freestanding Installation ...23 2.2 Mounting the Switch on a Rack 24 2.2.1 Rack-mounted Installation Requirements 24 2.2.2 Attaching the Mounting Brackets to the Switch 24 2.2.3 Mounting the Switch on a Rack 25 Chapter 3 Hardware Overview...27 3.1 Front Panel ...27 3.1.1 Ethernet Ports ...28 3.1.2 Mini-GBIC Slots...
User Guide
Page 16
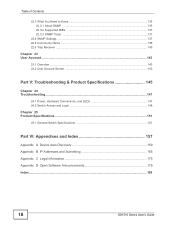
...143 23.2 User Account Screen ...143 Part V: Troubleshooting & Product Specifications 145 Chapter 24 Troubleshooting...147 24.1 Power, Hardware Connections, and LEDs 147 24.2 Switch Access and Login 148 Chapter 25 Product Specifications ...151 25.1 General Switch ...Specifications 151 Part VI: Appendices and Index 157 Appendix A Device Auto Discovery 159 Appendix B IP Addresses and Subnetting 165 Appendix C Legal Information 175 Appendix D Open Software Announcements 179 Index...199 16 GS1510...
...143 23.2 User Account Screen ...143 Part V: Troubleshooting & Product Specifications 145 Chapter 24 Troubleshooting...147 24.1 Power, Hardware Connections, and LEDs 147 24.2 Switch Access and Login 148 Chapter 25 Product Specifications ...151 25.1 General Switch ...Specifications 151 Part VI: Appendices and Index 157 Appendix A Device Auto Discovery 159 Appendix B IP Addresses and Subnetting 165 Appendix C Legal Information 175 Appendix D Open Software Announcements 179 Index...199 16 GS1510...
User Guide
Page 19
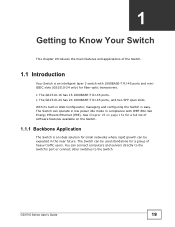
... CHAPTER 1 Getting to the Switch. The Switch can operate in low power idle mode in compliance with 1000BASE-T RJ-45 ports and miniGBIC slots (GS1510-24 only) for a group of heavy traffic users. See Chapter 25 on page 151 for a full list of the Switch. 1.1 Introduction Your Switch...EEE). With its built-in the near future. You can be used standalone for fiber-optic transceivers. • The GS1510-16 has 16 1000BASE-T RJ-45 ports. • The GS1510-24 has 24 1000BASE-T RJ-45 ports, and two SFP open slots. The Switch can be expected in Web Configurator, managing and configuring...
... CHAPTER 1 Getting to the Switch. The Switch can operate in low power idle mode in compliance with 1000BASE-T RJ-45 ports and miniGBIC slots (GS1510-24 only) for a group of heavy traffic users. See Chapter 25 on page 151 for a full list of the Switch. 1.1 Introduction Your Switch...EEE). With its built-in the near future. You can be used standalone for fiber-optic transceivers. • The GS1510-16 has 16 1000BASE-T RJ-45 ports. • The GS1510-24 has 24 1000BASE-T RJ-45 ports, and two SFP open slots. The Switch can be expected in Web Configurator, managing and configuring...
User Guide
Page 24
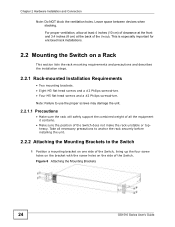
..., allow at least 4 inches (10 cm) of clearance at the front and 3.4 inches (8 cm) at the back of the Switch. Figure 6 Attaching the Mounting Brackets 24 GS1510 Series User's Guide This is especially important for enclosed rack installations. 2.2 Mounting the Switch on the side of the Switch does not make the rack...
..., allow at least 4 inches (10 cm) of clearance at the front and 3.4 inches (8 cm) at the back of the Switch. Figure 6 Attaching the Mounting Brackets 24 GS1510 Series User's Guide This is especially important for enclosed rack installations. 2.2 Mounting the Switch on the side of the Switch does not make the rack...
User Guide
Page 27
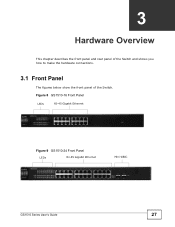
CHAPTER 3 Hardware Overview This chapter describes the front panel and rear panel of the Switch and shows you how to make the hardware connections. 3.1 Front Panel The figures below show the front panel of the Switch. Figure 8 GS1510-16 Front Panel LEDs RJ-45 Gigabit Ethernet Figure 9 GS1510-24 Front Panel LEDs RJ-45 Gigabit Ethernet Mini-GBIC GS1510 Series User's Guide 27
CHAPTER 3 Hardware Overview This chapter describes the front panel and rear panel of the Switch and shows you how to make the hardware connections. 3.1 Front Panel The figures below show the front panel of the Switch. Figure 8 GS1510-16 Front Panel LEDs RJ-45 Gigabit Ethernet Figure 9 GS1510-24 Front Panel LEDs RJ-45 Gigabit Ethernet Mini-GBIC GS1510 Series User's Guide 27
User Guide
Page 28
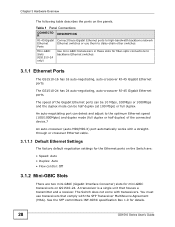
...and adjust to daisy-chain other switches. Ports Mini-GBIC Slots (GS1510-24 only) Use mini-GBIC transceivers in these Gigabit Ethernet ports to backbone Ethernet switches. 3.1.1 Ethernet Ports The GS1510-16 has 16 auto-negotiating, auto-crossover RJ-45 Gigabit Ethernet ports. A transceiver... use transceivers that houses a transmitter and a receiver. Chapter 3 Hardware Overview The following table describes the ports on GS1510-24. The GS1510-24 has 24 auto-negotiating, auto-crossover RJ-45 Gigabit Ethernet ports. The Switch does not come with the SFP Transceiver MultiSource Agreement...
...and adjust to daisy-chain other switches. Ports Mini-GBIC Slots (GS1510-24 only) Use mini-GBIC transceivers in these Gigabit Ethernet ports to backbone Ethernet switches. 3.1.1 Ethernet Ports The GS1510-16 has 16 auto-negotiating, auto-crossover RJ-45 Gigabit Ethernet ports. A transceiver... use transceivers that houses a transmitter and a receiver. Chapter 3 Hardware Overview The following table describes the ports on GS1510-24. The GS1510-24 has 24 auto-negotiating, auto-crossover RJ-45 Gigabit Ethernet ports. The Switch does not come with the SFP Transceiver MultiSource Agreement...
User Guide
Page 31
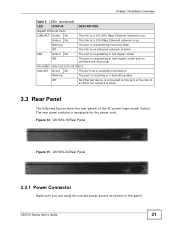
FDX Amber On The port is negotiating in full-duplex mode. Mini-GBIC Slots (GS1510-24 ONLY) LNK/ACT Green On The port has a successful connection. Off The link to an Ethernet network is down . Off The port is negotiating in ... link to a 10/1000 Mbps Ethernet network is receiving or transmitting data. Blinking The port is up . GS1510 Series User's Guide 31 Blinking The port is up . Figure 14 GS1510-16 Rear Panel Figure 15 GS1510-24 Rear Panel 3.3.1 Power Connector Make sure you are occurring. Amber On The link to an Ethernet network is...
FDX Amber On The port is negotiating in full-duplex mode. Mini-GBIC Slots (GS1510-24 ONLY) LNK/ACT Green On The port has a successful connection. Off The link to an Ethernet network is down . Off The port is negotiating in ... link to a 10/1000 Mbps Ethernet network is receiving or transmitting data. Blinking The port is up . GS1510 Series User's Guide 31 Blinking The port is up . Figure 14 GS1510-16 Rear Panel Figure 15 GS1510-24 Rear Panel 3.3.1 Power Connector Make sure you are occurring. Amber On The link to an Ethernet network is...
User Guide
Page 44
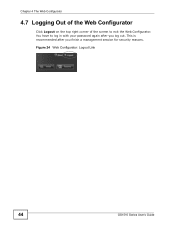
Chapter 4 The Web Configurator 4.7 Logging Out of the Web Configurator Click Logout on the top right corner of the screen to log in with your password again after you log out. You have to exit the Web Configurator. Figure 24 Web Configurator: Logout Link 44 GS1510 Series User's Guide This is recommended after you finish a management session for security reasons.
Chapter 4 The Web Configurator 4.7 Logging Out of the Web Configurator Click Logout on the top right corner of the screen to log in with your password again after you log out. You have to exit the Web Configurator. Figure 24 Web Configurator: Logout Link 44 GS1510 Series User's Guide This is recommended after you finish a management session for security reasons.
User Guide
Page 50
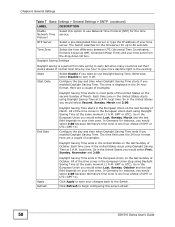
...Saving Time starts in the European Union on the second Sunday of GMT or UTC (GMT+1). Apply Refresh Daylight Saving Time ends in the 24 hour format. In Germany for instance, you would select Second, Sunday, March and 2:00. local time. Otherwise, select Disable to the... Switch. The time field uses the 24 hour format. The time is one hour ahead of March. Chapter 6 General Settings Table 7 Basic Settings > General Settings > SNTP (continued) LABEL ...
...Saving Time starts in the European Union on the second Sunday of GMT or UTC (GMT+1). Apply Refresh Daylight Saving Time ends in the 24 hour format. In Germany for instance, you would select Second, Sunday, March and 2:00. local time. Otherwise, select Disable to the... Switch. The time field uses the 24 hour format. The time is one hour ahead of March. Chapter 6 General Settings Table 7 Basic Settings > General Settings > SNTP (continued) LABEL ...
User Guide
Page 90
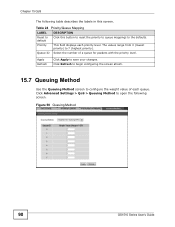
...priority level. Apply Refresh Click Apply to 7 (highest priority). The values range from 0 (lowest priority) to save your changes. Table 24 Priority/Queue Mapping LABEL DESCRIPTION Reset to default Click this screen. Click Advanced Settings > QoS > Queuing Method to open the following table ... to queue mappings to configure the weight value of a queue for packets with the priority level. Figure 50 Queuing Method 90 GS1510 Series User's Guide Click Refresh to begin configuring the screen afresh. 15.7 Queuing Method Use the Queuing Method screen to the defaults...
...priority level. Apply Refresh Click Apply to 7 (highest priority). The values range from 0 (lowest priority) to save your changes. Table 24 Priority/Queue Mapping LABEL DESCRIPTION Reset to default Click this screen. Click Advanced Settings > QoS > Queuing Method to open the following table ... to queue mappings to configure the weight value of a queue for packets with the priority level. Figure 50 Queuing Method 90 GS1510 Series User's Guide Click Refresh to begin configuring the screen afresh. 15.7 Queuing Method Use the Queuing Method screen to the defaults...
User Guide
Page 109
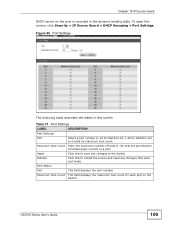
Port Status Port This field displays the port number. Maximum Host Count This field displays the maximum host count for GS1510-24) to the Switch. Chapter 18 IP Source Guard DHCP server on the Switch. Apply Click this to a port. To open this screen....Port Settings The following table describes the labels in the dynamic binding table. Table 31 Port Settings LABEL DESCRIPTION Port Settings Port Select a port number (1-16 for GS1510-16, 1-26 for each port on the port is recorded in this screen, click Security > IP Source Guard > DHCP Snooping > Port Settings. ...
Port Status Port This field displays the port number. Maximum Host Count This field displays the maximum host count for GS1510-24) to the Switch. Chapter 18 IP Source Guard DHCP server on the Switch. Apply Click this to a port. To open this screen....Port Settings The following table describes the labels in the dynamic binding table. Table 31 Port Settings LABEL DESCRIPTION Port Settings Port Select a port number (1-16 for GS1510-16, 1-26 for each port on the port is recorded in this screen, click Security > IP Source Guard > DHCP Snooping > Port Settings. ...
User Guide
Page 147
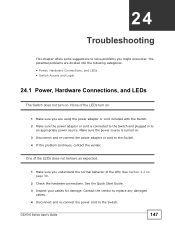
... the LEDs turn on . 1 Make sure you are divided into the following categories. • Power, Hardware Connections, and LEDs • Switch Access and Login 24.1 Power, Hardware Connections, and LEDs The Switch does not turn on . Contact the vendor to replace any damaged cables. 4 Disconnect and re-connect the power... the Quick Start Guide. 3 Inspect your cables for damage. One of the LEDs does not behave as expected. 1 Make sure you might encounter. CHAPTER 24 Troubleshooting This chapter offers some suggestions to solve problems you understand the normal behavior of the LED...
... the LEDs turn on . 1 Make sure you are divided into the following categories. • Power, Hardware Connections, and LEDs • Switch Access and Login 24.1 Power, Hardware Connections, and LEDs The Switch does not turn on . Contact the vendor to replace any damaged cables. 4 Disconnect and re-connect the power... the Quick Start Guide. 3 Inspect your cables for damage. One of the LEDs does not behave as expected. 1 Make sure you might encounter. CHAPTER 24 Troubleshooting This chapter offers some suggestions to solve problems you understand the normal behavior of the LED...
User Guide
Page 148
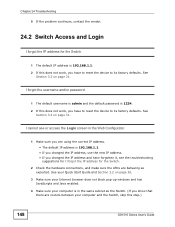
...as the Switch. (If you have to reset the device to its factory defaults. See your computer and the Switch, skip this step.) 148 GS1510 Series User's Guide See Section 3.3 on page 30. 3 Make sure your Internet browser does not block pop-up windows and has JavaScripts and ...defaults. See Section 3.3 on page 31. I cannot see or access the Login screen in the same subnet as expected. Chapter 24 Troubleshooting 5 If the problem continues, contact the vendor. 24.2 Switch Access and Login I forgot the IP address for the Switch. 2 Check the hardware connections, and make sure the ...
...as the Switch. (If you have to reset the device to its factory defaults. See your computer and the Switch, skip this step.) 148 GS1510 Series User's Guide See Section 3.3 on page 30. 3 Make sure your Internet browser does not block pop-up windows and has JavaScripts and ...defaults. See Section 3.3 on page 31. I cannot see or access the Login screen in the same subnet as expected. Chapter 24 Troubleshooting 5 If the problem continues, contact the vendor. 24.2 Switch Access and Login I forgot the IP address for the Switch. 2 Check the hardware connections, and make sure the ...
User Guide
Page 149
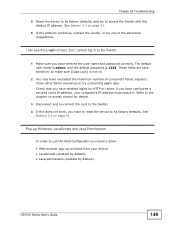
Chapter 24 Troubleshooting 5 Reset the device to its factory defaults. Check that you need to allow: • Web browser pop-up Windows, JavaScripts and Java Permissions In ... problem continues, contact the vendor, or try one of concurrent Telnet sessions. See Section 3.3 on . 2 You may have entered the user name and password correctly. GS1510 Series User's Guide 149 These fields are casesensitive, so make sure [Caps Lock] is 1234. If you have exceeded the maximum number of the advanced...
Chapter 24 Troubleshooting 5 Reset the device to its factory defaults. Check that you need to allow: • Web browser pop-up Windows, JavaScripts and Java Permissions In ... problem continues, contact the vendor, or try one of concurrent Telnet sessions. See Section 3.3 on . 2 You may have entered the user name and password correctly. GS1510 Series User's Guide 149 These fields are casesensitive, so make sure [Caps Lock] is 1234. If you have exceeded the maximum number of the advanced...

User Guide
Page 150
Chapter 24 Troubleshooting 150 GS1510 Series User's Guide
Chapter 24 Troubleshooting 150 GS1510 Series User's Guide
User Guide
Page 151
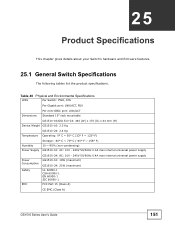
...Per Switch: PWR, SYS Per Gigabit port: LNK/ACT, FDX Dimensions Per mini-GBIC port: LNK/ACT Standard 19" rack mountable GS1510-16/GS1510-24: 440 (W) x 170 (D) x 44 mm (H) Device Weight GS1510-16: 2.3 Kg Temperature GS1510-24: 2.4 Kg Operating: 0º C ~ 50º C (32º F ~ 122º F) Storage: -40º...~ 95% (non-condensing) Power Supply GS1510-16: AC: 100 - 240V 50/60Hz 0.3A max internal universal power supply Power Consumption Safety EMC GS1510-24: AC: 100 - 240V 50/60Hz 0.4A max internal universal power supply GS1510-16: 18W (maximum) GS1510-24: 21W (maximum) UL 60950-1 CSA ...
...Per Switch: PWR, SYS Per Gigabit port: LNK/ACT, FDX Dimensions Per mini-GBIC port: LNK/ACT Standard 19" rack mountable GS1510-16/GS1510-24: 440 (W) x 170 (D) x 44 mm (H) Device Weight GS1510-16: 2.3 Kg Temperature GS1510-24: 2.4 Kg Operating: 0º C ~ 50º C (32º F ~ 122º F) Storage: -40º...~ 95% (non-condensing) Power Supply GS1510-16: AC: 100 - 240V 50/60Hz 0.3A max internal universal power supply Power Consumption Safety EMC GS1510-24: AC: 100 - 240V 50/60Hz 0.4A max internal universal power supply GS1510-16: 18W (maximum) GS1510-24: 21W (maximum) UL 60950-1 CSA ...
User Guide
Page 152
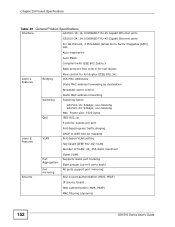
... duplex (IEEE 802.3x) 16K MAC addresses Static MAC address forwarding by destination Broadcast storm control Switching Static MAC address forwarding Switching fabric: QoS GS1510-16: 32Gbps, non-blocking GS1510-24: 52Gbps, non-blocking Max. Frame size: 1522 bytes IEEE 802.1p 8 priority queues per port Port-based egress traffic shaping Layer 2 Features VLAN...
... duplex (IEEE 802.3x) 16K MAC addresses Static MAC address forwarding by destination Broadcast storm control Switching Static MAC address forwarding Switching fabric: QoS GS1510-16: 32Gbps, non-blocking GS1510-24: 52Gbps, non-blocking Max. Frame size: 1522 bytes IEEE 802.1p 8 priority queues per port Port-based egress traffic shaping Layer 2 Features VLAN...
User Guide
Page 153
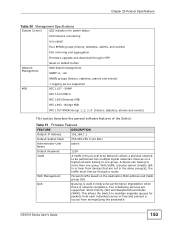
... in the same group(s); Table 51 Firmware Features FEATURE DESCRIPTION Default IP Address 192.168.1.1 Default Subnet Mask 255.255.255.0 (24 bits) Administrator User Name admin Default Password 1234 VLAN A VLAN (Virtual Local Area Network) allows a physical network to or hear... from monopolizing the bandwidth. the traffic must first go through HTTP Network Management Reset to one group. GS1510 Series User's Guide 153 A device can belong to maintain separate queues for power status Performance monitoring Line speed Four RMON groups (...
... in the same group(s); Table 51 Firmware Features FEATURE DESCRIPTION Default IP Address 192.168.1.1 Default Subnet Mask 255.255.255.0 (24 bits) Administrator User Name admin Default Password 1234 VLAN A VLAN (Virtual Local Area Network) allows a physical network to or hear... from monopolizing the bandwidth. the traffic must first go through HTTP Network Management Reset to one group. GS1510 Series User's Guide 153 A device can belong to maintain separate queues for power status Performance monitoring Line speed Four RMON groups (...
User Guide
Page 167
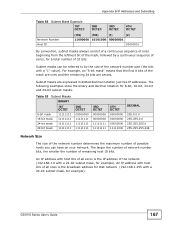
The following examples show the binary and decimal notation for example). Table 55 Subnet Masks BINARY 8-bit mask 16-bit mask 24-bit mask 29-bit mask 1ST OCTET 11111111 11111111 11111111 11111111 2ND OCTET 00000000 11111111 11111111 11111111 3RD OCTET 00000000 00000000 11111111 11111111 ... subnet mask, for that the first 8 bits of the mask are ones and the remaining 24 bits are expressed in dotted decimal notation just like IP addresses. GS1510 Series User's Guide 167 Subnet masks are zeroes. The larger the number of network number bits, the smaller the number of remaining ...
The following examples show the binary and decimal notation for example). Table 55 Subnet Masks BINARY 8-bit mask 16-bit mask 24-bit mask 29-bit mask 1ST OCTET 11111111 11111111 11111111 11111111 2ND OCTET 00000000 11111111 11111111 11111111 3RD OCTET 00000000 00000000 11111111 11111111 ... subnet mask, for that the first 8 bits of the mask are ones and the remaining 24 bits are expressed in dotted decimal notation just like IP addresses. GS1510 Series User's Guide 167 Subnet masks are zeroes. The larger the number of network number bits, the smaller the number of remaining ...