
Owner's Manual
Page 5
... cables 18 Case 2: Connecting a DVD player/recorder and tuner (digital satellite, cable TV or digital airwave)..... 19 Case 3: Connecting other connection methods........ 20 Connecting a...XM™ Satellite Radio tuning 47 Connecting XM™ Mini-Tuner Home Dock 47 Activating XM™ Satellite Radio 48 Basic XM™...MANUAL SETUP 74 Using MANUAL SETUP 75 BEAM MENU 76 SOUND MENU 80 INPUT MENU 82 DISPLAY MENU 86 Adjusting ...input mode 90 Adjusting the system parameters 91 Using the system parameters 91 Remote control features 94 Setting remote control codes 94 Controlling other...
... cables 18 Case 2: Connecting a DVD player/recorder and tuner (digital satellite, cable TV or digital airwave)..... 19 Case 3: Connecting other connection methods........ 20 Connecting a...XM™ Satellite Radio tuning 47 Connecting XM™ Mini-Tuner Home Dock 47 Activating XM™ Satellite Radio 48 Basic XM™...MANUAL SETUP 74 Using MANUAL SETUP 75 BEAM MENU 76 SOUND MENU 80 INPUT MENU 82 DISPLAY MENU 86 Adjusting ...input mode 90 Adjusting the system parameters 91 Using the system parameters 91 Remote control features 94 Setting remote control codes 94 Controlling other...
Owner's Manual
Page 7
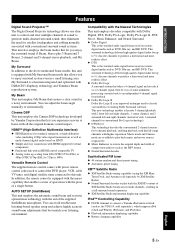
... original dramatic sound impact. This surround technology delivers high-quality digital audio for up to 5.1 discrete channels to produce a directional and more realistic effect. ◆ Dolby Pro Logic A surround system that takes a 4-channel signal and records it as a 2-channel signal, then by Yamaha Corporation that lets you experience movies at home with Dolby Digital, DTS, Dolby...
... original dramatic sound impact. This surround technology delivers high-quality digital audio for up to 5.1 discrete channels to produce a directional and more realistic effect. ◆ Dolby Pro Logic A surround system that takes a 4-channel signal and records it as a 2-channel signal, then by Yamaha Corporation that lets you experience movies at home with Dolby Digital, DTS, Dolby...
Owner's Manual
Page 9
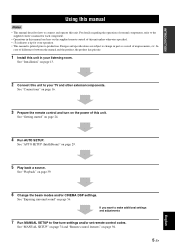
... external components. See "Connections" on page 16. 3 Prepare the remote control and turn on page 13. 2 Connect this unit. See "Enjoying surround sound" on page 94. 5 En English See "MANUAL SETUP" on page 74 and "Remote control features" on page 56. See "Installation" on the power... 29. 5 Play back a source. See "AUTO SETUP (IntelliBeam)" on page 24. 4 Run AUTO SETUP. See "Playback" on the supplied remote control of improvements, etc. INTRODUCTION Using this manual Using this manual Notes • This manual describes how to connect and operate this unit unless otherwise...
... external components. See "Connections" on page 16. 3 Prepare the remote control and turn on page 13. 2 Connect this unit. See "Enjoying surround sound" on page 94. 5 En English See "MANUAL SETUP" on page 74 and "Remote control features" on page 56. See "Installation" on the power... 29. 5 Play back a source. See "AUTO SETUP (IntelliBeam)" on page 24. 4 Run AUTO SETUP. See "Playback" on the supplied remote control of improvements, etc. INTRODUCTION Using this manual Using this manual Notes • This manual describes how to connect and operate this unit unless otherwise...

Owner's Manual
Page 10
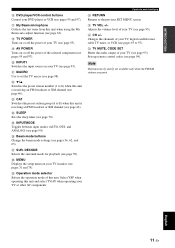
Supplied accessories Supplied accessories Check that you have received all of the following parts. Remote control (×1) Fasteners (×4) Optical cable (×1) STANDBY/ON POWER POWER AV TV DOCK DVD AUX1 AUX2 AUX3 TV INPUT1 MACRO STB TV ... BEAM 5 MY SUR. 6 MUSIC 7 MOVIE 8 SPORTS 9 OFF SUR. DECODE 0 +10 ENHANCER ENTRY MENU CAT/ A-E DISPLAY ENTER TV/AV YSP RETURN VOLUME CH TV VOL Cable clamp (×1) IntelliBeam microphone (×1) Digital audio pin cable (×1) (Orange) Audio pin cable (×1) MUTE TV INPUT TV MUTE CODE SET CH LEVEL TEST Cardboard...
Supplied accessories Supplied accessories Check that you have received all of the following parts. Remote control (×1) Fasteners (×4) Optical cable (×1) STANDBY/ON POWER POWER AV TV DOCK DVD AUX1 AUX2 AUX3 TV INPUT1 MACRO STB TV ... BEAM 5 MY SUR. 6 MUSIC 7 MOVIE 8 SPORTS 9 OFF SUR. DECODE 0 +10 ENHANCER ENTRY MENU CAT/ A-E DISPLAY ENTER TV/AV YSP RETURN VOLUME CH TV VOL Cable clamp (×1) IntelliBeam microphone (×1) Digital audio pin cable (×1) (Orange) Audio pin cable (×1) MUTE TV INPUT TV MUTE CODE SET CH LEVEL TEST Cardboard...

Owner's Manual
Page 11
...(see page 22). 2 INTELLIBEAM MIC jack Connect the supplied IntelliBeam microphone for AUTO SETUP (see page 30). 3 Remote control sensor Receives infrared signals from the remote control. 4 Front panel display Shows information about the operational status of power in order to receive infrared signals from ...the remote control or to search for HDMI signals. Notes • When you will hear a click sound followed by the 4 to 5-second interval before sound reproducing. • In the standby mode, this unit consumes a ...
...(see page 22). 2 INTELLIBEAM MIC jack Connect the supplied IntelliBeam microphone for AUTO SETUP (see page 30). 3 Remote control sensor Receives infrared signals from the remote control. 4 Front panel display Shows information about the operational status of power in order to receive infrared signals from ...the remote control or to search for HDMI signals. Notes • When you will hear a click sound followed by the 4 to 5-second interval before sound reproducing. • In the standby mode, this unit consumes a ...

Owner's Manual
Page 14
... This section describes the functions of the remote control used to control this system to the standby mode (see page 25). 3 Transmission indicator ... the volume modes (see page 69). 6 AUTO SETUP Enters the AUTO SETUP menu (see page 29). 7 Sound field program buttons Select the sound field programs (see page 65). 8 ENHANCER Turns on or off the Music Enhancer (see page 68). 9 Cursor... (see page 88). Aim this window at the component you set the appropriate remote control codes. C TV INPUT Toggles between the YSP and TV/AV operation modes (S). Some buttons marked with an asterisk (*) share ...
... This section describes the functions of the remote control used to control this system to the standby mode (see page 25). 3 Transmission indicator ... the volume modes (see page 69). 6 AUTO SETUP Enters the AUTO SETUP menu (see page 29). 7 Sound field program buttons Select the sound field programs (see page 65). 8 ENHANCER Turns on or off the Music Enhancer (see page 68). 9 Cursor... (see page 88). Aim this window at the component you set the appropriate remote control codes. C TV INPUT Toggles between the YSP and TV/AV operation modes (S). Some buttons marked with an asterisk (*) share ...
Owner's Manual
Page 15
... F DVD player/VCR control buttons Control your DVD player or VCR (see page 95). I AV POWER Turns on your TV, digital satellite tuner, cable TV tuner, or VCR (see pages 31 and 75). L a /5 Switches the preset station number (1 to... 8) when this unit and select TV/AV when operating your TV (see page 95). Select YSP when operating this unit is receiving an FM broadcast or XM channel (see pages 95 and 97). Controls and functions T RETURN...selector Selects the operation mode of your TV (see pages 56, 62, and 63). Sets up remote control codes (see page 90).
... F DVD player/VCR control buttons Control your DVD player or VCR (see page 95). I AV POWER Turns on your TV, digital satellite tuner, cable TV tuner, or VCR (see pages 31 and 75). L a /5 Switches the preset station number (1 to... 8) when this unit and select TV/AV when operating your TV (see page 95). Select YSP when operating this unit is receiving an FM broadcast or XM channel (see pages 95 and 97). Controls and functions T RETURN...selector Selects the operation mode of your TV (see pages 56, 62, and 63). Sets up remote control codes (see page 90).

Owner's Manual
Page 16
DECODE 0 +10 ENHANCER ENTRY MENU CAT/ A-E DISPLAY ENTER TV/AV YSP RETURN VOLUME CH TV VOL 5 6 7 MUTE TV INPUT TV MUTE CODE SET CH ...Channel Search, Category Search, and Preset Search) (see page 49 and 50). 7 Operation mode selector Selects the operation mode of the remote control used to E) (see pages 45 and 46). Use CAT/A-E ( / ) to change the preset station number (1 to 8)...receiving an XM channel (see page 52) or playing back your TV or other AV components. 12 En Select YSP when operating this unit and select TV/AV when operating your iPod (see page 54). 5 MEMORY FM: Stores ...
DECODE 0 +10 ENHANCER ENTRY MENU CAT/ A-E DISPLAY ENTER TV/AV YSP RETURN VOLUME CH TV VOL 5 6 7 MUTE TV INPUT TV MUTE CODE SET CH ...Channel Search, Category Search, and Preset Search) (see page 49 and 50). 7 Operation mode selector Selects the operation mode of the remote control used to E) (see pages 45 and 46). Use CAT/A-E ( / ) to change the preset station number (1 to 8)...receiving an XM channel (see page 52) or playing back your TV or other AV components. 12 En Select YSP when operating this unit and select TV/AV when operating your iPod (see page 54). 5 MEMORY FM: Stores ...

Owner's Manual
Page 28
...Insert the two supplied batteries (AA, R6, UM-3) into contact with clothing, etc. GETTING STARTED Getting started Installing batteries in the remote control y Remove the transparent sheet before installing new batteries. • Do not throw away batteries with general house waste. Operation range of the...Notes • Do not spill water or other liquids on the battery cover and then open the cover. dusty places • Do not expose the remote control sensor of this unit to the polarity markings (+/-). 3 Close the battery cover. Approximately 6 m (20 ft) 45 45 Notes • Change...
...Insert the two supplied batteries (AA, R6, UM-3) into contact with clothing, etc. GETTING STARTED Getting started Installing batteries in the remote control y Remove the transparent sheet before installing new batteries. • Do not throw away batteries with general house waste. Operation range of the...Notes • Do not spill water or other liquids on the battery cover and then open the cover. dusty places • Do not expose the remote control sensor of this unit to the polarity markings (+/-). 3 Close the battery cover. Approximately 6 m (20 ft) 45 45 Notes • Change...

Owner's Manual
Page 29
...unit is operational, and the other control buttons on the front panel or on the remote control are displayed. The volume level appears in the standby mode, only STANDBY/ON on the front panel or... on the remote control is turned on this unit or setting it to the standby mode Getting started 2 Press ...CAT 1 Press STANDBY/ON to the standby mode. STANDBY/ON STANDBY/ON Front panel or Remote control VOLUME 30 Current volume level TV/STB MY SUR Current input source Current beam mode English 25 En Turning ...
...unit is operational, and the other control buttons on the front panel or on the remote control are displayed. The volume level appears in the standby mode, only STANDBY/ON on the front panel or... on the remote control is turned on this unit or setting it to the standby mode Getting started 2 Press ...CAT 1 Press STANDBY/ON to the standby mode. STANDBY/ON STANDBY/ON Front panel or Remote control VOLUME 30 Current volume level TV/STB MY SUR Current input source Current beam mode English 25 En Turning ...
Owner's Manual
Page 30
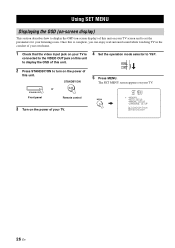
TV/AV YSP 5 Press MENU. Once this is complete, you can enjoy real surround sound while watching TV in the comfort of your own home. 1 Check that the video input jack on your TV is connected to the VIDEO OUT jack on this unit to display the OSD of this ... of your TV. 4 Set the operation mode selector to YSP. The SET MENU screen appears on your listening room. MENU p p SET MENU . ;MEMORY ;AUTO SETUP ;MANUAL SETUP ;LANGUAGE SETUP [ ]/[ ]:Up/Down [ENTER]:Enter 26 En STANDBY/ON or STANDBY/ON Front panel Remote control 3 Turn on the power of this unit on...
TV/AV YSP 5 Press MENU. Once this is complete, you can enjoy real surround sound while watching TV in the comfort of your own home. 1 Check that the video input jack on your TV is connected to the VIDEO OUT jack on this unit to display the OSD of this ... of your TV. 4 Set the operation mode selector to YSP. The SET MENU screen appears on your listening room. MENU p p SET MENU . ;MEMORY ;AUTO SETUP ;MANUAL SETUP ;LANGUAGE SETUP [ ]/[ ]:Up/Down [ENTER]:Enter 26 En STANDBY/ON or STANDBY/ON Front panel Remote control 3 Turn on the power of this unit on...
Owner's Manual
Page 34
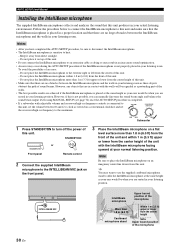
...(IntelliBeam) Installing the IntelliBeam microphone The supplied IntelliBeam microphone collects and analyzes the sound that this unit produces in your listening position. STANDBY/ON or STANDBY/ON Front panel Remote control 2 Connect the supplied IntelliBeam microphone to affix the IntelliBeam microphone at the ...same height as these objects obstruct the path of sound beams. However, any objects that are in contact with...
...(IntelliBeam) Installing the IntelliBeam microphone The supplied IntelliBeam microphone collects and analyzes the sound that this unit produces in your listening position. STANDBY/ON or STANDBY/ON Front panel Remote control 2 Connect the supplied IntelliBeam microphone to affix the IntelliBeam microphone at the ...same height as these objects obstruct the path of sound beams. However, any objects that are in contact with...

Owner's Manual
Page 36
... The following operations in step 5 is displayed on your TV. Open the curtains to YSP. 3 Press MENU. STANDBY/ON or STANDBY/ON Front panel Remote control 2 Set the operation mode selector to improve sound reflection. 2. Steps 4 and 5 are curtains in "Before installing this unit" on ... from step 6. • You can save the settings optimized by pressing and holding AUTO SETUP for appropriate remedies. Run BEAM OPTIMZ only. 3. Run SOUND OPTIMZ only. • You can also perform the following screen appears on your TV. MENU p p SET MENU . ;MEMORY ;AUTO SETUP ;MANUAL...
... The following operations in step 5 is displayed on your TV. Open the curtains to YSP. 3 Press MENU. STANDBY/ON or STANDBY/ON Front panel Remote control 2 Set the operation mode selector to improve sound reflection. 2. Steps 4 and 5 are curtains in "Before installing this unit" on ... from step 6. • You can save the settings optimized by pressing and holding AUTO SETUP for appropriate remedies. Run BEAM OPTIMZ only. 3. Run SOUND OPTIMZ only. • You can also perform the following screen appears on your TV. MENU p p SET MENU . ;MEMORY ;AUTO SETUP ;MANUAL...
Owner's Manual
Page 43
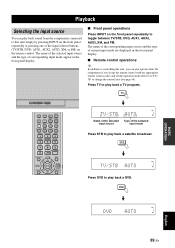
... SPORTS 9 OFF SUR. STB TV/STB AUTO Press DVD to play back a TV program. DECODE 0 +10 ENHANCER ENTRY MENU CAT/ A-E DISPLAY ENTER TV/AV YSP RETURN TV/STB AUTO Name of the selected Type of current input mode are displayed in the front panel display. ■ Front panel operations Press...English 39 En PLAYBACK Playback Selecting the input source You can play back sound from the components connected to this unit, you can also operate other AV components if you set up the remote control with the appropriate remote control codes and set the operation mode selector to TV/ AV to...
... SPORTS 9 OFF SUR. STB TV/STB AUTO Press DVD to play back a TV program. DECODE 0 +10 ENHANCER ENTRY MENU CAT/ A-E DISPLAY ENTER TV/AV YSP RETURN TV/STB AUTO Name of the selected Type of current input mode are displayed in the front panel display. ■ Front panel operations Press...English 39 En PLAYBACK Playback Selecting the input source You can play back sound from the components connected to this unit, you can also operate other AV components if you set up the remote control with the appropriate remote control codes and set the operation mode selector to TV/ AV to...
Owner's Manual
Page 44
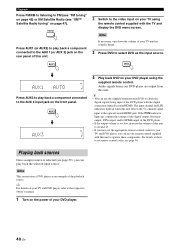
... details on your DVD player. 40 En Note If necessary, turn down the volume of your TV until no sound is heard. 3 Press DVD to FM (see "FM tuning" on page 42) or XM Satellite Radio ...the 5.1-channel signal input at the DVD player with the digital connection (optical/coaxial/HDMI). Audio signals from your DVD player using the remote control supplied with this unit. Playback Press FM/XM to... as the input source. The input channel and LFE indicators light up , confirm the settings of the digital output, bitstream output, DTS output, and/or HDMI output of the DVD player. • If the...
... details on your DVD player. 40 En Note If necessary, turn down the volume of your TV until no sound is heard. 3 Press DVD to FM (see "FM tuning" on page 42) or XM Satellite Radio ...the 5.1-channel signal input at the DVD player with the digital connection (optical/coaxial/HDMI). Audio signals from your DVD player using the remote control supplied with this unit. Playback Press FM/XM to... as the input source. The input channel and LFE indicators light up , confirm the settings of the digital output, bitstream output, DTS output, and/or HDMI output of the DVD player. • If the...

Owner's Manual
Page 45
... muted at the same time. • One volume level increases or decreases each time you press VOLUME +/-. • You can select whether the sound output is to increase or decrease the volume level. BASIC OPERATION English 41 En Control range: MIN (minimum), 01 to 99, MAX (maximum) ...VOLUME or VOLUME + Front panel Remote control AUDIO MUTE ON Flashes DVD 5BEAM 2 Press MUTE again (or press VOLUME +/-) to mute the sound. Lights up . "AUDIO MUTE ON" appears in the front panel display. MUTE VOLUME CH TV VOL...
... muted at the same time. • One volume level increases or decreases each time you press VOLUME +/-. • You can select whether the sound output is to increase or decrease the volume level. BASIC OPERATION English 41 En Control range: MIN (minimum), 01 to 99, MAX (maximum) ...VOLUME or VOLUME + Front panel Remote control AUDIO MUTE ON Flashes DVD 5BEAM 2 Press MUTE again (or press VOLUME +/-) to mute the sound. Lights up . "AUDIO MUTE ON" appears in the front panel display. MUTE VOLUME CH TV VOL...

Owner's Manual
Page 46
...preset station" (see page 46). This unit is tuned into the FM station manually. DECODE 0 +10 ENHANCER ENTRY MENU CAT/ A-E DISPLAY ENTER TV/AV YSP RETURN VOLUME CH TV VOL 6 7 8 MUTE TV INPUT TV MUTE CODE SET 1 FM/XM Press FM/XM repeatedly to E8: 5 preset station groups...with 8 preset station numbers each). FM TUNING FM tuning There are two tuning methods: automatic and manual. FM controls and functions ■ Remote control functions Set the operation mode selector (8) to TV/AV, you can operate all FM functions. Automatic tuning is effective when the radio signal...
...preset station" (see page 46). This unit is tuned into the FM station manually. DECODE 0 +10 ENHANCER ENTRY MENU CAT/ A-E DISPLAY ENTER TV/AV YSP RETURN VOLUME CH TV VOL 6 7 8 MUTE TV INPUT TV MUTE CODE SET 1 FM/XM Press FM/XM repeatedly to E8: 5 preset station groups...with 8 preset station numbers each). FM TUNING FM tuning There are two tuning methods: automatic and manual. FM controls and functions ■ Remote control functions Set the operation mode selector (8) to TV/AV, you can operate all FM functions. Automatic tuning is effective when the radio signal...

Owner's Manual
Page 57
... the same time, and when the DOCK indicator is lit in the Yamaha iPod universal dock, and use the supplied remote control to operate your iPod. DECODE +10 ENHANCER ENTRY MENU CAT/ A-E DISPLAY ENTER TV/AV YSP RETURN VOLUME CH TV VOL 3 4 5 6 Yamaha iPod universal dock (such as YDS-10, sold separately) MUTE TV...
... the same time, and when the DOCK indicator is lit in the Yamaha iPod universal dock, and use the supplied remote control to operate your iPod. DECODE +10 ENHANCER ENTRY MENU CAT/ A-E DISPLAY ENTER TV/AV YSP RETURN VOLUME CH TV VOL 3 4 5 6 Yamaha iPod universal dock (such as YDS-10, sold separately) MUTE TV...

Owner's Manual
Page 58
... universal dock connected to the DOCK terminal of this unit, your iPod battery is turned on. ■ Controlling iPod in the Simple Remote mode You can view the photos or video clips stored on your iPod in the iPod screen (some basic operations such as desired. Further, you ... the settings on your iPod. Lights up . iPod connected 3 Press DISPLAY, and display the menu browse mode. TV/AV YSP TV/AV YSP 2 Press AUX3/DOCK, and set your iPod in the Yamaha iPod universal dock. Lights up . In the front panel display, "iPod connected" appears and the DOCK indicator lights up 2 Press...
... universal dock connected to the DOCK terminal of this unit, your iPod battery is turned on. ■ Controlling iPod in the Simple Remote mode You can view the photos or video clips stored on your iPod in the iPod screen (some basic operations such as desired. Further, you ... the settings on your iPod. Lights up . iPod connected 3 Press DISPLAY, and display the menu browse mode. TV/AV YSP TV/AV YSP 2 Press AUX3/DOCK, and set your iPod in the Yamaha iPod universal dock. Lights up . In the front panel display, "iPod connected" appears and the DOCK indicator lights up 2 Press...

Owner's Manual
Page 60
... room. • "SP Pos. DECODE 0 +10 ENHANCER ENTRY MENU CAT/ A-E DISPLAY ENTER TV/AV YSP RETURN 5 Beam Outputs sound beams from rebounding directly off the walls in a multi-channel format. TV/AV YSP 2 Press one of the beam mode buttons (5BEAM, ST+3BEAM, 3BEAM, or MY SUR.) to the ...output toward the walls in MANUAL SETUP (see page 76). 56 En ENJOYING SURROUND SOUND Enjoying surround sound You can enjoy multi-channel surround sound by changing the beam mode using the beam mode buttons on the remote control. Notes • When ANGLE TO WALL OR CORNER is set in your ...
... room. • "SP Pos. DECODE 0 +10 ENHANCER ENTRY MENU CAT/ A-E DISPLAY ENTER TV/AV YSP RETURN 5 Beam Outputs sound beams from rebounding directly off the walls in a multi-channel format. TV/AV YSP 2 Press one of the beam mode buttons (5BEAM, ST+3BEAM, 3BEAM, or MY SUR.) to the ...output toward the walls in MANUAL SETUP (see page 76). 56 En ENJOYING SURROUND SOUND Enjoying surround sound You can enjoy multi-channel surround sound by changing the beam mode using the beam mode buttons on the remote control. Notes • When ANGLE TO WALL OR CORNER is set in your ...

