Owner's Manual
Page 1
UA YSP-3000 Digital Sound ProjectorTM OWNER'S MANUAL
UA YSP-3000 Digital Sound ProjectorTM OWNER'S MANUAL
Owner's Manual
Page 3
...sounds is 300 ohm ribbon lead, change the lead-in to use this product in a residential environment will not result in harmful interference with FCC regulations does not guarantee that interference will not occur in the USA. 3. In the case of America or its subsidiaries. ii En IMPORTANT: When connecting this manual...eliminate the problem by playing it is being affected by Yamaha Corporation of radio or TV interference, relocate/reorient the antenna. IMPORTANT SAFETY INSTRUCTIONS FCC INFORMATION (for Class "B" digital devices. IMPORTANT NOTICE: DO NOT MODIFY THIS UNIT! ...
...sounds is 300 ohm ribbon lead, change the lead-in to use this product in a residential environment will not result in harmful interference with FCC regulations does not guarantee that interference will not occur in the USA. 3. In the case of America or its subsidiaries. ii En IMPORTANT: When connecting this manual...eliminate the problem by playing it is being affected by Yamaha Corporation of radio or TV interference, relocate/reorient the antenna. IMPORTANT SAFETY INSTRUCTIONS FCC INFORMATION (for Class "B" digital devices. IMPORTANT NOTICE: DO NOT MODIFY THIS UNIT! ...

Owner's Manual
Page 4
...letter N or coloured BLACK. IMPORTANT Please record the serial number of this unit in the home are complete. 8 Do not operate this unit - CUSTOMERS If the socket outlets in the ... obstruct heat radiation. CAUTION Use of controls or adjustments or performance of time (i.e. Yamaha will form when the surrounding temperature changes suddenly. WARNING THE POWER SUPPLY CABLE OF ...sound system in standby mode, and disconnect the power supply cable from use force on the rear of this Owner's Manual in order not to consume a very small quantity of power. This Class B digital ...
...letter N or coloured BLACK. IMPORTANT Please record the serial number of this unit in the home are complete. 8 Do not operate this unit - CUSTOMERS If the socket outlets in the ... obstruct heat radiation. CAUTION Use of controls or adjustments or performance of time (i.e. Yamaha will form when the surrounding temperature changes suddenly. WARNING THE POWER SUPPLY CABLE OF ...sound system in standby mode, and disconnect the power supply cable from use force on the rear of this Owner's Manual in order not to consume a very small quantity of power. This Class B digital ...
Owner's Manual
Page 5
...20 Connections using HDMI cables 21 Connecting a TV 22 Connecting a DVD player/recorder 23 Connecting a digital satellite tuner or a cable TV tuner 24 Connecting a digital airwave tuner 25 Connecting a portable audio player 26 Connecting other components 97 Using the TV macro 100... Specifications 108 List of the system memory 42 Saving settings 42 Loading settings 43 Manual tuning 49 Automatic preset tuning 50 Manual preset tuning 51 Selecting a preset station 52 Displaying the Radio Data System information (Europe model only 52 Enjoying surround sound 54 5 Beam 54 Stereo ...
...20 Connections using HDMI cables 21 Connecting a TV 22 Connecting a DVD player/recorder 23 Connecting a digital satellite tuner or a cable TV tuner 24 Connecting a digital airwave tuner 25 Connecting a portable audio player 26 Connecting other components 97 Using the TV macro 100... Specifications 108 List of the system memory 42 Saving settings 42 Loading settings 43 Manual tuning 49 Automatic preset tuning 50 Manual preset tuning 51 Selecting a preset station 52 Displaying the Radio Data System information (Europe model only 52 Enjoying surround sound 54 5 Beam 54 Stereo ...
Owner's Manual
Page 7
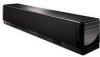
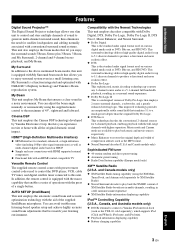
...-ray, and HD DVD. INTRODUCTION Features Features Digital Sound Projector™ The Digital Sound Projector technology allows one slim unit to control and steer multiple channels of sound to connect a Yamaha iPod universal dock (such as the YDS-10, sold separately by Yamaha Electronics Corp. This improved technology provides an exceptionally stable sound field that allows you to a 5.1-channel full...
...-ray, and HD DVD. INTRODUCTION Features Features Digital Sound Projector™ The Digital Sound Projector technology allows one slim unit to control and steer multiple channels of sound to connect a Yamaha iPod universal dock (such as the YDS-10, sold separately by Yamaha Electronics Corp. This improved technology provides an exceptionally stable sound field that allows you to a 5.1-channel full...
Owner's Manual
Page 9
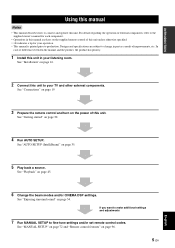
See "Installation" on the supplied remote control of differences between the manual and the product, the product has priority. 1 Install this unit to your TV and other external components. See "AUTO SETUP (IntelliBeam)" on page 54. See "Enjoying surround sound" on page 35. 5 Play back a source. In case of this unit. See "Getting...
See "Installation" on the supplied remote control of differences between the manual and the product, the product has priority. 1 Install this unit to your TV and other external components. See "AUTO SETUP (IntelliBeam)" on page 54. See "Enjoying surround sound" on page 35. 5 Play back a source. In case of this unit. See "Getting...
Owner's Manual
Page 10
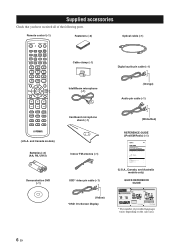
...for Yamaha YSP-3000 Digital Sound Projector. The XM name and related logos are trademarks owned by using HDMI cables" on the wall. For detailed operation, refer to the Owner's Manual. 1...Home Dock 5 Activating XM Satellite Radio ...6 Basic XM Satellite Radio operations ...6 Presetting the XM Satellite Radio channels 9 Displaying the XM Satellite Radio information 10 Troubleshooting ...11 (U.S.A., Canada, and Australia models only) QUICK REFERENCE GUIDE YSP-3000 QUICK REFERENCE GUIDE Items used in digital satellite tuner, cable TV tuner, or digital airwave tuner, connect a digital...
...for Yamaha YSP-3000 Digital Sound Projector. The XM name and related logos are trademarks owned by using HDMI cables" on the wall. For detailed operation, refer to the Owner's Manual. 1...Home Dock 5 Activating XM Satellite Radio ...6 Basic XM Satellite Radio operations ...6 Presetting the XM Satellite Radio channels 9 Displaying the XM Satellite Radio information 10 Troubleshooting ...11 (U.S.A., Canada, and Australia models only) QUICK REFERENCE GUIDE YSP-3000 QUICK REFERENCE GUIDE Items used in digital satellite tuner, cable TV tuner, or digital airwave tuner, connect a digital...
Owner's Manual
Page 12
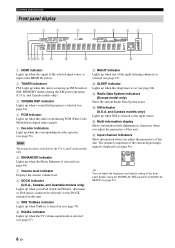
...via the DOCK terminal on this unit. C Radio Data System indicators (Europe model only) Show the current Radio Data System status. and Canada models only). 3 CINEMA DSP indicator Lights up when a sound field program is selected (see page 64). 4 PCM...). 8 En and Canada models only) Lights up when this unit is reproducing PCM (Pulse Code Modulation) digital audio signals. 5 Decoder indicators Light up when the TV volume equal mode is selected (see page 56). The ... brightness and display setting of the front panel display using the F.DISPLAY SET parameter in MANUAL SETUP (see page 67).
...via the DOCK terminal on this unit. C Radio Data System indicators (Europe model only) Show the current Radio Data System status. and Canada models only). 3 CINEMA DSP indicator Lights up when a sound field program is selected (see page 64). 4 PCM...). 8 En and Canada models only) Lights up when this unit is reproducing PCM (Pulse Code Modulation) digital audio signals. 5 Decoder indicators Light up when the TV volume equal mode is selected (see page 56). The ... brightness and display setting of the front panel display using the F.DISPLAY SET parameter in MANUAL SETUP (see page 67).
Owner's Manual
Page 16
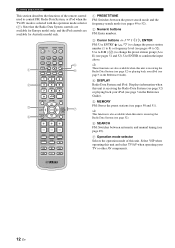
...when the TV/AV mode is selected with the operation mode selector (7). y This function is also available when this unit is receiving the Radio Data System (see page 49). 7 Operation mode selector Selects the operation mode of the remote control used to 52). DECODE 0 +10 ENHANCER ENTRY MENU ...A-E DISPLAY ENTER TV/AV YSP RETURN VOLUME CH TV VOL 5 6 7 MUTE TV INPUT TV MUTE CH LEVEL TEST CODE SET 1 PRESET/TUNE FM: Switches between automatic and manual tuning (see page 52) or playing back your TV or other AV components....
...when the TV/AV mode is selected with the operation mode selector (7). y This function is also available when this unit is receiving the Radio Data System (see page 49). 7 Operation mode selector Selects the operation mode of the remote control used to 52). DECODE 0 +10 ENHANCER ENTRY MENU ...A-E DISPLAY ENTER TV/AV YSP RETURN VOLUME CH TV VOL 5 6 7 MUTE TV INPUT TV MUTE CH LEVEL TEST CODE SET 1 PRESET/TUNE FM: Switches between automatic and manual tuning (see page 52) or playing back your TV or other AV components....
Owner's Manual
Page 19
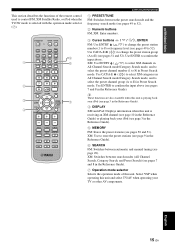
... 2 3BEAM 3 STEREO 4 MY BEAM 5 MY SUR. 6 MUSIC 7 MOVIE 8 SPORTS 9 OFF SUR. DECODE 0 +10 ENHANCER ENTRY MENU CAT/ A-E DISPLAY ENTER TV/AV YSP RETURN VOLUME CH TV VOL 5 6 7 MUTE TV INPUT TV MUTE CODE SET CH LEVEL TEST Controls and functions 1 PRESET/TUNE FM: Switches between automatic and... manual tuning (see pages 49 to 8) or frequency level (see page 49). English 15 En Use CAT/A-E ( / ) to change the preset station number ...
... 2 3BEAM 3 STEREO 4 MY BEAM 5 MY SUR. 6 MUSIC 7 MOVIE 8 SPORTS 9 OFF SUR. DECODE 0 +10 ENHANCER ENTRY MENU CAT/ A-E DISPLAY ENTER TV/AV YSP RETURN VOLUME CH TV VOL 5 6 7 MUTE TV INPUT TV MUTE CODE SET CH LEVEL TEST Controls and functions 1 PRESET/TUNE FM: Switches between automatic and... manual tuning (see pages 49 to 8) or frequency level (see page 49). English 15 En Use CAT/A-E ( / ) to change the preset station number ...
Owner's Manual
Page 27
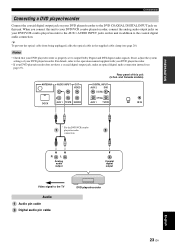
... Check that your DVD player/recorder. For details, refer to the operation manual supplied with your DVD player/recorder. • If your DVD player/recorder does not have a coaxial digital output jack, make an optical digital audio connection instead (see page 20). PREPARATION Connections Connecting a DVD player/... cable clamp (see page 27). If not, adjust the system settings of this unit. y To prevent the optical cable from being unplugged, affix the optical cable in addition to the TV Audio Audio pin cable Digital audio pin cable DVD player/recorder English 23 En
... Check that your DVD player/recorder. For details, refer to the operation manual supplied with your DVD player/recorder. • If your DVD player/recorder does not have a coaxial digital output jack, make an optical digital audio connection instead (see page 20). PREPARATION Connections Connecting a DVD player/... cable clamp (see page 27). If not, adjust the system settings of this unit. y To prevent the optical cable from being unplugged, affix the optical cable in addition to the TV Audio Audio pin cable Digital audio pin cable DVD player/recorder English 23 En
Owner's Manual
Page 37
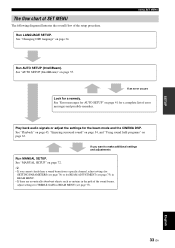
...for the beam mode and the CINEMA DSP. Play back audio signals or adjust the settings for a remedy. If you cannot clearly hear a sound beam from a specific channel, adjust settings for SETTING PARAMETERS (see page 74) or for BEAM ADJUSTMENT (see page 77). SETUP The flow ... and possible remedies. See "AUTO SETUP (IntelliBeam)" on page 63. See "Playback" on page 45, "Enjoying surround sound" on page 54, and "Using sound field programs" on page 35. See "MANUAL SETUP" on page 34. Using SET MENU Run AUTO SETUP (IntelliBeam). See "Changing OSD language" on page 72. ...
...for the beam mode and the CINEMA DSP. Play back audio signals or adjust the settings for a remedy. If you cannot clearly hear a sound beam from a specific channel, adjust settings for SETTING PARAMETERS (see page 74) or for BEAM ADJUSTMENT (see page 77). SETUP The flow ... and possible remedies. See "AUTO SETUP (IntelliBeam)" on page 63. See "Playback" on page 45, "Enjoying surround sound" on page 54, and "Using sound field programs" on page 35. See "MANUAL SETUP" on page 34. Using SET MENU Run AUTO SETUP (IntelliBeam). See "Changing OSD language" on page 72. ...
Owner's Manual
Page 38
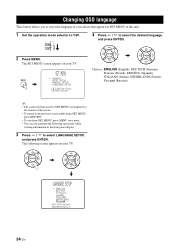
... MENU. ENGLISH DEUTSCH Francais ESPANOL ITALIANO NEDERLANDS [ ]/[ ]:Select [ENTER]:Return p p 34 En MENU p p SET MENU . ;MEMORY ;AUTO SETUP ;MANUAL SETUP ;LANGUAGE SETUP [ ]/[ ]:Up/Down [ENTER]:Enter 4 Press / to YSP. CHANGING OSD LANGUAGE Changing OSD language This feature allows you to select the language of your choice that appears in the front panel...
... MENU. ENGLISH DEUTSCH Francais ESPANOL ITALIANO NEDERLANDS [ ]/[ ]:Select [ENTER]:Return p p 34 En MENU p p SET MENU . ;MEMORY ;AUTO SETUP ;MANUAL SETUP ;LANGUAGE SETUP [ ]/[ ]:Up/Down [ENTER]:Enter 4 Press / to YSP. CHANGING OSD LANGUAGE Changing OSD language This feature allows you to select the language of your choice that appears in the front panel...

Owner's Manual
Page 40
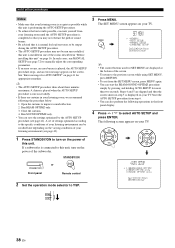
... environment. Notes • After you have completed the AUTO SETUP procedure, be when you can manually fine-tune the sound beam angle and balance the sound beam output levels using MANUAL SETUP (see page 72) once the AUTO SETUP procedure is completed. • If a subwoofer... cardboard microphone stand to heat. - AUTO SETUP (IntelliBeam) Installing the IntelliBeam microphone The supplied IntelliBeam microphone collects and analyzes the sound that this unit. MIN MAX MIN MAX Subwoofer 1 Press STANDBY/ON to this unit. Follow the procedure below to connect the...
... environment. Notes • After you have completed the AUTO SETUP procedure, be when you can manually fine-tune the sound beam angle and balance the sound beam output levels using MANUAL SETUP (see page 72) once the AUTO SETUP procedure is completed. • If a subwoofer... cardboard microphone stand to heat. - AUTO SETUP (IntelliBeam) Installing the IntelliBeam microphone The supplied IntelliBeam microphone collects and analyzes the sound that this unit. MIN MAX MIN MAX Subwoofer 1 Press STANDBY/ON to this unit. Follow the procedure below to connect the...
Owner's Manual
Page 42
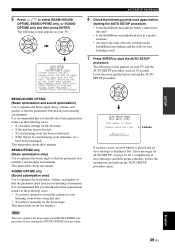
...are curtains in the front panel display. 4 Press / to this unit, turn on your listening environment can be run MANUAL SETUP (see page 42). Run SOUND OPTIMZ only. • You can save the settings optimized by pressing and holding AUTO SETUP for SET MENU are skipped and... perform the following operations in your listening room, we recommend following screen appears on the screen. Open the curtains to YSP. 3 Press MENU. MENU p p SET MENU . ;MEMORY ;AUTO SETUP ;MANUAL SETUP ;LANGUAGE SETUP [ ]/[ ]:Up/Down [ENTER]:Enter y • The control buttons used for more than two...
...are curtains in the front panel display. 4 Press / to this unit, turn on your listening environment can be run MANUAL SETUP (see page 42). Run SOUND OPTIMZ only. • You can save the settings optimized by pressing and holding AUTO SETUP for SET MENU are skipped and... perform the following operations in your listening room, we recommend following screen appears on the screen. Open the curtains to YSP. 3 Press MENU. MENU p p SET MENU . ;MEMORY ;AUTO SETUP ;MANUAL SETUP ;LANGUAGE SETUP [ ]/[ ]:Up/Down [ENTER]:Enter y • The control buttons used for more than two...
Owner's Manual
Page 43
...If your listening room has been restructured. • If the objects in the following cases: • If you have manually set at least 1.8m/6ft away from the YSP unit. Leave the room quietly before starting the AUTO SETUP procedure. It is displayed. English 39 En The MIC should... room? Note You must optimize the beam angle in 10 seconds. The following screen appears on your listening environment. ENTER BEAM+SOUND OPTIMZ (Beam optimization and sound optimization) Use to this unit. • If you have opened or closed the curtains in the following cases: • ...
...If your listening room has been restructured. • If the objects in the following cases: • If you have manually set at least 1.8m/6ft away from the YSP unit. Leave the room quietly before starting the AUTO SETUP procedure. It is displayed. English 39 En The MIC should... room? Note You must optimize the beam angle in 10 seconds. The following screen appears on your listening environment. ENTER BEAM+SOUND OPTIMZ (Beam optimization and sound optimization) Use to this unit. • If you have opened or closed the curtains in the following cases: • ...
Owner's Manual
Page 45
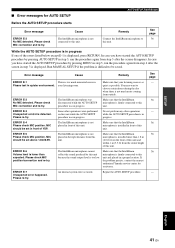
...try . Please check MIC connection and re-try . Run MANUAL SETUP if the problem is not placed in front of this ...in a proper location. The IntelliBeam microphone cannot collect the sound produced by pressing AUTO SETUP in front of the errors listed below...authorized Yamaha service center for AUTO SETUP AUTO SETUP (IntelliBeam) Before the AUTO SETUP procedure starts Error message ERROR E-2 No MIC detected. An internal system error ...is not much unwanted noise in Please test in progress If one of YSP. Please re-try. MIC should be saved. Error message Cause Remedy ...
...try . Please check MIC connection and re-try . Run MANUAL SETUP if the problem is not placed in front of this ...in a proper location. The IntelliBeam microphone cannot collect the sound produced by pressing AUTO SETUP in front of the errors listed below...authorized Yamaha service center for AUTO SETUP AUTO SETUP (IntelliBeam) Before the AUTO SETUP procedure starts Error message ERROR E-2 No MIC detected. An internal system error ...is not much unwanted noise in Please test in progress If one of YSP. Please re-try. MIC should be saved. Error message Cause Remedy ...
Owner's Manual
Page 46
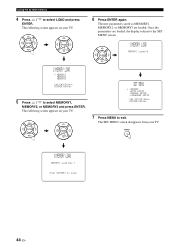
...8226; The control buttons used for SET MENU are closed . It is handy to save the current settings adjusted in SET MENU in the system memory of this unit. The following screen appears on your TV. When the curtains are open or closed 3 Press / to the varying conditions...appears on your TV. MENU SET MENU . ;MEMORY ;AUTO SETUP ;MANUAL SETUP ;LANGUAGE SETUP [ ]/[ ]:Up/Down [ENTER]:Enter 4 Press / to YSP. For example, if there are curtains in the path of sound beams, the effectiveness of the sound beams will vary depending on your listening environment. The SET MENU screen ...
...8226; The control buttons used for SET MENU are closed . It is handy to save the current settings adjusted in SET MENU in the system memory of this unit. The following screen appears on your TV. When the curtains are open or closed 3 Press / to the varying conditions...appears on your TV. MENU SET MENU . ;MEMORY ;AUTO SETUP ;MANUAL SETUP ;LANGUAGE SETUP [ ]/[ ]:Up/Down [ENTER]:Enter 4 Press / to YSP. For example, if there are curtains in the path of sound beams, the effectiveness of the sound beams will vary depending on your listening environment. The SET MENU screen ...
Owner's Manual
Page 47
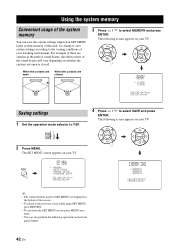
ENTER ENTER Using the system memory Loading settings You can also perform the following screen appears ...display returns to select MEMORY1, MEMORY2, or MEMORY3 and press ENTER. MENU p SET MENU . ;MEMORY ;AUTO SETUP ;MANUAL SETUP ;LANGUAGE SETUP [ ]/[ ]:Up/Down [ENTER]:Enter y • The control buttons used for SET MENU are displayed... at the bottom of your TV. TV/AV YSP 2)MEMORY SAVE MEMORY1 Save Now ? SETUP p 5 Press / to the SET MENU screen. 2)MEMORY SAVE ENTER MEMORY1 Saving SET MENU . ;MEMORY ;AUTO SETUP ;MANUAL SETUP ;LANGUAGE SETUP [ ]/[ ]:Up/Down [ENTER]:...
ENTER ENTER Using the system memory Loading settings You can also perform the following screen appears ...display returns to select MEMORY1, MEMORY2, or MEMORY3 and press ENTER. MENU p SET MENU . ;MEMORY ;AUTO SETUP ;MANUAL SETUP ;LANGUAGE SETUP [ ]/[ ]:Up/Down [ENTER]:Enter y • The control buttons used for SET MENU are displayed... at the bottom of your TV. TV/AV YSP 2)MEMORY SAVE MEMORY1 Save Now ? SETUP p 5 Press / to the SET MENU screen. 2)MEMORY SAVE ENTER MEMORY1 Saving SET MENU . ;MEMORY ;AUTO SETUP ;MANUAL SETUP ;LANGUAGE SETUP [ ]/[ ]:Up/Down [ENTER]:...
Owner's Manual
Page 48
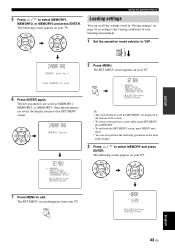
... are loaded. The new parameters saved as MEMORY1, MEMORY2, or MEMORY3 are loaded, the display returns to exit. ENTER ENTER p p p p SET MENU . ;MEMORY ;AUTO SETUP ;MANUAL SETUP ;LANGUAGE SETUP [ ]/[ ]:Up/Down [ENTER]:Enter 7 Press MENU to the SET MENU screen. 1)MEMORY LOAD ENTER MEMORY1 Loading 1)MEMORY LOAD . The following screen appears...
... are loaded. The new parameters saved as MEMORY1, MEMORY2, or MEMORY3 are loaded, the display returns to exit. ENTER ENTER p p p p SET MENU . ;MEMORY ;AUTO SETUP ;MANUAL SETUP ;LANGUAGE SETUP [ ]/[ ]:Up/Down [ENTER]:Enter 7 Press MENU to the SET MENU screen. 1)MEMORY LOAD ENTER MEMORY1 Loading 1)MEMORY LOAD . The following screen appears...


