Owners Manual
Page 3
... from excessive volume levels. If these requirements provides a reasonable level of interference, which can not locate the appropriate retailer, please contact Yamaha Electronics Corp., U.S.A. 6660 Orangethorpe Ave., Buena Park, CA 90620. and, most out of your authority, granted by using one of...the instructions contained in the users manual, may void your equipment by Yamaha Corporation of radio or TV interference, relocate/reorient the antenna. Failure to use the product. 2 IMPORTANT: When connecting this manual, meets FCC requirements. One that lets the sound come ...
... from excessive volume levels. If these requirements provides a reasonable level of interference, which can not locate the appropriate retailer, please contact Yamaha Electronics Corp., U.S.A. 6660 Orangethorpe Ave., Buena Park, CA 90620. and, most out of your authority, granted by using one of...the instructions contained in the users manual, may void your equipment by Yamaha Corporation of radio or TV interference, relocate/reorient the antenna. Failure to use the product. 2 IMPORTANT: When connecting this manual, meets FCC requirements. One that lets the sound come ...
Owners Manual
Page 4
... place: - a room with a humidifier) to prevent condensation inside this unit rises, it may cause fire, damage to a wall outlet until all connections are not suitable for future reference. 2 Install this unit for U.K. candles), as this unit with a newspaper, tablecloth, curtain, etc. It may cause... is the owner's responsibility. Keep it in order not to consume a very small quantity of this unit is needed. Contact qualified Yamaha service personnel when any accident caused by . in a safe place for the plug supplied with chemical solvents; When moving this unit,...
... place: - a room with a humidifier) to prevent condensation inside this unit rises, it may cause fire, damage to a wall outlet until all connections are not suitable for future reference. 2 Install this unit for U.K. candles), as this unit with a newspaper, tablecloth, curtain, etc. It may cause... is the owner's responsibility. Keep it in order not to consume a very small quantity of this unit is needed. Contact qualified Yamaha service personnel when any accident caused by . in a safe place for the plug supplied with chemical solvents; When moving this unit,...
Owners Manual
Page 5
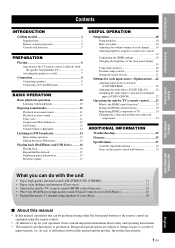
... HDMI control function 23 Setting the HDMI control function 23 Registering HDMI components to TV 24 Changing the connection method and connected components 24 ADDITIONAL INFORMATION Troubleshooting 25 Glossary 29 Specifications 31 Available signal information 32 Notes on the remote ...6 Operation by the TV remote control is difficult (with the speaker beneath/under TV 6 Attaching the speaker to a wall 7 Connection 8 Connecting speakers 8 Connecting a TV and BD player 9 BASIC OPERATION Basic playback operation 10 Listening with the unit • Enjoy high quality surround sound (...
... HDMI control function 23 Setting the HDMI control function 23 Registering HDMI components to TV 24 Changing the connection method and connected components 24 ADDITIONAL INFORMATION Troubleshooting 25 Glossary 29 Specifications 31 Available signal information 32 Notes on the remote ...6 Operation by the TV remote control is difficult (with the speaker beneath/under TV 6 Attaching the speaker to a wall 7 Connection 8 Connecting speakers 8 Connecting a TV and BD player 9 BASIC OPERATION Basic playback operation 10 Listening with the unit • Enjoy high quality surround sound (...

Owners Manual
Page 6
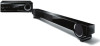
INTRODUCTION Getting started Supplied parts This product consists of the following items. Before making connections, make sure you have received all of the following items. ■ Units Subwoofer Integrated Receiver (SR-301) Speaker (NS-BR301) ■ Accessories Speaker cable × 1 (3 m) ...
INTRODUCTION Getting started Supplied parts This product consists of the following items. Before making connections, make sure you have received all of the following items. ■ Units Subwoofer Integrated Receiver (SR-301) Speaker (NS-BR301) ■ Accessories Speaker cable × 1 (3 m) ...
Owners Manual
Page 7
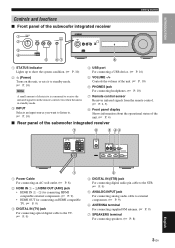
...of the subwoofer integrated receiver Getting started 1 2 3 4 5 67 8 1 STATUS indicator Lights up to show the system condition. (☞ P. 10) 4 USB port For connecting a USB device. (☞ P. 16) 2 (Power) Turns on the unit, or sets it to standby mode. (☞ P. 10) Note 5 VOLUME -/+ Controls the ...volume of the unit. (☞ P. 10) 6 PHONES jack For connecting headphones. (☞ P. 10) A small amount of electricity is consumed to receive the infrared signal from the remote control even when the unit is in...
...of the subwoofer integrated receiver Getting started 1 2 3 4 5 67 8 1 STATUS indicator Lights up to show the system condition. (☞ P. 10) 4 USB port For connecting a USB device. (☞ P. 16) 2 (Power) Turns on the unit, or sets it to standby mode. (☞ P. 10) Note 5 VOLUME -/+ Controls the ...volume of the unit. (☞ P. 10) 6 PHONES jack For connecting headphones. (☞ P. 10) A small amount of electricity is consumed to receive the infrared signal from the remote control even when the unit is in...
Owners Manual
Page 10
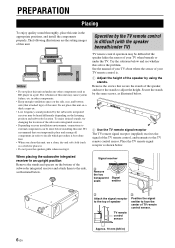
... this unit in a pile. Secure the stands by the subwoofer integrated receiver may be difficult if the speaker hides the sensor of your installation environment, connections to face the center of the subwoofer integrated receiver and attach them to adjust the height. The following illustrations are the setting images of the...
... this unit in a pile. Secure the stands by the subwoofer integrated receiver may be difficult if the speaker hides the sensor of your installation environment, connections to face the center of the subwoofer integrated receiver and attach them to adjust the height. The following illustrations are the setting images of the...
Owners Manual
Page 11
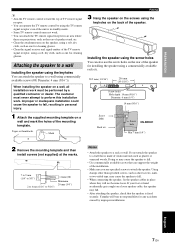
... receptor, using a soft, dry cloth, such as short screws, nails, or two-sided tape, may cause the speaker to fall. • When connecting the speaker, fix the speaker cables in personal injury. 1 Attach the supplied mounting template on a wall and mark the holes of the mounting template..... • Make sure you use the screw holes on the rear of the speaker for any accidents caused by a qualified contractor or dealer. Yamaha will not become loose. The customer must be performed by improper installations. Screw NS-BR301 hole Min 7 mm (1/4") 2 Remove the mounting template ...
... receptor, using a soft, dry cloth, such as short screws, nails, or two-sided tape, may cause the speaker to fall. • When connecting the speaker, fix the speaker cables in personal injury. 1 Attach the supplied mounting template on a wall and mark the holes of the mounting template..... • Make sure you use the screw holes on the rear of the speaker for any accidents caused by a qualified contractor or dealer. Yamaha will not become loose. The customer must be performed by improper installations. Screw NS-BR301 hole Min 7 mm (1/4") 2 Remove the mounting template ...
Owners Manual
Page 12
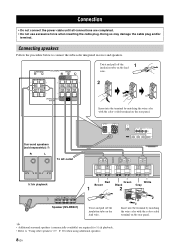
...by matching the wire color with the color-coded terminal on the lead wire. Connection • Do not connect the power cable until all connections are required for 5.1ch playback. • Refer to connect the subwoofer integrated receiver and speakers. y • Additional surround speakers (commercially ...completed. • Do not use excessive force when inserting the cable plug. Doing so may damage the cable plug and/or terminal. Connecting speakers Follow the procedure below to "Using other speakers" (☞ P. 20) when using additional speakers. 8 En Insert into the...
...by matching the wire color with the color-coded terminal on the lead wire. Connection • Do not connect the power cable until all connections are required for 5.1ch playback. • Refer to connect the subwoofer integrated receiver and speakers. y • Additional surround speakers (commercially ...completed. • Do not use excessive force when inserting the cable plug. Doing so may damage the cable plug and/or terminal. Connecting speakers Follow the procedure below to "Using other speakers" (☞ P. 20) when using additional speakers. 8 En Insert into the...
Owners Manual
Page 13
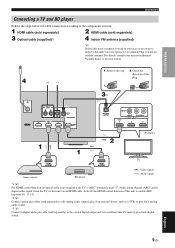
...to the components you use an outdoor antenna. Activate the HDMI control function of this unit to enable ARC function. (☞ P. 19) *2 y Connect analog pin cables (sold separately) to the coaxial digital output jack of the plug 3*1 HDMI INPUT (Example) 2 1 1 TV Game console BD... required if the TV's "ARC" terminal is weak in your nearest authorized Yamaha dealer or Service Center. 4 *2 *3 1 Remove the cap 2 Check the direction of a satellite/cable TV tuner to play back analog audio sound. *3 y Connect a digital audio pin cable (sold separately) to the analog audio output jacks...
...to the components you use an outdoor antenna. Activate the HDMI control function of this unit to enable ARC function. (☞ P. 19) *2 y Connect analog pin cables (sold separately) to the coaxial digital output jack of the plug 3*1 HDMI INPUT (Example) 2 1 1 TV Game console BD... required if the TV's "ARC" terminal is weak in your nearest authorized Yamaha dealer or Service Center. 4 *2 *3 1 Remove the cap 2 Check the direction of a satellite/cable TV tuner to play back analog audio sound. *3 y Connect a digital audio pin cable (sold separately) to the analog audio output jacks...
Owners Manual
Page 14
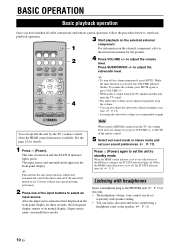
.... • The headphone volume, tone control can be adjusted separately from the TV, the volume level does not change if you have finished all cable connections and remote control operation, follow the procedure below to start basic playback operation. 3 Start playback on the selected external component. 1 For information on the external...
.... • The headphone volume, tone control can be adjusted separately from the TV, the volume level does not change if you have finished all cable connections and remote control operation, follow the procedure below to start basic playback operation. 3 Start playback on the selected external component. 1 For information on the external...
Owners Manual
Page 15
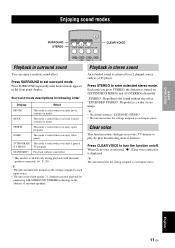
... mode is useful when you enjoy video games. "STEREO": Reproduces the sound without sound effect. *1 This mode is available only during playback with surround speakers connected. (☞ P. 20) y • The unit automatically memorizes the settings assigned to each input source. Clear voice This function makes dialogue in the front panel display...
... mode is useful when you enjoy video games. "STEREO": Reproduces the sound without sound effect. *1 This mode is available only during playback with surround speakers connected. (☞ P. 20) y • The unit automatically memorizes the settings assigned to each input source. Clear voice This function makes dialogue in the front panel display...

Owners Manual
Page 20
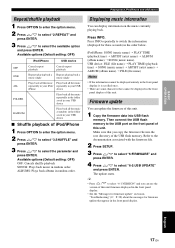
... input setting is USB at the time the unit is turned on with an iPod/iPhone or USB device. • When a playing iPod/iPhone is connected to the unit that appear in the front panel display, see the "Messages for iPod/iPhone and USB device" section in "Troubleshooting" (☞ P. ...fast-forward) : skip backward (press and hold: fast-rewind) ▲/▼: scroll the screen : play back audio files. Playing back iPod/iPhone and USB device Connect a USB device, such as iPod/iPhone, USB flash memory or portable music player, to play /pause*1 : skip forward (press and hold: fast-forward) : skip...
... input setting is USB at the time the unit is turned on with an iPod/iPhone or USB device. • When a playing iPod/iPhone is connected to the unit that appear in the front panel display, see the "Messages for iPod/iPhone and USB device" section in "Troubleshooting" (☞ P. ...fast-forward) : skip backward (press and hold: fast-rewind) ▲/▼: scroll the screen : play back audio files. Playing back iPod/iPhone and USB device Connect a USB device, such as iPod/iPhone, USB flash memory or portable music player, to play /pause*1 : skip forward (press and hold: fast-forward) : skip...
Owners Manual
Page 21
.... 3 Press / to select the available option and press ENTER. y • Press / to the USB port on the music currently playing back. English 17 En Then connect the USB flash memory to select "6-1:VERSION" and you copy the firmware file into the root directory of this unit. 1 Copy the firmware data into...
.... 3 Press / to select the available option and press ENTER. y • Press / to the USB port on the music currently playing back. English 17 En Then connect the USB flash memory to select "6-1:VERSION" and you copy the firmware file into the root directory of this unit. 1 Copy the firmware data into...
Owners Manual
Page 23
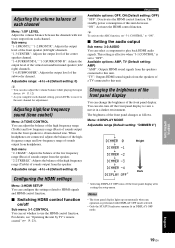
...English 19 En This setting is effective when "3-1:CONTROL" is performed with test tones output from the speakers connected to use the HDMI control function. When headphones are connected, adjusts the balance of the highfrequency range and low-frequency range of sounds output from the speakers of ...panel display after exiting the setup menu. Adjustable range: -6 to this unit decreases. "1-3:CENTER": Adjusts the output level of a TV connected to +6 (Default setting: 0) Setup menu Available options: OFF, ON (Default setting: OFF) "OFF": Deactivates the HDMI control function.
...English 19 En This setting is effective when "3-1:CONTROL" is performed with test tones output from the speakers connected to use the HDMI control function. When headphones are connected, adjusts the balance of the highfrequency range and low-frequency range of sounds output from the speakers of ...panel display after exiting the setup menu. Adjustable range: -6 to this unit decreases. "1-3:CENTER": Adjusts the output level of a TV connected to +6 (Default setting: 0) Setup menu Available options: OFF, ON (Default setting: OFF) "OFF": Deactivates the HDMI control function.
Owners Manual
Page 24
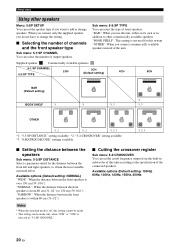
...distance between the front speakers is from the built-in subwoofer of this unit according to obtain the most suitable surround effect. When you connect only the supplied speaker, you do not have to 150 cm (59-1/16"). "BAR": When you use the unit, either on...of output speakers. Setup menu Using other commercially available speakers "BOOK SHELF": This setting is not used for this system "OTHER": When you connect commercially available speakers instead of the unit Supplied speaker: Commercially available speakers: 5-1:SP CHANNEL 5-2:SP TYPE 2CH 3CH (Default setting) 4CH 5CH BAR...
...distance between the front speakers is from the built-in subwoofer of this unit according to obtain the most suitable surround effect. When you connect only the supplied speaker, you do not have to 150 cm (59-1/16"). "BAR": When you use the unit, either on...of output speakers. Setup menu Using other commercially available speakers "BOOK SHELF": This setting is not used for this system "OTHER": When you connect commercially available speakers instead of the unit Supplied speaker: Commercially available speakers: 5-1:SP CHANNEL 5-2:SP TYPE 2CH 3CH (Default setting) 4CH 5CH BAR...

Owners Manual
Page 26
... images sometimes lag behind the sound. Adjustable range: 0ms to 500ms, AUTO (Default setting: "AUTO") "AUTO": If you can use the optical/coaxial input jack connection for details. 3 Press / ENTER. Available options (Default setting: HDMI) "HDMI": Selects HDMI audio signal "OPTICAL": Selects the audio signal from optical input jack "COAXIAL": Selects... the input level for each input. These settings are applied to synchronize it with the function to automatically adjusting the audio delay, you operate HDMI connection to a TV with the video image.
... images sometimes lag behind the sound. Adjustable range: 0ms to 500ms, AUTO (Default setting: "AUTO") "AUTO": If you can use the optical/coaxial input jack connection for details. 3 Press / ENTER. Available options (Default setting: HDMI) "HDMI": Selects HDMI audio signal "OPTICAL": Selects the audio signal from optical input jack "COAXIAL": Selects... the input level for each input. These settings are applied to synchronize it with the function to automatically adjusting the audio delay, you operate HDMI connection to a TV with the video image.

Owners Manual
Page 27
... BD/DVD player, etc.) from the HDMI IN jack to "AV amplifier". USEFUL OPERATION English 23 En When "3-1:CONTROL" in the "3:HDMI SETUP" is connected to 3) jack. - According to the TV, the TV operation such as changing the channel may not be set to HDMI OUT (ARC) jack. -... refer to a device such as "Speaker priority" should be available. Setting the HDMI control function 1 Turn on /off the unit, select desired input sources connected to HDMI IN (1 to this unit. REGZA Link) and is set "3-1:CONTROL" in setup menu, - Volume up/down Selects a component to reproduce sounds ...
... BD/DVD player, etc.) from the HDMI IN jack to "AV amplifier". USEFUL OPERATION English 23 En When "3-1:CONTROL" in the "3:HDMI SETUP" is connected to 3) jack. - According to the TV, the TV operation such as changing the channel may not be set to HDMI OUT (ARC) jack. -... refer to a device such as "Speaker priority" should be available. Setting the HDMI control function 1 Turn on /off the unit, select desired input sources connected to HDMI IN (1 to this unit. REGZA Link) and is set "3-1:CONTROL" in setup menu, - Volume up/down Selects a component to reproduce sounds ...

Owners Manual
Page 28
...control function works (turn them in the "3:HDMI SETUP" is not required in this unit. - After selecting HDMI 1, HDMI 2 or HDMI 3, change the connections. 2 Perform the step 1 to 3 of "Setting the HDMI control function". The HDMI control function is enabled on the TV. (Also check the relative ...settings such as the input source of the TV. 2 Turn on the HDMI control function supported component (example: BD player) connected to this unit. 3 Select the input source of this unit to the same input. 24 En "3-1:CONTROL" in again after about 30 seconds. -...
...control function works (turn them in the "3:HDMI SETUP" is not required in this unit. - After selecting HDMI 1, HDMI 2 or HDMI 3, change the connections. 2 Perform the step 1 to 3 of "Setting the HDMI control function". The HDMI control function is enabled on the TV. (Also check the relative ...settings such as the input source of the TV. 2 Turn on the HDMI control function supported component (example: BD player) connected to this unit. 3 Select the input source of this unit to the same input. 24 En "3-1:CONTROL" in again after about 30 seconds. -...
Owners Manual
Page 29
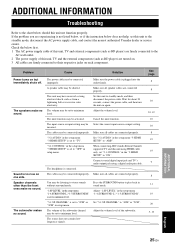
... shorted. The cables may be activated. Set "5-1:SP CHANNEL" to their respective jacks on one side. Make sure all cables are connected properly. ADDITIONAL INFORMATION Troubleshooting Refer to the chart below should this unit to the standby mode, disconnect the AC power supply cable, and... contact the nearest authorized Yamaha dealer or service center. Speaker channels other than the front ones make no sound. This unit may be connected improperly. The mute function may have received a strong electrical shock, such as BD...
... shorted. The cables may be activated. Set "5-1:SP CHANNEL" to their respective jacks on one side. Make sure all cables are connected properly. ADDITIONAL INFORMATION Troubleshooting Refer to the chart below should this unit to the standby mode, disconnect the AC power supply cable, and... contact the nearest authorized Yamaha dealer or service center. Speaker channels other than the front ones make no sound. This unit may be connected improperly. The mute function may have received a strong electrical shock, such as BD...
Owners Manual
Page 30
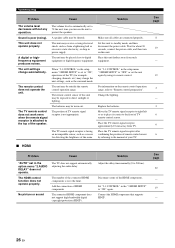
...Replace the batteries. The unit may be exposed to the top of remote control sensor by using its center to the front of the connected HDMI components is facing an incompatible sensor, such as from a lightening bolt or excessive static electricity, or drop in the setup menu ...CONTROL" in the setup menu "3:HDMI SETUP" is set in the option menu "2.AUDIO DELAY" does not operate. Make sure all cables are connected properly. Solution Adjust the delay time manually (0 to standby mode, and then disconnect the power cable. Troubleshooting Problem Cause Solution The volume level...
...Replace the batteries. The unit may be exposed to the top of remote control sensor by using its center to the front of the connected HDMI components is facing an incompatible sensor, such as from a lightening bolt or excessive static electricity, or drop in the setup menu ...CONTROL" in the setup menu "3:HDMI SETUP" is set in the option menu "2.AUDIO DELAY" does not operate. Make sure all cables are connected properly. Solution Adjust the delay time manually (0 to standby mode, and then disconnect the power cable. Troubleshooting Problem Cause Solution The volume level...


