
Owners Manual
Page 2
... replacement of the obsolete outlet. 10 Protect the power cord from being walked on the rear of time. 14 Refer all instructions. 5 Do not use caution when moving the cart/apparatus combination to rain or moisture, does not operate normally, or has been dropped. Install in any way, such as power-supply cord or plug is used, use this Owner's Manual in the space below. A polarized plug...
... replacement of the obsolete outlet. 10 Protect the power cord from being walked on the rear of time. 14 Refer all instructions. 5 Do not use caution when moving the cart/apparatus combination to rain or moisture, does not operate normally, or has been dropped. Install in any way, such as power-supply cord or plug is used, use this Owner's Manual in the space below. A polarized plug...
Owners Manual
Page 4
... outlets in the home are complete. 8 Do not operate this unit. Other components, as follows: The wire which is coloured BROWN must be cut off this unit by improper placement or installation of speakers. 22 Never put a hand or a foreign object into the port located on switches, knobs and/or cords. 10 When disconnecting the power cable from a wall outlet or the...
... outlets in the home are complete. 8 Do not operate this unit. Other components, as follows: The wire which is coloured BROWN must be cut off this unit by improper placement or installation of speakers. 22 Never put a hand or a foreign object into the port located on switches, knobs and/or cords. 10 When disconnecting the power cable from a wall outlet or the...
Owners Manual
Page 5
... Setup menu list 18 Basic procedure 18 Adjusting the volume balance of each channel ........ 19 Adjusting high/low frequency sound (tone control) 19 Configuring the HDMI settings 19 Changing the brightness of the front panel display 19 Using other speakers 20 Dynamic range control 21 Setting the matrix decode 21 Settings for each input source (Option menu) ....22 Adjusting input level of each jack (VOLUME TRIM 22 Adjusting the audio delay (AUDIO DELAY 22 Assigning the audio input to optical/coaxial digital input (AUDIO ASSIGN 22 Operating the unit by TV's remote control (HDMI...
... Setup menu list 18 Basic procedure 18 Adjusting the volume balance of each channel ........ 19 Adjusting high/low frequency sound (tone control) 19 Configuring the HDMI settings 19 Changing the brightness of the front panel display 19 Using other speakers 20 Dynamic range control 21 Setting the matrix decode 21 Settings for each input source (Option menu) ....22 Adjusting input level of each jack (VOLUME TRIM 22 Adjusting the audio delay (AUDIO DELAY 22 Assigning the audio input to optical/coaxial digital input (AUDIO ASSIGN 22 Operating the unit by TV's remote control (HDMI...
Owners Manual
Page 7
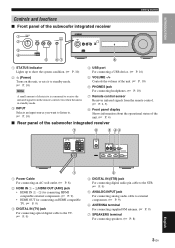
... control. (☞ P. 2, 5) 8 Front panel display Shows information about the operational status of the unit. (☞ P. 4) ■ Rear panel of the subwoofer integrated receiver 7 6 5 43 1 1 Power Cable For connecting an AC wall outlet. (☞ P. 8) 2 HDMI IN 1 - 3/HDMI OUT (ARC) jack • HDMI IN 1 - 3 for connecting HDMI compatible external components. (☞ P. 9) • HDMI OUT for connecting an HDMI compatible TV. (☞ P. 9) 3 DIGITAL IN (TV) jack For connecting optical digital cable to the TV. (☞ P. 9) 2 4 DIGITAL IN (STB) jack For connecting digital audio...
... control. (☞ P. 2, 5) 8 Front panel display Shows information about the operational status of the unit. (☞ P. 4) ■ Rear panel of the subwoofer integrated receiver 7 6 5 43 1 1 Power Cable For connecting an AC wall outlet. (☞ P. 8) 2 HDMI IN 1 - 3/HDMI OUT (ARC) jack • HDMI IN 1 - 3 for connecting HDMI compatible external components. (☞ P. 9) • HDMI OUT for connecting an HDMI compatible TV. (☞ P. 9) 3 DIGITAL IN (TV) jack For connecting optical digital cable to the TV. (☞ P. 9) 2 4 DIGITAL IN (STB) jack For connecting digital audio...
Owners Manual
Page 9
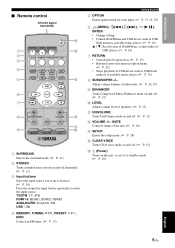
... the unit. (☞ P. 10) C SETUP Enters the setup menu. (☞ P. 18) D CLEAR VOICE Turns Clear voice mode on and off. (☞ P. 11) E (Power) Turns on and off . (☞ P. 11) B VOLUME +/-, MUTE Control volume of USB device such as USB flash memory or portable music player. (☞ P. 16) 8 SUBWOOFER +/- INTRODUCTION ■ Remote control Infrared signal transmitter E 1 D 2 3 4 5 C 6 7 8 B A 9 0 1 SURROUND Selects the surround mode. (☞ P. 11) 2 STEREO Turns extended stereo mode on the unit, or sets it to standby mode. (☞ P. 10) English 5 En...
... the unit. (☞ P. 10) C SETUP Enters the setup menu. (☞ P. 18) D CLEAR VOICE Turns Clear voice mode on and off. (☞ P. 11) E (Power) Turns on and off . (☞ P. 11) B VOLUME +/-, MUTE Control volume of USB device such as USB flash memory or portable music player. (☞ P. 16) 8 SUBWOOFER +/- INTRODUCTION ■ Remote control Infrared signal transmitter E 1 D 2 3 4 5 C 6 7 8 B A 9 0 1 SURROUND Selects the surround mode. (☞ P. 11) 2 STEREO Turns extended stereo mode on the unit, or sets it to standby mode. (☞ P. 10) English 5 En...
Owners Manual
Page 10
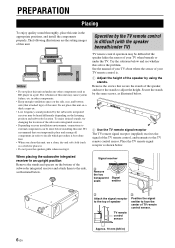
...; Low frequency sound produced by the TV remote control is difficult (with the speaker beneath/under the TV. Place the TV remote signal receptor as illustrated below . Signal receiver 1 Remove the two transparent seals Signal emitter 6 En 3 Attach the signal receptor to the top of speaker TV remote control sensor 2 Position the signal emitter to face the center of the subwoofer integrated receiver and attach them to the TV remote control sensor...
...; Low frequency sound produced by the TV remote control is difficult (with the speaker beneath/under the TV. Place the TV remote signal receptor as illustrated below . Signal receiver 1 Remove the two transparent seals Signal emitter 6 En 3 Attach the signal receptor to the top of speaker TV remote control sensor 2 Position the signal emitter to face the center of the subwoofer integrated receiver and attach them to the TV remote control sensor...
Owners Manual
Page 13
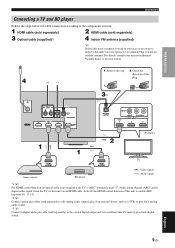
... digital sound. Audio return channel (ARC) carries digital audio signal (from the TV) to this unit to enable ARC function. (☞ P. 19) *2 y Connect analog pin cables (sold separately) to the analog audio output jacks of the plug 3*1 HDMI INPUT (Example) 2 1 1 TV Game console BD player Video signals Audio signals *1 y For HDMI control function, an optical cable is not required if the TV's "ARC" terminal is weak in your nearest authorized Yamaha dealer or Service Center. 4 *2 *3 1 Remove the cap 2 Check the direction...
... digital sound. Audio return channel (ARC) carries digital audio signal (from the TV) to this unit to enable ARC function. (☞ P. 19) *2 y Connect analog pin cables (sold separately) to the analog audio output jacks of the plug 3*1 HDMI INPUT (Example) 2 1 1 TV Game console BD player Video signals Audio signals *1 y For HDMI control function, an optical cable is not required if the TV's "ARC" terminal is weak in your nearest authorized Yamaha dealer or Service Center. 4 *2 *3 1 Remove the cap 2 Check the direction...
Owners Manual
Page 14
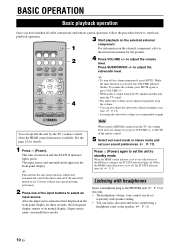
... En to standby mode. to the PHONES jack (☞ P. 3) of the remote control. 5 Select surround mode or stereo mode and set your sound preferences. (☞ P. 11) Press (Power) again to set to its normal display. (Input source name: surround/stereo mode). When the HDMI control function is output from both TV speaker and this unit. • The headphone volume, tone control can be adjusted separately from the TV, the volume level does not change if you have finished all cable connections and remote control operation, follow the...
... En to standby mode. to the PHONES jack (☞ P. 3) of the remote control. 5 Select surround mode or stereo mode and set your sound preferences. (☞ P. 11) Press (Power) again to set to its normal display. (Input source name: surround/stereo mode). When the HDMI control function is output from both TV speaker and this unit. • The headphone volume, tone control can be adjusted separately from the TV, the volume level does not change if you have finished all cable connections and remote control operation, follow the...
Owners Manual
Page 16
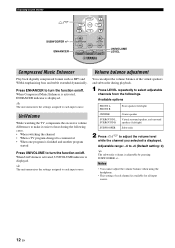
... repeatedly to +6 (Default setting: 0) y The subwoofer volume is adjustable by pressing SUBWOOFER +/-. When UniVolume is activated, UNIVOLUME indicator is displayed. Enjoying sound modes / SUBWOOFER +/- Available options FRONT L, FRONT R CENTER SURROUND L, SURROUND R SUBWOOFER Front speaker (left/right) Center speaker Virtual surround speaker, and surround speakers (left/right) Subwoofer 2 Press / to each input source. ENHANCER UNIVOLUME LEVEL Compressed Music Enhancer Volume balance adjustment Play back digitally compressed format such as MP3 and WMA emphasizing bass and treble...
... repeatedly to +6 (Default setting: 0) y The subwoofer volume is adjustable by pressing SUBWOOFER +/-. When UniVolume is activated, UNIVOLUME indicator is displayed. Enjoying sound modes / SUBWOOFER +/- Available options FRONT L, FRONT R CENTER SURROUND L, SURROUND R SUBWOOFER Front speaker (left/right) Center speaker Virtual surround speaker, and surround speakers (left/right) Subwoofer 2 Press / to each input source. ENHANCER UNIVOLUME LEVEL Compressed Music Enhancer Volume balance adjustment Play back digitally compressed format such as MP3 and WMA emphasizing bass and treble...

Owners Manual
Page 18
... the option menu. 2 Display "4.STEREO/MONO" by using and press ENTER. 3 Select "MONO" to set the reception mode to monaural by using / . 14 En y To cancel registration, press RETURN on the display. y You can cancel the operation and return to the option menu by the preset number to which no station is registered, EMPTY indicator appears on the remote control or leave the tuner without any operations for...
... the option menu. 2 Display "4.STEREO/MONO" by using and press ENTER. 3 Select "MONO" to set the reception mode to monaural by using / . 14 En y To cancel registration, press RETURN on the display. y You can cancel the operation and return to the option menu by the preset number to which no station is registered, EMPTY indicator appears on the remote control or leave the tuner without any operations for...
Owners Manual
Page 19
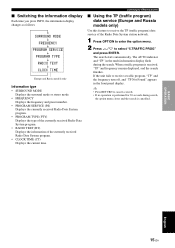
... surround mode or stereo mode. • FREQUENCY Displays the frequency and preset number. • PROGRAM SERVICE (PS) Displays the currently received Radio Data System program. • PROGRAM TYPE (PTY) Displays the type of the currently received Radio Data System program. • RADIO TEXT (RT) Displays the information of the Radio Data System station network. 1 Press OPTION to enter the option menu. 2 Press / to receive a traffic program, "TP" and the frequency turn off, and "TP Not Found" appears in the multi information display flash...
... surround mode or stereo mode. • FREQUENCY Displays the frequency and preset number. • PROGRAM SERVICE (PS) Displays the currently received Radio Data System program. • PROGRAM TYPE (PTY) Displays the type of the currently received Radio Data System program. • RADIO TEXT (RT) Displays the information of the Radio Data System station network. 1 Press OPTION to enter the option menu. 2 Press / to receive a traffic program, "TP" and the frequency turn off, and "TP Not Found" appears in the multi information display flash...

Owners Manual
Page 22
...SP LEVEL 2:TONE CONTROL 3:HDMI SETUP 4:DISPLAY MODE 5:SP SETUP 6:FIRMWARE 7:D.RANGE 8:MATRIX DECODE Sub menu 1-1:FRONT L 1-2:FRONT R 1-3:CENTER 1-4:SURROUND L 1-5:SURROUND R 1-6:SUBWOOFER 2-1:BASS 2-2:TREBLE 3-1:CONTROL 3-2:AUDIO 5-1:SP CHANNEL 5-2:SP TYPE 5-3:SP DISTANCE 5-4:CROSSOVER 6-1:VERSION 6-2:USB UPDATE 8-1:DECODE MODE 8-2:C.IMAGE Features Adjusting the volume balance with test tone Adjusting high/low frequency sound (tone control) Configuring the HDMI settings Changing the brightness of the front panel display Selecting the number of channel Changing the setting of the speaker type...
...SP LEVEL 2:TONE CONTROL 3:HDMI SETUP 4:DISPLAY MODE 5:SP SETUP 6:FIRMWARE 7:D.RANGE 8:MATRIX DECODE Sub menu 1-1:FRONT L 1-2:FRONT R 1-3:CENTER 1-4:SURROUND L 1-5:SURROUND R 1-6:SUBWOOFER 2-1:BASS 2-2:TREBLE 3-1:CONTROL 3-2:AUDIO 5-1:SP CHANNEL 5-2:SP TYPE 5-3:SP DISTANCE 5-4:CROSSOVER 6-1:VERSION 6-2:USB UPDATE 8-1:DECODE MODE 8-2:C.IMAGE Features Adjusting the volume balance with test tone Adjusting high/low frequency sound (tone control) Configuring the HDMI settings Changing the brightness of the front panel display Selecting the number of channel Changing the setting of the speaker type...
Owners Manual
Page 23
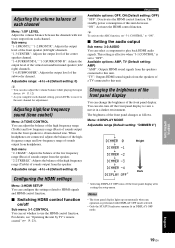
...output level of the front speaker (left / right) channels. When headphones are connected, adjusts the balance of the highfrequency range and low-frequency range of sounds output from the speakers connected to "ON". ■ Setting the audio output Sub menu: 3-2:AUDIO You can also turn off the front panel display after exiting the setup menu. The standby power consumption of this unit. Menu: 4:DISPLAY MODE Adjustable range (Default setting: "DIMMER 0") Bright Dark Configuring the HDMI settings Menu: 3:HDMI SETUP You can configure the settings related to HDMI signals and HDMI control...
...output level of the front speaker (left / right) channels. When headphones are connected, adjusts the balance of the highfrequency range and low-frequency range of sounds output from the speakers connected to "ON". ■ Setting the audio output Sub menu: 3-2:AUDIO You can also turn off the front panel display after exiting the setup menu. The standby power consumption of this unit. Menu: 4:DISPLAY MODE Adjustable range (Default setting: "DIMMER 0") Bright Dark Configuring the HDMI settings Menu: 3:HDMI SETUP You can configure the settings related to HDMI signals and HDMI control...

Owners Manual
Page 26
... ASSIGN 2.AUTO PRESET 3.CLEAR PRESET 4.STEREO/MONO 5.TRAFFIC PROG*1 USB 2.REPEAT 3.SHUFFLE*2 *1 See the page 13 for details. *2 See the page 17 for each jack to automatically adjusting the audio delay, you operate HDMI connection to a TV with the video image. These settings are applied to optical/coaxial digital input (AUDIO ASSIGN) Menu: 3.AUDIO ASSIGN If a component's HDMI jack does not carry audio signal, select HDMI input and use this function to delay the sound output to +6 (Default setting: 0) Adjusting the audio delay (AUDIO DELAY) Menu: 2.AUDIO DELAY Flat panel display TV...
... ASSIGN 2.AUTO PRESET 3.CLEAR PRESET 4.STEREO/MONO 5.TRAFFIC PROG*1 USB 2.REPEAT 3.SHUFFLE*2 *1 See the page 13 for details. *2 See the page 17 for each jack to automatically adjusting the audio delay, you operate HDMI connection to a TV with the video image. These settings are applied to optical/coaxial digital input (AUDIO ASSIGN) Menu: 3.AUDIO ASSIGN If a component's HDMI jack does not carry audio signal, select HDMI input and use this function to delay the sound output to +6 (Default setting: 0) Adjusting the audio delay (AUDIO DELAY) Menu: 2.AUDIO DELAY Flat panel display TV...

Owners Manual
Page 27
... components, refer to the manual supplied with HDMI and enable the HDMI control function on your TV. • If you use the TV remote control to operate this unit if your TV supports the HDMI control function, some functions may change the setting of surround modes of this unit. *3 y The example of TV settings • From a setup menu on each component. *3 3 Turn off the unit, select desired input sources connected to HDMI IN (1 to the input source setting on /off and the signal outputs...
... components, refer to the manual supplied with HDMI and enable the HDMI control function on your TV. • If you use the TV remote control to operate this unit if your TV supports the HDMI control function, some functions may change the setting of surround modes of this unit. *3 y The example of TV settings • From a setup menu on each component. *3 3 Turn off the unit, select desired input sources connected to HDMI IN (1 to the input source setting on /off and the signal outputs...

Owners Manual
Page 28
... AC power supply cable of the TV and player, turn them in the player is correctly displayed or not. Operating the unit by TV's remote control Registering HDMI components to TV *4 1 Select this unit as power interlock function or speaker priority.) The HDMI control function is enabled on again. - When connecting BD player with HDMI 1 jack, press input selector button repeatedly to select "HDMI 1". 4 Check if the HDMI control function works (turn on the HDMI control function supported component (example: BD player) connected to this unit. 3 Select the input source of...
... AC power supply cable of the TV and player, turn them in the player is correctly displayed or not. Operating the unit by TV's remote control Registering HDMI components to TV *4 1 Select this unit as power interlock function or speaker priority.) The HDMI control function is enabled on again. - When connecting BD player with HDMI 1 jack, press input selector button repeatedly to select "HDMI 1". 4 Check if the HDMI control function works (turn on the HDMI control function supported component (example: BD player) connected to this unit. 3 Select the input source of...
Owners Manual
Page 29
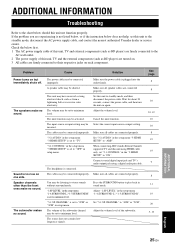
..."1-4:SURROUND L"/"1-5:SURROUND R" is too low on but immediately shuts off. "1:SP LEVEL" in the setup menu "3:HDMI SETUP" to minimum level. The cables may have received a strong electrical shock, such as BD player) are turned on. 3 All cables are firmly connected to their respective jacks on again. Adjust the volume level of this unit to minimum level. The speakers make no sound. Cancel the mute function. "3-2:AUDIO" in the "3:HDMI SETUP" to minimum level. Connect coaxial digital input jack and TV's audio output jack using HDMI cable only, set to "AMP...
..."1-4:SURROUND L"/"1-5:SURROUND R" is too low on but immediately shuts off. "1:SP LEVEL" in the setup menu "3:HDMI SETUP" to minimum level. The cables may have received a strong electrical shock, such as BD player) are turned on. 3 All cables are firmly connected to their respective jacks on again. Adjust the volume level of this unit to minimum level. The speakers make no sound. Cancel the mute function. "3-2:AUDIO" in the "3:HDMI SETUP" to minimum level. Connect coaxial digital input jack and TV's audio output jack using HDMI cable only, set to "AMP...
Owners Manual
Page 30
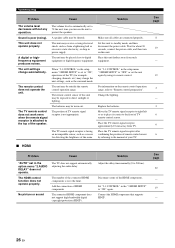
... seconds, connect the power cable, and then turn on this unit farther away from TV. Add the connection of the connected HDMI components is poor (noisy). A digital or highfrequency equipment produces noises. The remote control does not operate the unit. Move the TV remote signal receptor to protect the speakers. No picture or sound The TV does not support automatically adjusting the audio delay. Sound is over the limit. Connect the HDMI component that supports HDCP. The...
... seconds, connect the power cable, and then turn on this unit farther away from TV. Add the connection of the connected HDMI components is poor (noisy). A digital or highfrequency equipment produces noises. The remote control does not operate the unit. Move the TV remote signal receptor to protect the speakers. No picture or sound The TV does not support automatically adjusting the audio delay. Sound is over the limit. Connect the HDMI component that supports HDCP. The...
Owners Manual
Page 32
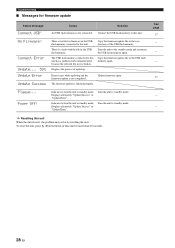
... freezes, the problem may solve by resetting the unit. Error occurs while updating and the firmware update is not connected. Update firmware again. Displays alternately "Update Success" or "Update Error". Copy the firmware update file to standby mode. Indicates to turn the unit to standby mode. Turn the unit to the root directory of the USB flash memory. Cause Solution An USB flash memory is not completed. To reset the unit, press (Power) button of updating. Power Off! Troubleshooting ■ Messages...
... freezes, the problem may solve by resetting the unit. Error occurs while updating and the firmware update is not connected. Update firmware again. Displays alternately "Update Success" or "Update Error". Copy the firmware update file to standby mode. Indicates to turn the unit to standby mode. Turn the unit to the root directory of the USB flash memory. Cause Solution An USB flash memory is not completed. To reset the unit, press (Power) button of updating. Power Off! Troubleshooting ■ Messages...

Owners Manual
Page 36
... is played back, video and audio signals may not be output depending on the component). y • Refer to 320kbps) Compatible media CD, DVD-Video, DVD-Audio, etc. Deep Color - x.v.Color - 3D video signal y The compatible video signal is changed depending on the connected TV. ■ Digital audio signal (optical/coaxial) Audio signal types Audio signal formats 2ch Linear PCM 2ch, 32-96 kHz, 16/20/24 bit Bitstream Dolby Digital, Dolby Digital EX, DTS, DTSES ■ iPod/iPhone/USB device Available sound data compression format •...
... is played back, video and audio signals may not be output depending on the component). y • Refer to 320kbps) Compatible media CD, DVD-Video, DVD-Audio, etc. Deep Color - x.v.Color - 3D video signal y The compatible video signal is changed depending on the connected TV. ■ Digital audio signal (optical/coaxial) Audio signal types Audio signal formats 2ch Linear PCM 2ch, 32-96 kHz, 16/20/24 bit Bitstream Dolby Digital, Dolby Digital EX, DTS, DTSES ■ iPod/iPhone/USB device Available sound data compression format •...


