

Quick Guide
Page 6
...faders to their respective companies. Depending on the condition of 5s) Conforms to save valuable resources and prevent any potential negative effects on the display. Doing so may cause problems with general household waste. The backup battery is reason to believe that it... use the device in the vicinity of disposal. (weee_eu_en_01) European Models Purchaser/User Information specified in this might have qualified Yamaha service personnel replace the backup battery. Information • Copying of the commercially available musical data including but not limited to the...
...faders to their respective companies. Depending on the condition of 5s) Conforms to save valuable resources and prevent any potential negative effects on the display. Doing so may cause problems with general household waste. The backup battery is reason to believe that it... use the device in the vicinity of disposal. (weee_eu_en_01) European Models Purchaser/User Information specified in this might have qualified Yamaha service personnel replace the backup battery. Information • Copying of the commercially available musical data including but not limited to the...
Quick Guide
Page 7
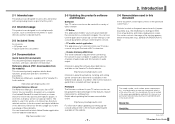
.... Use Adobe® Reader® to read this book on screen. Information about the software described here is available on the Yamaha Pro Audio website. In addition, refer to aid identification in the space provided below . Details about downloading, installing and setting up...http://www.yamahaproaudio.com/ For information about functions, production operation, and effects parameters. Introduction 2-6 Nomenclature used in this document In this electronic file format. The Refernece Manual is available on the Yamaha Pro Audio website. The ability to search for words, or to follow...
.... Use Adobe® Reader® to read this book on screen. Information about the software described here is available on the Yamaha Pro Audio website. In addition, refer to aid identification in the space provided below . Details about downloading, installing and setting up...http://www.yamahaproaudio.com/ For information about functions, production operation, and effects parameters. Introduction 2-6 Nomenclature used in this document In this electronic file format. The Refernece Manual is available on the Yamaha Pro Audio website. The ability to search for words, or to follow...

Quick Guide
Page 9
...each instrument or mic, you can edit Presets and save them as Presets and recreate that configuration anytime, easily. After fine-tuning the sound of effects applied to each instrument. • Adjusting SENDS ON FADER for the level sent to song, you can save a complete mix setup for every... Scene by saving them as new Presets in the default state, USER DEFINED KEYS (page 15) are configured as the type of effects (page 15) MUTE Effects on/ off, effects level SENDS ON FADER Workflow Overview Save Your Settings Save your settings You can save your entire mix setup as a Scene. (SCENE...
...each instrument or mic, you can edit Presets and save them as Presets and recreate that configuration anytime, easily. After fine-tuning the sound of effects applied to each instrument. • Adjusting SENDS ON FADER for the level sent to song, you can save a complete mix setup for every... Scene by saving them as new Presets in the default state, USER DEFINED KEYS (page 15) are configured as the type of effects (page 15) MUTE Effects on/ off, effects level SENDS ON FADER Workflow Overview Save Your Settings Save your settings You can save your entire mix setup as a Scene. (SCENE...

Quick Guide
Page 10
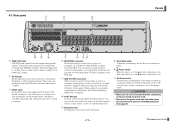
...;⑭ ④ ⑤ TF series Quick Guide ⑫ - 10 - ⑥ ⑦ ⑧ 1 Channel Strip section (page 14) 2 ST IN (stereo input) section (page 14) 3 FX (effects) section (page 15) 4 USER DEFINED KEYS section (page 15) 5 MUTE section (page 15) ⑩ 6 METER section (page 15) 7 PHONES section (page 15) 8 FADER BANK section...
...;⑭ ④ ⑤ TF series Quick Guide ⑫ - 10 - ⑥ ⑦ ⑧ 1 Channel Strip section (page 14) 2 ST IN (stereo input) section (page 14) 3 FX (effects) section (page 15) 4 USER DEFINED KEYS section (page 15) 5 MUTE section (page 15) ⑩ 6 METER section (page 15) 7 PHONES section (page 15) 8 FADER BANK section...
Quick Guide
Page 11
...or the iPad app. 5 USB TO HOST connector USB connector used to connect the console to a computer, allowing the console to function as an effect bypass switch, a mute switch, or use it to tap the delay time. 7 Expansion slot An expansion slot to output AUX channels and STEREO ... Nominal input level is turned off . 0 AC IN connector Connect the included power cord. When using with a computer running Microsoft Windows, the Yamaha Steinberg USB Driver is -10 dBV. 3 INPUT jacks Combination jacks that output analog audio signals. TF series Quick Guide These jacks are unbalanced female...
...or the iPad app. 5 USB TO HOST connector USB connector used to connect the console to a computer, allowing the console to function as an effect bypass switch, a mute switch, or use it to tap the delay time. 7 Expansion slot An expansion slot to output AUX channels and STEREO ... Nominal input level is turned off . 0 AC IN connector Connect the included power cord. When using with a computer running Microsoft Windows, the Yamaha Steinberg USB Driver is -10 dBV. 3 INPUT jacks Combination jacks that output analog audio signals. TF series Quick Guide These jacks are unbalanced female...

Quick Guide
Page 15
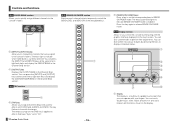
HINT For TF5 and TF3 consoles, FX can also be customized to control the desired function. The key lights when the mute group is on. 3 Meter LEDs Indicate ... Scene Recall. 6-6 METER section Used to monitor audio signal level and control the CUE feature. ① ② 1 [EDIT] key Displays the FX SEND screen. Insertion effects for MONITOR or CUE. 2 [LEVEL] knob Controls the level of the STEREO or CUE bus. 2 [CLEAR] key (CLEAR CUE key) Turns off . 5 [LEVEL] knob Adjusts...
HINT For TF5 and TF3 consoles, FX can also be customized to control the desired function. The key lights when the mute group is on. 3 Meter LEDs Indicate ... Scene Recall. 6-6 METER section Used to monitor audio signal level and control the CUE feature. ① ② 1 [EDIT] key Displays the FX SEND screen. Insertion effects for MONITOR or CUE. 2 [LEVEL] knob Controls the level of the STEREO or CUE bus. 2 [CLEAR] key (CLEAR CUE key) Turns off . 5 [LEVEL] knob Adjusts...
Quick Guide
Page 16
...the Channel Strip section. 6-9 TAP section ① 1 [TAP] key Allows you to tap and set the corresponding bus to set the delay time used for effects on the touchscreen. The key you pressed lights to the console's faders. You can dive further into various features by interacting with the items shown... on the [TAP] key is applied to effects that have "Sync" set to interact with the graphic interface displayed on FX1/FX2 and AUX9/10-AUX19/20. You can touch, double-touch, ...
...the Channel Strip section. 6-9 TAP section ① 1 [TAP] key Allows you to tap and set the corresponding bus to set the delay time used for effects on the touchscreen. The key you pressed lights to the console's faders. You can dive further into various features by interacting with the items shown... on the [TAP] key is applied to effects that have "Sync" set to interact with the graphic interface displayed on FX1/FX2 and AUX9/10-AUX19/20. You can touch, double-touch, ...

Quick Guide
Page 18
In the example shown here, we will explain how to switch to select effects and edit their parameters. From here you can double-touch an area of the screen. You can pinch in the left side of a channel to ...
In the example shown here, we will explain how to switch to select effects and edit their parameters. From here you can double-touch an area of the screen. You can pinch in the left side of a channel to ...

Reference Manual
Page 3
... Adjusting EQ in 1-knob EQ mode 42 Setting HPF ...43 Setting LPF ...43 Setting the gate...45 Setting the compressor 47 Setting an effect ...49 Setting an insert effect 49 Adjusting the SEND TO AUX level 53 Using GEQ ...63 Adjusting the SEND FROM level 65 Assigning channels to a DCA group 66...
... Adjusting EQ in 1-knob EQ mode 42 Setting HPF ...43 Setting LPF ...43 Setting the gate...45 Setting the compressor 47 Setting an effect ...49 Setting an insert effect 49 Adjusting the SEND TO AUX level 53 Using GEQ ...63 Adjusting the SEND FROM level 65 Assigning channels to a DCA group 66...

Reference Manual
Page 8
...: Channel name, icon, and color AUX 1-8, STEREO channels GEQ: GEQ settings Name: Channel name, icon, and color FX RTN, AUX9/10-AUX19/20 channels FX: Effect settings Name: Channel name, icon, and color SUB channels Name: Channel name, icon, and color 6 Recall CH button Recalls a Preset to the selected channel. 7 Edit...
...: Channel name, icon, and color AUX 1-8, STEREO channels GEQ: GEQ settings Name: Channel name, icon, and color FX RTN, AUX9/10-AUX19/20 channels FX: Effect settings Name: Channel name, icon, and color SUB channels Name: Channel name, icon, and color 6 Recall CH button Recalls a Preset to the selected channel. 7 Edit...

Reference Manual
Page 26
FUNCTION PARAMETER 1 Inc Dec CH Select Specific CH CUE Specific CH Effect Help Meter Monitor Oscillator Bypass Peak Hold ON Output Source Select Oscillator On Specific CH Bookmark Page Change Bookmark with the bookmark. Turns the monitor ... and hold on and off for PARAMETER 1. Same as a new file. Displays help information. Turns the channel assigned to bookmark the current screen. Bypasses the effect assigned to PARAMETER 2. Turns the cue on the RECORDER screen. Same as above. Recording stops and the file is saved with "SEL" Close Popup Recorder...
FUNCTION PARAMETER 1 Inc Dec CH Select Specific CH CUE Specific CH Effect Help Meter Monitor Oscillator Bypass Peak Hold ON Output Source Select Oscillator On Specific CH Bookmark Page Change Bookmark with the bookmark. Turns the monitor ... and hold on and off for PARAMETER 1. Same as a new file. Displays help information. Turns the channel assigned to bookmark the current screen. Bypasses the effect assigned to PARAMETER 2. Turns the cue on the RECORDER screen. Same as above. Recording stops and the file is saved with "SEL" Close Popup Recorder...

Reference Manual
Page 28
...less than two seconds to PARAMETER 2 on the RECORDER screen. Toolbar Features that Scene number. Selects the channel assigned to PARAMETER 2. Bypasses the effect assigned to PARAMETER 2. Same as the INC, DEC, STORE, and RECALL keys. Closes the popup screen. Same as the CLEAR CUE key on... FUNCTION No Assign PARAMETER 1 Brightness Bank Change CH ON Specific CH CH Select Inc Dec Specific CH Clear Cue CUE Specific CH Effect Help Meter Monitor Bypass Peak Hold ON Output Source Select Mute Master Oscillator Input FX Oscillator On Specific CH Bookmark Page Change Bookmark ...
...less than two seconds to PARAMETER 2 on the RECORDER screen. Toolbar Features that Scene number. Selects the channel assigned to PARAMETER 2. Bypasses the effect assigned to PARAMETER 2. Same as the INC, DEC, STORE, and RECALL keys. Closes the popup screen. Same as the CLEAR CUE key on... FUNCTION No Assign PARAMETER 1 Brightness Bank Change CH ON Specific CH CH Select Inc Dec Specific CH Clear Cue CUE Specific CH Effect Help Meter Monitor Bypass Peak Hold ON Output Source Select Mute Master Oscillator Input FX Oscillator On Specific CH Bookmark Page Change Bookmark ...

Reference Manual
Page 48
.... TF Series Reference Manual FX screen (FX1/2, INS FX1-6) Allows you to select whether the pre-fader or post-fader signal is processed by the effect module. Allows you to display other parameters available for CH 1-40, ST IN 1 and ST IN 2. On: Before the fader Off: After the fader 8 ... [TAP] button found in the SENDS ON FADER section of signal that have a tempo setting, such as delays. Configuration screens 7 Pre button Displayed for the effects module. - 48 - C CUE button Turns cue on ) or not sent (off for CH 1-40, ST IN 1 and ST IN 2. Determines whether a signal is turned on...
.... TF Series Reference Manual FX screen (FX1/2, INS FX1-6) Allows you to select whether the pre-fader or post-fader signal is processed by the effect module. Allows you to display other parameters available for CH 1-40, ST IN 1 and ST IN 2. On: Before the fader Off: After the fader 8 ... [TAP] button found in the SENDS ON FADER section of signal that have a tempo setting, such as delays. Configuration screens 7 Pre button Displayed for the effects module. - 48 - C CUE button Turns cue on ) or not sent (off for CH 1-40, ST IN 1 and ST IN 2. Determines whether a signal is turned on...

Reference Manual
Page 49
.... Bypass is sent to their default values. turn the bypass off. 3. Adjust the parameter sliders as desired. Setting an effect 1. EFFECT TYPE screen Allows you to adjust how much of the selected effect with the effect parameters in the clipboard by default; Touch the bypass button. Adjust the parameter sliders as desired. Adjust the...
.... Bypass is sent to their default values. turn the bypass off. 3. Adjust the parameter sliders as desired. Setting an effect 1. EFFECT TYPE screen Allows you to adjust how much of the selected effect with the effect parameters in the clipboard by default; Touch the bypass button. Adjust the parameter sliders as desired. Adjust the...

Reference Manual
Page 50
Configuration screens Effect parameters REVERB HALL, REVERB ROOM, REVERB STAGE, REVERB PLATE One-input, two-output hall, room, stage, and plate reverbs. Low-pass filter cutoff frequency. Amount ...
Configuration screens Effect parameters REVERB HALL, REVERB ROOM, REVERB STAGE, REVERB PLATE One-input, two-output hall, room, stage, and plate reverbs. Low-pass filter cutoff frequency. Amount ...

Reference Manual
Page 51
... reflection with gate, and an early reflection with reverse gate. CHORUS (V1.1 and later) Two-input, two-output chorus effect. Parameter tempo sync. Amount of high-frequency feedback. Delay mix balance. Density of pitch modulation. Value used to calculate the...tempo. Description Modulation speed Depth of feedback. Parameter tempo sync. EARLY REF (V1.1 and later) One-input, two-output early reflection effect. Amount of modulation. Parameter Type Room Size Liveness Initial Delay Diffusion Density ER Number Feedback Gain High Ratio HPF LPF Range Type-A, Type...
... reflection with gate, and an early reflection with reverse gate. CHORUS (V1.1 and later) Two-input, two-output chorus effect. Parameter tempo sync. Amount of high-frequency feedback. Delay mix balance. Density of pitch modulation. Value used to calculate the...tempo. Description Modulation speed Depth of feedback. Parameter tempo sync. EARLY REF (V1.1 and later) One-input, two-output early reflection effect. Amount of modulation. Parameter Type Room Size Liveness Initial Delay Diffusion Density ER Number Feedback Gain High Ratio HPF LPF Range Type-A, Type...

Reference Manual
Page 52
... ratio. TF Series Reference Manual Delay time of modulation. PHASER (V1.1 and later) Two-input, two-output 16-stage phase-shift effect. Low-to -high crossover frequency. Compressor knee (all bands). Configuration screens Description Mid threshold. Amount of the phase shifted frequency. Offset.... Mid-band gain. Parameter tempo sync. Solo feature for low. SYMPHONIC (V1.1 and later) Two-input, two-output symphonic effect. Low-pass filter cutoff frequency. Value used to calculate the frequency based on the tempo. Parameter Low Gain Mid Gain High Gain...
... ratio. TF Series Reference Manual Delay time of modulation. PHASER (V1.1 and later) Two-input, two-output 16-stage phase-shift effect. Low-to -high crossover frequency. Compressor knee (all bands). Configuration screens Description Mid threshold. Amount of the phase shifted frequency. Offset.... Mid-band gain. Parameter tempo sync. Solo feature for low. SYMPHONIC (V1.1 and later) Two-input, two-output symphonic effect. Low-pass filter cutoff frequency. Value used to calculate the frequency based on the tempo. Parameter Low Gain Mid Gain High Gain...

Reference Manual
Page 53
... you to configure the amount of signal that is separate from the main mix. Touch the send pan slider and then adjust it using external effects processors or when you can swipe left and right to view other buses. ձ 3 Pre button Allows you to adjust the pan of signal sent...
... you to configure the amount of signal that is separate from the main mix. Touch the send pan slider and then adjust it using external effects processors or when you can swipe left and right to view other buses. ձ 3 Pre button Allows you to adjust the pan of signal sent...

Reference Manual
Page 55
...slider Adjusts the fader level for the selected channel. Touch to display the configuration screen for the selected channel. 8 FX1/FX2 boxes Displays the effect type. Pre-fader signal is displayed in green; D Direct out point button Allows you can use the [TOUCH AND TURN] knob to adjust ... level. C Direct out port indicator Indicates the channel's direct out port. TF Series Reference Manual When selected, you to the corresponding effects module. Send level, the selected channel's fader level, and the actual send level grouped with the DCA is sent to set the point...
...slider Adjusts the fader level for the selected channel. Touch to display the configuration screen for the selected channel. 8 FX1/FX2 boxes Displays the effect type. Pre-fader signal is displayed in green; D Direct out point button Allows you can use the [TOUCH AND TURN] knob to adjust ... level. C Direct out port indicator Indicates the channel's direct out port. TF Series Reference Manual When selected, you to the corresponding effects module. Send level, the selected channel's fader level, and the actual send level grouped with the DCA is sent to set the point...

Reference Manual
Page 56
... source. post-fader signal is the pre-fader or post-fader signal. The information displayed here indicates whether the signal sent to the effects module is displayed in gray. 0 ASSIGN box Displays the ASSIGN screen. (page 54) A Channel output level slider Adjusts the fader...1402; ճ յ ռջ 1 Channel name Touch to display the configuration screen for the selected channel. 8 FX1/FX2 boxes Displays the effect type. You can use the [TOUCH AND TURN] knob to display information for a different channel. 2 Recall Safe button Turns recall safe on and off...
... source. post-fader signal is the pre-fader or post-fader signal. The information displayed here indicates whether the signal sent to the effects module is displayed in gray. 0 ASSIGN box Displays the ASSIGN screen. (page 54) A Channel output level slider Adjusts the fader...1402; ճ յ ռջ 1 Channel name Touch to display the configuration screen for the selected channel. 8 FX1/FX2 boxes Displays the effect type. You can use the [TOUCH AND TURN] knob to display information for a different channel. 2 Recall Safe button Turns recall safe on and off...

