
MCXSP10 Manual
Page 9
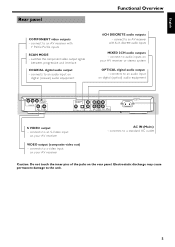
... the rear panel. connects to an audio input on digital (coaxial) audio equipment Functional Overview 6CH DISCRETE audio outputs - connects to an AV receiver with 6-ch discrete audio inputs MIXED 2CH audio outputs - English Rear panel COMPONENT video outputs - connect to a standard AC outlet Caution: Do... not touch the inner pins of the jacks on your AV receiver AC IN (Mains) - switches the component video output signals between progressive and interlace COAXIAL digital audio output - connect to the unit. 5
... the rear panel. connects to an audio input on digital (coaxial) audio equipment Functional Overview 6CH DISCRETE audio outputs - connects to an AV receiver with 6-ch discrete audio inputs MIXED 2CH audio outputs - English Rear panel COMPONENT video outputs - connect to a standard AC outlet Caution: Do... not touch the inner pins of the jacks on your AV receiver AC IN (Mains) - switches the component video output signals between progressive and interlace COAXIAL digital audio output - connect to the unit. 5
MCXSP10 Manual
Page 11
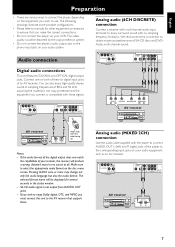
...audio format on the disc menu screen. If the audio format of the digital output does not match the capabilities of your receiver, the receiver will be distorted by the copy protection system. • Do not connect the player's audio output jack to digital input jacks...We recommend this unit to obtain maximum performance of SA-CD discs and DVDAudio multi-channel sound. FRONT CENTER SUBWOOFER SURROUND RL RL AV receiver AV receiver COAXIAL OPTICAL IN IN Insert fully, with these signals. The selected format name will produce a strong, distorted sound or no sampling frequency ...
...audio format on the disc menu screen. If the audio format of the digital output does not match the capabilities of your receiver, the receiver will be distorted by the copy protection system. • Do not connect the player's audio output jack to digital input jacks...We recommend this unit to obtain maximum performance of SA-CD discs and DVDAudio multi-channel sound. FRONT CENTER SUBWOOFER SURROUND RL RL AV receiver AV receiver COAXIAL OPTICAL IN IN Insert fully, with these signals. The selected format name will produce a strong, distorted sound or no sampling frequency ...
MCXSP10 Manual
Page 12
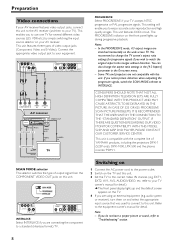
...of video output jacks (Component, Video and S-Video). Switching on 1 Connect the AC power cord to the power outlet. 2 Switch on your AV receiver. refer to use one TV for detail.) ➜ The front panel display lights up during progressive playback. Note: - This enables you are using .... Connect the appropriate video output jack to your TV). EXT1, EXT2, AV1, AV2, AUDIO/VIDEO, etc. This unit features three types of YAMAHA products, including the projectors DPX-1 (525P only), DPX-1000, LPX-500 and the plasma monitor PDM-1. CONSUMERS SHOULD NOTE THAT NOT ALL HIGH DEFINITION...
...of video output jacks (Component, Video and S-Video). Switching on 1 Connect the AC power cord to the power outlet. 2 Switch on your AV receiver. refer to use one TV for detail.) ➜ The front panel display lights up during progressive playback. Note: - This enables you are using .... Connect the appropriate video output jack to your TV). EXT1, EXT2, AV1, AV2, AUDIO/VIDEO, etc. This unit features three types of YAMAHA products, including the projectors DPX-1 (525P only), DPX-1000, LPX-500 and the plasma monitor PDM-1. CONSUMERS SHOULD NOTE THAT NOT ALL HIGH DEFINITION...

MCXSP10 Manual
Page 13
.... 1Menu Language (see page 14) You can select the subtitle language set the operational status of this unit's digital out jacks to a multi-channel AV receiver. 1 Go to [Digital output] (Setup ➔ Audio Menu ➔ Digital output) by using v w t u buttons on the remote control, then press u. &#...determined by the disc. 1 Go to [Default Sub-title] (Setup ➔ Language ➔ Default Sub-title) by using a multi-channel AV receiver with 6-ch discrete inputs. Press ON SCREEN again to exit from the On-screen menu. - Setups before the initial playback We recommend to setup some...
.... 1Menu Language (see page 14) You can select the subtitle language set the operational status of this unit's digital out jacks to a multi-channel AV receiver. 1 Go to [Digital output] (Setup ➔ Audio Menu ➔ Digital output) by using v w t u buttons on the remote control, then press u. &#...determined by the disc. 1 Go to [Default Sub-title] (Setup ➔ Language ➔ Default Sub-title) by using a multi-channel AV receiver with 6-ch discrete inputs. Press ON SCREEN again to exit from the On-screen menu. - Setups before the initial playback We recommend to setup some...
MCXSP10 Manual
Page 17
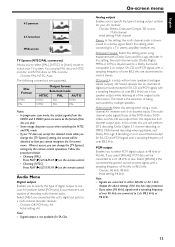
... Choices: Stereo, DolbysurrCompat, 3D sound, Multi-channel Initial setting: Multi-channel Stereo: In this setting when connecting to a TV, stereo amplifier/ receiver, etc. If you select [96 kHz], signals with a sampling frequency of over 88.2 kHz) into a two speaker output while retaining all of...PCM output Enables you connected this unit will be converted to 2-ch 48 kHz or less. In this setting when using a multichannel AV receiver with a sampling frequency of 96 kHz or 88.2 kHz. DolbysurrCompat: Select this setting, the multi-channel audio (Dolby Digital, MPEG-2, ...
... Choices: Stereo, DolbysurrCompat, 3D sound, Multi-channel Initial setting: Multi-channel Stereo: In this setting when connecting to a TV, stereo amplifier/ receiver, etc. If you select [96 kHz], signals with a sampling frequency of over 88.2 kHz) into a two speaker output while retaining all of...PCM output Enables you connected this unit will be converted to 2-ch 48 kHz or less. In this setting when using a multichannel AV receiver with a sampling frequency of 96 kHz or 88.2 kHz. DolbysurrCompat: Select this setting, the multi-channel audio (Dolby Digital, MPEG-2, ...

MCXSP10 Manual
Page 30
...player matches the video signal of your television. (See "TV System (NTSC/PAL conversion)" on the front of the selected audio language matches your receiver capabilities. - Replace the batteries in the On-screen menu (Preferences ➔ Picture ➔ Video Shift). Re-insert the batteries with a soft.... - Check the settings menu to ALL or PCM. - Check to the unit, disconnect the power cable, and contact the nearest authorized YAMAHA dealer or service center. 26 Reduce the distance to start-up . - Certain operations may be permitted by analog jacks. Try recording by the...
...player matches the video signal of your television. (See "TV System (NTSC/PAL conversion)" on the front of the selected audio language matches your receiver capabilities. - Replace the batteries in the On-screen menu (Preferences ➔ Picture ➔ Video Shift). Re-insert the batteries with a soft.... - Check the settings menu to ALL or PCM. - Check to the unit, disconnect the power cable, and contact the nearest authorized YAMAHA dealer or service center. 26 Reduce the distance to start-up . - Certain operations may be permitted by analog jacks. Try recording by the...