Owner's Manual
Page 5
...remote control 9 Installing batteries in the remote control 9 Using the remote control 9 Connections 10 Placing speakers 10 Connecting speakers 11 Information on jacks and cable plugs 13 Connecting a TV monitor or projector 14 Connecting other components 15 Connecting a Yamaha iPod universal dock or Bluetooth™ wireless audio receiver...Using iPod 30 Controlling iPod 30 Using Bluetooth™ components 32 Pairing the Bluetooth™ wireless audio receiver and your Bluetooth component 32 Playback of the Bluetooth™ component 32 ADVANCED OPERATION Setting the option menu...
...remote control 9 Installing batteries in the remote control 9 Using the remote control 9 Connections 10 Placing speakers 10 Connecting speakers 11 Information on jacks and cable plugs 13 Connecting a TV monitor or projector 14 Connecting other components 15 Connecting a Yamaha iPod universal dock or Bluetooth™ wireless audio receiver...Using iPod 30 Controlling iPod 30 Using Bluetooth™ components 32 Pairing the Bluetooth™ wireless audio receiver and your Bluetooth component 32 Playback of the Bluetooth™ component 32 ADVANCED OPERATION Setting the option menu...
Owner's Manual
Page 7
... by using either the keys on the front panel or the ones on the remote control. "SILENT CINEMA" is a trademark of Yamaha Corporation. x.v.Color™ "x.v.Color" is a trademark of Sony Corporation. Supplied accessories Check that you received all of Yamaha Corporation. Refer to production. and other U.S. In case the key names differ between the...
... by using either the keys on the front panel or the ones on the remote control. "SILENT CINEMA" is a trademark of Yamaha Corporation. x.v.Color™ "x.v.Color" is a trademark of Sony Corporation. Supplied accessories Check that you received all of Yamaha Corporation. Refer to production. and other U.S. In case the key names differ between the...
Owner's Manual
Page 10
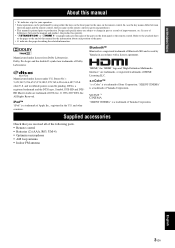
...). Part names and functions Front panel display a b c STEREO TUNED g h a HDMI indicator Lights up while receiving a radio broadcast signal from which signals are available for the current operation. g Cursor indicators Light up if corresponding cursors on the remote control are currently output. c Tuner indicator Lights up during normal communication when HDMI is muted...
...). Part names and functions Front panel display a b c STEREO TUNED g h a HDMI indicator Lights up while receiving a radio broadcast signal from which signals are available for the current operation. g Cursor indicators Light up if corresponding cursors on the remote control are currently output. c Tuner indicator Lights up during normal communication when HDMI is muted...

Owner's Manual
Page 11
f POWER Switches this unit (see page 39). Selects AV inputs 1 through 4. Selects a Yamaha iPod universal dock/ Bluetooth wireless audio receiver connected to the previous screen or ends the menu screen. Selects a preset station. Changes tuning frequencies. Confirms a ...keys Operate recording, playback etc. Selects AUDIO inputs 1 and 2. k SCENE Switches between FM and AM. o VOLUME +/- c CODE SET Sets remote control codes for external component operations (see page 30). Presets radio stations. p DISPLAY Changes the operation mode of external components (see page 22...
f POWER Switches this unit (see page 39). Selects AV inputs 1 through 4. Selects a Yamaha iPod universal dock/ Bluetooth wireless audio receiver connected to the previous screen or ends the menu screen. Selects a preset station. Changes tuning frequencies. Confirms a ...keys Operate recording, playback etc. Selects AUDIO inputs 1 and 2. k SCENE Switches between FM and AM. o VOLUME +/- c CODE SET Sets remote control codes for external component operations (see page 30). Presets radio stations. p DISPLAY Changes the operation mode of external components (see page 22...

Owner's Manual
Page 12
... perform setup following items for Blu-ray disc, DVD and CD, and you can enjoy good balanced sound without special knowledge by pressing a remote control key. The priority of the requirement of other speakers is a CRT, we recommend that you use this unit based on room acoustic... are preset for different purposes for setting up your TV, DVD player, or other components ☞P. 15 • Connecting a Yamaha iPod universal dock or Bluetooth wireless audio receiver ☞P. 16 • Connecting the FM and AM antennas ☞P. 17 Step 4: Turn on the power Connect the power ...
... perform setup following items for Blu-ray disc, DVD and CD, and you can enjoy good balanced sound without special knowledge by pressing a remote control key. The priority of the requirement of other speakers is a CRT, we recommend that you use this unit based on room acoustic... are preset for different purposes for setting up your TV, DVD player, or other components ☞P. 15 • Connecting a Yamaha iPod universal dock or Bluetooth wireless audio receiver ☞P. 16 • Connecting the FM and AM antennas ☞P. 17 Step 4: Turn on the power Connect the power ...

Owner's Manual
Page 13
...leaked material comes into contact with this unit during operation. Notes • Do not spill water or other liquids on this remote control by setting the remote control code. places of batteries may be cleared. dusty places y • You can operate external components with your skin... may be different even though they look the same. • If you notice the following conditions: - places of batteries (such as near a bath - Remote control sensor window 2 30 30 within 6 m (20 ft) 1 Take off the battery compartment cover. 2 Insert the two supplied batteries (AAA, R03,...
...leaked material comes into contact with this unit during operation. Notes • Do not spill water or other liquids on this remote control by setting the remote control code. places of batteries may be cleared. dusty places y • You can operate external components with your skin... may be different even though they look the same. • If you notice the following conditions: - places of batteries (such as near a bath - Remote control sensor window 2 30 30 within 6 m (20 ft) 1 Take off the battery compartment cover. 2 Insert the two supplied batteries (AAA, R03,...

Owner's Manual
Page 18
... 1-6 and an audio output terminal. By connecting a TV that you to switch an input source to the AV input 1 with the remote control of the following three types according to the input signal format supported by the video monitor. For details, see page 21). If... HD ANTENNA COMPONENT VIDEO UNBAL. Jacks on components Jacks on this unit can select one of the TV. FM GND AM O OPTICAL ( TV ) AV 1 COAXIAL AV 2 COAXIAL (CD) AV 3 OPTICAL AV 4 AV 5 AV 6 AV OUT AUDIO1 14 En TV, or projector a c b HDMI Y PB PR V Outputting sound of a TV from this unit To output sound of...
... 1-6 and an audio output terminal. By connecting a TV that you to switch an input source to the AV input 1 with the remote control of the following three types according to the input signal format supported by the video monitor. For details, see page 21). If... HD ANTENNA COMPONENT VIDEO UNBAL. Jacks on components Jacks on this unit can select one of the TV. FM GND AM O OPTICAL ( TV ) AV 1 COAXIAL AV 2 COAXIAL (CD) AV 3 OPTICAL AV 4 AV 5 AV 6 AV OUT AUDIO1 14 En TV, or projector a c b HDMI Y PB PR V Outputting sound of a TV from this unit To output sound of...

Owner's Manual
Page 19
... of the input source displayed on standby. If your Yamaha component has the Remote in parentheses are recommended to connect to the external components, make sure that component with composite video output Audio Video Audio Coaxial digital output Composite output Optical digital output AV 3 (CD) AV 4 COAXIAL VIDEO OPTICAL Video Composite output VIDEO Audio...
... of the input source displayed on standby. If your Yamaha component has the Remote in parentheses are recommended to connect to the external components, make sure that component with composite video output Audio Video Audio Coaxial digital output Composite output Optical digital output AV 3 (CD) AV 4 COAXIAL VIDEO OPTICAL Video Composite output VIDEO Audio...

Owner's Manual
Page 21
... antenna To the AC wall outlet Power cable Turning this unit on and off 1 Press ASTANDBY/ON on the front panel (or fPOWER on the remote control) to turn on this unit. 2 Press ASTANDBY/ON (or fPOWER) again to obtain good reception. • Position the AM loop antenna away ...from the AC wall outlet. For more details, consult the nearest authorized Yamaha dealer or service center. • Always use an outdoor antenna. We recommend disconnecting the power cable from this unit. • If you cannot get ...
... antenna To the AC wall outlet Power cable Turning this unit on and off 1 Press ASTANDBY/ON on the front panel (or fPOWER on the remote control) to turn on this unit. 2 Press ASTANDBY/ON (or fPOWER) again to obtain good reception. • Position the AM loop antenna away ...from the AC wall outlet. For more details, consult the nearest authorized Yamaha dealer or service center. • Always use an outdoor antenna. We recommend disconnecting the power cable from this unit. • If you cannot get ...

Owner's Manual
Page 25
... for each input source. Input source Sound field program BD/DVD TV CD RADIO HDMI 1 AV 1 AV 3 TUNER Straight Straight Straight 7ch Enhancer y • When this unit by setting a remote control code for the external component for different usages, such as the initial factory settings. Selecting... scenes are provided as playing movies or music. Input source name VOL. Connect the playback component to scene selections. 1 Register the remote control code of the playback component. 2) When noise is displayed for desired input sources allows you to change input sources and sound...
... for each input source. Input source Sound field program BD/DVD TV CD RADIO HDMI 1 AV 1 AV 3 TUNER Straight Straight Straight 7ch Enhancer y • When this unit by setting a remote control code for the external component for different usages, such as the initial factory settings. Selecting... scenes are provided as playing movies or music. Input source name VOL. Connect the playback component to scene selections. 1 Register the remote control code of the playback component. 2) When noise is displayed for desired input sources allows you to change input sources and sound...

Owner's Manual
Page 26
... is activated, this unit is displayed on the remote control to mute the audio output. Sleep Off Sleep 30min. Press eSLEEP on the remote control repeatedly until "Sleep Off" appears on the remote control for the input source whose remote control code was registered in direct mode. •...eSLEEP repeatedly to change. Using your headphones in Direct mode. - Adjusting high/low frequency sound (tone control) You can now be controlled remotely just by selecting a scene. Press MDIRECT (or jDIRECT) to turn the Direct mode on the front panel repeatedly to SILENT CINEMA mode. ...
... is activated, this unit is displayed on the remote control to mute the audio output. Sleep Off Sleep 30min. Press eSLEEP on the remote control repeatedly until "Sleep Off" appears on the remote control for the input source whose remote control code was registered in direct mode. •...eSLEEP repeatedly to change. Using your headphones in Direct mode. - Adjusting high/low frequency sound (tone control) You can now be controlled remotely just by selecting a scene. Press MDIRECT (or jDIRECT) to turn the Direct mode on the front panel repeatedly to SILENT CINEMA mode. ...

Owner's Manual
Page 27
..., DSP Program, Audio Decoder AUDIO1-2: Input, DSP Program, Audio Decoder V-AUX: Input, DSP Program, Audio Decoder FM/AM: Frequency, DSP Program, Audio Decoder iPod (Simple remote mode): Input, DSP Program, Audio Decoder iPod (Menu browse mode): (in PlayInfo displayed) Artist, Album, Song, DSP Program, Audio Decoder (in Play menu displayed) List...
..., DSP Program, Audio Decoder AUDIO1-2: Input, DSP Program, Audio Decoder V-AUX: Input, DSP Program, Audio Decoder FM/AM: Frequency, DSP Program, Audio Decoder iPod (Simple remote mode): Input, DSP Program, Audio Decoder iPod (Menu browse mode): (in PlayInfo displayed) Artist, Album, Song, DSP Program, Audio Decoder (in Play menu displayed) List...

Owner's Manual
Page 28
...with CINEMA DSP. Sound field programs for each input source. Surround decoder Press jSUR.DECODE repeatedly. It has been designed with a Yamaha digital sound field processing (DSP) chip. This program is also equipped with the concept of "an ideal movie theater," in ...; Selecting a sound field program with clear separation between audio channels and the clarity of cinematographically created virtual spaces reproduced with the remote control Perform the following screen appears on the category of surround decoders. Select a sound field program based on your listening preference,...
...with CINEMA DSP. Sound field programs for each input source. Surround decoder Press jSUR.DECODE repeatedly. It has been designed with a Yamaha digital sound field processing (DSP) chip. This program is also equipped with the concept of "an ideal movie theater," in ...; Selecting a sound field program with clear separation between audio channels and the clarity of cinematographically created virtual spaces reproduced with the remote control Perform the following screen appears on the category of surround decoders. Select a sound field program based on your listening preference,...
Owner's Manual
Page 32
...To adjust it to "TUNER." 2 Press mOPTION on the remote control. This is correct. y • You can switch between stereo and monaural for tuning. ■ Frequency tuning mode (Auto tuning / Manual tuning) You can receive strong signals without any interference. AM stations cannot be automatically ...unit for setting options of a station that you press HTUNING l / h (or hTUNING k / n). Use this method when the tuner cannot receive strong signals and stations are skipped during the search. For example, if you keep holding the key, the search continues even when a station is...
...To adjust it to "TUNER." 2 Press mOPTION on the remote control. This is correct. y • You can switch between stereo and monaural for tuning. ■ Frequency tuning mode (Auto tuning / Manual tuning) You can receive strong signals without any interference. AM stations cannot be automatically ...unit for setting options of a station that you press HTUNING l / h (or hTUNING k / n). Use this method when the tuner cannot receive strong signals and stations are skipped during the search. For example, if you keep holding the key, the search continues even when a station is...

Owner's Manual
Page 33
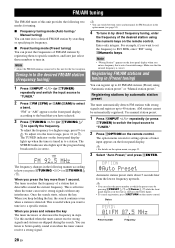
... in to the desired FM/AM station (Frequency tuning)" (see page 28). 2 Press DMEMORY (or hMEMORY). "Manual Preset" appears on the remote control, the screen returns to the original state. When registration is cleared. FM/AM tuning Calling a preset station (Preset tuning) You can select... a preset number using the nCursor k / n and press nENTER. The following screen appears on the remote control or leave the tuner without any operations for about 30 seconds. Press EPRESET l / h (or hPRESET k / n) to "TUNER." 2 Press mOPTION...
... in to the desired FM/AM station (Frequency tuning)" (see page 28). 2 Press DMEMORY (or hMEMORY). "Manual Preset" appears on the remote control, the screen returns to the original state. When registration is cleared. FM/AM tuning Calling a preset station (Preset tuning) You can select... a preset number using the nCursor k / n and press nENTER. The following screen appears on the remote control or leave the tuner without any operations for about 30 seconds. Press EPRESET l / h (or hPRESET k / n) to "TUNER." 2 Press mOPTION...

Owner's Manual
Page 34
...the Compressed Music Enhancer mode of this unit to start playback. Controlling iPod™ You can control your iPod when you set it in a Yamaha iPod universal dock (such as MP3 format) stored on your iPod (see page 24). When you can perform the following operations with the ...the "iPod" section on the model of status messages that is currently selected. 30 En Press pDISPLAY on the remote control to change information screens on the front panel display. • For a complete list of Yamaha iPod universal dock. The following sections describe the procedure when using the YDS-11.
...the Compressed Music Enhancer mode of this unit to start playback. Controlling iPod™ You can control your iPod when you set it in a Yamaha iPod universal dock (such as MP3 format) stored on your iPod (see page 24). When you can perform the following operations with the ...the "iPod" section on the model of status messages that is currently selected. 30 En Press pDISPLAY on the remote control to change information screens on the front panel display. • For a complete list of Yamaha iPod universal dock. The following sections describe the procedure when using the YDS-11.
Owner's Manual
Page 36
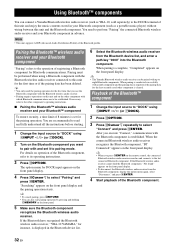
... component with up to the last connected Bluetooth component. If the Bluetooth have recognized the Bluetooth wireless audio receiver, "YBA-10 YAMAHA," for instance, is registered, the pairing data for the least recently used other component's operating instructions. ...Press mOPTION. 3 Press nCursor n repeatedly to this unit and on the remote control, the connected Bluetooth wireless audio receiver searches and connects to eight Bluetooth components. y • The Yamaha Bluetooth wireless audio receiver can also start pairing operation by pressing and holding DMEMORY on the front ...
... component with up to the last connected Bluetooth component. If the Bluetooth have recognized the Bluetooth wireless audio receiver, "YBA-10 YAMAHA," for instance, is registered, the pairing data for the least recently used other component's operating instructions. ...Press mOPTION. 3 Press nCursor n repeatedly to this unit and on the remote control, the connected Bluetooth wireless audio receiver searches and connects to eight Bluetooth components. y • The Yamaha Bluetooth wireless audio receiver can also start pairing operation by pressing and holding DMEMORY on the front ...

Owner's Manual
Page 37
... following section. You can set differ depending on the menu items. 5 To close the OPTION menu. The displayed OPTION menu items differ depending on the remote control.
... following section. You can set differ depending on the menu items. 5 To close the OPTION menu. The displayed OPTION menu items differ depending on the remote control.

Owner's Manual
Page 40
... on the front panel display, press nCursor h again, press nCursor h to confirm the initialization or nCursor l to cancel it to "Off." 1 Press lSETUP on the remote control. To initialize the parameters of the sound field effect to be added). You can change the parameters, set to "On" (see page 43). Editing...
... on the front panel display, press nCursor h again, press nCursor h to confirm the initialization or nCursor l to cancel it to "Off." 1 Press lSETUP on the remote control. To initialize the parameters of the sound field effect to be added). You can change the parameters, set to "On" (see page 43). Editing...

Owner's Manual
Page 42
...), suitable for input sources. Range 2 Lipsync HDMI Auto Auto Manual Func. Sets brightness of speakers and headphones. You can call the setup menu using the remote control and change the following settings in conjunction with the volume level.
...), suitable for input sources. Range 2 Lipsync HDMI Auto Auto Manual Func. Sets brightness of speakers and headphones. You can call the setup menu using the remote control and change the following settings in conjunction with the volume level.


