
Owners Manual
Page 1
U RX-V363 AV Receiver OWNER'S MANUAL
U RX-V363 AV Receiver OWNER'S MANUAL

Owners Manual
Page 3
... covered by the operating instructions as an improper adjustment of interference, which can not locate the appropriate retailer, please contact Yamaha Electronics Corp., U.S.A. 6660 Orangethorpe Ave., Buena Park, CA 90620. If you can be sure the service technician has ...residential environment will not result in performance - d) If the product does not operate normally by following measures: Relocate either this manual, meets FCC requirements. this type of other electronic devices. Unauthorized substitutions may cause interference harmful to grounding electrodes, and requirements ...
... covered by the operating instructions as an improper adjustment of interference, which can not locate the appropriate retailer, please contact Yamaha Electronics Corp., U.S.A. 6660 Orangethorpe Ave., Buena Park, CA 90620. If you can be sure the service technician has ...residential environment will not result in performance - d) If the product does not operate normally by following measures: Relocate either this manual, meets FCC requirements. this type of other electronic devices. Unauthorized substitutions may cause interference harmful to grounding electrodes, and requirements ...

Owners Manual
Page 4
...they may be opened for long periods of this unit, and/or personal injury. - CAUTION: READ THIS BEFORE OPERATING YOUR UNIT. Contact qualified Yamaha service personnel when any reasons. 15 When not planning to prevent condensation inside this unit rises, it in a safe place for future reference.... la fiche dans la borne correspondante de la prise et pousser jusqu'au fond. IMPORTANT Please record the serial number of this Owner's Manual in a safe place for future reference. Containers with a higher voltage than specified. 13 To prevent damage by ASTANDBY/ON. vacation), ...
...they may be opened for long periods of this unit, and/or personal injury. - CAUTION: READ THIS BEFORE OPERATING YOUR UNIT. Contact qualified Yamaha service personnel when any reasons. 15 When not planning to prevent condensation inside this unit rises, it in a safe place for future reference.... la fiche dans la borne correspondante de la prise et pousser jusqu'au fond. IMPORTANT Please record the serial number of this Owner's Manual in a safe place for future reference. Containers with a higher voltage than specified. 13 To prevent damage by ASTANDBY/ON. vacation), ...
Owners Manual
Page 5
...12 Information on jacks and cable plugs 13 Information on HDMI 14 Connecting video components 15 Connecting audio components 17 Connecting a Yamaha iPod™ universal dock and Bluetooth™ adapter 18 Connecting to the attached sheet or the pages at the end of this... 29 Additional operations 30 Sound field programs 34 Sound field program descriptions 34 FM/AM tuning 37 Automatic tuning 37 Manual tuning 37 Automatic preset tuning 38 Manual preset tuning 38 Selecting preset stations 39 Exchanging preset stations 39 Using iPod 40 Controls and functions for the information...
...12 Information on jacks and cable plugs 13 Information on HDMI 14 Connecting video components 15 Connecting audio components 17 Connecting a Yamaha iPod™ universal dock and Bluetooth™ adapter 18 Connecting to the attached sheet or the pages at the end of this... 29 Additional operations 30 Sound field programs 34 Sound field program descriptions 34 FM/AM tuning 37 Automatic tuning 37 Manual tuning 37 Automatic preset tuning 38 Manual preset tuning 38 Selecting preset stations 39 Exchanging preset stations 39 Using iPod 40 Controls and functions for the information...

Owners Manual
Page 11
... name of the video monitor to this unit. 2 Press ASTANDBY/ON on this room. sound field program: STRAIGHT For when you want to the instruction manual of the DVD player for this unit and recall your player. TV Viewing *1 - to "6ΩMIN" before using this unit can turn on the front... speakers, set the input source selector of the SCENE template and its description DVD Viewing - sound field program: Music Enh. 5ch For when you connect a Yamaha product that has been assigned to a music disc from the FM radio station English 7 En
... name of the video monitor to this unit. 2 Press ASTANDBY/ON on this room. sound field program: STRAIGHT For when you want to the instruction manual of the DVD player for this unit and recall your player. TV Viewing *1 - to "6ΩMIN" before using this unit can turn on the front... speakers, set the input source selector of the SCENE template and its description DVD Viewing - sound field program: Music Enh. 5ch For when you connect a Yamaha product that has been assigned to a music disc from the FM radio station English 7 En

Owners Manual
Page 12
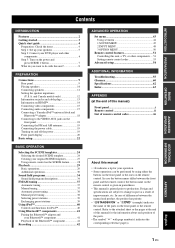
Note In the standby mode, this unit consumes a small amount of power in order to receive infrared signals from the standby mode, press ASTANDBY/ON (or DPOWER) on the front panel. Press ASTANDBY/ON on this unit from the remote control. &#... the end of this unit ☞ P. 29 • Enjoying FM/AM radio programs ☞ P. 37 • Using your listening room (BASIC SETUP) ☞ P. 22 • Manually adjusting various parameters of this unit • Optimizing the speaker parameters for details. ■ After using this unit ☞ P. 33 8 En See page 19 for...
Note In the standby mode, this unit consumes a small amount of power in order to receive infrared signals from the standby mode, press ASTANDBY/ON (or DPOWER) on the front panel. Press ASTANDBY/ON on this unit from the remote control. &#... the end of this unit ☞ P. 29 • Enjoying FM/AM radio programs ☞ P. 37 • Using your listening room (BASIC SETUP) ☞ P. 22 • Manually adjusting various parameters of this unit • Optimizing the speaker parameters for details. ■ After using this unit ☞ P. 33 8 En See page 19 for...

Owners Manual
Page 18
... the volume of the connected video monitor. Furthermore, available audio/video signals depend on the specification of the connected video monitor. Refer to the instruction manual of each connected component. ■ HDMI jack and cable plug HDMI HDMI cable plug y • We recommend using HDMI connections. To enjoy the sound from...
... the volume of the connected video monitor. Furthermore, available audio/video signals depend on the specification of the connected video monitor. Refer to the instruction manual of each connected component. ■ HDMI jack and cable plug HDMI HDMI cable plug y • We recommend using HDMI connections. To enjoy the sound from...

Owners Manual
Page 20
... to the HDMI or COMPONENT VIDEO jacks You can enjoy high-quality pictures by connecting your video monitor and video source components to the instruction manual of each connected component. 16 En Cable TV or satellite tuner DVD recorder To enjoy the sound from speakers connected to this unit using an...
... to the HDMI or COMPONENT VIDEO jacks You can enjoy high-quality pictures by connecting your video monitor and video source components to the instruction manual of each connected component. 16 En Cable TV or satellite tuner DVD recorder To enjoy the sound from speakers connected to this unit using an...

Owners Manual
Page 26
.... Basic setup Basic setup The "BASIC SETUP" feature is a useful way to set up your speakers. Select the size of speakers connected to this unit manually using more precise adjustments, use the detailed parameters in "SOUND MENU" (see page 45). • Altering any parameters in "BASIC SETUP" resets all parameters...
.... Basic setup Basic setup The "BASIC SETUP" feature is a useful way to set up your speakers. Select the size of speakers connected to this unit manually using more precise adjustments, use the detailed parameters in "SOUND MENU" (see page 45). • Altering any parameters in "BASIC SETUP" resets all parameters...

Owners Manual
Page 41
... tuning. Press BPRESET/TUNING to turn the colon (:) off . 4 Press EPRESET/TUNING l / h to select is weak, tune into it manually. If the signal received from the station you want to tune into a station, the TUNED indicator lights up A AM 1440 kHz No colon (:) If a colon (:)... appears in the front panel display, automatic tuning is effective when station signals are 2 tuning methods: automatic and manual. BASIC OPERATION...
... tuning. Press BPRESET/TUNING to turn the colon (:) off . 4 Press EPRESET/TUNING l / h to select is weak, tune into it manually. If the signal received from the station you want to tune into a station, the TUNED indicator lights up A AM 1440 kHz No colon (:) If a colon (:)... appears in the front panel display, automatic tuning is effective when station signals are 2 tuning methods: automatic and manual. BASIC OPERATION...

Owners Manual
Page 42
... DA/B/C/D/E and EPRESET/TUNING l / h repeatedly to select a preset station group and number (A1 to store is weak in signal strength, tune into a station automatically or manually. The preset station number as well as C3. y You can then recall any preset station easily by selecting the preset station number. 1 Press NINPUT l / h repeatedly...: 8 preset station numbers in each of the last preset station. You can select the preset station group and the preset station number where the first received station will be stored by automatic preset tuning.
... DA/B/C/D/E and EPRESET/TUNING l / h repeatedly to select a preset station group and number (A1 to store is weak in signal strength, tune into a station automatically or manually. The preset station number as well as C3. y You can then recall any preset station easily by selecting the preset station number. 1 Press NINPUT l / h repeatedly...: 8 preset station numbers in each of the last preset station. You can select the preset station group and the preset station number where the first received station will be stored by automatic preset tuning.
Owners Manual
Page 44
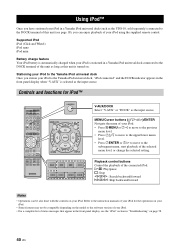
... backward/forward b/a: Skip backward/forward Notes • Operations can enjoy playback of your iPod using the supplied remote control. Refer to the instruction manuals of your iPod for iPod™ POWER POWER STANDBY POWER TV AV A B C MUTE CD MD/CD-R TUNER DVD DTV/CBL DVR TV...2 ENHANCER SUR. Playback control buttons Control the playback of the selected menu level, or change the selected setting. Stationing your iPod to the Yamaha iPod universal dock Once you can be compatible depending on the model or the software version of your iPod. • For a complete list...
... backward/forward b/a: Skip backward/forward Notes • Operations can enjoy playback of your iPod using the supplied remote control. Refer to the instruction manuals of your iPod for iPod™ POWER POWER STANDBY POWER TV AV A B C MUTE CD MD/CD-R TUNER DVD DTV/CBL DVR TV...2 ENHANCER SUR. Playback control buttons Control the playback of the selected menu level, or change the selected setting. Stationing your iPod to the Yamaha iPod universal dock Once you can be compatible depending on the model or the software version of your iPod. • For a complete list...

Owners Manual
Page 47
...SP DISTANCE D)CENTER GEQ E)LFE LEVEL F)D.RANGE G)AUDIO SET Features Selects the size of each speaker, the speakers for the sources connected to manually adjust any speaker settings, alter the quality and tone of this unit operates. Selects the decoder mode for low-frequency signal output, the ... or rename the input source. Page 48 49 49 49 49 ADVANCED OPERATION English 43 En Adjusts the distance of each parameter) to manually adjust speaker and system parameters. Adjusts the output level of each jack. Adjusts the muting level, audio delay settings, maximum volume level...
...SP DISTANCE D)CENTER GEQ E)LFE LEVEL F)D.RANGE G)AUDIO SET Features Selects the size of each speaker, the speakers for the sources connected to manually adjust any speaker settings, alter the quality and tone of this unit operates. Selects the decoder mode for low-frequency signal output, the ... or rename the input source. Page 48 49 49 49 49 ADVANCED OPERATION English 43 En Adjusts the distance of each parameter) to manually adjust speaker and system parameters. Adjusts the output level of each jack. Adjusts the muting level, audio delay settings, maximum volume level...
Owners Manual
Page 48
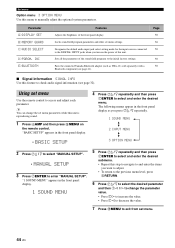
Pairs the connected Yamaha Bluetooth adapter (such as you press 7k / n repeatedly. 1 SOUND MENU 2 INPUT MENU 3 OPTION MENU 2 Press 7 k / n to select "MANUAL SETUP". .MANUAL SETUP 3 Press 7ENTER to exit from set menu parameters while this unit is reproducing sound. 1 Press 4AMP and then ... settings. "BASIC SETUP" appears in the front panel display. .BASIC SETUP 4 Press 7k / n repeatedly and then press 7ENTER to manually adjust the optional system parameters. Designates the default audio input jack select setting mode for the input sources connected to the DIGITAL INPUT jacks when...
Pairs the connected Yamaha Bluetooth adapter (such as you press 7k / n repeatedly. 1 SOUND MENU 2 INPUT MENU 3 OPTION MENU 2 Press 7 k / n to select "MANUAL SETUP". .MANUAL SETUP 3 Press 7ENTER to exit from set menu parameters while this unit is reproducing sound. 1 Press 4AMP and then ... settings. "BASIC SETUP" appears in the front panel display. .BASIC SETUP 4 Press 7k / n repeatedly and then press 7ENTER to manually adjust the optional system parameters. Designates the default audio input jack select setting mode for the input sources connected to the DIGITAL INPUT jacks when...

Owners Manual
Page 49
... the FRONT B terminals only. If FRONT A is 16 cm (6.5 in) or larger: large Woofer section of the front speakers connected to manually adjust any speaker settings or compensate for video signal processing delays when using LCD monitors or projectors. ■ Speaker settings A)SPEAKER SET Use this... than "LARGE" in advance, this unit automatically changes the value to "FRNT" (see page 36). Set menu 1 SOUND MENU Use this menu to manually adjust any speaker settings. When the center speaker is large Select "LRG" (large). FRONT B speaker setting FRONT B Use this feature to select the...
... the FRONT B terminals only. If FRONT A is 16 cm (6.5 in) or larger: large Woofer section of the front speakers connected to manually adjust any speaker settings or compensate for video signal processing delays when using LCD monitors or projectors. ■ Speaker settings A)SPEAKER SET Use this... than "LARGE" in advance, this unit automatically changes the value to "FRNT" (see page 36). Set menu 1 SOUND MENU Use this menu to manually adjust any speaker settings. When the center speaker is large Select "LRG" (large). FRONT B speaker setting FRONT B Use this feature to select the...

Owners Manual
Page 50
... as well as the low-frequency signals of the "FRONT" setting (see page 45). Set menu LFE/Bass out BASS OUT Use this feature to manually adjust the output level of other speakers set to "SML" (or "SMALL") are all the speakers set to "SML" (or "SMALL") or to "NONE" in...
... as well as the low-frequency signals of the "FRONT" setting (see page 45). Set menu LFE/Bass out BASS OUT Use this feature to manually adjust the output level of other speakers set to "SML" (or "SMALL") are all the speakers set to "SML" (or "SMALL") or to "NONE" in...

Owners Manual
Page 51
...: 2.60 m (8.5 ft) SUR. and Canada models]: feet (ft) [Other models]: meters (m) • Select "meters" to adjust speaker distances in most home situations. R: 2.40 m (8.0 ft) SP DISTANCE FRONT L FRONT R CENTER SUR. Speaker dynamic range SP D.R Adjusts the speaker compression. Speaker distances Control range...CENTER GEQ Use this feature to adjust the built-in feet. ■ Speaker distance C)SP DISTANCE Use this feature to manually adjust the distance of the front speakers. R SWFR Adjusted speaker Front left speaker Front right speaker Center speaker Surround left ...
...: 2.60 m (8.5 ft) SUR. and Canada models]: feet (ft) [Other models]: meters (m) • Select "meters" to adjust speaker distances in most home situations. R: 2.40 m (8.0 ft) SP DISTANCE FRONT L FRONT R CENTER SUR. Speaker dynamic range SP D.R Adjusts the speaker compression. Speaker distances Control range...CENTER GEQ Use this feature to adjust the built-in feet. ■ Speaker distance C)SP DISTANCE Use this feature to manually adjust the distance of the front speakers. R SWFR Adjusted speaker Front left speaker Front right speaker Center speaker Surround left ...

Owners Manual
Page 57
... source Component category Manufacturer Default code CD CD Yamaha 5013 MD/CD-R CD-R Yamaha 5001 TUNER TUNER Yamaha 5007 DVD DVD Yamaha 2000 DTV/CBL - - - V-AUX/D OCK TUNER Yamaha 5011 DVR DVR Yamaha 2011 A TUNER Yamaha 5012 B TUNER Yamaha 5009 C TUNER Yamaha 5017 D - - - Notes • ... control codes Use this case, try each of them until you find the correct one of your Yamaha component even if a Yamaha remote control code is canceled. In this manual. A B C 2 Press the numeric buttons (0 to 9) (N) to the initial factory settings....
... source Component category Manufacturer Default code CD CD Yamaha 5013 MD/CD-R CD-R Yamaha 5001 TUNER TUNER Yamaha 5007 DVD DVD Yamaha 2000 DTV/CBL - - - V-AUX/D OCK TUNER Yamaha 5011 DVR DVR Yamaha 2011 A TUNER Yamaha 5012 B TUNER Yamaha 5009 C TUNER Yamaha 5017 D - - - Notes • ... control codes Use this case, try each of them until you find the correct one of your Yamaha component even if a Yamaha remote control code is canceled. In this manual. A B C 2 Press the numeric buttons (0 to 9) (N) to the initial factory settings....

Owners Manual
Page 59
... with ISPEAKERS. The front speakers to the standby mode, disconnect the power cable, plug it back in "SP LEVEL". Signals this unit. manual of a short circuit, etc. The protection circuitry has been activated because of the connected component. The protection circuitry has been activated. Set... play the source again. No sound The sound suddenly goes off this unit, disconnect the power cable, and contact the nearest authorized Yamaha dealer or service center. ■ General Problem Cause Remedy This unit fails to resume audio output. No appropriate Audio input jack select...
... with ISPEAKERS. The front speakers to the standby mode, disconnect the power cable, plug it back in "SP LEVEL". Signals this unit. manual of a short circuit, etc. The protection circuitry has been activated because of the connected component. The protection circuitry has been activated. Set... play the source again. No sound The sound suddenly goes off this unit, disconnect the power cable, and contact the nearest authorized Yamaha dealer or service center. ■ General Problem Cause Remedy This unit fails to resume audio output. No appropriate Audio input jack select...

Owners Manual
Page 61
... the AM loop antenna connections and orient it back on. Use the manual tuning method. Use an outdoor antenna and a ground wire. A TV set . Check the antenna connections. Use the manual tuning method. The desired station cannot be tuned into with the automatic ...page - - ■ Tuner Problem Cause Remedy FM stereo reception is disturbed. clear reception cannot FM be tuned into . Use the manual tuning method. Adjust the antenna position to prevent dubbing. Set preset stations. Use a high-quality directional FM antenna. Noises result from ...
... the AM loop antenna connections and orient it back on. Use the manual tuning method. Use an outdoor antenna and a ground wire. A TV set . Check the antenna connections. Use the manual tuning method. The desired station cannot be tuned into with the automatic ...page - - ■ Tuner Problem Cause Remedy FM stereo reception is disturbed. clear reception cannot FM be tuned into . Use the manual tuning method. Adjust the antenna position to prevent dubbing. Set preset stations. Use a high-quality directional FM antenna. Noises result from ...


