MCXSP10 Manual
Page 1
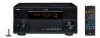
U AV Receiver STANDBY /ON PURE DIRECT 2CH/MULTI CH INPUT SELECTOR SPEAKERS A B REC OUT/ZONE 2 SOURCE/REMOTE DTV/LD DVD CABLE MD/TAPE SAT CD-R VCR 1 CD VCR 2 DVR VIDEO AUX TUNER PHONO INPUT MODE MULTI CH INPUT STRAIGHT DSP PROGRAM MULTI JOG EFFECT SILENT OPTIMIZER MIC VIDEO AUX BALANCE TONE CONTROL PHONES S VIDEO VIDEO L AUDIO R OPTICAL VOLUME OWNER'S MANUAL
U AV Receiver STANDBY /ON PURE DIRECT 2CH/MULTI CH INPUT SELECTOR SPEAKERS A B REC OUT/ZONE 2 SOURCE/REMOTE DTV/LD DVD CABLE MD/TAPE SAT CD-R VCR 1 CD VCR 2 DVR VIDEO AUX TUNER PHONO INPUT MODE MULTI CH INPUT STRAIGHT DSP PROGRAM MULTI JOG EFFECT SILENT OPTIMIZER MIC VIDEO AUX BALANCE TONE CONTROL PHONES S VIDEO VIDEO L AUDIO R OPTICAL VOLUME OWNER'S MANUAL

MCXSP10 Manual
Page 3
...interference with the requirements listed in FCC Regulations, Part 15 for proper grounding and, in all installation instructions. Adjust only those products distributed by Yamaha Corporation of product. this indicates a need for US customers) 1 IMPORTANT NOTICE : DO NOT MODIFY THIS UNIT! IMPORTANT SAFETY INSTRUCTIONS 24 ...breaker or fuse) circuits or install AC line filter/s. If the antenna lead-in is 300 ohm ribbon lead, change in this manual, meets FCC requirements. d) If the product does not operate normally by following measures: Relocate either this product or the device that...
...interference with the requirements listed in FCC Regulations, Part 15 for proper grounding and, in all installation instructions. Adjust only those products distributed by Yamaha Corporation of product. this indicates a need for US customers) 1 IMPORTANT NOTICE : DO NOT MODIFY THIS UNIT! IMPORTANT SAFETY INSTRUCTIONS 24 ...breaker or fuse) circuits or install AC line filter/s. If the antenna lead-in is 300 ohm ribbon lead, change in this manual, meets FCC requirements. d) If the product does not operate normally by following measures: Relocate either this product or the device that...
MCXSP10 Manual
Page 4
... REDUCE THE RISK OF FIRE OR ELECTRIC SHOCK, DO NOT EXPOSE THIS UNIT TO RAIN OR MOISTURE. This state is needed. Retain this Owner's Manual in a safe place for future reference. 2 Install this sound system in them, as they may overheat, possibly causing damage. 9 Do not ... not operate this unit, and/or personal injury. This Class B digital apparatus complies with chemical solvents; We Want You Listening For A Lifetime YAMAHA and the Electronic Industries Association's Consumer Electronics Group want you to this unit upside-down. vacation), disconnect the AC power plug from the wall ...
... REDUCE THE RISK OF FIRE OR ELECTRIC SHOCK, DO NOT EXPOSE THIS UNIT TO RAIN OR MOISTURE. This state is needed. Retain this Owner's Manual in a safe place for future reference. 2 Install this sound system in them, as they may overheat, possibly causing damage. 9 Do not ... not operate this unit, and/or personal injury. This Class B digital apparatus complies with chemical solvents; We Want You Listening For A Lifetime YAMAHA and the Electronic Industries Association's Consumer Electronics Group want you to this unit upside-down. vacation), disconnect the AC power plug from the wall ...
MCXSP10 Manual
Page 5
... operations 39 Selecting sound field programs 41 Listening to uncompromising pure audio 45 Selecting input modes 46 TUNING 48 Automatic and manual tuning 48 Presetting stations 49 Selecting preset stations 51 Exchanging preset stations 52 RECORDING 53 SOUND FIELD PROGRAMS SOUND FIELD PROGRAM ... timer 60 Using the test tone 61 SYSTEM OPTIONS 62 Changing parameter settings 64 Input Select 65 Manual setup: Sound 68 Manual setup: Basic 71 Manual setup: Video 78 Manual setup: Option 82 Memory Guard 85 REMOTE CONTROL FEATURES 87 Control area 87 Setting manufacturer codes 88...
... operations 39 Selecting sound field programs 41 Listening to uncompromising pure audio 45 Selecting input modes 46 TUNING 48 Automatic and manual tuning 48 Presetting stations 49 Selecting preset stations 51 Exchanging preset stations 52 RECORDING 53 SOUND FIELD PROGRAMS SOUND FIELD PROGRAM ... timer 60 Using the test tone 61 SYSTEM OPTIONS 62 Changing parameter settings 64 Input Select 65 Manual setup: Sound 68 Manual setup: Basic 71 Manual setup: Video 78 Manual setup: Option 82 Memory Guard 85 REMOTE CONTROL FEATURES 87 Control area 87 Setting manufacturer codes 88...
MCXSP10 Manual
Page 6
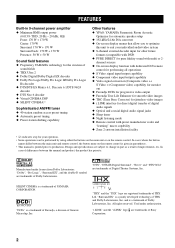
"DCDi" is printed prior to production. In cases where the button names differ between the manual and product, the product has priority. "THX" and the "THX" logo are trademarks of Digital Theater Systems, Inc. All rights reserved. ... sound with preset manufacturer codes and "learning" macro capability ◆ Zone 2 custom installation facility • y indicates a tip for direct digital transfer of YAMAHA CORPORATION. "Dolby", "Pro Logic", "Surround EX", and the double-D symbol are trademarks of differences between the main unit and remote control, the button name...
"DCDi" is printed prior to production. In cases where the button names differ between the manual and product, the product has priority. "THX" and the "THX" logo are trademarks of Digital Theater Systems, Inc. All rights reserved. ... sound with preset manufacturer codes and "learning" macro capability ◆ Zone 2 custom installation facility • y indicates a tip for direct digital transfer of YAMAHA CORPORATION. "Dolby", "Pro Logic", "Surround EX", and the double-D symbol are trademarks of differences between the main unit and remote control, the button name...

MCXSP10 Manual
Page 10
... of all outputs. I TUNING MODE Switches the tuning mode between FM and AM. K FM/AM Switches the reception band between automatic ("AUTO" indicator on) and manual ("AUTO" indicator off the set to the SOURCE/REMOTE position, the input source is displayed next to adjust the bass/treble balance for the AUTO...
... of all outputs. I TUNING MODE Switches the tuning mode between FM and AM. K FM/AM Switches the reception band between automatic ("AUTO" indicator on) and manual ("AUTO" indicator off the set to the SOURCE/REMOTE position, the input source is displayed next to adjust the bass/treble balance for the AUTO...

MCXSP10 Manual
Page 35
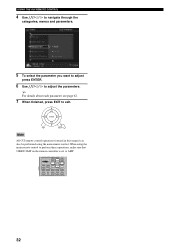
...display on your system settings • Display information about audio and video signals 3 Press k/n repeatedly to select a category (i.e., Manual Setup), then press h to : • Configure i.LINK connections • Select and configure sound field programs • Select and configure input sources •...; Manually configure your system settings • Automatically set up your system • Protect your video monitor. The TOP display appears. You ...
...display on your system settings • Display information about audio and video signals 3 Press k/n repeatedly to select a category (i.e., Manual Setup), then press h to : • Configure i.LINK connections • Select and configure sound field programs • Select and configure input sources •...; Manually configure your system settings • Automatically set up your system • Protect your video monitor. The TOP display appears. You ...
MCXSP10 Manual
Page 36
... CH IN SOURCE INPUT MODE DISPLAY TOP MENU SELECT SEARCH ENTER EXIT SOUND - ENTER TOP EXIT Note All GUI remote control operations featured in this manual can also be performed using the main remote control to perform these operations, make sure that 10KEY/AMP on the remote controller is set to...
... CH IN SOURCE INPUT MODE DISPLAY TOP MENU SELECT SEARCH ENTER EXIT SOUND - ENTER TOP EXIT Note All GUI remote control operations featured in this manual can also be performed using the main remote control to perform these operations, make sure that 10KEY/AMP on the remote controller is set to...

MCXSP10 Manual
Page 40
The results are displayed individually after making settings in the Manual Setup menu, navigate to the Information screen in the Auto Setup menu, press k/n repeatedly to select the parameter you set for the same band to ... k and select Retry to measure the current item again. • Press h and select Detail to Auto. This may also be the case when using the Manual Setup menu. If you want to return to the Auto Setup settings after each analysis. • Press n and select Setup to set the measured values...
The results are displayed individually after making settings in the Manual Setup menu, navigate to the Information screen in the Auto Setup menu, press k/n repeatedly to select the parameter you set for the same band to ... k and select Retry to measure the current item again. • Press h and select Detail to Auto. This may also be the case when using the Manual Setup menu. If you want to return to the Auto Setup settings after each analysis. • Press n and select Setup to set the measured values...
MCXSP10 Manual
Page 52
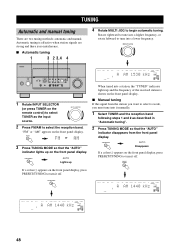
... in "Automatic tuning". 2 Press TUNING MODE so that the "AUTO" indicator lights up and the frequency of the received station is shown on the front panel display. ■ Manual tuning If the signal from the front panel display. TUNING MODE AUTO Disappears If a colon (:) appears on the remote...LD DVD MD/TAPE CD-R CD TUNER PHONO AM 1530 kHz VOLUME LFE L CR SL SR When tuned into it off . RUNNING H/F 1 TUNING Automatic and manual tuning There are strong and there is no interference. ■ Automatic tuning 1 3 2 3,4 4 4 Rotate MULTI JOG to select is weak, you want...
... in "Automatic tuning". 2 Press TUNING MODE so that the "AUTO" indicator lights up and the frequency of the received station is shown on the front panel display. ■ Manual tuning If the signal from the front panel display. TUNING MODE AUTO Disappears If a colon (:) appears on the remote...LD DVD MD/TAPE CD-R CD TUNER PHONO AM 1530 kHz VOLUME LFE L CR SL SR When tuned into it off . RUNNING H/F 1 TUNING Automatic and manual tuning There are strong and there is no interference. ■ Automatic tuning 1 3 2 3,4 4 4 Rotate MULTI JOG to select is weak, you want...
MCXSP10 Manual
Page 53
FM/AM 2 Press TUNING MODE so that preset number. • If the number of the received stations does not reach E8, automatic preset tuning has automatically stopped after searching all been stored up to 40 (8 stations x 5 groups) of the last ... change the reception mode to monaural to increase the signal quality. 3 Press and hold MEMORY for more than 3 seconds. After pressing MEMORY in "Manually presetting stations". Manually rotate MULTI JOG to continue searching. The preset number and "MEMORY" and "AUTO" indicators flash. You can use the automatic preset tuning feature to...
FM/AM 2 Press TUNING MODE so that preset number. • If the number of the received stations does not reach E8, automatic preset tuning has automatically stopped after searching all been stored up to 40 (8 stations x 5 groups) of the last ... change the reception mode to monaural to increase the signal quality. 3 Press and hold MEMORY for more than 3 seconds. After pressing MEMORY in "Manually presetting stations". Manually rotate MULTI JOG to continue searching. The preset number and "MEMORY" and "AUTO" indicators flash. You can use the automatic preset tuning feature to...
MCXSP10 Manual
Page 54
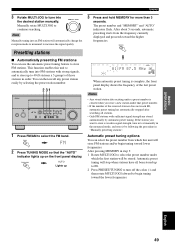
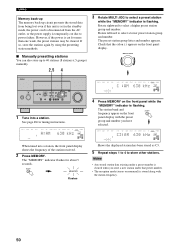
...MIC VIDEO AUX PHONES S VIDEO VIDEO L AUDIO R OPTICAL VOLUME 1 Tune into a station, the front panel display shows the frequency of the station received. 2 Press MEMORY. MEMORY MEMORY Flashes MULTI CH V-AUX DVR VCR 2 SP AB TUNED MEMORY VCR 1 C SAT CABLE DTV/LD DVD MD/TAPE ...be cleared. The preset station group letter and number appears. TUNING Memory back-up The memory back-up to 40 stations (8 stations x 5 groups) manually. 2,5 4 3 Rotate MULTI JOG to select a preset station while the "MEMORY" indicator is flashing. If so, store the stations again by ...
...MIC VIDEO AUX PHONES S VIDEO VIDEO L AUDIO R OPTICAL VOLUME 1 Tune into a station, the front panel display shows the frequency of the station received. 2 Press MEMORY. MEMORY MEMORY Flashes MULTI CH V-AUX DVR VCR 2 SP AB TUNED MEMORY VCR 1 C SAT CABLE DTV/LD DVD MD/TAPE ...be cleared. The preset station group letter and number appears. TUNING Memory back-up The memory back-up to 40 stations (8 stations x 5 groups) manually. 2,5 4 3 Rotate MULTI JOG to select a preset station while the "MEMORY" indicator is flashing. If so, store the stations again by ...
MCXSP10 Manual
Page 65
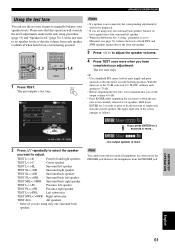
... upper right area of speakers. TEST The unit outputs a test tone. ADVANCED OPERATIONS Using the test tone You can use the test tone feature to manually balance your listening position. y • Use a handheld SPL meter, hold at arms length and point upwards so that of the surround left speaker TEST PLPR...
... upper right area of speakers. TEST The unit outputs a test tone. ADVANCED OPERATIONS Using the test tone You can use the test tone feature to manually balance your listening position. y • Use a handheld SPL meter, hold at arms length and point upwards so that of the surround left speaker TEST PLPR...
MCXSP10 Manual
Page 66
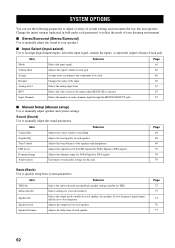
... a variety of audio channels input through the MULTI CH INPUT jacks Page 65 66 66 66 67 67 67 ■ Manual Setup (Manual setup) Use to manually adjust speaker and system settings. Item Mode Volume Trim Assign Rename Analog Level BGV Input Channels Features Selects the input signal. ...input level. Changes the name of each parameter) to reflect the needs of your listening environment. ■ Stereo/Surround (Stereo/Surround) Use to manually adjust the sound of your speakers. ■ Input Select (Input select) Use to reassign digital input/outputs, select the input signal, rename the ...
... a variety of audio channels input through the MULTI CH INPUT jacks Page 65 66 66 66 67 67 67 ■ Manual Setup (Manual setup) Use to manually adjust speaker and system settings. Item Mode Volume Trim Assign Rename Analog Level BGV Input Channels Features Selects the input signal. ...input level. Changes the name of each parameter) to reflect the needs of your listening environment. ■ Stereo/Surround (Stereo/Surround) Use to manually adjust the sound of your speakers. ■ Input Select (Input select) Use to reassign digital input/outputs, select the input signal, rename the ...
MCXSP10 Manual
Page 67
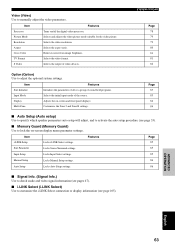
... Selects the aspect ratio. Features Page 85 Surr.Parameter Locks Stereo/Surround settings. 85 Input Setup Locks Input Select settings. 85 Manual Setup Locks Manual Setup settings. 86 Auto Setup Locks Auto Setup settings. 86 ■ Signal Info. (Signal Info.) Use to check audio ...and video signal information (see pages 47). ■ i.LINK Select (i.LINK Select) Use to manually adjust the video parameters. Item Surr.Initialize Features Initializes the parameters of all or a group of sound field programs. Input Mode Display Multi ...
... Selects the aspect ratio. Features Page 85 Surr.Parameter Locks Stereo/Surround settings. 85 Input Setup Locks Input Select settings. 85 Manual Setup Locks Manual Setup settings. 86 Auto Setup Locks Auto Setup settings. 86 ■ Signal Info. (Signal Info.) Use to check audio ...and video signal information (see pages 47). ■ i.LINK Select (i.LINK Select) Use to manually adjust the video parameters. Item Surr.Initialize Features Initializes the parameters of all or a group of sound field programs. Input Mode Display Multi ...
MCXSP10 Manual
Page 72
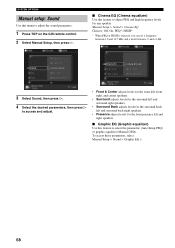
... h. ■ Cinema EQ (Cinema equalizer) Use this feature to adjust PEQ and high frequency levels for any speaker. To access these parameters, select: Manual Setup > Sound > Graphic EQ > 68 Manual Setup > Sound > Cinema EQ Choices: Off, On, PEQ*, HIGH* * When PEQ or HIGH is selected, you can set a frequency between 1.0 and 12... the front presence left and right speakers. ■ Graphic EQ (Graphic equalizer) Use this feature to select the parametric (Auto Setup PEQ) or graphic equalizer (Manual GEQ).
... h. ■ Cinema EQ (Cinema equalizer) Use this feature to adjust PEQ and high frequency levels for any speaker. To access these parameters, select: Manual Setup > Sound > Graphic EQ > 68 Manual Setup > Sound > Cinema EQ Choices: Off, On, PEQ*, HIGH* * When PEQ or HIGH is selected, you can set a frequency between 1.0 and 12... the front presence left and right speakers. ■ Graphic EQ (Graphic equalizer) Use this feature to select the parametric (Auto Setup PEQ) or graphic equalizer (Manual GEQ).

MCXSP10 Manual
Page 73
...the presence left and right speakers. • Select EQ Defeat to cancel equalizing. EQ Select (Equalizer select) Choices: Auto Setup PEQ, Manual GEQ, EQ Defeat SYSTEM OPTIONS ■ Tone Control (Tone control) Use to adjust the amount of the presence right speaker... Control > Control (Tone control) Choices: Defeat, Speaker, Headphone • Select Auto Setup PEQ to use the equalizer adjusted in auto setup. • Select Manual GEQ to adjust the built-in 9-band graphic equalizer so that the tonal quality of the presence L/R, center, surround L/R and surround back L/R speakers matches that...
...the presence left and right speakers. • Select EQ Defeat to cancel equalizing. EQ Select (Equalizer select) Choices: Auto Setup PEQ, Manual GEQ, EQ Defeat SYSTEM OPTIONS ■ Tone Control (Tone control) Use to adjust the amount of the presence right speaker... Control > Control (Tone control) Choices: Defeat, Speaker, Headphone • Select Auto Setup PEQ to use the equalizer adjusted in auto setup. • Select Manual GEQ to adjust the built-in 9-band graphic equalizer so that the tonal quality of the presence L/R, center, surround L/R and surround back L/R speakers matches that...
MCXSP10 Manual
Page 74
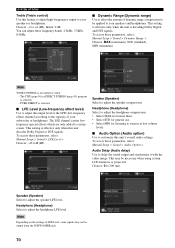
...Select to adjust the headphone LFE level. Headphone (Headphone) Select to adjust the speaker LFE level. To access these parameters, select: Manual Setup > Sound > LFE Level > Choices: -20 to 0 (dB) Speaker (Speaker) Select to your subwoofer or headphones. To access these parameters, select... on the settings of dynamic range compression to delay the sound output and synchronize it with the video image. To access these parameters, select: Manual Setup > Sound > Audio Option > Audio Delay (Audio delay) Use to be necessary when using certain LCD monitors or projectors. The THX...
...Select to adjust the headphone LFE level. Headphone (Headphone) Select to adjust the speaker LFE level. To access these parameters, select: Manual Setup > Sound > LFE Level > Choices: -20 to 0 (dB) Speaker (Speaker) Select to your subwoofer or headphones. To access these parameters, select... on the settings of dynamic range compression to delay the sound output and synchronize it with the video image. To access these parameters, select: Manual Setup > Sound > Audio Option > Audio Delay (Audio delay) Use to be necessary when using certain LCD monitors or projectors. The THX...

MCXSP10 Manual
Page 75
... halt all output of the parameters described in the basic menu are set up basic system parameters. 1 Press TOP on the GUI remote control. 2 Select Manual Setup, then press h. • Select Full to access and adjust. y • Most of sound. • Select -20dB to reduce the current volume by performing the...
... halt all output of the parameters described in the basic menu are set up basic system parameters. 1 Press TOP on the GUI remote control. 2 Select Manual Setup, then press h. • Select Full to access and adjust. y • Most of sound. • Select -20dB to reduce the current volume by performing the...

MCXSP10 Manual
Page 76
.... • Select Off if you have to the rear wall. Choices: No*, Yes SB Speaker Dist. (Surround back speaker distance) Use this feature to Off. Manual Setup > Basic > THX Set > THX Ultra2 SWFR (THX Ultra2 subwoofer) Use this feature to optimize the surround sound field when you do not want to... to select the THX Ultra2-compatible subwoofer. THX Ultra2 SWFR Bndry Gain Comp SB Speaker Dist. • Select No if you do not want to manually adjust the THX settings. SYSTEM OPTIONS ■ THX Set (THX settings) Use to use the Bndry Gain Comp function. 72
.... • Select Off if you have to the rear wall. Choices: No*, Yes SB Speaker Dist. (Surround back speaker distance) Use this feature to Off. Manual Setup > Basic > THX Set > THX Ultra2 SWFR (THX Ultra2 subwoofer) Use this feature to optimize the surround sound field when you do not want to... to select the THX Ultra2-compatible subwoofer. THX Ultra2 SWFR Bndry Gain Comp SB Speaker Dist. • Select No if you do not want to manually adjust the THX settings. SYSTEM OPTIONS ■ THX Set (THX settings) Use to use the Bndry Gain Comp function. 72


