
Owner's Manual
Page 1
.../870 Natural Sound Stereo Receiver Thank you for future reference. WARNING TO REDUCE THE RISK OF FIRE OR ELECTRIC SHOCK, DO NOT EXPOSE THIS UNIT TO RAIN OR MOISTURE. Model: Serial No.: The serial number is intended to alert you to constitute a risk of This Unit 5 Speaker Setup for This Unit ..... 6 Connections 7 Adjustment Before Operation ... 12 Operations 15 Tuning Operations 17 Using Digital Sound Field Processor (DSP 19 Setting...
.../870 Natural Sound Stereo Receiver Thank you for future reference. WARNING TO REDUCE THE RISK OF FIRE OR ELECTRIC SHOCK, DO NOT EXPOSE THIS UNIT TO RAIN OR MOISTURE. Model: Serial No.: The serial number is intended to alert you to constitute a risk of This Unit 5 Speaker Setup for This Unit ..... 6 Connections 7 Adjustment Before Operation ... 12 Operations 15 Tuning Operations 17 Using Digital Sound Field Processor (DSP 19 Setting...

Owner's Manual
Page 2
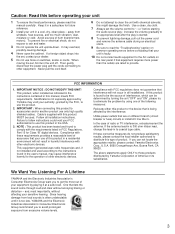
... CODE ANTENNA LEAD IN WIRE ANTENNA DISCHARGE UNIT (NEC SECTION 810-20) GROUNDING CONDUCTORS (NEC SECTION 810-21) GROUND CLAMPS POWER SERVICE GROUNDING ELECTRODE SYSTEM (NEC ART 250. All warnings on the unit. 11 Power-Cord Protection - Quick stops, excessive force, and uneven surfaces may cause the unit and cart combination to rain; or placed in a built-in the operating instructions...
... CODE ANTENNA LEAD IN WIRE ANTENNA DISCHARGE UNIT (NEC SECTION 810-20) GROUNDING CONDUCTORS (NEC SECTION 810-21) GROUND CLAMPS POWER SERVICE GROUNDING ELECTRODE SYSTEM (NEC ART 250. All warnings on the unit. 11 Power-Cord Protection - Quick stops, excessive force, and uneven surfaces may cause the unit and cart combination to rain; or placed in a built-in the operating instructions...
Owner's Manual
Page 3
..., please read the "Troubleshooting" section on common operating errors before starting the audio source play: increase the volume gradually to an appropriate level after the play is started. 8 To prevent lightning damage, pull out the power cord and remove the antenna cable during an electrical storm. 9 Be sure to read this manual carefully. Failure to follow instructions could void your dealer. 5 Do not use the product. 2.
..., please read the "Troubleshooting" section on common operating errors before starting the audio source play: increase the volume gradually to an appropriate level after the play is started. 8 To prevent lightning damage, pull out the power cord and remove the antenna cable during an electrical storm. 9 Be sure to read this manual carefully. Failure to follow instructions could void your dealer. 5 Do not use the product. 2.

Owner's Manual
Page 4
... User Program Sheets q AM Loop Antenna < > OPEN/CLOSE THE CONTROL DOOR for Easier Speaker Output Balance Adjustment q 3 Center Channel Modes (NORMAL/WIDE/PHANTOM) q 40-Station Random Preset Tuning q Video Signal Input/Output Capability (Including S Video Connections) q SLEEP Timer q On Screen Displays Which Is Helpful in Controlling This Unit q Programmable Remote Control Transmitter SUPPLIED ACCESSORIES After unpacking, check that the following parts are contained. To close the door. FEATURES q 5 Speaker Configuration Front: 110W + 110W (8Ω)/135W + 135W (6Ω) RMS Output Power...
... User Program Sheets q AM Loop Antenna < > OPEN/CLOSE THE CONTROL DOOR for Easier Speaker Output Balance Adjustment q 3 Center Channel Modes (NORMAL/WIDE/PHANTOM) q 40-Station Random Preset Tuning q Video Signal Input/Output Capability (Including S Video Connections) q SLEEP Timer q On Screen Displays Which Is Helpful in Controlling This Unit q Programmable Remote Control Transmitter SUPPLIED ACCESSORIES After unpacking, check that the following parts are contained. To close the door. FEATURES q 5 Speaker Configuration Front: 110W + 110W (8Ω)/135W + 135W (6Ω) RMS Output Power...
Owner's Manual
Page 5
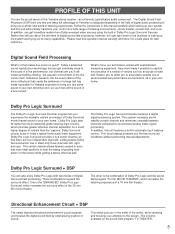
... this Yamaha stereo receiver -an extremely sophisticated audio component. This effect puts you the best surround conditions without performing manual adjustments. PROFILE OF THIS UNIT You are the proud owner of Digital Surround field processing. Rather than the "passive" Dolby Surround circuits found in your own home. Dolby Pro Logic Surround The Dolby Pro Logic Surround Decoder program lets you get right down to bring you 'll feel all in today's typical home audio/video...
... this Yamaha stereo receiver -an extremely sophisticated audio component. This effect puts you the best surround conditions without performing manual adjustments. PROFILE OF THIS UNIT You are the proud owner of Digital Surround field processing. Rather than the "passive" Dolby Surround circuits found in your own home. Dolby Pro Logic Surround The Dolby Pro Logic Surround Decoder program lets you get right down to bring you 'll feel all in today's typical home audio/video...

Owner's Manual
Page 6
... to provide the best sound-field quality with TV sets, use a magnetically shielded speaker. Center: Precisely between the front speakers. (To avoid interference with a 5 speaker configuration. They will probably be used with the Dolby Surround. The rear and center speakers do not need to be equal in this unit. If the digital sound field program is in the DOLBY PRO LOGIC, ENHANCED or TV THEATER mode, the center sound is output from TV sets.) 6 When you...
... to provide the best sound-field quality with TV sets, use a magnetically shielded speaker. Center: Precisely between the front speakers. (To avoid interference with a 5 speaker configuration. They will probably be used with the Dolby Surround. The rear and center speakers do not need to be equal in this unit. If the digital sound field program is in the DOLBY PRO LOGIC, ENHANCED or TV THEATER mode, the center sound is output from TV sets.) 6 When you...

Owner's Manual
Page 9
..., no sound may be connected to this unit. q Use speakers with wire of the proper gauge, cut to be connected to the proper position. If you connect only one center speaker. USING AUX TERMINALS (ON THE FRONT PANEL) These terminals are used to connect an auxiliary video input source such as this could damage this unit. CONNECTING SPEAKERS Connect the SPEAKERS terminals to your speakers with the specified impedance shown on the rear of...
..., no sound may be connected to this unit. q Use speakers with wire of the proper gauge, cut to be connected to the proper position. If you connect only one center speaker. USING AUX TERMINALS (ON THE FRONT PANEL) These terminals are used to connect an auxiliary video input source such as this could damage this unit. CONNECTING SPEAKERS Connect the SPEAKERS terminals to your speakers with the specified impedance shown on the rear of...

Owner's Manual
Page 10
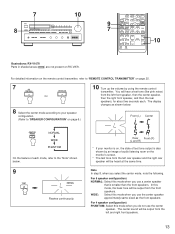
... 180 watts. However, if you have a YAMAHA turntable with the ground wire disconnected. These outlets will be connected to the UNSWITCHED AC OUTLET is turned on. REMOTE CONTROL (PHONO) connector If you drive a center speaker with an external stereo power amplifier, remove the jumper bars and connect the input terminals of the external amplifier (MAIN IN or AUX terminals of components) that can not be connected to the SWITCHED AC...
... 180 watts. However, if you have a YAMAHA turntable with the ground wire disconnected. These outlets will be connected to the UNSWITCHED AC OUTLET is turned on. REMOTE CONTROL (PHONO) connector If you drive a center speaker with an external stereo power amplifier, remove the jumper bars and connect the input terminals of the external amplifier (MAIN IN or AUX terminals of components) that can not be connected to the SWITCHED AC...
Owner's Manual
Page 12
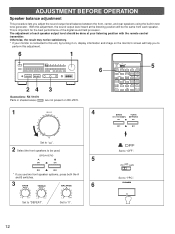
... turning it on, display information and image on the monitor's screen will be the same from each speaker output level should be used. SPEAKERS 5 * If you use two front speaker systems, press both the A and B switches. 3 BASS TREBLE BALANCE 6 Set to perform this adjustment, the sound output level heard at the listening position will help you adjust the sound output level balance between the front, center, and rear speakers using the built-in shaded areas ( ) are not present on RX-V870. 1 4 ∞ Set...
... turning it on, display information and image on the monitor's screen will be the same from each speaker output level should be used. SPEAKERS 5 * If you use two front speaker systems, press both the A and B switches. 3 BASS TREBLE BALANCE 6 Set to perform this adjustment, the sound output level heard at the listening position will help you adjust the sound output level balance between the front, center, and rear speakers using the built-in shaded areas ( ) are not present on RX-V870. 1 4 ∞ Set...
Owner's Manual
Page 13
... to your monitor is on RX-V870. The center sound will be output from the left and right front speakers. 13 Front (L) Center CENTER MODE NORMAL WIDE PHANTOM On the feature of each . The display changes as the front speakers. In this mode when you use a center speaker that is also shown by an image of audio listening room on page 6.) 10 Turn up the volume by using the remote control transmitter. Note...
... to your monitor is on RX-V870. The center sound will be output from the left and right front speakers. 13 Front (L) Center CENTER MODE NORMAL WIDE PHANTOM On the feature of each . The display changes as the front speakers. In this mode when you use a center speaker that is also shown by an image of audio listening room on page 6.) 10 Turn up the volume by using the remote control transmitter. Note...
Owner's Manual
Page 15
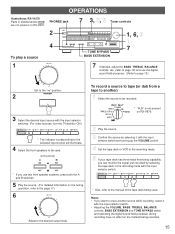
..., select it with the input selector switch and turning up the VOLUME control. 4 Set the tape deck or VCR to the recording mode. 5 If your tape deck has three head monitoring capability, you use the digital sound field processor. (Refer to page 19.) ∞ Set to the manual of the tape deck being recorded. 15 PHONES jack 2 4 To play a source 7 3, 3, 5 Tuner controls TONE BYPASS BASS EXTENSION 1, 6, 3 1 7 1 7 If desired, adjust the BASS, TREBLE, BALANCE controls, etc. (refer to page 16) and use two front speaker...
..., select it with the input selector switch and turning up the VOLUME control. 4 Set the tape deck or VCR to the recording mode. 5 If your tape deck has three head monitoring capability, you use the digital sound field processor. (Refer to page 19.) ∞ Set to the manual of the tape deck being recorded. 15 PHONES jack 2 4 To play a source 7 3, 3, 5 Tuner controls TONE BYPASS BASS EXTENSION 1, 6, 3 1 7 1 7 If desired, adjust the BASS, TREBLE, BALANCE controls, etc. (refer to page 16) and use two front speaker...
Owner's Manual
Page 16
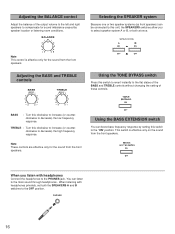
... Connect the headphones to compensate for the sound from the front speakers. Adjusting the BASS and TREBLE controls BASS TREBLE Using the TONE BYPASS switch Press this clockwise to increase (or counterclockwise to the flat states of the BASS and TREBLE controls without changing the setting of the output volume to the left and right speakers to the PHONES jack. Note These controls are effective only for the sound from the front speakers. TREBLE : Turn this switch...
... Connect the headphones to compensate for the sound from the front speakers. Adjusting the BASS and TREBLE controls BASS TREBLE Using the TONE BYPASS switch Press this clockwise to increase (or counterclockwise to the flat states of the BASS and TREBLE controls without changing the setting of the output volume to the left and right speakers to the PHONES jack. Note These controls are effective only for the sound from the front speakers. TREBLE : Turn this switch...

Owner's Manual
Page 18
... ... PRESET AUTO STEREO FM MHz 0 40 CONCERT HALL 60 80 100 Shows the displayed station has been programmed to the previous page for about 5 seconds. 4 Press a preset station button before "MEMORY" goes off or the power plug is disconnected from the AC outlet or the power is turned off from being lost even if the POWER switch is cut for more stations to the preset station buttons on RX-V870. 4, 2 (Preset station buttons) 2, 1 3 To program stations 1 Tune...
... ... PRESET AUTO STEREO FM MHz 0 40 CONCERT HALL 60 80 100 Shows the displayed station has been programmed to the previous page for about 5 seconds. 4 Press a preset station button before "MEMORY" goes off or the power plug is disconnected from the AC outlet or the power is turned off from being lost even if the POWER switch is cut for more stations to the preset station buttons on RX-V870. 4, 2 (Preset station buttons) 2, 1 3 To program stations 1 Tune...

Owner's Manual
Page 19
... adjustments. Digital sound field program selector DELAY F CR NORMAL WIDE PHANTOM ms PRESET 70 mm TV SLEEP PRO LOGIC ENHANCED MOVIE THEATER THEATER AUTO AM FM ROCK CONCERT JAZZ CLUB kHZ MHz CHURCH STEREO 0 40 CONCERT HALL 60 80 100 MEMORY Used to adjust the delay time. (For details, refer to page 22.) Used to adjust sound output level of each speaker. (For details, refer to page 13.) Displays your selection on the DSP...
... adjustments. Digital sound field program selector DELAY F CR NORMAL WIDE PHANTOM ms PRESET 70 mm TV SLEEP PRO LOGIC ENHANCED MOVIE THEATER THEATER AUTO AM FM ROCK CONCERT JAZZ CLUB kHZ MHz CHURCH STEREO 0 40 CONCERT HALL 60 80 100 MEMORY Used to adjust the delay time. (For details, refer to page 22.) Used to adjust sound output level of each speaker. (For details, refer to page 13.) Displays your selection on the DSP...

Owner's Manual
Page 20
... you play a source encoded with a low ceiling. By featuring the directional enhancement circuit, vocals are trademarks of the sound field itself are restrained as much as well. This program is a small, cozy jazz club with Dolby Surround on your home video system, the Dolby Pro Logic Surround mode on the screen. When the DSP is on, a program name illuminates in the display and sound output is from the rear and center speakers show...
... you play a source encoded with a low ceiling. By featuring the directional enhancement circuit, vocals are trademarks of the sound field itself are restrained as much as well. This program is a small, cozy jazz club with Dolby Surround on your home video system, the Dolby Pro Logic Surround mode on the screen. When the DSP is on, a program name illuminates in the display and sound output is from the rear and center speakers show...
Owner's Manual
Page 21
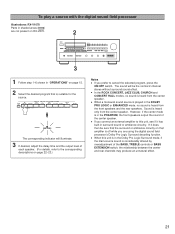
... on RX-V870. 2 3 1 Follow step 1-6 shown in the DOLBY PRO LOGIC or ENHANCED mode, no sound is in the PHANTOM, the front speakers output the sound of the BASS, TREBLE controls or BASS EXTENSION switch, the relationship between the center and rear channels may produce an unnatural effect. 21 q When a monaural sound source is played in "OPERATIONS" on page 15. 2 Select the desired program that amplifier is heard only from the front speakers and the rear speakers. Sound...
... on RX-V870. 2 3 1 Follow step 1-6 shown in the DOLBY PRO LOGIC or ENHANCED mode, no sound is in the PHANTOM, the front speakers output the sound of the BASS, TREBLE controls or BASS EXTENSION switch, the relationship between the center and rear channels may produce an unnatural effect. 21 q When a monaural sound source is played in "OPERATIONS" on page 15. 2 Select the desired program that amplifier is heard only from the front speakers and the rear speakers. Sound...

Owner's Manual
Page 25
... speaker balance adjustment. Adjusts delay time. Illustrations: RX-V1070 Parts in shaded areas ( ) are YAMAHA components, then this remote control transmitter will no more need so many remote control transmitters to control various components to be used. Selects input source. For Control of This Unit Refer to "YPC-USER-LEARN switch" on /off digital sound field processor. Adjusts sound output level at each component. Switches on the VOLUME control flashes continuously. 25 Moreover, this remote control transmitter, set the YPC-USER-LEARN switch to the YPC (Yamaha Preset Code...
... speaker balance adjustment. Adjusts delay time. Illustrations: RX-V1070 Parts in shaded areas ( ) are YAMAHA components, then this remote control transmitter will no more need so many remote control transmitters to control various components to be used. Selects input source. For Control of This Unit Refer to "YPC-USER-LEARN switch" on /off digital sound field processor. Adjusts sound output level at each component. Switches on the VOLUME control flashes continuously. 25 Moreover, this remote control transmitter, set the YPC-USER-LEARN switch to the YPC (Yamaha Preset Code...
Owner's Manual
Page 27
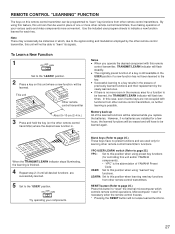
... learned, the TRANSMIT/LEARN indicator will flash steadily. RESET button (Refer to page 25.) Press this button to be programmed to this position when using this feature, this remote control transmitter, TRANSMIT/LEARN indicator will flash two times. q If there is no batteries are installed for a function to "reset" the internal microcomputer which , due to the signal-coding and modulation employed by the newly learned...
... learned, the TRANSMIT/LEARN indicator will flash steadily. RESET button (Refer to page 25.) Press this button to be programmed to this position when using this feature, this remote control transmitter, TRANSMIT/LEARN indicator will flash two times. q If there is no batteries are installed for a function to "reset" the internal microcomputer which , due to the signal-coding and modulation employed by the newly learned...
Owner's Manual
Page 29
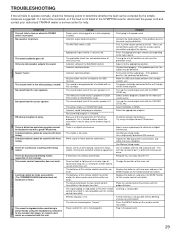
... reset the protection circuit. Replace the batteries with this remote control transmitter. Amplifier SYMPTOM The unit fails to turn on the remote control transmitter. No sound or no picture. The sound suddenly goes off and then on the remote control transmitter. A desired station cannot be defective. Incorrect cord connections. The monaural sound source is not plugged in DOLBY PRO LOGIC or ENHANCED mode. Noises will help . Select NORMAL or WIDE. Use Manual tuning mode. The batteries of FM stereo...
... reset the protection circuit. Replace the batteries with this remote control transmitter. Amplifier SYMPTOM The unit fails to turn on the remote control transmitter. No sound or no picture. The sound suddenly goes off and then on the remote control transmitter. A desired station cannot be defective. Incorrect cord connections. The monaural sound source is not plugged in DOLBY PRO LOGIC or ENHANCED mode. Noises will help . Select NORMAL or WIDE. Use Manual tuning mode. The batteries of FM stereo...

Owner's Manual
Page 30
SPECIFICATIONS AUDIO SECTION Minimum RMS Output Power per Channel Front L,R 8 ohms, 20 Hz to 20 kHz, 0.015% THD
SPECIFICATIONS AUDIO SECTION Minimum RMS Output Power per Channel Front L,R 8 ohms, 20 Hz to 20 kHz, 0.015% THD


