Owner's Manual
Page 1
U RX-V863 AV Receiver OWNER'S MANUAL
U RX-V863 AV Receiver OWNER'S MANUAL
Owner's Manual
Page 3
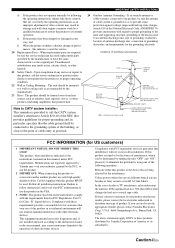
... product, when installed as to follow instructions could void your authority, granted by using one of product. Modifications not expressly approved by Yamaha may result in damage and will often require extensive work by the manufacturer or have the same characteristics as practical. Cable/s supplied with... frequencies and, if not installed and used according to the instructions found in the users manual, may result in to distribute this indicates a need for service. 20 Replacement Parts - If this manual, meets FCC requirements. If the antenna lead-in is in FCC Regulations, Part 15...
... product, when installed as to follow instructions could void your authority, granted by using one of product. Modifications not expressly approved by Yamaha may result in damage and will often require extensive work by the manufacturer or have the same characteristics as practical. Cable/s supplied with... frequencies and, if not installed and used according to the instructions found in the users manual, may result in to distribute this indicates a need for service. 20 Replacement Parts - If this manual, meets FCC requirements. If the antenna lead-in is in FCC Regulations, Part 15...
Owner's Manual
Page 4
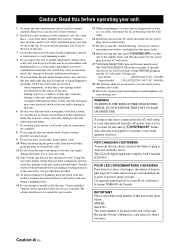
...heat such as this unit in order not to the AC wall outlet, it is designed to wide slot and fully insert. Retain this Owner's Manual in a safe place for future reference. 2 Install this unit is not disconnected from the wall outlet, grasp the plug; in the space below...the AC wall outlet. In this state, this sound system in an environment with high humidity (i.e. On the top of the unit. Contact qualified Yamaha service personnel when any damage resulting from use this unit for your unit. 1 To assure the finest performance, please read the "Troubleshooting" section ...
...heat such as this unit in order not to the AC wall outlet, it is designed to wide slot and fully insert. Retain this Owner's Manual in a safe place for future reference. 2 Install this unit is not disconnected from the wall outlet, grasp the plug; in the space below...the AC wall outlet. In this state, this sound system in an environment with high humidity (i.e. On the top of the unit. Contact qualified Yamaha service personnel when any damage resulting from use this unit for your unit. 1 To assure the finest performance, please read the "Troubleshooting" section ...
Owner's Manual
Page 5
...Bluetooth™ component 72 Recording 73 ADVANCED OPERATION Advanced sound configurations 74 Changing sound field parameter settings 74 Selecting decoders 79 Customizing this unit (MANUAL SETUP).........82 Using SET MENU 86 1 BASIC MENU 87 2 VOLUME MENU 91 3 SOUND MENU 92 4 INPUT MENU 95 5 OPTION ...113 Resetting the system 122 Glossary 123 Sound field program information 126 Specifications 127 Index 129 APPENDIX (at the end of this manual for the SCENE feature 41 Playback 42 Basic procedure 42 Selecting the MULTI CH INPUT component......... 43 Selecting the front speaker ...
...Bluetooth™ component 72 Recording 73 ADVANCED OPERATION Advanced sound configurations 74 Changing sound field parameter settings 74 Selecting decoders 79 Customizing this unit (MANUAL SETUP).........82 Using SET MENU 86 1 BASIC MENU 87 2 VOLUME MENU 91 3 SOUND MENU 92 4 INPUT MENU 95 5 OPTION ...113 Resetting the system 122 Glossary 123 Sound field program information 126 Specifications 127 Index 129 APPENDIX (at the end of this manual for the SCENE feature 41 Playback 42 Basic procedure 42 Selecting the MULTI CH INPUT component......... 43 Selecting the front speaker ...
Owner's Manual
Page 7
... Foreign Patents. All Rights Reserved. Bluetooth™ Bluetooth is a registered trademark of the Bluetooth SIG and is too late, Yamaha and the Electronic Industries Association's Consumer Electronics Group recommend you to change in accordance with page number(s) indicates the corresponding reference ...page(s). Manufactured under license under license from Dolby Laboratories. Refer to production. INTRODUCTION Notice Notice About this manual for your operation. • Some operations can be performed by using either the buttons on the front panel or...
... Foreign Patents. All Rights Reserved. Bluetooth™ Bluetooth is a registered trademark of the Bluetooth SIG and is too late, Yamaha and the Electronic Industries Association's Consumer Electronics Group recommend you to change in accordance with page number(s) indicates the corresponding reference ...page(s). Manufactured under license under license from Dolby Laboratories. Refer to production. INTRODUCTION Notice Notice About this manual for your operation. • Some operations can be performed by using either the buttons on the front panel or...
Owner's Manual
Page 12
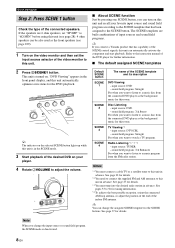
...information. ■ The default assigned SCENE templates 2 Press SSCENE1 button. "DVD Viewing" appears in advance. sound field program: Straight For when you connect a Yamaha product that has been assigned to "6Ω MIN" before using this unit and recall your player. 4 Rotate JVOLUME to adjust the volume. Radio Listening *2, ... to a music disc from the connected DVD player as the front speakers (see page 109). 1 Turn on . Refer to the instruction manual of the video monitor to this unit in the front panel display, and this room. See page 27 for the SCENE buttons. y You...
...information. ■ The default assigned SCENE templates 2 Press SSCENE1 button. "DVD Viewing" appears in advance. sound field program: Straight For when you connect a Yamaha product that has been assigned to "6Ω MIN" before using this unit and recall your player. 4 Rotate JVOLUME to adjust the volume. Radio Listening *2, ... to a music disc from the connected DVD player as the front speakers (see page 109). 1 Turn on . Refer to the instruction manual of the video monitor to this unit in the front panel display, and this room. See page 27 for the SCENE buttons. y You...
Owner's Manual
Page 13
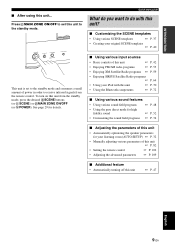
... using this unit? ■ Customizing the SCENE templates • Using various SCENE templates ☞ P. 37 • Creating your listening room (AUTO SETUP) ☞ P. 32 • Manually adjusting various parameters of this unit ☞ P. 82 • Setting the remote control ☞ P. 102 • Adjusting the advanced parameters ☞ P. 109 ■ Additional feature...
... using this unit? ■ Customizing the SCENE templates • Using various SCENE templates ☞ P. 37 • Creating your listening room (AUTO SETUP) ☞ P. 32 • Manually adjusting various parameters of this unit ☞ P. 82 • Setting the remote control ☞ P. 102 • Adjusting the advanced parameters ☞ P. 109 ■ Additional feature...
Owner's Manual
Page 16
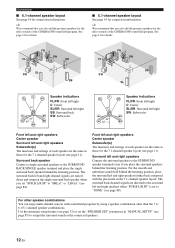
... field program. Surround left and right speakers Connect the surround speakers to the SURROUND speaker terminals even if you set the "SPEAKER SET" parameters in "MANUAL SETUP" (see page 87) to output the surround sounds at the single surround back speaker when you place the surround speakers behind the listening position...
... field program. Surround left and right speakers Connect the surround speakers to the SURROUND speaker terminals even if you set the "SPEAKER SET" parameters in "MANUAL SETUP" (see page 87) to output the surround sounds at the single surround back speaker when you place the surround speakers behind the listening position...
Owner's Manual
Page 20
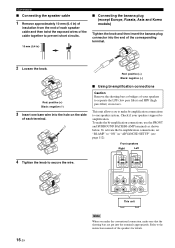
... speakers to one bare wire into the end of the corresponding terminal. 2 Loosen the knob. Front speakers Right Left 4 Tighten the knob to the instruction manuals of the speakers for details. Connections ■ Connecting the speaker cable 1 Remove approximately 10 mm (0.4 in "ADVANCED SETUP" (see page 112). To activate the bi...
... speakers to one bare wire into the end of the corresponding terminal. 2 Loosen the knob. Front speakers Right Left 4 Tighten the knob to the instruction manuals of the speakers for details. Connections ■ Connecting the speaker cable 1 Remove approximately 10 mm (0.4 in "ADVANCED SETUP" (see page 112). To activate the bi...
Owner's Manual
Page 22
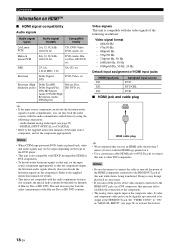
...8226; The analog video signals input at the composite video, S-video and component video jacks can be digitally up-converted to the supplied instruction manuals of the Blu-ray Disc or HD DVD contents. Doing so may disrupt playback or cause noise. • If you can decode the ...components. • To decode audio bitstream signals on it. • Use a conversion cable (HDMI jack ↔ DVI-D jack) to the supplied instruction manuals for example, the special audio contents downloaded via a DVI connection, this unit may not be output depending on the type of HDMI input jacks HDMI...
...8226; The analog video signals input at the composite video, S-video and component video jacks can be digitally up-converted to the supplied instruction manuals of the Blu-ray Disc or HD DVD contents. Doing so may disrupt playback or cause noise. • If you can decode the ...components. • To decode audio bitstream signals on it. • Use a conversion cable (HDMI jack ↔ DVI-D jack) to the supplied instruction manuals for example, the special audio contents downloaded via a DVI connection, this unit may not be output depending on the type of HDMI input jacks HDMI...
Owner's Manual
Page 30
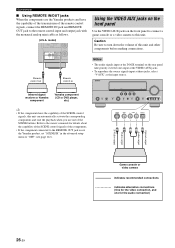
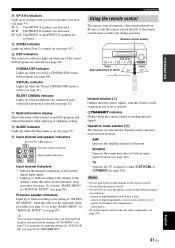
... SCENE control signals of the components. • If the component connected to the REMOTE OUT jack is not the Yamaha product, set "SCENE IR" in Infrared signal receiver or Yamaha component Yamaha component (CD or DVD player, etc.) Using the VIDEO AUX jacks on the front panel Use the VIDEO AUX ...analog mini cable as the input source. model) FM 75Ω UNBAL. Connections ■ Using REMOTE IN/OUT jacks When the components are the Yamaha products and have the capability of the SCENE control signals, this unit and other components before making connections. Refer to the owner...
... SCENE control signals of the components. • If the component connected to the REMOTE OUT jack is not the Yamaha product, set "SCENE IR" in Infrared signal receiver or Yamaha component Yamaha component (CD or DVD player, etc.) Using the VIDEO AUX jacks on the front panel Use the VIDEO AUX ...analog mini cable as the input source. model) FM 75Ω UNBAL. Connections ■ Using REMOTE IN/OUT jacks When the components are the Yamaha products and have the capability of the SCENE control signals, this unit and other components before making connections. Refer to the owner...
Owner's Manual
Page 35
... control signals. y You can make settings for the presence and surround back speakers automatically by running "AUTO SETUP" (see page 32) or manually by adjusting settings for other information when adjusting or changing settings. PREPARATION D SP A B indicators Light up or flash according to the settings ...of the speakers when this unit is in the automatic setup procedure (see page 32) or in the "BASIC MENU" in "MANUAL SETUP" (see page 89). Presence speaker indicators Light up when headphones are connected and a sound field program is sending infrared signals. SILENT...
... control signals. y You can make settings for the presence and surround back speakers automatically by running "AUTO SETUP" (see page 32) or manually by adjusting settings for other information when adjusting or changing settings. PREPARATION D SP A B indicators Light up or flash according to the settings ...of the speakers when this unit is in the automatic setup procedure (see page 32) or in the "BASIC MENU" in "MANUAL SETUP" (see page 89). Presence speaker indicators Light up when headphones are connected and a sound field program is sending infrared signals. SILENT...
Owner's Manual
Page 36
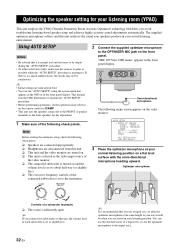
...you are indicated in your listening position. Using AUTO SETUP Notes • Be advised that appears in the OSD or in progress. This manual uses the OSD illustrations to explain the "AUTO SETUP" procedure. • Before performing operations, set the operation mode selector on the remote... THE SPEAKER SETTING FOR YOUR LISTENING ROOM (YPAO) Optimizing the speaker setting for your listening room (YPAO) This unit employs the YPAO (Yamaha Parametric Room Acoustic Optimizer) technology which lets you connect two subwoofers to this unit, the volume level of each subwoofer is set to slightly...
...you are indicated in your listening position. Using AUTO SETUP Notes • Be advised that appears in the OSD or in progress. This manual uses the OSD illustrations to explain the "AUTO SETUP" procedure. • Before performing operations, set the operation mode selector on the remote... THE SPEAKER SETTING FOR YOUR LISTENING ROOM (YPAO) Optimizing the speaker setting for your listening room (YPAO) This unit employs the YPAO (Yamaha Parametric Room Acoustic Optimizer) technology which lets you connect two subwoofers to this unit, the volume level of each subwoofer is set to slightly...
Owner's Manual
Page 39
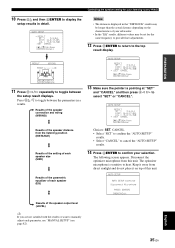
...speaker distance from the listening position (DISTANCE) Results of the setting of each speaker size (SIZE) Results of the parametric equalizer of each parameter, use "MANUAL SETUP" (see page 82). The optimizer microphone is pointing at "SET" and "CANCEL" and then press 8l / h to select "SET" or ... Complete Disconnect Microphone PRESS [ENTER] [MENU]:Exit Results of the speaker output level (LEVEL) y If you are not satisfied with the results or want to manually adjust each speaker (EQ) AUTO SETUP RESULT SP : 3/4/0.1 DIST: 14.0/17.0ft LVL : -9.0/+6.5dB . >SET CANCEL [ ]/[ ]:Up/Down [ENTER]:...
...speaker distance from the listening position (DISTANCE) Results of the setting of each speaker size (SIZE) Results of the parametric equalizer of each parameter, use "MANUAL SETUP" (see page 82). The optimizer microphone is pointing at "SET" and "CANCEL" and then press 8l / h to select "SET" or ... Complete Disconnect Microphone PRESS [ENTER] [MENU]:Exit Results of the speaker output level (LEVEL) y If you are not satisfied with the results or want to manually adjust each speaker (EQ) AUTO SETUP RESULT SP : 3/4/0.1 DIST: 14.0/17.0ft LVL : -9.0/+6.5dB . >SET CANCEL [ ]/[ ]:Up/Down [ENTER]:...
Owner's Manual
Page 40
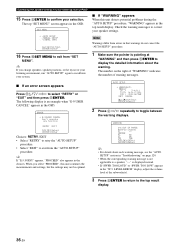
... is not applicable to a speaker, "--" is displayed instead. • If "SWFR: TOO LOUD" or "SWFR: TOO LOW" appears in the OSD. SET MENU . ;AUTO SETUP ;MANUAL SETUP .A;SIGNAL INFO [ ]/[ ]:Up/Down [ENTER]:Enter 16 Press ISET MENU to toggle between the warning displays. E-9:USER CANCEL Don't operate any function >RETRY EXIT...
... is not applicable to a speaker, "--" is displayed instead. • If "SWFR: TOO LOUD" or "SWFR: TOO LOW" appears in the OSD. SET MENU . ;AUTO SETUP ;MANUAL SETUP .A;SIGNAL INFO [ ]/[ ]:Up/Down [ENTER]:Enter 16 Press ISET MENU to toggle between the warning displays. E-9:USER CANCEL Don't operate any function >RETRY EXIT...
Owner's Manual
Page 50
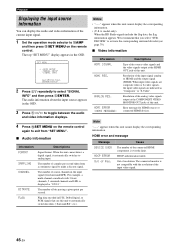
SET MENU . ;AUTO SETUP ;MANUAL SETUP .A;SIGNAL INFO [ ]/[ ]:Up/Down [ENTER]:Enter p p 2 Press 8n repeatedly to activate the corresponding surround decoder (see page 79). ■ Video information Information HDMI SIGNAL ...
SET MENU . ;AUTO SETUP ;MANUAL SETUP .A;SIGNAL INFO [ ]/[ ]:Up/Down [ENTER]:Enter p p 2 Press 8n repeatedly to activate the corresponding surround decoder (see page 79). ■ Video information Information HDMI SIGNAL ...
Owner's Manual
Page 57
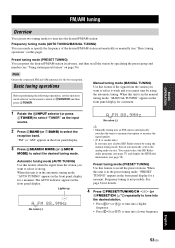
... the RINPUT selector (or press 4TUNER) to select "TUNER" as the input source. 2 Press CBAND (or 7BAND) to select the reception band. Manual tuning mode (MANUAL TUNING) Use this page). The AUTO indicator appears in the front panel display for the best reception. "FM" or "AM" appears in advance, and... Press El (or 8n) to select is weak and you want to tune into a lower frequency. When this unit is in the manual tuning mode, "MANUAL TUNING" appears in the front panel display. Frequency tuning is in the preset tuning mode, "PRESET TUNING" appears in the front panel display...
... the RINPUT selector (or press 4TUNER) to select "TUNER" as the input source. 2 Press CBAND (or 7BAND) to select the reception band. Manual tuning mode (MANUAL TUNING) Use this page). The AUTO indicator appears in the front panel display for the best reception. "FM" or "AM" appears in advance, and... Press El (or 8n) to select is weak and you want to tune into a lower frequency. When this unit is in the manual tuning mode, "MANUAL TUNING" appears in the front panel display. Frequency tuning is in the preset tuning mode, "PRESET TUNING" appears in the front panel display...
Owner's Manual
Page 58
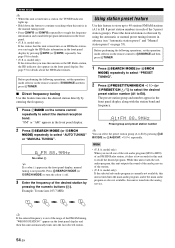
...the colon (:) off. 3 Enter the frequency of the station. • (U.S.A. While this unit recalls the subaudio program, this unit is in the manual tuning mode. • Press GINFO (or 0INFO) repeatedly to toggle the frequency information and sound field program information in advance (see "Automatic station preset...the button to continue searching when this unit outputs the sound of the analog service of the desired station by using the automatic or manual preset tuning features in the front panel. • (U.S.A. See page 57 for details about the HD Radio features. Before performing the...
...the colon (:) off. 3 Enter the frequency of the station. • (U.S.A. While this unit recalls the subaudio program, this unit is in the manual tuning mode. • Press GINFO (or 0INFO) repeatedly to toggle the frequency information and sound field program information in advance (see "Automatic station preset...the button to continue searching when this unit outputs the sound of the analog service of the desired station by using the automatic or manual preset tuning features in the front panel. • (U.S.A. See page 57 for details about the HD Radio features. Before performing the...
Owner's Manual
Page 59
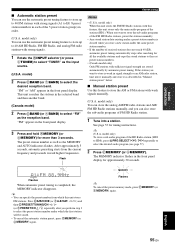
... the available stations and copy the stored stations to the rest preset station numbers. • (Canada model only) Only FM stations with weak signals manually. (U.S.A. MEMORY AUTO A1:FM 88.9MHz Flashes When automatic preset tuning is weak in the front panel display for more than 3 seconds. Press DA... stores FM stations. BASIC OPERATION ■ Automatic station preset You can store the analog AM/FM radio stations and AM/ FM HD Radio stations manually, and you perform step 3 to select the preset station number under a preset station number is cleared when you want to E8: 8 preset ...
... the available stations and copy the stored stations to the rest preset station numbers. • (Canada model only) Only FM stations with weak signals manually. (U.S.A. MEMORY AUTO A1:FM 88.9MHz Flashes When automatic preset tuning is weak in the front panel display for more than 3 seconds. Press DA... stores FM stations. BASIC OPERATION ■ Automatic station preset You can store the analog AM/FM radio stations and AM/ FM HD Radio stations manually, and you perform step 3 to select the preset station number under a preset station number is cleared when you want to E8: 8 preset ...
Owner's Manual
Page 61
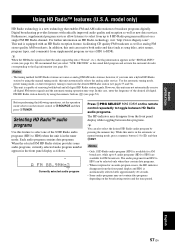
...broadcasts as well as new data services. Furthermore, supplemental program services allow listeners to tune into a hybrid HD Radio station by using the manual tuning mode, this feature to select one of receiving both audio and data (such as follows. y When the HD Radio signals include ... currently selected audio program number appears in the "SIGNAL INFO" screen (see pages 53 and 54). • This unit is in the automatic or manual tuning mode, press a numeric button (1-8) (6) and then H ENT. English 57 En In addition, this unit may not automatically receive all -digital HD...
...broadcasts as well as new data services. Furthermore, supplemental program services allow listeners to tune into a hybrid HD Radio station by using the manual tuning mode, this feature to select one of receiving both audio and data (such as follows. y When the HD Radio signals include ... currently selected audio program number appears in the "SIGNAL INFO" screen (see pages 53 and 54). • This unit is in the automatic or manual tuning mode, press a numeric button (1-8) (6) and then H ENT. English 57 En In addition, this unit may not automatically receive all -digital HD...


