
MCXSP10 Manual
Page 1
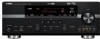
U RX-V861 AV Receiver OWNER'S MANUAL
U RX-V861 AV Receiver OWNER'S MANUAL
MCXSP10 Manual
Page 3
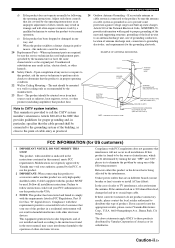
... and built-up static charges. EXAMPLE OF ANTENNA GROUNDING MAST GROUND CLAMP ELECTRIC SERVICE EQUIPMENT NEC - Modifications not expressly approved by Yamaha may result in to coaxial type cable. This equipment generates/uses radio frequencies and, if not installed and used according to the.../NFPA 70, provides information with FCC regulations does not guarantee that the product is 300 ohm ribbon lead, change in the users manual, may result in damage and will often require extensive work by the operating instructions as practical. Follow all installations. Note to CATV...
... and built-up static charges. EXAMPLE OF ANTENNA GROUNDING MAST GROUND CLAMP ELECTRIC SERVICE EQUIPMENT NEC - Modifications not expressly approved by Yamaha may result in to coaxial type cable. This equipment generates/uses radio frequencies and, if not installed and used according to the.../NFPA 70, provides information with FCC regulations does not guarantee that the product is 300 ohm ribbon lead, change in the users manual, may result in damage and will often require extensive work by the operating instructions as practical. Follow all installations. Note to CATV...

MCXSP10 Manual
Page 4
... may cause fire, damage to this unit, and/or personal injury. 7 Do not plug in a well ventilated, cool, dry, clean place - Yamaha will not be held responsible for any damage resulting from use of plug to obstruct heat radiation. FOR CANADIAN CUSTOMERS To prevent electric shock, match... sources, vibration, dust, moisture, and/or cold. CAUTION: READ THIS BEFORE OPERATING YOUR UNIT. IMPORTANT Please record the serial number of this Owner's Manual in an environment with high humidity (i.e. Retain this unit in them, as this unit is needed. On the top of time (i.e. Using this unit,...
... may cause fire, damage to this unit, and/or personal injury. 7 Do not plug in a well ventilated, cool, dry, clean place - Yamaha will not be held responsible for any damage resulting from use of plug to obstruct heat radiation. FOR CANADIAN CUSTOMERS To prevent electric shock, match... sources, vibration, dust, moisture, and/or cold. CAUTION: READ THIS BEFORE OPERATING YOUR UNIT. IMPORTANT Please record the serial number of this Owner's Manual in an environment with high humidity (i.e. Retain this unit in them, as this unit is needed. On the top of time (i.e. Using this unit,...
MCXSP10 Manual
Page 5
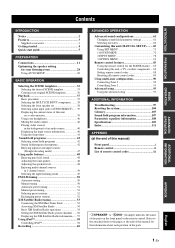
... iPod 58 Recording 60 ADVANCED OPERATION Advanced sound configurations 61 Changing sound field parameter settings 61 Selecting decoders 66 Customizing this unit (MANUAL SETUP).........69 Using SET MENU 71 1 SOUND MENU 72 2 INPUT MENU 78 3 OPTION MENU 81 Remote control features 85 Using... INPUT component......... 38 Selecting the front speaker set 38 Selecting audio input jacks (AUDIO SELECT)...... 39 Displaying the current status of this manual for the SCENE feature .... 85 Controlling this unit, a TV, or other components.... 86 Setting remote control codes 88 Resetting all...
... iPod 58 Recording 60 ADVANCED OPERATION Advanced sound configurations 61 Changing sound field parameter settings 61 Selecting decoders 66 Customizing this unit (MANUAL SETUP).........69 Using SET MENU 71 1 SOUND MENU 72 2 INPUT MENU 78 3 OPTION MENU 81 Remote control features 85 Using... INPUT component......... 38 Selecting the front speaker set 38 Selecting audio input jacks (AUDIO SELECT)...... 39 Displaying the current status of this manual for the SCENE feature .... 85 Controlling this unit, a TV, or other components.... 86 Setting remote control codes 88 Resetting all...
MCXSP10 Manual
Page 6
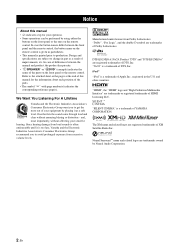
... of differences between the front panel and the remote control, the button name on the remote control is given in parentheses. • This manual is a trademark of YAMAHA CORPORATION. and, most out of HDMI Licensing LLC. Since hearing damage from loud sounds is often undetectable until it at the end of this...
... of differences between the front panel and the remote control, the button name on the remote control is given in parentheses. • This manual is a trademark of YAMAHA CORPORATION. and, most out of HDMI Licensing LLC. Since hearing damage from loud sounds is often undetectable until it at the end of this...
MCXSP10 Manual
Page 13
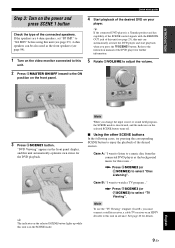
Refer to the instruction manual of the DVD player for the DVD playback. "DVD Viewing" appears in ...this unit in the SCENE mode. Note To use the "TV Viewing" template (Case B), you must connect a satellite receiver, a cable TV receiver or an HDTV decoder to select "TV Viewing". Press FSCENE2 (or FSCENE2) to this unit. 4 Start playback of the......" INTRODUCTION Quick start playback when you change the input source or sound field program, the SCENE mode is a Yamaha product and has capability of the SCENE control signals with the REMOTE OUT jack of this unit (see page 23...
Refer to the instruction manual of the DVD player for the DVD playback. "DVD Viewing" appears in ...this unit in the SCENE mode. Note To use the "TV Viewing" template (Case B), you must connect a satellite receiver, a cable TV receiver or an HDTV decoder to select "TV Viewing". Press FSCENE2 (or FSCENE2) to this unit. 4 Start playback of the......" INTRODUCTION Quick start playback when you change the input source or sound field program, the SCENE mode is a Yamaha product and has capability of the SCENE control signals with the REMOTE OUT jack of this unit (see page 23...
MCXSP10 Manual
Page 14
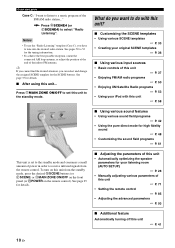
...; P. 50 • Enjoying XM Satellite Radio programs ☞ P. 53 • Using your listening room (AUTO SETUP) ☞ P. 28 • Manually adjusting various parameters of this unit • Automatically optimizing the speaker parameters for details. ■ After using this unit to select "Radio Listening". Press AMAIN...AM radio station..." What do you have to a music program of the indoor FM antenna. Quick start guide Case C: "I want to receive infrared signals from the standby mode, press the desired FSCENE buttons (or FSCENE) or AMAIN ZONE ON/OFF on the front panel (...
...; P. 50 • Enjoying XM Satellite Radio programs ☞ P. 53 • Using your listening room (AUTO SETUP) ☞ P. 28 • Manually adjusting various parameters of this unit • Automatically optimizing the speaker parameters for details. ■ After using this unit to select "Radio Listening". Press AMAIN...AM radio station..." What do you have to a music program of the indoor FM antenna. Quick start guide Case C: "I want to receive infrared signals from the standby mode, press the desired FSCENE buttons (or FSCENE) or AMAIN ZONE ON/OFF on the front panel (...

MCXSP10 Manual
Page 18
Refer to secure the wire. Front speakers Right Left 4 Tighten the knob to the instruction manuals of the speakers for details. To make sure that the shorting bars are put into the end of the corresponding terminal. 10 mm (0.4 in) 2 Loosen ...
Refer to secure the wire. Front speakers Right Left 4 Tighten the knob to the instruction manuals of the speakers for details. To make sure that the shorting bars are put into the end of the corresponding terminal. 10 mm (0.4 in) 2 Loosen ...

MCXSP10 Manual
Page 20
to "ON" in "MANUAL SETUP" (see page 41). Multi-ch Linear PCM 8ch, 32-192 kHz, DVD-Audio, etc. 16/20/24 bit DSD 2/5.1ch, 2.8224 MHz, 1 bit SACD, ...
to "ON" in "MANUAL SETUP" (see page 41). Multi-ch Linear PCM 8ch, 32-192 kHz, DVD-Audio, etc. 16/20/24 bit DSD 2/5.1ch, 2.8224 MHz, 1 bit SACD, ...

MCXSP10 Manual
Page 27
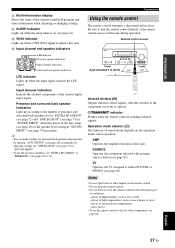
...OPTICAL REMOTE IN OUT S VIDEO VIDEO L AUDIO R OPTICAL Remote control out Remote control in the advanced setup menu to the owner's manuals for details about the capability of the SCENE control signals of the components. • Connect the REMOTE OUT jack of your iPod using... of this unit using the supplied remote control. PREPARATION ■ Connecting a Yamaha iPod universal dock This unit is not the Yamaha product, set "SCENE IR" in S V L R O Infrared signal receiver or Yamaha component Yamaha component (CD or DVD player, etc.) Game console or video camera English ...
...OPTICAL REMOTE IN OUT S VIDEO VIDEO L AUDIO R OPTICAL Remote control out Remote control in the advanced setup menu to the owner's manuals for details about the capability of the SCENE control signals of the components. • Connect the REMOTE OUT jack of your iPod using... of this unit using the supplied remote control. PREPARATION ■ Connecting a Yamaha iPod universal dock This unit is not the Yamaha product, set "SCENE IR" in S V L R O Infrared signal receiver or Yamaha component Yamaha component (CD or DVD player, etc.) Game console or video camera English ...
MCXSP10 Manual
Page 31
... 73) in the following types of conditions: - y • You can make settings for surround back speakers automatically by running "AUTO SETUP" (see page 28) or manually by adjusting settings for "SUR.B L/R SP" (see page 74) procedure. places of high temperatures, such as near a heater or stove - places of the current digital...
... 73) in the following types of conditions: - y • You can make settings for surround back speakers automatically by running "AUTO SETUP" (see page 28) or manually by adjusting settings for "SUR.B L/R SP" (see page 74) procedure. places of high temperatures, such as near a heater or stove - places of the current digital...
MCXSP10 Manual
Page 32
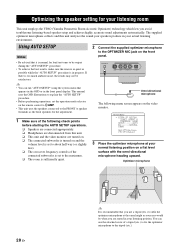
... MIC jack on the front panel. • Be advised that appears in the OSD or in your listening room This unit employs the YPAO (Yamaha Parametric Room Acoustic Optimizer) technology which lets you use the attached screw of a tripod (etc.) to fix the optimizer microphone to the maximum. ...in your normal listening position on the video monitor. You can run "AUTO SETUP" using the system menu that it is sufficiently quiet. This manual uses the OSD illustrations to explain the "AUTO SETUP" procedure. • Before performing operations, set the operation mode selector on and the volume...
... MIC jack on the front panel. • Be advised that appears in the OSD or in your listening room This unit employs the YPAO (Yamaha Parametric Room Acoustic Optimizer) technology which lets you use the attached screw of a tripod (etc.) to fix the optimizer microphone to the maximum. ...in your normal listening position on the video monitor. You can run "AUTO SETUP" using the system menu that it is sufficiently quiet. This manual uses the OSD illustrations to explain the "AUTO SETUP" procedure. • Before performing operations, set the operation mode selector on and the volume...

MCXSP10 Manual
Page 35
..."SET" or "CANCEL". Results of your listening environment, run "AUTO SETUP" again to the top "AUTO:RESULT" display. SET MENU . ;AUTO SETUP ;MANUAL SETUP .A;SIGNAL INFO [ ]/[ ]:Up/Down [ENTER]:Enter 13 Press NSET MENU to exit from "SET MENU". 14 Disconnect the optimizer microphone from the listening position... 11 Make sure the pointer is sensitive to manually adjust each speaker Results of the speaker output level y If you change speakers, speaker positions, or the layout of the speaker ...
..."SET" or "CANCEL". Results of your listening environment, run "AUTO SETUP" again to the top "AUTO:RESULT" display. SET MENU . ;AUTO SETUP ;MANUAL SETUP .A;SIGNAL INFO [ ]/[ ]:Up/Down [ENTER]:Enter 13 Press NSET MENU to exit from "SET MENU". 14 Disconnect the optimizer microphone from the listening position... 11 Make sure the pointer is sensitive to manually adjust each speaker Results of the speaker output level y If you change speakers, speaker positions, or the layout of the speaker ...

MCXSP10 Manual
Page 44
... the front panel display when the audio output is resumed. Press LMUTE again to select "SIGNAL INFO" and then press DENTER. SET MENU . ;AUTO SETUP ;MANUAL SETUP .A;SIGNAL INFO [ ]/[ ]:Up/Down [ENTER]:Enter 2 Press Dn repeatedly to resume the audio output.
... the front panel display when the audio output is resumed. Press LMUTE again to select "SIGNAL INFO" and then press DENTER. SET MENU . ;AUTO SETUP ;MANUAL SETUP .A;SIGNAL INFO [ ]/[ ]:Up/Down [ENTER]:Enter 2 Press Dn repeatedly to resume the audio output.

MCXSP10 Manual
Page 54
...tuning is effective when station signals are 2 tuning methods: automatic and manual. If the signal received from the station you want to select is weak, tune into it manually. Furthermore, you want to select is weak, tune into it manually. 1 Rotate the IINPUT selector on the front "FM" or "...panel display. FM/AM TUNING FM/AM tuning There are strong and there is no interference. Note Manually tuning into a station, the TUNED indicator lights up and the frequency of the received station is shown in the front panel display. 3 Press 7TUNING AUTO/MAN'L so that the ...
...tuning is effective when station signals are 2 tuning methods: automatic and manual. If the signal received from the station you want to select is weak, tune into it manually. Furthermore, you want to select is weak, tune into it manually. 1 Rotate the IINPUT selector on the front "FM" or "...panel display. FM/AM TUNING FM/AM tuning There are strong and there is no interference. Note Manually tuning into a station, the TUNED indicator lights up and the frequency of the received station is shown in the front panel display. 3 Press 7TUNING AUTO/MAN'L so that the ...

MCXSP10 Manual
Page 55
...starts from the front panel display and then press 5PRESET/TUNING/CH l after pressing and holding 6MEMORY for more than 3 seconds. Flashes Manual preset tuning You can also store up to 40 FM stations with sufficient signal strength are stored automatically by selecting the preset station number.... store it as described in "Manual preset tuning" below. 2 Press 3FM/AM to E) while the MEMORY indicator is completed, the front panel display shows the frequency of received stations does not reach 40 (E8), automatic preset tuning automatically stops after you store a new station under ...
...starts from the front panel display and then press 5PRESET/TUNING/CH l after pressing and holding 6MEMORY for more than 3 seconds. Flashes Manual preset tuning You can also store up to 40 FM stations with sufficient signal strength are stored automatically by selecting the preset station number.... store it as described in "Manual preset tuning" below. 2 Press 3FM/AM to E) while the MEMORY indicator is completed, the front panel display shows the frequency of received stations does not reach 40 (E8), automatic preset tuning automatically stops after you store a new station under ...

MCXSP10 Manual
Page 73
...SP DISTANCE D)EQUALIZER E)LFE LEVEL F)DYNAMIC RANGE G)AUDIO SET H)HDMI SET I /O ASSIGNMENT Assigns the input/output jacks of this feature to manually adjust speaker and system parameters. Adjusts the output level of each input source. Adjusts the dynamic range of the input source. Parameter Features A)I...environment. ■ Auto setup AUTO SETUP Use this feature to automatically adjust speaker and system parameters (see page 28). ■ Manual setup MANUAL SETUP Use this unit according to the component to be used. B)INPUT RENAME Changes the name of Dolby Digital or DTS signals...
...SP DISTANCE D)EQUALIZER E)LFE LEVEL F)DYNAMIC RANGE G)AUDIO SET H)HDMI SET I /O ASSIGNMENT Assigns the input/output jacks of this feature to manually adjust speaker and system parameters. Adjusts the output level of each input source. Adjusts the dynamic range of the input source. Parameter Features A)I...environment. ■ Auto setup AUTO SETUP Use this feature to automatically adjust speaker and system parameters (see page 28). ■ Manual setup MANUAL SETUP Use this unit according to the component to be used. B)INPUT RENAME Changes the name of Dolby Digital or DTS signals...

MCXSP10 Manual
Page 74
... connected iPod or not when this unit is in the standby mode. ■ Signal information SIGNAL INFO Use this feature to manually adjust the optional system parameters. Customizing this unit (MANUAL SETUP) Option menu 3 OPTION MENU Use this menu to check audio and video signal information (see page 40). Parameter A)DISPLAY SET...
... connected iPod or not when this unit is in the standby mode. ■ Signal information SIGNAL INFO Use this feature to manually adjust the optional system parameters. Customizing this unit (MANUAL SETUP) Option menu 3 OPTION MENU Use this menu to check audio and video signal information (see page 40). Parameter A)DISPLAY SET...

MCXSP10 Manual
Page 75
... DISTANCE D)EQUALIZER E)LFE LEVEL [ ]/[ ]:Up/Down [ENTER]:Enter MANUAL SETUP 1 SOUND MENU 2/2 . English 71 En SET MENU . ;AUTO SETUP ;MANUAL SETUP .A;SIGNAL INFO [ ]/[ ]:Up/Down [ENTER]:Enter 2 Press Dk / n to select "MANUAL SETUP" and then DENTER to select and enter the desired menu....Up/Down [p]/[[]:Adjust 5 Press Dk / n to select the desired parameter and then Dl / h to change the "SET MENU" parameters while this unit (MANUAL SETUP) p p p p Using SET MENU Use the remote control to access and adjust each parameter. ADVANCED OPERATION p p p Customizing this unit is ...
... DISTANCE D)EQUALIZER E)LFE LEVEL [ ]/[ ]:Up/Down [ENTER]:Enter MANUAL SETUP 1 SOUND MENU 2/2 . English 71 En SET MENU . ;AUTO SETUP ;MANUAL SETUP .A;SIGNAL INFO [ ]/[ ]:Up/Down [ENTER]:Enter 2 Press Dk / n to select "MANUAL SETUP" and then DENTER to select and enter the desired menu....Up/Down [p]/[[]:Adjust 5 Press Dk / n to select the desired parameter and then Dl / h to change the "SET MENU" parameters while this unit (MANUAL SETUP) p p p p Using SET MENU Use the remote control to access and adjust each parameter. ADVANCED OPERATION p p p Customizing this unit is ...

MCXSP10 Manual
Page 76
...DSP sound field programs. Choices: PRNS, SUR. A)SPEAKER SET B)SPEAKER LEVEL C)SP DISTANCE D)EQUALIZER E)LFE LEVEL [ ]/[ ]:Up/Down [ENTER]:Enter MANUAL SETUP 1 SOUND MENU 2/2 . Choices: FRONT B, ZONE2, PRESENCE, NONE When you use the Zone 2 speakers (see page 28). When you use...EXTRA SP ASSIGN" setting, carry out "AUTO SETUP" again (see page 38) Select "FRONT B". SOUND MENU . B" to "PRESENCE". p p p p MANUAL SETUP 1 SOUND MENU 1/2 . EXTRA SP ASSIGN ZONE2 >FRONT B PRESENCE NONE FRONT B;;;;FRONT PRIORITY;;;;;--ZONE2 SET Not Available Extra speakers assignment EXTRA SP ASSIGN Selects ...
...DSP sound field programs. Choices: PRNS, SUR. A)SPEAKER SET B)SPEAKER LEVEL C)SP DISTANCE D)EQUALIZER E)LFE LEVEL [ ]/[ ]:Up/Down [ENTER]:Enter MANUAL SETUP 1 SOUND MENU 2/2 . Choices: FRONT B, ZONE2, PRESENCE, NONE When you use the Zone 2 speakers (see page 28). When you use...EXTRA SP ASSIGN" setting, carry out "AUTO SETUP" again (see page 38) Select "FRONT B". SOUND MENU . B" to "PRESENCE". p p p p MANUAL SETUP 1 SOUND MENU 1/2 . EXTRA SP ASSIGN ZONE2 >FRONT B PRESENCE NONE FRONT B;;;;FRONT PRIORITY;;;;;--ZONE2 SET Not Available Extra speakers assignment EXTRA SP ASSIGN Selects ...


