

Owner's Manual
Page 3
... INTRODUCTION CONTENTS 1 FEATURES 2 GETTING STARTED 3 Checking the Package Contents 3 Installing Batteries in the Remote Control 3 CONTROLS AND FUNCTIONS 4 Front Panel 4 Remote Control 6 Description of the Numeric Buttons 7 Using the Remote Control 8 Front Panel Display 9 Rear Panel 10 PREPARATION SPEAKER SETUP 11 Speakers to Be Used 11...Unit 50 Button Names and Functions in Each Position ...... 51 Setting the Manufacturer Code 54 Programming a New Remote Control Function (Learn Feature 55 Returning to the Factory Setting 56 ADDITIONAL INFORMATION SOUND FIELD PROGRAM 57 Hi-Fi...
... INTRODUCTION CONTENTS 1 FEATURES 2 GETTING STARTED 3 Checking the Package Contents 3 Installing Batteries in the Remote Control 3 CONTROLS AND FUNCTIONS 4 Front Panel 4 Remote Control 6 Description of the Numeric Buttons 7 Using the Remote Control 8 Front Panel Display 9 Rear Panel 10 PREPARATION SPEAKER SETUP 11 Speakers to Be Used 11...Unit 50 Button Names and Functions in Each Position ...... 51 Setting the Manufacturer Code 54 Programming a New Remote Control Function (Learn Feature 55 Returning to the Factory Setting 56 ADDITIONAL INFORMATION SOUND FIELD PROGRAM 57 Hi-Fi...
Owner's Manual
Page 4
... using either the buttons on the main unit or on the remote control is given in parentheses in this YAMAHA AV receiver. US Pat. In cases when the button names differ between the main unit and the remote control, the button name on the remote control. No. 5,451,942 and other world-wide patents issued and pending...
... using either the buttons on the main unit or on the remote control is given in parentheses in this YAMAHA AV receiver. US Pat. In cases when the button names differ between the main unit and the remote control, the button name on the remote control. No. 5,451,942 and other world-wide patents issued and pending...
Owner's Manual
Page 5
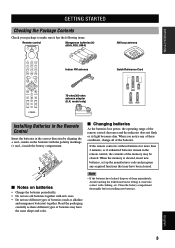
...new ones. • Do not use old batteries together with clothing, etc. model only) Installing Batteries in the Remote Control Insert the batteries in the remote control, the contents of them immediately. When you notice any acquired functions that may be cleared. Avoid touching the leaked... material or letting it has the following items. Remote control Manganese batteries (4) (AAA, R03, UM-4) AM loop antenna Indoor FM antenna Quick Reference Card Quick Reference Card A/B/C/D/E 75-ohm/300...
...new ones. • Do not use old batteries together with clothing, etc. model only) Installing Batteries in the Remote Control Insert the batteries in the remote control, the contents of them immediately. When you notice any acquired functions that may be cleared. Avoid touching the leaked... material or letting it has the following items. Remote control Manganese batteries (4) (AAA, R03, UM-4) AM loop antenna Indoor FM antenna Quick Reference Card Quick Reference Card A/B/C/D/E 75-ohm/300...
Owner's Manual
Page 6
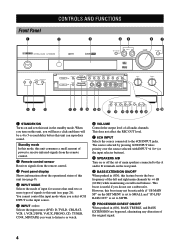
Standby mode In this mode, this unit consumes a small amount of power to receive infrared-signals from the remote control. 2 Remote control sensor Receives signals from the remote control. 3 Front panel display Shows information about the operational status of this unit (see page 26). This does.... This boost is set to 5-second delay before this unit can reproduce sound. Front Panel 1 STANDBY /ON SPEAKERS A B BASS PROCESSOR EXTENSION DIRECT ON OFF CONTROLS AND FUNCTIONS 2 3 D I G I TA L 45 INPUT MODE INPUT D I G I TA L SURROUND 67 VOLUME 6CH INPUT TUNER DSP A/B/C/D/E EFFECT ...
Standby mode In this mode, this unit consumes a small amount of power to receive infrared-signals from the remote control. 2 Remote control sensor Receives signals from the remote control. 3 Front panel display Shows information about the operational status of this unit (see page 26). This does.... This boost is set to 5-second delay before this unit can reproduce sound. Front Panel 1 STANDBY /ON SPEAKERS A B BASS PROCESSOR EXTENSION DIRECT ON OFF CONTROLS AND FUNCTIONS 2 3 D I G I TA L 45 INPUT MODE INPUT D I G I TA L SURROUND 67 VOLUME 6CH INPUT TUNER DSP A/B/C/D/E EFFECT ...
Owner's Manual
Page 8
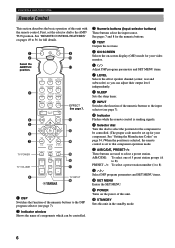
.... 8 SLEEP Sets the sleep timer. 9 INPUT Switches the function of the numeric buttons to the input selector (see page 7). 0 Indicator Flashes while the remote control is set up for full details. 1 9 2 0 Select the AMP/TUN q position. 3 4 5 6 7 TV POWER TV VOLUME 8 EFFECT See...4 TEST Outputs the test tone. 5 ON SCREEN Selects the on page 54.) When the position is selected, the remote control is sending signals. CONTROLS AND FUNCTIONS Remote Control This section describes the basic operation of this unit. See "Setting the Manufacture Codes" on -screen display (OSD) mode...
.... 8 SLEEP Sets the sleep timer. 9 INPUT Switches the function of the numeric buttons to the input selector (see page 7). 0 Indicator Flashes while the remote control is set up for full details. 1 9 2 0 Select the AMP/TUN q position. 3 4 5 6 7 TV POWER TV VOLUME 8 EFFECT See...4 TEST Outputs the test tone. 5 ON SCREEN Selects the on page 54.) When the position is selected, the remote control is sending signals. CONTROLS AND FUNCTIONS Remote Control This section describes the basic operation of this unit. See "Setting the Manufacture Codes" on -screen display (OSD) mode...

Owner's Manual
Page 10
Be sure to 8). or - in the AMP/TUN (or DSP/TUN) position. The remote control transmits a directional infrared beam. high humidity or temperature such as near a heater, stove or bath; - See page 34.... aim the remote control directly at the remote control sensor on the remote control. • Do not drop the remote control. • Do not leave or store the remote control in the following types of conditions: - CONTROLS AND FUNCTIONS I When selecting a preset station number Using the Remote Control STANDBY /ON TUNER DSP D I G I TA L D I G I Handling the remote control • ...
Be sure to 8). or - in the AMP/TUN (or DSP/TUN) position. The remote control transmits a directional infrared beam. high humidity or temperature such as near a heater, stove or bath; - See page 34.... aim the remote control directly at the remote control sensor on the remote control. • Do not drop the remote control. • Do not leave or store the remote control in the following types of conditions: - CONTROLS AND FUNCTIONS I When selecting a preset station number Using the Remote Control STANDBY /ON TUNER DSP D I G I TA L D I G I Handling the remote control • ...

Owner's Manual
Page 22
... set the OSD to turn on the power, the video monitor and front panel display show the current DSP program. 2 Press ON SCREEN on the remote control repeatedly to change the amount of information the OSD shows. The OSD mode changes in the same format as the front panel display at the...
... set the OSD to turn on the power, the video monitor and front panel display show the current DSP program. 2 Press ON SCREEN on the remote control repeatedly to change the amount of information the OSD shows. The OSD mode changes in the same format as the front panel display at the...

Owner's Manual
Page 24
... speaker in order. The test tone is made, the output level heard at the listening position will be made at your listening position with the remote control. LEFT RIGHT (TEST LEFT) (TEST RIGHT) CENTER (TEST CENTER) LEFT SURROUND RIGHT SURROUND (TEST L SUR.) (TEST R SUR.) 22 Note • Since this unit cannot enter...
... speaker in order. The test tone is made, the output level heard at the listening position will be made at your listening position with the remote control. LEFT RIGHT (TEST LEFT) (TEST RIGHT) CENTER (TEST CENTER) LEFT SURROUND RIGHT SURROUND (TEST L SUR.) (TEST R SUR.) 22 Note • Since this unit cannot enter...
Owner's Manual
Page 26
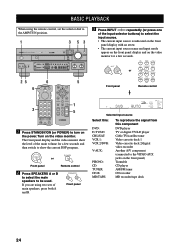
...the power. BASIC OPERATION BASIC PLAYBACK When using two sets of main speakers, press both A and B. INPUT or 25 6 6 5 Front panel Remote control 1 3 5 1 Press STANDBY/ON (or POWER) to select the input source. • The current input source is indicated on the front ... front panel display and the video monitor show the current DSP program. Turn on the video monitor for a few seconds. If you are using the remote control, set the selector dial to the AMP/TUN position. 1 3 53 STANDBY /ON SPEAKERS A B BASS PROCESSOR EXTENSION DIRECT ON OFF D I G I TA L INPUT ...
...the power. BASIC OPERATION BASIC PLAYBACK When using two sets of main speakers, press both A and B. INPUT or 25 6 6 5 Front panel Remote control 1 3 5 1 Press STANDBY/ON (or POWER) to select the input source. • The current input source is indicated on the front ... front panel display and the video monitor show the current DSP program. Turn on the video monitor for a few seconds. If you are using the remote control, set the selector dial to the AMP/TUN position. 1 3 53 STANDBY /ON SPEAKERS A B BASS PROCESSOR EXTENSION DIRECT ON OFF D I G I TA L INPUT ...

Owner's Manual
Page 27
...playback (or select a broadcast station) on the source component. See page 28. I To mute the sound Press MUTE on the remote control. These controls are only effective for the component. 5 Adjust the volume to BOTH, the sound is also output from the front panel display and...player for the player.) Note the following indication will be lowered. ADVANCED OPERATION ADDITIONAL INFORMATION APPENDIX English 25 VOLUME or Front panel BASS TREBLE Remote control BASS PROCESSOR EXTENSION DIRECT - +- + ON OFF Front panel Note • If the component connected to the VCR 1 OUT, VCR...
...playback (or select a broadcast station) on the source component. See page 28. I To mute the sound Press MUTE on the remote control. These controls are only effective for the component. 5 Adjust the volume to BOTH, the sound is also output from the front panel display and...player for the player.) Note the following indication will be lowered. ADVANCED OPERATION ADDITIONAL INFORMATION APPENDIX English 25 VOLUME or Front panel BASS TREBLE Remote control BASS PROCESSOR EXTENSION DIRECT - +- + ON OFF Front panel Note • If the component connected to the VCR 1 OUT, VCR...
Owner's Manual
Page 28
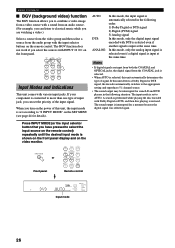
... interrupted for some LD and DVD players in the following situation: The input mode is performed while playing the disc encoded with INPUT l / h on the remote control. A search is set to AUTO. Press INPUT MODE (or the input selector button that you have pressed to select the input source on the... from a video source with a sound from an audio source. (For example, you can set the priority of the input signal. INPUT MODE or Front panel Remote control VIRTUAL DIGITAL PRO LOGIC DSP 6.1/ES SP PCM AB DTS MOVIE THEATER 1 2 PS PTY RT CT PTY HOLD EON STEREO AUTO DOLBY DIGITAL NEWS INFO...
... interrupted for some LD and DVD players in the following situation: The input mode is performed while playing the disc encoded with INPUT l / h on the remote control. A search is set to AUTO. Press INPUT MODE (or the input selector button that you have pressed to select the input source on the... from a video source with a sound from an audio source. (For example, you can set the priority of the input signal. INPUT MODE or Front panel Remote control VIRTUAL DIGITAL PRO LOGIC DSP 6.1/ES SP PCM AB DTS MOVIE THEATER 1 2 PS PTY RT CT PTY HOLD EON STEREO AUTO DOLBY DIGITAL NEWS INFO...

Owner's Manual
Page 30
For details about 3 seconds. Remote control y • If the selector dial is set to the DSP/TUN position, skip this unit, the DSP program cannot be selected. VIRTUAL DIGITAL PRO LOGIC ... signals are automatically selected when you set to AUTO, the DSP program automatically switches to 60. The acoustics of the program. PROGRAM or Front panel Remote control Program group 2 1 Press DSP on the power again. • If a Dolby Digital or DTS signal is input when the input mode is set this case...
For details about 3 seconds. Remote control y • If the selector dial is set to the DSP/TUN position, skip this unit, the DSP program cannot be selected. VIRTUAL DIGITAL PRO LOGIC ... signals are automatically selected when you set to AUTO, the DSP program automatically switches to 60. The acoustics of the program. PROGRAM or Front panel Remote control Program group 2 1 Press DSP on the power again. • If a Dolby Digital or DTS signal is input when the input mode is set this case...

Owner's Manual
Page 31
..." on the SET MENU to MIN. when the Dolby Digital KARAOKE source is selected as the input source; - or - when connecting the headphones. Remote control BASIC PLAYBACK Normal Stereo Reproduction Press EFFECT to turn on the Dolby Digital Matrix 6.1 or DTS ES decoder (see "12 6.1/ES AUTO" on pages... also listen to a position other than the DSP/TUN position, first press DSP and then EFFECT on the remote control. y • If the selector dial is selected; - EFFECT or Front panel Remote control VIRTUAL DIGITAL PRO LOGIC DSP 6.1/ES SP PCM AB DTS MOVIE THEATER 1 2 PS PTY RT CT PTY...
..." on the SET MENU to MIN. when the Dolby Digital KARAOKE source is selected as the input source; - or - when connecting the headphones. Remote control BASIC PLAYBACK Normal Stereo Reproduction Press EFFECT to turn on the Dolby Digital Matrix 6.1 or DTS ES decoder (see "12 6.1/ES AUTO" on pages... also listen to a position other than the DSP/TUN position, first press DSP and then EFFECT on the remote control. y • If the selector dial is selected; - EFFECT or Front panel Remote control VIRTUAL DIGITAL PRO LOGIC DSP 6.1/ES SP PCM AB DTS MOVIE THEATER 1 2 PS PTY RT CT PTY...
Owner's Manual
Page 35
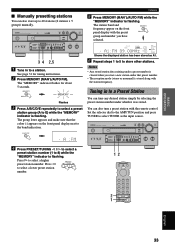
... VIDEO AUX BASS TREBLE - + - + 4 Press PRESET/TUNING l / h to select a preset station number (1 to the AMP/TUN position and press indicator is stored along with the remote control. Press h to select a lower preset station number. 12 2 1 ADVANCED OPERATION ADDITIONAL INFORMATION APPENDIX English 33 Press l PRESET/ TUNING to select a higher preset station number. The...
... VIDEO AUX BASS TREBLE - + - + 4 Press PRESET/TUNING l / h to select a preset station number (1 to the AMP/TUN position and press indicator is stored along with the remote control. Press h to select a lower preset station number. 12 2 1 ADVANCED OPERATION ADDITIONAL INFORMATION APPENDIX English 33 Press l PRESET/ TUNING to select a higher preset station number. The...

Owner's Manual
Page 36
...8226; You can exchange the assignment of stations has been completed. 34 See "Tuning in the AMP/TUN (or DSP/TUN) position. A/B/C/D/E Front panel or A/B/C/D/E Remote control 2 Press PRESET/TUNING l / h (or PRESET -/+) to select a preset station number (1 to preset station "E1". "A5" and the "MEMORY" indicator ... for exchanging preset station "E1" with the station band, frequency and the "TUNED" indicator lights up in to 8) on the remote control if code number "0023" has been set up . The preset group letter appears on the front panel display. Exchanging Preset Stations You...
...8226; You can exchange the assignment of stations has been completed. 34 See "Tuning in the AMP/TUN (or DSP/TUN) position. A/B/C/D/E Front panel or A/B/C/D/E Remote control 2 Press PRESET/TUNING l / h (or PRESET -/+) to select a preset station number (1 to preset station "E1". "A5" and the "MEMORY" indicator ... for exchanging preset station "E1" with the station band, frequency and the "TUNED" indicator lights up in to 8) on the remote control if code number "0023" has been set up . The preset group letter appears on the front panel display. Exchanging Preset Stations You...
Owner's Manual
Page 40
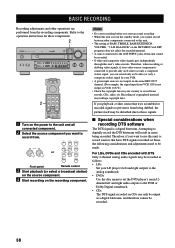
... bitstream, and therefore cannot be recorded. 38 Refer to record from VCR 1 IN is connected to use this unit's video circuits. INPUT or Front panel Remote control 3 Start playback (or select a broadcast station) on the source component. 4 Start recording on the recording component. BASIC RECORDING Recording adjustments and other components connected to...
... bitstream, and therefore cannot be recorded. 38 Refer to record from VCR 1 IN is connected to use this unit's video circuits. INPUT or Front panel Remote control 3 Start playback (or select a broadcast station) on the source component. 4 Start recording on the recording component. BASIC RECORDING Recording adjustments and other components connected to...

Owner's Manual
Page 41
... the front panel display on this unit while adjusting the items. Note • The indication on the SET MENU Adjustment should be made with the remote control. 1 3,6 4,5 2 Note • Some items require extra steps to change to the desired setting. 1 Set the selector dial to the AMP/TUN (or DSP/TUN) position...
... the front panel display on this unit while adjusting the items. Note • The indication on the SET MENU Adjustment should be made with the remote control. 1 3,6 4,5 2 Note • Some items require extra steps to change to the desired setting. 1 Set the selector dial to the AMP/TUN (or DSP/TUN) position...

Owner's Manual
Page 44
... you use a subwoofer and you want to the LFE channel when you select the small speaker setting in your configuration. Change the setting with the remote control while sitting in the listening position. 1 Press j / i to set this unit in the standby mode and make sure all main, center and rear channels are...
... you use a subwoofer and you want to the LFE channel when you select the small speaker setting in your configuration. Change the setting with the remote control while sitting in the listening position. 1 Press j / i to set this unit in the standby mode and make sure all main, center and rear channels are...

Owner's Manual
Page 46
... the last input mode used for that group revert to their initial settings. 1 Press DSP. 2 Press the numeric button (DSP program group button) on the remote control for details about the input mode). Choices: AUTO, LAST Initial setting: AUTO AUTO Select this to allow this unit to automatically detect the type of...
... the last input mode used for that group revert to their initial settings. 1 Press DSP. 2 Press the numeric button (DSP program group button) on the remote control for details about the input mode). Choices: AUTO, LAST Initial setting: AUTO AUTO Select this to allow this unit to automatically detect the type of...

Owner's Manual
Page 47
Control value (dB): -20 to 0 Initial setting: 0 dB for both SP (speaker) and HP (headphones) • Select MAX for feature films. • Select STD for general ... or off the Dolby Digital Matrix 6.1 or DTS ES decoder manually by pressing 6.1/ ES on the remote control. INTRODUCTION PREPARATION BASIC OPERATION 10 DOLBY D. The LFE signal carries the lowfrequency special effect sound which is detected. Control range (dB): -10 to +10 Initial setting: 0 dB for both SPEAKER and HEADPHONE Note • Adjust...
Control value (dB): -20 to 0 Initial setting: 0 dB for both SP (speaker) and HP (headphones) • Select MAX for feature films. • Select STD for general ... or off the Dolby Digital Matrix 6.1 or DTS ES decoder manually by pressing 6.1/ ES on the remote control. INTRODUCTION PREPARATION BASIC OPERATION 10 DOLBY D. The LFE signal carries the lowfrequency special effect sound which is detected. Control range (dB): -10 to +10 Initial setting: 0 dB for both SPEAKER and HEADPHONE Note • Adjust...


