
Owner's Manual
Page 5
... 3 Features 3 What's DSP 4 GETTING STARTED 7 Getting started 7 Unpacking 7 Installing batteries in the remote controller 8 Notes about the remote controller 8 Controls and their functions 9 Front panel 9 Display panel 11 PREPARATION 12 Speaker setup 12 Connections 14 Audio/video source equipment 14 Speakers 20 Antennas 23 Plugging in this unit 25 On screen display...
... 3 Features 3 What's DSP 4 GETTING STARTED 7 Getting started 7 Unpacking 7 Installing batteries in the remote controller 8 Notes about the remote controller 8 Controls and their functions 9 Front panel 9 Display panel 11 PREPARATION 12 Speaker setup 12 Connections 14 Audio/video source equipment 14 Speakers 20 Antennas 23 Plugging in this unit 25 On screen display...

Owner's Manual
Page 6
...or other equipment. Move this unit farther away from such equipment if interference is on the both sides and 30 cm above the top panel of humming (transformers, motors). Increase the volume gradually to rain or water. 3. Grounding or polarization - FREQUENCY STEP switch (China and .... When moving the unit, first disconnect the power plug and the wires connected to "- ∞" before starting the audio source play. YAMAHA will rise rapidly. When not planning to prevent fire and damage. IMPEDANCE SELECTOR REAR (SURROUND) CAUTION SEE INSTRUCTION MANUAL FOR CORRECT SETTING. ...
...or other equipment. Move this unit farther away from such equipment if interference is on the both sides and 30 cm above the top panel of humming (transformers, motors). Increase the volume gradually to rain or water. 3. Grounding or polarization - FREQUENCY STEP switch (China and .... When moving the unit, first disconnect the power plug and the wires connected to "- ∞" before starting the audio source play. YAMAHA will rise rapidly. When not planning to prevent fire and damage. IMPEDANCE SELECTOR REAR (SURROUND) CAUTION SEE INSTRUCTION MANUAL FOR CORRECT SETTING. ...
Owner's Manual
Page 13
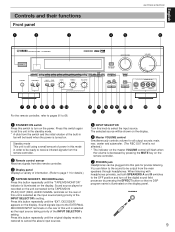
...taking priority of information. (Refer to the OFF position and turn on the display panel. You can be shown on the master VOLUME control will be output from the remote controller. 3 Display panel Displays a variety of the INPUT SELECTOR's setting. Press this switch again to ... repeatedly until the "TAPE/MD MONITOR" indicator is turned on the display. English Controls and their functions Front panel 1 2 3 GETTING STARTED 45 6 NATURAL SOUND AV RECEIVER RX V795aRDS CINEMA DSP STANDBY/ON PHONES PRESET ROOM 2 AM FM kHz MHz MEMORY TAPE 2 MONITOR STEREO AUTO TUNING...
...taking priority of information. (Refer to the OFF position and turn on the display panel. You can be shown on the master VOLUME control will be output from the remote controller. 3 Display panel Displays a variety of the INPUT SELECTOR's setting. Press this switch again to ... repeatedly until the "TAPE/MD MONITOR" indicator is turned on the display. English Controls and their functions Front panel 1 2 3 GETTING STARTED 45 6 NATURAL SOUND AV RECEIVER RX V795aRDS CINEMA DSP STANDBY/ON PHONES PRESET ROOM 2 AM FM kHz MHz MEMORY TAPE 2 MONITOR STEREO AUTO TUNING...
Owner's Manual
Page 15
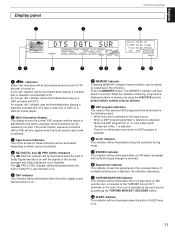
... illuminated when playing a compact disc or laserdisc encoded with DTS. If multipath interference is turned on and the signals of the received station. English Display panel 1 2 GETTING STARTED 3 DIGITAL PRO LOGIC DSP MEMORY ENHANCED MOVIE THEATER 12 TV SPORTS MONO MOVIE DISCO JAZZ CLUB ROCK CONCERT CHURCH CONCERT HALL AUTO STEREO...
... illuminated when playing a compact disc or laserdisc encoded with DTS. If multipath interference is turned on and the signals of the received station. English Display panel 1 2 GETTING STARTED 3 DIGITAL PRO LOGIC DSP MEMORY ENHANCED MOVIE THEATER 12 TV SPORTS MONO MOVIE DISCO JAZZ CLUB ROCK CONCERT CHURCH CONCERT HALL AUTO STEREO...

Owner's Manual
Page 18
... be obtained with the exception described later. Audio/video source equipment q Use RCA type pin plug cables for each of YAMAHA audio/video units numbered as 1, 3, 4, etc. on the rear panel must be connected to the owner's manual for audio/video units with the ground wire disconnected. 14 TV/Satellite tuner Video...
... be obtained with the exception described later. Audio/video source equipment q Use RCA type pin plug cables for each of YAMAHA audio/video units numbered as 1, 3, 4, etc. on the rear panel must be connected to the owner's manual for audio/video units with the ground wire disconnected. 14 TV/Satellite tuner Video...

Owner's Manual
Page 19
... to the components for the format your TV monitor employs, otherwise a picture will not be connected in series. (U.S.A. English VIDEO AUX terminals (on the front panel) These terminals are used to connect a video input source such as a camcorder. When this unit is sent from an external video unit to this unit...
... to the components for the format your TV monitor employs, otherwise a picture will not be connected in series. (U.S.A. English VIDEO AUX terminals (on the front panel) These terminals are used to connect a video input source such as a camcorder. When this unit is sent from an external video unit to this unit...

Owner's Manual
Page 23
DECODER button on the display. DECODER" appears on the front panel repeatedly until "EXT. MAIN LEVEL" is equipped with additional 6-channel audio signal input terminals (for left main, right main, center, left rear surround, right rear ...
DECODER button on the display. DECODER" appears on the front panel repeatedly until "EXT. MAIN LEVEL" is equipped with additional 6-channel audio signal input terminals (for left main, right main, center, left rear surround, right rear ...
Owner's Manual
Page 26
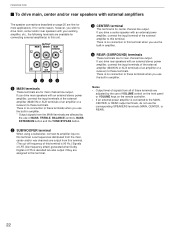
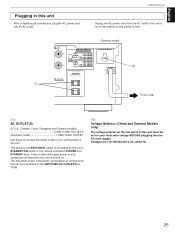
... terminal This terminal is for center channel line output. There is no connection to these terminals when you use of VOLUME control on the front panel or VOLUME keys on page 20 are for main channel line output. There is no connection to this terminal. Notes • Output level of signals...
... terminal This terminal is for center channel line output. There is no connection to these terminals when you use of VOLUME control on the front panel or VOLUME keys on page 20 are for main channel line output. There is no connection to this terminal. Notes • Output level of signals...
Owner's Manual
Page 29
These outlets will supply power to any connected unit whenever this unit is turned on the rear panel of this unit must be set for a long period of time. (*1) REAR (SURROUND) CAUTION SEE INSTRUCTION MANUAL FOR CORRECT SETTING. (General model) IMPEDANCE SELECTOR SET ...
These outlets will supply power to any connected unit whenever this unit is turned on the rear panel of this unit must be set for a long period of time. (*1) REAR (SURROUND) CAUTION SEE INSTRUCTION MANUAL FOR CORRECT SETTING. (General model) IMPEDANCE SELECTOR SET ...
Owner's Manual
Page 30
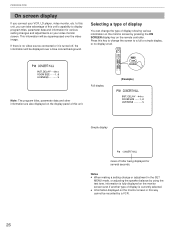
... If you can change the type of display showing various information on the monitor screen by pressing the ON SCREEN display key on the display panel of this way cannot be superimposed over a blue colored background. to display program titles, parameter data and information for several seconds.
... If you can change the type of display showing various information on the monitor screen by pressing the ON SCREEN display key on the display panel of this way cannot be superimposed over a blue colored background. to display program titles, parameter data and information for several seconds.
Owner's Manual
Page 33
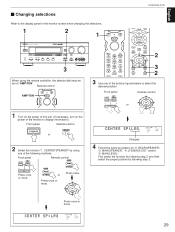
... function by following step 2, and then select the proper position by using the remote controller, the selector dial must be set at "AMP/TUN". Front panel SET LEVEL MENU Press once or more . Press once or more. DECODER A/B/C/D/E 1 2 3 SPEAKERS A B ON OFF BASS TONE EXTENSION BYPASS ON OFF 4 5 ... When using one of the monitor to select the desired position. English Ⅵ Changing selections PREPARATION Refer to the display panel or the monitor screen when changing the selections. 1 2 NATURAL SOUND AV RECEIVER CINEMA DSP STANDBY/ON PHONES PRESET ROOM ...
... function by following step 2, and then select the proper position by using the remote controller, the selector dial must be set at "AMP/TUN". Front panel SET LEVEL MENU Press once or more . Press once or more. DECODER A/B/C/D/E 1 2 3 SPEAKERS A B ON OFF BASS TONE EXTENSION BYPASS ON OFF 4 5 ... When using one of the monitor to select the desired position. English Ⅵ Changing selections PREPARATION Refer to the display panel or the monitor screen when changing the selections. 1 2 NATURAL SOUND AV RECEIVER CINEMA DSP STANDBY/ON PHONES PRESET ROOM ...
Owner's Manual
Page 34
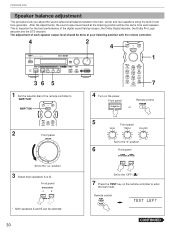
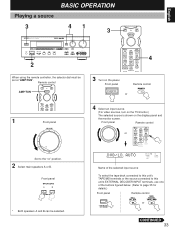
...Remote control POWER or 2 /DTS SURROUND CD 1 MONO MOVIE DVD/ D MOVIE THEATER 1 TUNER 2 MOVIE THEATER 2 TAPE/MD 3 DISCO VCR Front panel VOLUME l6 20 l2 28 8 40 4 60 2 0 -dB Set to the "OFF ( )". 7 Press the TEST key on the power. ...each speaker output level should be done at the listening position will be selected. 30 5 Front panel BASS l 0l 2 2 TREBLE l 0l 2 2 BALANCE l 0l 2 2 3 3 3 3 3 3 4 5 4 5 4 5 4 5 4 L5 4 5R Set to the "0" position. 6 Front panel BASS TONE EXTENSION BYPASS ON OFF Set to the "∞" position. 3 Select main speakers A ...
...Remote control POWER or 2 /DTS SURROUND CD 1 MONO MOVIE DVD/ D MOVIE THEATER 1 TUNER 2 MOVIE THEATER 2 TAPE/MD 3 DISCO VCR Front panel VOLUME l6 20 l2 28 8 40 4 60 2 0 -dB Set to the "OFF ( )". 7 Press the TEST key on the power. ...each speaker output level should be done at the listening position will be selected. 30 5 Front panel BASS l 0l 2 2 TREBLE l 0l 2 2 BALANCE l 0l 2 2 3 3 3 3 3 3 4 5 4 5 4 5 4 5 4 L5 4 5R Set to the "0" position. 6 Front panel BASS TONE EXTENSION BYPASS ON OFF Set to the "∞" position. 3 Select main speakers A ...
Owner's Manual
Page 35
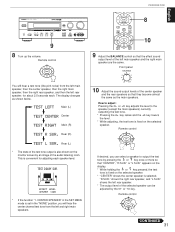
... T E ANG E 9 Adjust the BALANCE control so that "CENTER", "R SUR." CENTER SPEAKER" in the SET MENU mode is convenient for about 2.5 seconds each speaker level. Front panel BALANCE l 0l 2 2 3 3 4 L5 4 5R 10 Adjust the sound output levels of the audio listening room.
... T E ANG E 9 Adjust the BALANCE control so that "CENTER", "R SUR." CENTER SPEAKER" in the SET MENU mode is convenient for about 2.5 seconds each speaker level. Front panel BALANCE l 0l 2 2 3 3 4 L5 4 5R 10 Adjust the sound output levels of the audio listening room.
Owner's Manual
Page 37
... WIDEPHANTOM PS PTY RT CT DIGITAL DSP PRO LOGIC PCM AC-3 AUTO SLEEP PTY HOLD EON NEWS INFO AFFAIRS SPORT TAPE/MD MON /EXT. Front panel STANDBY/ON or Remote control POWER /DTS SURROUND CD 1 MONO MOVIE DVD/LD 4 MOVIE THEATER 1 TUNER 2 TV SPORTS TV/DBS MOVIE THEATER 2 TAPE/MD 3 ... dial must be selected. 4 Select an input source. (For video sources, turn on the TV/monitor.) The selected source is shown on the power. Front panel Remote control or /DTS SURROUND CD 1 MONO MOVIE DVD/LD 4 ROCK PHONO 7 HALL EXT. Remote control AMP/TUN POWER STANDBY AMP/TUN 3 POWER STANDBY AMP...
... WIDEPHANTOM PS PTY RT CT DIGITAL DSP PRO LOGIC PCM AC-3 AUTO SLEEP PTY HOLD EON NEWS INFO AFFAIRS SPORT TAPE/MD MON /EXT. Front panel STANDBY/ON or Remote control POWER /DTS SURROUND CD 1 MONO MOVIE DVD/LD 4 MOVIE THEATER 1 TUNER 2 TV SPORTS TV/DBS MOVIE THEATER 2 TAPE/MD 3 ... dial must be selected. 4 Select an input source. (For video sources, turn on the TV/monitor.) The selected source is shown on the power. Front panel Remote control or /DTS SURROUND CD 1 MONO MOVIE DVD/LD 4 ROCK PHONO 7 HALL EXT. Remote control AMP/TUN POWER STANDBY AMP/TUN 3 POWER STANDBY AMP...
Owner's Manual
Page 38
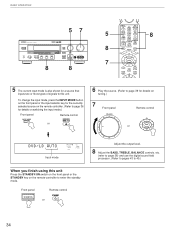
... SLEEP VCR REC / POWER TV INDEX DISP ON SCREEN TV INPUT A/B 8 5 The current input mode is also shown for details on tuning.) 7 Front panel Remote control VOLUME l6 20 l2 28 8 or 40 4 TV CODE SET MUTE VOLUME 60 2 0 -dB Adjust the output level. 8 Adjust the BASS...40 4 60 2 0 -dB EFFECT PROGRAM VIDEO AUX S VIDEO VIDEO L AUDIO R 8 8 5 8 7 /DTS SURROUND CD 1 MONO MOVIE DVD/LD 4 ROCK PHONO 7 HALL EXT. Front panel STANDBY/ON Remote control STANDBY or 34 BASIC OPERATION 57 NATURAL SOUND AV RECEIVER CINEMA DSP STANDBY/ON PHONES PRESET ROOM 2 AM FM kHz MHz...
... SLEEP VCR REC / POWER TV INDEX DISP ON SCREEN TV INPUT A/B 8 5 The current input mode is also shown for details on tuning.) 7 Front panel Remote control VOLUME l6 20 l2 28 8 or 40 4 TV CODE SET MUTE VOLUME 60 2 0 -dB Adjust the output level. 8 Adjust the BASS...40 4 60 2 0 -dB EFFECT PROGRAM VIDEO AUX S VIDEO VIDEO L AUDIO R 8 8 5 8 7 /DTS SURROUND CD 1 MONO MOVIE DVD/LD 4 ROCK PHONO 7 HALL EXT. Front panel STANDBY/ON Remote control STANDBY or 34 BASIC OPERATION 57 NATURAL SOUND AV RECEIVER CINEMA DSP STANDBY/ON PHONES PRESET ROOM 2 AM FM kHz MHz...

Owner's Manual
Page 39
...the picture of the video input source and hear the sound of the buttons figured above to make the corresponding indicator illuminated on the front panel, select "V-AUX". TAPE/MD MONITOR or BASIC OPERATION Notes on input source selection q Note that selecting an input source means that the ...source which was used ) which is connected to the corresponding input terminals on the rear panel is selected. English To select the tape deck connected to this unit's TAPE/MD terminals or the source connected to this way has priority...
...the picture of the video input source and hear the sound of the buttons figured above to make the corresponding indicator illuminated on the front panel, select "V-AUX". TAPE/MD MONITOR or BASIC OPERATION Notes on input source selection q Note that selecting an input source means that the ...source which was used ) which is connected to the corresponding input terminals on the rear panel is selected. English To select the tape deck connected to this unit's TAPE/MD terminals or the source connected to this way has priority...
Owner's Manual
Page 40
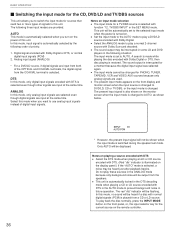
... mode to play a DVD/LD source encoded with Dolby Digital. Do not play back the disc normally, press the INPUT MODE button on the front panel, or, the input selector key for the current source on the monitor screen when the input mode is selected. To play these sources in the... mode. DTS In this mode, only analog input signals are selected even though digital signals are input at the same time. Notes on the display panel.) If the "AUTO" mode is selected, a noise may be shown when the input mode is selected even though other signals are input at the same...
... mode to play a DVD/LD source encoded with Dolby Digital. Do not play back the disc normally, press the INPUT MODE button on the front panel, or, the input selector key for the current source on the monitor screen when the input mode is selected. To play these sources in the... mode. DTS In this mode, only analog input signals are selected even though digital signals are input at the same time. Notes on the display panel.) If the "AUTO" mode is selected, a noise may be shown when the input mode is selected even though other signals are input at the same...

Owner's Manual
Page 41
...terminals only cannot be a case that uses scramble or encoded signals to prevent it from being recorded. Front panel TAPE/MD MON /EXT. Also, do not make "EXT. DECODER button once or more. Front panel Remote control /DTS SURROUND CD or 1 2 Play the source and then turn the VOLUME control up the... (or MD) Ⅵ Recording the playing source to this unit. 4 If the tape deck (or MD recorder etc.) is used for details on tuning.) Front panel Remote control VOLUME l6 20 l2 28 8 40 4 60 2 0 -dB or TV CODE SET MUTE VOLUME 3 Begin recording to the tape deck (or MD ...
...terminals only cannot be a case that uses scramble or encoded signals to prevent it from being recorded. Front panel TAPE/MD MON /EXT. Also, do not make "EXT. DECODER button once or more. Front panel Remote control /DTS SURROUND CD or 1 2 Play the source and then turn the VOLUME control up the... (or MD) Ⅵ Recording the playing source to this unit. 4 If the tape deck (or MD recorder etc.) is used for details on tuning.) Front panel Remote control VOLUME l6 20 l2 28 8 40 4 60 2 0 -dB or TV CODE SET MUTE VOLUME 3 Begin recording to the tape deck (or MD ...

Owner's Manual
Page 44
Front panel Remote control 1 2 3 4 DISC SKIP PRESET or CH CH Notes • A new setting can recall any desired station only by the tuning operation. If, however, the ..., A3 ... E) of preset stations. A8. * You can be deleted. A/B/C/D/E 1 Select the group of preset stations. With this unit is set to a temporary power failure. Front panel A/B/C/D/E Remote control +10 or ENTER A/B/C/D/E 3 MEMORY MAN'L/AUTO FM MEMORY Flashes on other groups in place of the reception mode (stereo or monaural) is stored...
Front panel Remote control 1 2 3 4 DISC SKIP PRESET or CH CH Notes • A new setting can recall any desired station only by the tuning operation. If, however, the ..., A3 ... E) of preset stations. A8. * You can be deleted. A/B/C/D/E 1 Select the group of preset stations. With this unit is set to a temporary power failure. Front panel A/B/C/D/E Remote control +10 or ENTER A/B/C/D/E 3 MEMORY MAN'L/AUTO FM MEMORY Flashes on other groups in place of the reception mode (stereo or monaural) is stored...
Owner's Manual
Page 47
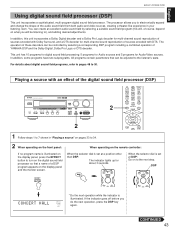
...CD MOVIE THEATER 1 MOVIE THEATER 2 TAPE/MD * Do the next operation while the indicator is set at DSP: Go on the display panel and the monitor screen. For details about 3 seconds. DSP POWER STANDBY AMP/TUN When the selector dial is illuminated. CONTINUED 43 In addition...sound reproduction of sources encoded with Dolby Surround, and a DTS decoder for multi-channel sound reproduction of sources encoded with an effect of YAMAHA DSP and the Dolby Digital, Dolby Pro Logic or DTS decoder. English BASIC OPERATION Using digital sound field processor (DSP) This unit ...
...CD MOVIE THEATER 1 MOVIE THEATER 2 TAPE/MD * Do the next operation while the indicator is set at DSP: Go on the display panel and the monitor screen. For details about 3 seconds. DSP POWER STANDBY AMP/TUN When the selector dial is illuminated. CONTINUED 43 In addition...sound reproduction of sources encoded with Dolby Surround, and a DTS decoder for multi-channel sound reproduction of sources encoded with an effect of YAMAHA DSP and the Dolby Digital, Dolby Pro Logic or DTS decoder. English BASIC OPERATION Using digital sound field processor (DSP) This unit ...

