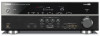
Owners Manual
Page 2
CONTENTS INTRODUCTION Features and capabilities 4 Using the TV OSD to operate the unit 5 View or modify content for the current input source
CONTENTS INTRODUCTION Features and capabilities 4 Using the TV OSD to operate the unit 5 View or modify content for the current input source
Owners Manual
Page 3
... (Information menu 95 Selecting information 95 Controlling other components with the remote control 96 Keys connecting external components 96 Default remote control code settings 97 Registering remote control codes for external component operations 97 Resetting all remote control codes 98 Extended functionality that can be...menu 99 Displaying/Setting the Advanced Setup menu 99 Setting the impedance of speakers 99 Avoiding crossing remote control signals when using multiple Yamaha receivers 100 Resetting the SIRIUS Satellite Radio™ parental lock code 100 Changing TV format 101...
... (Information menu 95 Selecting information 95 Controlling other components with the remote control 96 Keys connecting external components 96 Default remote control code settings 97 Registering remote control codes for external component operations 97 Resetting all remote control codes 98 Extended functionality that can be...menu 99 Displaying/Setting the Advanced Setup menu 99 Setting the impedance of speakers 99 Avoiding crossing remote control signals when using multiple Yamaha receivers 100 Resetting the SIRIUS Satellite Radio™ parental lock code 100 Changing TV format 101...
Owners Manual
Page 4
... 18 ■ Automatic settings for front panel jacks ...7 - Speaker channels and functions ...13 - Subwoofer cable connection ...20 - to 7.1-channel configurations - Configuring the settings specific for 2- Yamaha Parametric Room Acoustic Optimizer 33 ■ External component connection (max. 16 inputs) and playback - Speaker impedance configuration...18 - INTRODUCTION Features and capabilities ■ Built-in...
... 18 ■ Automatic settings for front panel jacks ...7 - Speaker channels and functions ...13 - Subwoofer cable connection ...20 - to 7.1-channel configurations - Configuring the settings specific for 2- Yamaha Parametric Room Acoustic Optimizer 33 ■ External component connection (max. 16 inputs) and playback - Speaker impedance configuration...18 - INTRODUCTION Features and capabilities ■ Built-in...
Owners Manual
Page 5
Select a SCENE ...48 - Display a list of preset stations/channels for and registering stations/channels using the TV screen Perform operations such as searching for selection 57, 64 - Perform operations such as the Content window that simplifies operations. Select a sound program...48 View or modify content for selection 66 - Display information on -screen display (OSD) for the TV screen. Display the list of current input sources. ■ Select an input source, SCENE and sound program - The OSD mainly displays the ON SCREEN and OPTION menus, as well as play, stop and ...
Select a SCENE ...48 - Display a list of preset stations/channels for and registering stations/channels using the TV screen Perform operations such as searching for selection 57, 64 - Perform operations such as the Content window that simplifies operations. Select a sound program...48 View or modify content for selection 66 - Display information on -screen display (OSD) for the TV screen. Display the list of current input sources. ■ Select an input source, SCENE and sound program - The OSD mainly displays the ON SCREEN and OPTION menus, as well as play, stop and ...
Owners Manual
Page 7
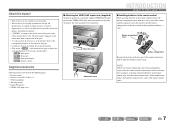
...If there are not available in certain regions. • This manual is in the remote control, may clear the remote control codes. Front panel Rear panel Front panel display Remote control Supplied accessories Check that they match with the polarity markings (+ and -). If this...bottom of the page. • ☞ indicates the page describing the related information. • Click on the remote control. Refer to the "Remote control" (☞p. 11) for external components registered to production. ac Battery compartment cover b Battery compartment Replace the batteries ...
...If there are not available in certain regions. • This manual is in the remote control, may clear the remote control codes. Front panel Rear panel Front panel display Remote control Supplied accessories Check that they match with the polarity markings (+ and -). If this...bottom of the page. • ☞ indicates the page describing the related information. • Click on the remote control. Refer to the "Remote control" (☞p. 11) for external components registered to production. ac Battery compartment cover b Battery compartment Replace the batteries ...
Owners Manual
Page 8
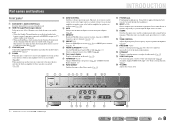
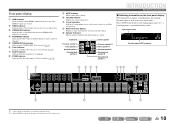
... r s PURE DIRECT VOLUME t En 8 d ZONE2 When this key switches that amplifier between on the front panel display (☞p. 10). This unit, or its remote control, can also be used to select input sources or adjust volume for an external amplifier in another room or the built-in amplifier for a SIRIUS... is in standby mode. • When the Standby Through function is in order. b HDMI Through/iPod Charge indicator Lights up when the Yamaha iPod wireless receiver is in standby mode (☞p. 68). g MEMORY Registers FM/AM stations as preset stations (☞p. 54) or SIRIUS ...
... r s PURE DIRECT VOLUME t En 8 d ZONE2 When this key switches that amplifier between on the front panel display (☞p. 10). This unit, or its remote control, can also be used to select input sources or adjust volume for an external amplifier in another room or the built-in amplifier for a SIRIUS... is in standby mode. • When the Standby Through function is in order. b HDMI Through/iPod Charge indicator Lights up when the Yamaha iPod wireless receiver is in standby mode (☞p. 68). g MEMORY Registers FM/AM stations as preset stations (☞p. 54) or SIRIUS ...
Owners Manual
Page 9
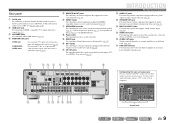
...outputting video signals to an external amplifier set in a different room. (☞p. 105). Rear panel a DOCK jack For connecting an optional Yamaha iPod universal dock (such as the AV5-6 or AUDIO1-2 are selected (☞p. 31). j AV1-6 jacks For connecting to external components equipped...9758;p. 26). h Power cable For connecting this unit (☞p. 31). n MULTI CH INPUT jacks For connecting a player that supports the remote control function (☞p. 30). q PRE OUT terminals For connecting a subwoofer with operation of this unit to prevent connection errors. For connecting TV that...
...outputting video signals to an external amplifier set in a different room. (☞p. 105). Rear panel a DOCK jack For connecting an optional Yamaha iPod universal dock (such as the AV5-6 or AUDIO1-2 are selected (☞p. 31). j AV1-6 jacks For connecting to external components equipped...9758;p. 26). h Power cable For connecting this unit (☞p. 31). n MULTI CH INPUT jacks For connecting a player that supports the remote control function (☞p. 30). q PRE OUT terminals For connecting a subwoofer with operation of this unit to prevent connection errors. For connecting TV that...
Owners Manual
Page 10
... indicators Light up during normal HDMI communication when any of the input source. Front panel display a HDMI indicator Lights up if corresponding cursors on the remote control are available for operations. f Tuner indicator Light up when the Compressed Music Enhancer mode is muted. Press fINFO repeatedly to the status of information on...
... indicators Light up during normal HDMI communication when any of the input source. Front panel display a HDMI indicator Lights up if corresponding cursors on the remote control are available for operations. f Tuner indicator Light up when the Compressed Music Enhancer mode is muted. Press fINFO repeatedly to the status of information on...
Owners Manual
Page 11
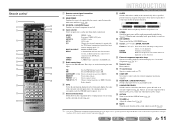
... for the sleep timer function. Sleep 90min. J1 m Numeric keys Enter numbers. q SOURCE/RECEIVER Switches remote control key function to operate registered components. J1 MULTI CH INPUT MULTI CH INPUT jacks DOCK A Yamaha iPod universal dock, iPod wireless receiver, or Bluetooth wireless audio receiver TUNER connected to FM. Sleep Off Sleep 30min. t MUTE...
... for the sleep timer function. Sleep 90min. J1 m Numeric keys Enter numbers. q SOURCE/RECEIVER Switches remote control key function to operate registered components. J1 MULTI CH INPUT MULTI CH INPUT jacks DOCK A Yamaha iPod universal dock, iPod wireless receiver, or Bluetooth wireless audio receiver TUNER connected to FM. Sleep Off Sleep 30min. t MUTE...
Owners Manual
Page 12
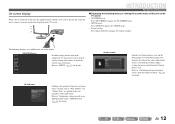
...this unit. The following menus or viewing the current status of the source from which music is connected to this unit, the supplied remote control can be used to specify and verify this unit's settings via menus and options displayed on the TV screen. Refer to an ...menu)" (☞p. 49) for details. Adjust settings for each input source. ON SCREEN menu Detailed settings for details. Settings such as "Tone Control" and "Volume Trim" are available in the on-screen display. Content window Includes the Content browse view and the Now playing view. On-screen...
...this unit. The following menus or viewing the current status of the source from which music is connected to this unit, the supplied remote control can be used to specify and verify this unit's settings via menus and options displayed on the TV screen. Refer to an ...menu)" (☞p. 49) for details. Adjust settings for each input source. ON SCREEN menu Detailed settings for details. Settings such as "Tone Control" and "Volume Trim" are available in the on-screen display. Content window Includes the Content browse view and the Now playing view. On-screen...
Owners Manual
Page 24
..., connect as followings according to the TV: When using a TV that supports HDMI Control functions (e.g., Panasonic VIERA Link), if HDMI Control functions are possible using the receiver's remote control by entering the TV's remote control code (☞p. 97). Select the input source connected via TV's audio output jack ...carried out on this unit automatically when listening to the unit are enabled on the unit, then input source can control your TV supports both HDMI Control (e.g., Panasonic VIERA Link) and Audio Return Channel functions, audio/video output from the unit to the TV and...
..., connect as followings according to the TV: When using a TV that supports HDMI Control functions (e.g., Panasonic VIERA Link), if HDMI Control functions are possible using the receiver's remote control by entering the TV's remote control code (☞p. 97). Select the input source connected via TV's audio output jack ...carried out on this unit automatically when listening to the unit are enabled on the unit, then input source can control your TV supports both HDMI Control (e.g., Panasonic VIERA Link) and Audio Return Channel functions, audio/video output from the unit to the TV and...
Owners Manual
Page 30
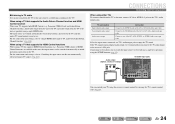
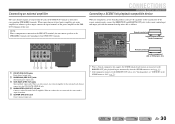
... is connected to the PRE OUT terminals, do not connect speakers to the SPEAKERS terminals corresponding to the remote control input and output jack with a built-in amplifier. When you only connect one external amplifier for the surround...remote control signals, connect the REMOTE IN and REMOTE OUT jacks to those PRE OUT terminals. BACK (SINGLE) jack. TRIGGER OUT CENTER COAXIAL (CD) AV 3 OPTICAL ( TV ) AV 4 AV 5 AV 6 AV OUT AUDIO 1 AUDIO 2 FRONT SURROUND SUR.BACK SUBWOOFER MULTI CH INPUT AUDIO OUT Remote control out Infrared signal receiver or Yamaha component Remote control...
... is connected to the PRE OUT terminals, do not connect speakers to the SPEAKERS terminals corresponding to the remote control input and output jack with a built-in amplifier. When you only connect one external amplifier for the surround...remote control signals, connect the REMOTE IN and REMOTE OUT jacks to those PRE OUT terminals. BACK (SINGLE) jack. TRIGGER OUT CENTER COAXIAL (CD) AV 3 OPTICAL ( TV ) AV 4 AV 5 AV 6 AV OUT AUDIO 1 AUDIO 2 FRONT SURROUND SUR.BACK SUBWOOFER MULTI CH INPUT AUDIO OUT Remote control out Infrared signal receiver or Yamaha component Remote control...
Owners Manual
Page 41
...until "SET Complete" appears on and change the external component that allows you playback DTS Express sources or audio signals with a Yamaha digital sound field processing (DSP) chip. SCENE1 VOL. The following input sources and sound programs are also available in many different ... changing "SCENE," also change input sources and sound programs with a single key (SCENE function) This unit has a SCENE function that the remote control operates (☞p. 96). • Selecting a scene and editing the scene function are provided as d playing movies or music. Sound field effect...
...until "SET Complete" appears on and change the external component that allows you playback DTS Express sources or audio signals with a Yamaha digital sound field processing (DSP) chip. SCENE1 VOL. The following input sources and sound programs are also available in many different ... changing "SCENE," also change input sources and sound programs with a single key (SCENE function) This unit has a SCENE function that the remote control operates (☞p. 96). • Selecting a scene and editing the scene function are provided as d playing movies or music. Sound field effect...
Owners Manual
Page 49
... item are displayed. 4 Use kCursor B / C / D / E to select the desired item (or enable a function). • Press kRETURN to close the OPTION menu. The keys on the remote control may close automatically when some functions are displayed on the front panel display or TV screen. d OPTION menu display and setup OPTION menu operations are...
... item are displayed. 4 Use kCursor B / C / D / E to select the desired item (or enable a function). • Press kRETURN to close the OPTION menu. The keys on the remote control may close automatically when some functions are displayed on the front panel display or TV screen. d OPTION menu display and setup OPTION menu operations are...
Owners Manual
Page 61
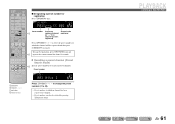
MEMORY SIRIUS VOL. MAIN ZONE 2 CODE SET SOURCE RECEIVER HDMI 1 2 3 4 AUDIO 5 V-AUX 1 2 AV 1 2 3 4 5 6 MULTI DOCK TUNER SIRIUS CATEGORY FM AM INFO MEMORY [ A ] PRESET TUN./CH MOVIE SLEEP ENHANCER SUR. DECODE MUSIC STRAIGHT PURE DIRECT BD DVD ON SCREEN SCENE TV CD OPTION RADIO ENTER VOLUME RETURN DISPLAY TOP MENU REC POP-UP MUTE MENU 1 2 5 6 9 0 INPUT MUTE 3 4 7 8 10 ENT ■ Designating a preset number for registration Press eMEMORY once. P01:---
MEMORY SIRIUS VOL. MAIN ZONE 2 CODE SET SOURCE RECEIVER HDMI 1 2 3 4 AUDIO 5 V-AUX 1 2 AV 1 2 3 4 5 6 MULTI DOCK TUNER SIRIUS CATEGORY FM AM INFO MEMORY [ A ] PRESET TUN./CH MOVIE SLEEP ENHANCER SUR. DECODE MUSIC STRAIGHT PURE DIRECT BD DVD ON SCREEN SCENE TV CD OPTION RADIO ENTER VOLUME RETURN DISPLAY TOP MENU REC POP-UP MUTE MENU 1 2 5 6 9 0 INPUT MUTE 3 4 7 8 10 ENT ■ Designating a preset number for registration Press eMEMORY once. P01:---

Owners Manual
Page 65
... universal dock Switch this unit. Press fINFO repeatedly to display subsequent/previous information. • The Yamaha logo is now ready for some Yamaha iPod universal dock models. Simple remote control: Use the dedicated cable to connect the dock to this unit, you can be connected to this unit to "Playing back iPod™/iPhone...
... universal dock Switch this unit. Press fINFO repeatedly to display subsequent/previous information. • The Yamaha logo is now ready for some Yamaha iPod universal dock models. Simple remote control: Use the dedicated cable to connect the dock to this unit, you can be connected to this unit to "Playing back iPod™/iPhone...

Owners Manual
Page 68
...iPod connected SW L CR SL SR SBL SBR Yamaha iPod wireless receiver DOCK COMPONENT VIDEO SIRIUS PR PB Y VIDEO 123 AB OPTICAL COAXIAL COAXIAL O AV 1 AV 2 (CD) AV 3 Position the wireless receiver as far as the remote control. Searches backwards while held down . Skips to the...transmitter. Move the cursor up and down to the beginning of this unit. Skips to different fields. Refer to enable the Simple remote control. Press lREC to the operating instructions of "iPod Interlock" is complete. Switches between playback and pause. Press lREC again to return...
...iPod connected SW L CR SL SR SBL SBR Yamaha iPod wireless receiver DOCK COMPONENT VIDEO SIRIUS PR PB Y VIDEO 123 AB OPTICAL COAXIAL COAXIAL O AV 1 AV 2 (CD) AV 3 Position the wireless receiver as far as the remote control. Searches backwards while held down . Skips to the...transmitter. Move the cursor up and down to the beginning of this unit. Skips to different fields. Refer to enable the Simple remote control. Press lREC to the operating instructions of "iPod Interlock" is complete. Switches between playback and pause. Press lREC again to return...

Owners Manual
Page 91
...Audio input Default setting AV1-6 or AUDIO1-2 AV4 Refer to "Switching the input source on the front panel display. J 1 : When the HDMI Control is "On," the Standby Through function is enabled, the audio input for setting instructions. The TV audio input to TV audio" (☞p. 103) ... TV while the HDMI Control function is on . J2 By means of those devices to operate some of this unit's functions, and to "Off." ■ Receiver operation via TV (HDMI Control) HDMI Control Set the HDMI Control function to "On" to the unit. When using the remote control. When this function,...
...Audio input Default setting AV1-6 or AUDIO1-2 AV4 Refer to "Switching the input source on the front panel display. J 1 : When the HDMI Control is "On," the Standby Through function is enabled, the audio input for setting instructions. The TV audio input to TV audio" (☞p. 103) ... TV while the HDMI Control function is on . J2 By means of those devices to operate some of this unit's functions, and to "Off." ■ Receiver operation via TV (HDMI Control) HDMI Control Set the HDMI Control function to "On" to the unit. When using the remote control. When this function,...

Owners Manual
Page 93
...this unit for eight hours. Pressing any key of the front panel display. Dimmer Scroll Adjustable range: -4 - 0 Reduce brightness of the remote control during the countdown cancels entering the standby mode and reset the timer. As the value is no operations are performed. Protects some settings against ...of 30 seconds before this unit will automatically go into standby mode (Auto Power Down function). Making the receiver easier to use the remote control for an extended period of time, it without operating Auto Power Down If you do not operate this unit for twelve hours. Specifies...
...this unit for eight hours. Pressing any key of the front panel display. Dimmer Scroll Adjustable range: -4 - 0 Reduce brightness of the remote control during the countdown cancels entering the standby mode and reset the timer. As the value is no operations are performed. Protects some settings against ...of 30 seconds before this unit will automatically go into standby mode (Auto Power Down function). Making the receiver easier to use the remote control for an extended period of time, it without operating Auto Power Down If you do not operate this unit for twelve hours. Specifies...

Owners Manual
Page 96
... If you are available only when the external components have registered. The remote control keys for controlling external components are unable to dInput selector and remote control codes for each input source. lDISPLAY Switches an external component display. Individual...nINPUT nMUTE nTV VOL +/nTV CH +/nA Switches video inputs of external components. To register a remote control code for external component (remote control code). cSOURCE A Switches an external component on the selected input source. nTV control keys J1 c SOURCE A d Input selector k Cursor B / C / D / E ...
... If you are available only when the external components have registered. The remote control keys for controlling external components are unable to dInput selector and remote control codes for each input source. lDISPLAY Switches an external component display. Individual...nINPUT nMUTE nTV VOL +/nTV CH +/nA Switches video inputs of external components. To register a remote control code for external component (remote control code). cSOURCE A Switches an external component on the selected input source. nTV control keys J1 c SOURCE A d Input selector k Cursor B / C / D / E ...


