Owners Manual
Page 2
CONTENTS INTRODUCTION Features and capabilities 4 Using the TV OSD to operate the unit 5 View or modify content for the current input source
CONTENTS INTRODUCTION Features and capabilities 4 Using the TV OSD to operate the unit 5 View or modify content for the current input source
Owners Manual
Page 4
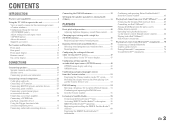
Speaker layout...14 - Configuring the settings specific for 2- Subwoofer cable connection ...20 - Yamaha Parametric Room Acoustic Optimizer 33 ■ External component connection (max. 16 inputs) and playback - INTRODUCTION Features and capabilities ... for speaker acoustic parameters (YPAO - High quality playback using bi-amplification connections 18 ■ Automatic settings for front panel jacks ...7 - to 7.1-channel configurations - Speaker cable connection...17 - Speaker impedance configuration...18 - Speaker channels and functions ...13 - External component...
Speaker layout...14 - Configuring the settings specific for 2- Subwoofer cable connection ...20 - Yamaha Parametric Room Acoustic Optimizer 33 ■ External component connection (max. 16 inputs) and playback - INTRODUCTION Features and capabilities ... for speaker acoustic parameters (YPAO - High quality playback using bi-amplification connections 18 ■ Automatic settings for front panel jacks ...7 - to 7.1-channel configurations - Speaker cable connection...17 - Speaker impedance configuration...18 - Speaker channels and functions ...13 - External component...
Owners Manual
Page 6
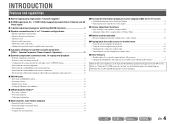
■ HDMI settings - Assign the audio input source for the TV
■ HDMI settings - Assign the audio input source for the TV
Owners Manual
Page 7
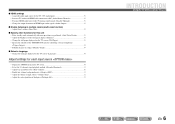
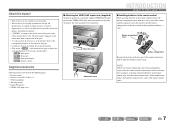
Front panel Rear panel Front panel display Remote control Supplied accessories Check that you do not use the jacks. ac Battery compartment cover b Battery compartment Replace the batteries with new ones, ...
Front panel Rear panel Front panel display Remote control Supplied accessories Check that you do not use the jacks. ac Battery compartment cover b Battery compartment Replace the batteries with new ones, ...
Owners Manual
Page 8
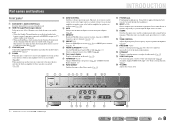
...(☞p. 68). g MEMORY Registers FM/AM stations as preset stations (☞p. 54) or SIRIUS channels as preset channels (☞p. 60). j Front panel display Displays information on and standby mode. Press either the left or right key repeatedly to this unit (☞p. 10). p TONE CONTROL Adjusts high-frequency... unit is in standby mode. • When the Standby Through function is enabled and audio/video from which is placed in the Yamaha iPod universal dock, is charging while the unit is connected to select input sources or adjust volume for an external amplifier in another room...
...(☞p. 68). g MEMORY Registers FM/AM stations as preset stations (☞p. 54) or SIRIUS channels as preset channels (☞p. 60). j Front panel display Displays information on and standby mode. Press either the left or right key repeatedly to this unit (☞p. 10). p TONE CONTROL Adjusts high-frequency... unit is in standby mode. • When the Standby Through function is enabled and audio/video from which is placed in the Yamaha iPod universal dock, is charging while the unit is connected to select input sources or adjust volume for an external amplifier in another room...
Owners Manual
Page 9
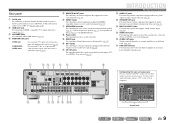
..., using three cables to output audio/video signals (☞p. 23). h Power cable For connecting this unit to operate it (☞p. 23). Rear panel a DOCK jack For connecting an optional Yamaha iPod universal dock (such as the AV5-6 or AUDIO1-2 are selected (☞p. 31). b HDMI OUT jack For connecting an HDMI - compatible TV...
..., using three cables to output audio/video signals (☞p. 23). h Power cable For connecting this unit to operate it (☞p. 23). Rear panel a DOCK jack For connecting an optional Yamaha iPod universal dock (such as the AV5-6 or AUDIO1-2 are selected (☞p. 31). b HDMI OUT jack For connecting an HDMI - compatible TV...
Owners Manual
Page 10
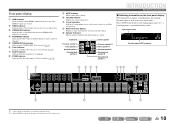
...up when CINEMA DSP 3D is selected as the active input source. l Multi information display Displays a range of the input source. Front panel display a HDMI indicator Lights up during normal HDMI communication when any of the HDMI1-5 inputs are output. i MUTE indicator Flashes when ...INTRODUCTION Part names and functions ■ Switching information on (☞p. 11). Press fINFO repeatedly to Zone2 is on the front panel display The front panel can display sound programs and surround decoder names as well as an input source. f Tuner indicator Light up when the sleep...
...up when CINEMA DSP 3D is selected as the active input source. l Multi information display Displays a range of the input source. Front panel display a HDMI indicator Lights up during normal HDMI communication when any of the HDMI1-5 inputs are output. i MUTE indicator Flashes when ...INTRODUCTION Part names and functions ■ Switching information on (☞p. 11). Press fINFO repeatedly to Zone2 is on the front panel display The front panel can display sound programs and surround decoder names as well as an input source. f Tuner indicator Light up when the sleep...
Owners Manual
Page 11
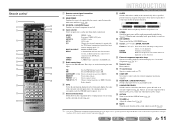
..., the surround decoder, the FM/AM tuner frequency, etc.). J1 MULTI CH INPUT MULTI CH INPUT jacks DOCK A Yamaha iPod universal dock, iPod wireless receiver, or Bluetooth wireless audio receiver TUNER connected to FM. Press this unit from which...for external component operations (☞p. 97). p RECEIVER A (RECEIVER Power) Switches this key to playback. HDMI1-5 HDMI1-5 jacks V-AUX Front panel VIDEO AUX jacks AUDIO1-2 AUDIO1-2 jacks AV1-6 [A] AV1-6 jacks Changes the external component to operate registered components. Sleep 90min. Sleep Off Sleep...
..., the surround decoder, the FM/AM tuner frequency, etc.). J1 MULTI CH INPUT MULTI CH INPUT jacks DOCK A Yamaha iPod universal dock, iPod wireless receiver, or Bluetooth wireless audio receiver TUNER connected to FM. Press this unit from which...for external component operations (☞p. 97). p RECEIVER A (RECEIVER Power) Switches this key to playback. HDMI1-5 HDMI1-5 jacks V-AUX Front panel VIDEO AUX jacks AUDIO1-2 AUDIO1-2 jacks AV1-6 [A] AV1-6 jacks Changes the external component to operate registered components. Sleep 90min. Sleep Off Sleep...

Owners Manual
Page 17
...you cannot output sounds from the power outlet before connecting the speakers. • Generally speaker cables consist of these cables is switched on the front panel display when this unit and the speakers, and the other cable into the "-" (negative, black) terminal. • Be careful that output ... 45), sound with the metal areas of the speaker cable does not touch anything or come into the "+" (positive, red) terminal on the rear panel. Continues to their respective terminals on this unit is a different color, or has a line running along it, to this unit. If the speaker...
...you cannot output sounds from the power outlet before connecting the speakers. • Generally speaker cables consist of these cables is switched on the front panel display when this unit and the speakers, and the other cable into the "-" (negative, black) terminal. • Be careful that output ... 45), sound with the metal areas of the speaker cable does not touch anything or come into the "+" (positive, red) terminal on the rear panel. Continues to their respective terminals on this unit is a different color, or has a line running along it, to this unit. If the speaker...
Owners Manual
Page 18
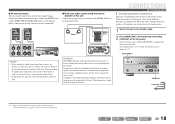
... damage. En 18 See this unit to the standby mode. 2 Press MAIN ZONE A while pressing and holding STRAIGHT on the front panel. This information is displayed on the back panel of this unit Connect the speakers in the second zone to a Passive Loudspeaker Selector Box or more than one loudspeaker per channel... be connected to the "Extended functionality that support bi-amp connections. Compliance with a tweeter. Release the keys when "ADVANCED SETUP" is found on the front panel display.
... damage. En 18 See this unit to the standby mode. 2 Press MAIN ZONE A while pressing and holding STRAIGHT on the front panel. This information is displayed on the back panel of this unit Connect the speakers in the second zone to a Passive Loudspeaker Selector Box or more than one loudspeaker per channel... be connected to the "Extended functionality that support bi-amp connections. Compliance with a tweeter. Release the keys when "ADVANCED SETUP" is found on the front panel display.

Owners Manual
Page 19
... • Surround back L/R speakers • Bi-amp connection (Front speaker L/R speakers) 5 Switch this unit to the standby mode, and then switch it on the front panel. Connecting the banana plug Tighten the knob, and then insert the banana plug into the gap on , when the settings you made has been configured...
... • Surround back L/R speakers • Bi-amp connection (Front speaker L/R speakers) 5 Switch this unit to the standby mode, and then switch it on the front panel. Connecting the banana plug Tighten the knob, and then insert the banana plug into the gap on , when the settings you made has been configured...
Owners Manual
Page 25
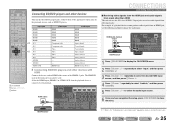
... BD/DVD players and other devices This unit has the following method to one of the HDMI1-5 jacks. The HDMI IN jack on the front panel can use the following input jacks. HDMI/Audio (Optical) output HDMI HDMI OPTICAL BD/DVD player O O DOCK COMPONENT VIDEO SIRIUS PR PB Y VIDEO ARC HDMI...
... BD/DVD players and other devices This unit has the following method to one of the HDMI1-5 jacks. The HDMI IN jack on the front panel can use the following input jacks. HDMI/Audio (Optical) output HDMI HDMI OPTICAL BD/DVD player O O DOCK COMPONENT VIDEO SIRIUS PR PB Y VIDEO ARC HDMI...

Owners Manual
Page 29
... the analog video/audio connection are performed between the HDMI compatible device and this unit, only the HDMI signal will be displayed on the front panel to temporarily connect devices such as the input source, the digital sound field processor and tone control are automatically disabled. • Since this unit does...
... the analog video/audio connection are performed between the HDMI compatible device and this unit, only the HDMI signal will be displayed on the front panel to temporarily connect devices such as the input source, the digital sound field processor and tone control are automatically disabled. • Since this unit does...

Owners Manual
Page 33
... children. When using YPAO. • The test tone is output at high volume. J1 When using YPAO, a test tone will be viewed on the front panel display or TV screen. 1 Check the following when using a tripod, use the tripod screws to fix the microphone in which this unit on . • ... or the locations in order to provide an optimal sound field. Setting up the speaker parameters automatically (YPAO) CONNECTIONS This unit is equipped with a Yamaha Parametric Room Acoustic Optimizer (YPAO) that adjusts the status, size, and volume balance of the speakers in which they are removed.
... children. When using YPAO. • The test tone is output at high volume. J1 When using YPAO, a test tone will be viewed on the front panel display or TV screen. 1 Check the following when using a tripod, use the tripod screws to fix the microphone in which this unit on . • ... or the locations in order to provide an optimal sound field. Setting up the speaker parameters automatically (YPAO) CONNECTIONS This unit is equipped with a Yamaha Parametric Room Acoustic Optimizer (YPAO) that adjusts the status, size, and volume balance of the speakers in which they are removed.

Owners Manual
Page 34
... seconds. • To start measurement. The following when measuring acoustics. • It takes approximately 3 minutes to the YPAO MIC jack on the front panel display or TV screen. YPAO VOL. Display during measurement YPAO Progress VOL. 0% PL SW PR L CR SL SR SBL SBR 5 Press kCursor B...En 34 MAIN ZONE YPAO MIC ZONE2 ZON "Mic On. View ON SCREEN" appears on the front k panel display, and the following display appears on the front panel. Auto measurement starts in a corner of the following display appears when measurement finishes without any problems. YPAO ...
... seconds. • To start measurement. The following when measuring acoustics. • It takes approximately 3 minutes to the YPAO MIC jack on the front panel display or TV screen. YPAO VOL. Display during measurement YPAO Progress VOL. 0% PL SW PR L CR SL SR SBL SBR 5 Press kCursor B...En 34 MAIN ZONE YPAO MIC ZONE2 ZON "Mic On. View ON SCREEN" appears on the front k panel display, and the following display appears on the front panel. Auto measurement starts in a corner of the following display appears when measurement finishes without any problems. YPAO ...

Owners Manual
Page 38
.... Only one surround back speaker is detected. Measure again in the Setup menu to the YPAO MIC jack on the front panel. However, we recommend resolving the problem and measuring again, as continuing measurement without doing so will allow you purchased this unit, ...or the nearest Yamaha service center. The YPAO microphone could not distinguish a test tone. Check that the YPAO microphone has been installed correctly. Inquire at...
.... Only one surround back speaker is detected. Measure again in the Setup menu to the YPAO MIC jack on the front panel. However, we recommend resolving the problem and measuring again, as continuing measurement without doing so will allow you purchased this unit, ...or the nearest Yamaha service center. The YPAO microphone could not distinguish a test tone. Check that the YPAO microphone has been installed correctly. Inquire at...

Owners Manual
Page 40
... of the high-frequency range (Treble) and low-frequency range (Bass) of the selected input source is displayed for details on the front panel repeatedly to select the input source. TONE Treble VOL. En 40 Press tMUTE again to adjust the volume. For details on external components (... channels well. • The tone control can change the input source name displayed on the front panel display as the source input, or select a s radio station on the front panel display. DECODE MUSIC STRAIGHT PURE DIRECT BD DVD ON SCREEN SCENE TV CD OPTION RADIO ENTER VOLUME ...
... of the high-frequency range (Treble) and low-frequency range (Bass) of the selected input source is displayed for details on the front panel repeatedly to select the input source. TONE Treble VOL. En 40 Press tMUTE again to adjust the volume. For details on external components (... channels well. • The tone control can change the input source name displayed on the front panel display as the source input, or select a s radio station on the front panel display. DECODE MUSIC STRAIGHT PURE DIRECT BD DVD ON SCREEN SCENE TV CD OPTION RADIO ENTER VOLUME ...
Owners Manual
Page 41
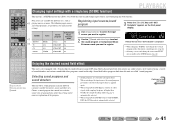
... and editing the scene function are stored for that input source is applied again. • When you playback DTS Express sources or audio signals with a Yamaha digital sound field processing (DSP) chip. PLAYBACK MAIN ZONE 2 CODE SET SOURCE RECEIVER HDMI 1 2 3 4 AUDIO 5 V-AUX 1 2 AV 1 2 3 4 ...3 Press the iSCENE key until "SET Complete" appears on the name or explanation of higher than relying on the front panel display. DECODE MUSIC STRAIGHT PURE DIRECT BD DVD ON SCREEN SCENE TV CD OPTION RADIO ENTER VOLUME RETURN DISPLAY Changing input ...
... and editing the scene function are stored for that input source is applied again. • When you playback DTS Express sources or audio signals with a Yamaha digital sound field processing (DSP) chip. PLAYBACK MAIN ZONE 2 CODE SET SOURCE RECEIVER HDMI 1 2 3 4 AUDIO 5 V-AUX 1 2 AV 1 2 3 4 ...3 Press the iSCENE key until "SET Complete" appears on the name or explanation of higher than relying on the front panel display. DECODE MUSIC STRAIGHT PURE DIRECT BD DVD ON SCREEN SCENE TV CD OPTION RADIO ENTER VOLUME RETURN DISPLAY Changing input ...

Owners Manual
Page 42
... ENHANCER SUR. DECODE repeatedly Turning on Straight decoding mode: Press gSTRAIGHT g Turning on Pure Direct mode (☞p. 44): Press gPURE DIRECT Turning on the front panel display to split the signal into multiple channels.
... ENHANCER SUR. DECODE repeatedly Turning on Straight decoding mode: Press gSTRAIGHT g Turning on Pure Direct mode (☞p. 44): Press gPURE DIRECT Turning on the front panel display to split the signal into multiple channels.

Owners Manual
Page 43
...) CINEMA DSP 3D mode creates an intensive and accurate stereoscopic sound field in CINEMA DSP 3D mode, the CINEMA DSP 3D indicator on the front panel lights up MUSIC 3 VOL. Do the following conditions: • When a "2ch Stereo" sound program is selected. • When Pure Direct mode or straight decoding mode...
...) CINEMA DSP 3D mode creates an intensive and accurate stereoscopic sound field in CINEMA DSP 3D mode, the CINEMA DSP 3D indicator on the front panel lights up MUSIC 3 VOL. Do the following conditions: • When a "2ch Stereo" sound program is selected. • When Pure Direct mode or straight decoding mode...

