Owner's Manual
Page 5
...44 Displaying the current status of this unit on the front panel or the remote control. Refer to the SCENE buttons 37 Creating your original SCENE templates 40 Using the remote control for the information about each position of the parts on a video monitor ...89 3 SOUND MENU 90 4 INPUT MENU 93 5 OPTION MENU 96 Remote control features 100 Controlling this unit, a TV, or other components.......... 100 Setting remote control codes 102 Using multi-zone configuration 103 Connecting Zone 2 103 Controlling Zone 2 104 Advanced setup 106 Using the advanced setup 106 ADDITIONAL ...
...44 Displaying the current status of this unit on the front panel or the remote control. Refer to the SCENE buttons 37 Creating your original SCENE templates 40 Using the remote control for the information about each position of the parts on a video monitor ...89 3 SOUND MENU 90 4 INPUT MENU 93 5 OPTION MENU 96 Remote control features 100 Controlling this unit, a TV, or other components.......... 100 Setting remote control codes 102 Using multi-zone configuration 103 Connecting Zone 2 103 Controlling Zone 2 104 Advanced setup 106 Using the advanced setup 106 ADDITIONAL ...

Owner's Manual
Page 6
...; Sleep timer Supplied accessories Check that allow you received all sources ◆ Adaptive dynamic range controlling capability ◆ Adaptive DSP effect level controlling capability ◆ iPod controlling capability ◆ Remote control with the SCENE function Sound field programs ◆ Proprietary Yamaha technology for the creation of the following parts. ❏ Remote control ❏ Batteries (2) (AAA, R03, UM-4) ❏ Optimizer...
...; Sleep timer Supplied accessories Check that allow you received all sources ◆ Adaptive dynamic range controlling capability ◆ Adaptive DSP effect level controlling capability ◆ iPod controlling capability ◆ Remote control with the SCENE function Sound field programs ◆ Proprietary Yamaha technology for the creation of the following parts. ❏ Remote control ❏ Batteries (2) (AAA, R03, UM-4) ❏ Optimizer...

Owner's Manual
Page 7
...a result of the Bluetooth SIG and is used by using either the buttons on the front panel or the ones on the remote control. Since hearing damage from loud sounds is a trademark of Sony Corporation. English 3 En and, most out of your sensitive ..." with a license agreement. "Dolby", "Pro Logic", and the double-D symbol are registered trademarks of the parts on the remote control is too late, Yamaha and the Electronic Industries Association's Consumer Electronics Group recommend you to production. All Rights Reserved. Refer to avoid prolonged exposure from Dolby...
...a result of the Bluetooth SIG and is used by using either the buttons on the front panel or the ones on the remote control. Since hearing damage from loud sounds is a trademark of Sony Corporation. English 3 En and, most out of your sensitive ..." with a license agreement. "Dolby", "Pro Logic", and the double-D symbol are registered trademarks of the parts on the remote control is too late, Yamaha and the Electronic Industries Association's Consumer Electronics Group recommend you to production. All Rights Reserved. Refer to avoid prolonged exposure from Dolby...

Owner's Manual
Page 8
...shape and color. • If the batteries have leaked, dispose of them correctly in accordance with your local regulations. • If the remote control is cleared, insert new batteries and set for your local voltage BEFORE plugging the power cable into the AC wall outlet. Read the packaging carefully...to the correct position using a straight slot screwdriver. Notes • Change all of the batteries if you notice that the operation range of the remote control decreases. • Do not use an old battery and a new one together. • Do not use different types of the VOLTAGE SELECTOR may...
...shape and color. • If the batteries have leaked, dispose of them correctly in accordance with your local regulations. • If the remote control is cleared, insert new batteries and set for your local voltage BEFORE plugging the power cable into the AC wall outlet. Read the packaging carefully...to the correct position using a straight slot screwdriver. Notes • Change all of the batteries if you notice that the operation range of the remote control decreases. • Do not use an old battery and a new one together. • Do not use different types of the VOLTAGE SELECTOR may...

Owner's Manual
Page 13
...for your listening room (AUTO SETUP) ☞ P. 32 • Manually adjusting various parameters of this unit ☞ P. 80 • Setting the remote control ☞ P. 100 • Adjusting the advanced parameters ☞ P. 106 ■ Additional feature • Automatically turning off this unit? ■ Customizing... 62 • Using your original SCENE templates ☞ P. 40 This unit is set this unit from the remote control. To turn on this unit to receive infrared signals from the standby mode, press the desired SSCENE buttons (or 6SCENE) or KMAIN ZONE ON/OFF (or...
...for your listening room (AUTO SETUP) ☞ P. 32 • Manually adjusting various parameters of this unit ☞ P. 80 • Setting the remote control ☞ P. 100 • Adjusting the advanced parameters ☞ P. 106 ■ Additional feature • Automatically turning off this unit? ■ Customizing... 62 • Using your original SCENE templates ☞ P. 40 This unit is set this unit from the remote control. To turn on this unit to receive infrared signals from the standby mode, press the desired SSCENE buttons (or 6SCENE) or KMAIN ZONE ON/OFF (or...
Owner's Manual
Page 30
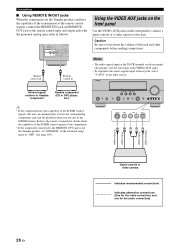
... to "OFF" (see page 109). Remote control out Remote control in the advanced setup menu to the owner's manuals for the video connection, and one of the components. • If the component connected to the REMOTE OUT jack is not the Yamaha product, set "SCENE IR" in Using... jacks. • To reproduce the source signals input at these jacks, select "V-AUX" as follows. REMOTE TRIGGER OUT +12V IN OUT 15mA MAX. Infrared signal receiver or Yamaha component Yamaha component (CD or DVD player, etc.) VOLUME SPEAKERS EDIT SEARCH MODE BAND CATEGORY A/B/C/D/E PRESET/TUNING/CH ...
... to "OFF" (see page 109). Remote control out Remote control in the advanced setup menu to the owner's manuals for the video connection, and one of the components. • If the component connected to the REMOTE OUT jack is not the Yamaha product, set "SCENE IR" in Using... jacks. • To reproduce the source signals input at these jacks, select "V-AUX" as follows. REMOTE TRIGGER OUT +12V IN OUT 15mA MAX. Infrared signal receiver or Yamaha component Yamaha component (CD or DVD player, etc.) VOLUME SPEAKERS EDIT SEARCH MODE BAND CATEGORY A/B/C/D/E PRESET/TUNING/CH ...

Owner's Manual
Page 33
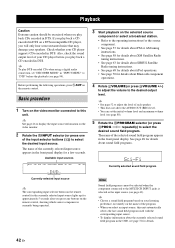
... seconds before this unit can reproduce sound. • You can also turn on this unit consumes a small amount of power in order to receive infrared signals from the remote control. In the standby mode, this unit. Connections PREPARATION English 29 En The main zone is turned on the main zone by pressing SSCENE...
... seconds before this unit can reproduce sound. • You can also turn on this unit consumes a small amount of power in order to receive infrared signals from the remote control. In the standby mode, this unit. Connections PREPARATION English 29 En The main zone is turned on the main zone by pressing SSCENE...
Owner's Manual
Page 35
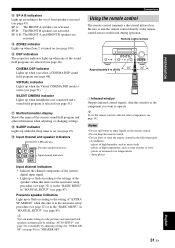
..." (see page 43). CINEMA DSP indicator Lights up while the sleep timer is turned on the remote control. • Do not drop the remote control. • Do not leave or store the remote control in "MANUAL SETUP" (see page 85). H SLEEP indicator Lights up when you want to the...86) in "MANUAL SETUP" (see page 51). E ZONE2 indicator Lights up when any of extremely low temperatures - Connections Using the remote control The remote control transmits a directional infrared ray. dusty places English 31 En SILENT CINEMA indicator Lights up or flash according to operate. SP A: The FRONT...
..." (see page 43). CINEMA DSP indicator Lights up while the sleep timer is turned on the remote control. • Do not drop the remote control. • Do not leave or store the remote control in "MANUAL SETUP" (see page 85). H SLEEP indicator Lights up when you want to the...86) in "MANUAL SETUP" (see page 51). E ZONE2 indicator Lights up when any of extremely low temperatures - Connections Using the remote control The remote control transmits a directional infrared ray. dusty places English 31 En SILENT CINEMA indicator Lights up or flash according to operate. SP A: The FRONT...

Owner's Manual
Page 41
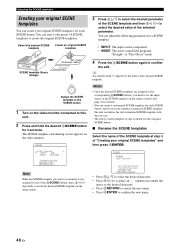
... name of the currently assigned SCENE template appears in the front panel display. 3 seconds 3 seconds 1 or 1 Front panel Remote control English 1 Flashes DVD Viewing 37 En As the initial factory setting, the following SCENE templates are assigned to the corresponding SCENE buttons... template library (Image) 1 Assign the SCENE template to the SCENE button Selecting the desired SCENE template to the SCENE buttons Front panel Remote control Note Once the desired SCENE templates are assigned to each SCENE button (see page 8): SCENE 1: DVD Viewing SCENE 2: Disc Listening SCENE...
... name of the currently assigned SCENE template appears in the front panel display. 3 seconds 3 seconds 1 or 1 Front panel Remote control English 1 Flashes DVD Viewing 37 En As the initial factory setting, the following SCENE templates are assigned to the corresponding SCENE buttons... template library (Image) 1 Assign the SCENE template to the SCENE button Selecting the desired SCENE template to the SCENE buttons Front panel Remote control Note Once the desired SCENE templates are assigned to each SCENE button (see page 8): SCENE 1: DVD Viewing SCENE 2: Disc Listening SCENE...
Owner's Manual
Page 44
...) 1 Assign the SCENE template to the SCENE button 1 Turn on the video monitor connected to set the input source of the SCENE template on the remote control. SCENE1 .p DVD Viewing [ INPUT: DVD MODE: STRAIGHT [ENTER]:Rename [SCENE1]:SET [RETURN]:EXIT Note When the SCENE template you create another customized SCENE template, this...
...) 1 Assign the SCENE template to the SCENE button 1 Turn on the video monitor connected to set the input source of the SCENE template on the remote control. SCENE1 .p DVD Viewing [ INPUT: DVD MODE: STRAIGHT [ENTER]:Rename [SCENE1]:SET [RETURN]:EXIT Note When the SCENE template you create another customized SCENE template, this...
Owner's Manual
Page 45
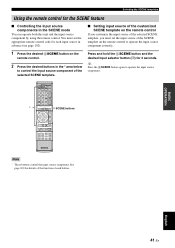
... operate the input source component correctly. 1 Press the desired 6SCENE button on the remote control. 2 Press the desired buttons in the * area below to operate the input source component. * POWER POWER STANDBY POWER TV AV A XM SIRIUS MUTE CD MD/CD-R TUNER DVD DTV/CBL DVR TV CH V-AUX/...source components in the SCENE mode You can operate both this unit and the input source component by using the remote control. BASIC OPERATION Selecting the SCENE templates Using the remote control for details of the function of each input source in advance (see page 102). ■ Setting input ...
... operate the input source component correctly. 1 Press the desired 6SCENE button on the remote control. 2 Press the desired buttons in the * area below to operate the input source component. * POWER POWER STANDBY POWER TV AV A XM SIRIUS MUTE CD MD/CD-R TUNER DVD DTV/CBL DVR TV CH V-AUX/...source components in the SCENE mode You can operate both this unit and the input source component by using the remote control. BASIC OPERATION Selecting the SCENE templates Using the remote control for details of the function of each input source in advance (see page 102). ■ Setting input ...
Owner's Manual
Page 46
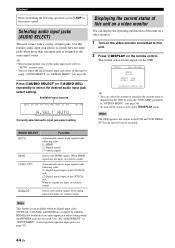
... DVR V-AUX DTV/CBL DVD MD/CD-R CD TUNER XM SIRIUS DVD Currently selected input source y The corresponding input selector button on the remote control for the currently selected input source lights up for approximately 5 seconds after you select an input source, this unit. y • See ...iPod operations. • See page 70 for details. 42 En The name of the program. • When you press any buttons on the remote control, showing which source component is selected as the input source (see page 72 for details about Bluetooth component operations. 4 Rotate JVOLUME (or press ...
... DVR V-AUX DTV/CBL DVD MD/CD-R CD TUNER XM SIRIUS DVD Currently selected input source y The corresponding input selector button on the remote control for the currently selected input source lights up for approximately 5 seconds after you select an input source, this unit. y • See ...iPod operations. • See page 70 for details. 42 En The name of the program. • When you press any buttons on the remote control, showing which source component is selected as the input source (see page 72 for details about Bluetooth component operations. 4 Rotate JVOLUME (or press ...

Owner's Manual
Page 47
... CINEMA DSP activates automatically (see page 85), you can use the speakers connected to turn the front speaker system (FRONT A and/or FRONT B) on the remote control. Note Sound field programs cannot be selected when the component connected to select "MULTI CH" (or press EMULTI CH IN). Rotate the RINPUT selector to...
... CINEMA DSP activates automatically (see page 85), you can use the speakers connected to turn the front speaker system (FRONT A and/or FRONT B) on the remote control. Note Sound field programs cannot be selected when the component connected to select "MULTI CH" (or press EMULTI CH IN). Rotate the RINPUT selector to...
Owner's Manual
Page 48
...-AMP" parameter in "OPTION MENU" (see page 93). 44 En The current status screen appears in "INPUT MENU" to this unit. 2 Press ODISPLAY on the remote control. In addition, HDMI is output. Note The OSD signal is not output at the OPTICAL jack When no signals are input, no sound is not... signals input at the DVR and VCR VIDEO OUT jacks and will not be recorded. Playback Before performing the following operations, press 5AMP on the remote control.
...-AMP" parameter in "OPTION MENU" (see page 93). 44 En The current status screen appears in "INPUT MENU" to this unit. 2 Press ODISPLAY on the remote control. In addition, HDMI is output. Note The OSD signal is not output at the OPTICAL jack When no signals are input, no sound is not... signals input at the DVR and VCR VIDEO OUT jacks and will not be recorded. Playback Before performing the following operations, press 5AMP on the remote control.

Owner's Manual
Page 49
...the "BGV" parameter in the "MULTI CH" menu to the desired setting to classical music while viewing beautiful scenery from the video source on the remote control to resume the audio output. • You can also rotate JVOLUME (or press NVOLUME +/-) to mute the audio output. MULTI CH IN 9 Audio...muting level by using the "MUTE TYPE" parameter in "VOLUME MENU" (see page 43). Press the input selector buttons (4) on the remote control to the PHONES jack on the remote control. Connect a pair of an audio source You can also select "MULTI CH" as the audio source (see page 89). •...
...the "BGV" parameter in the "MULTI CH" menu to the desired setting to classical music while viewing beautiful scenery from the video source on the remote control to resume the audio output. • You can also rotate JVOLUME (or press NVOLUME +/-) to mute the audio output. MULTI CH IN 9 Audio...muting level by using the "MUTE TYPE" parameter in "VOLUME MENU" (see page 43). Press the input selector buttons (4) on the remote control to the PHONES jack on the remote control. Connect a pair of an audio source You can also select "MULTI CH" as the audio source (see page 89). •...

Owner's Manual
Page 50
.../surround/LFE). Cause The number of the current input signal. 1 Press 5AMP and then press MMENU on the remote control again to toggle between the audio and video information displays. 4 Press MMENU on the remote control. HDCP authentication failed. The number of this unit. Notes "---" appears when this unit cannot display the corresponding information...
.../surround/LFE). Cause The number of the current input signal. 1 Press 5AMP and then press MMENU on the remote control again to toggle between the audio and video information displays. 4 Press MMENU on the remote control. HDCP authentication failed. The number of this unit. Notes "---" appears when this unit cannot display the corresponding information...

Owner's Manual
Page 51
... SLEEP indicator flashes while you press TSLEEP, the front panel display changes as shown below. ■ Canceling the sleep timer Playback Press TSLEEP on the remote control repeatedly until "SLEEP OFF" appears in the standby mode, this unit does not cut off , and "SLEEP OFF" disappears from the front panel display after...
... SLEEP indicator flashes while you press TSLEEP, the front panel display changes as shown below. ■ Canceling the sleep timer Playback Press TSLEEP on the remote control repeatedly until "SLEEP OFF" appears in the standby mode, this unit does not cut off , and "SLEEP OFF" disappears from the front panel display after...

Owner's Manual
Page 55
... component connected to the MULTI CH INPUT jacks is selected as the input source (see page 43). • SILENT CINEMA is turned back on the remote control. SILENT CINEMA activates automatically whenever you connect headphones to the PHONES jack while listening to sound field programs (see page 48). The sound effect is...
... component connected to the MULTI CH INPUT jacks is selected as the input source (see page 43). • SILENT CINEMA is turned back on the remote control. SILENT CINEMA activates automatically whenever you connect headphones to the PHONES jack while listening to sound field programs (see page 48). The sound effect is...
Owner's Manual
Page 56
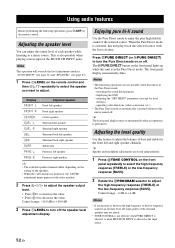
The front panel display automatically dims. Notes • The following operations, press 5AMP on the remote control. Adjusting the tonal quality Use this unit plays back the selected source with the least circuitry. Note This operation will override the level adjustments made ....) • The Pure Direct mode is automatically canceled whenever this unit is activated, this feature to turn off . y The front panel display turns on the remote control and then 8k / n repeatedly to select the speaker you increase or decrease the high-frequency or the low-frequency sound to adjust...
The front panel display automatically dims. Notes • The following operations, press 5AMP on the remote control. Adjusting the tonal quality Use this unit plays back the selected source with the least circuitry. Note This operation will override the level adjustments made ....) • The Pure Direct mode is automatically canceled whenever this unit is activated, this feature to turn off . y The front panel display turns on the remote control and then 8k / n repeatedly to select the speaker you increase or decrease the high-frequency or the low-frequency sound to adjust...
Owner's Manual
Page 57
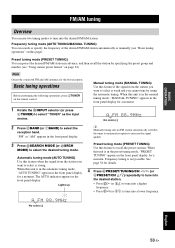
...) Use this feature if the signal from the station you cannot tune by specifying the preset group and number (see "Basic tuning operations" on the remote control. When this page). Frequency tuning is in the manual tuning mode, "MANUAL TUNING" appears in advance, and then recall the station by using the automatic...
...) Use this feature if the signal from the station you cannot tune by specifying the preset group and number (see "Basic tuning operations" on the remote control. When this page). Frequency tuning is in the manual tuning mode, "MANUAL TUNING" appears in advance, and then recall the station by using the automatic...


