
MCXSP10 Manual
Page 1
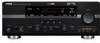
U RX-V661 AV Receiver OWNER'S MANUAL
U RX-V661 AV Receiver OWNER'S MANUAL
MCXSP10 Manual
Page 3
... against voltage surges and built-up static charges. This equipment generates/uses radio frequencies and, if not installed and used replacement parts specified by Yamaha may void your use the product. 2 IMPORTANT: When connecting this product or the device that is provided to call the CATV system installer's... In the case of America or its normal operation, e) If the product has been dropped or damaged in any service or repairs to this manual, meets FCC requirements. If you can be sure the antenna or cable system is 300 ohm ribbon lead, change in wire to an antenna...
... against voltage surges and built-up static charges. This equipment generates/uses radio frequencies and, if not installed and used replacement parts specified by Yamaha may void your use the product. 2 IMPORTANT: When connecting this product or the device that is provided to call the CATV system installer's... In the case of America or its normal operation, e) If the product has been dropped or damaged in any service or repairs to this manual, meets FCC requirements. If you can be sure the antenna or cable system is 300 ohm ribbon lead, change in wire to an antenna...

MCXSP10 Manual
Page 4
...may cause fire, damage to this unit may be set for future reference. This Class B digital apparatus complies with high humidity (i.e. Retain this manual carefully. Caution: Read this before concluding that this unit is not disconnected from a wall outlet or the unit during a lightning storm. 14...any reasons. 15 When not planning to hot, and do not place: - this unit is located on this unit. - Contact qualified Yamaha service personnel when any damage resulting from the wall outlet, grasp the plug; Caution-iii WARNING TO REDUCE THE RISK OF FIRE OR ...
...may cause fire, damage to this unit may be set for future reference. This Class B digital apparatus complies with high humidity (i.e. Retain this manual carefully. Caution: Read this before concluding that this unit is not disconnected from a wall outlet or the unit during a lightning storm. 14...any reasons. 15 When not planning to hot, and do not place: - this unit is located on this unit. - Contact qualified Yamaha service personnel when any damage resulting from the wall outlet, grasp the plug; Caution-iii WARNING TO REDUCE THE RISK OF FIRE OR ...
MCXSP10 Manual
Page 5
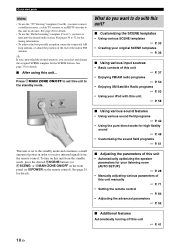
... iPod 58 Recording 60 ADVANCED OPERATION Advanced sound configurations 61 Changing sound field parameter settings 61 Selecting decoders 66 Customizing this unit (MANUAL SETUP).........69 Using SET MENU 71 1 SOUND MENU 72 2 INPUT MENU 78 3 OPTION MENU 81 Remote control features 84 Using...Glossary 104 Sound field program information 106 Parametric equalizer information 107 Specifications 108 Index 110 APPENDIX (at the end of this manual for your listening room 28 Using AUTO SETUP 28 BASIC OPERATION Selecting the SCENE templates 33 Selecting the desired SCENE template 33...
... iPod 58 Recording 60 ADVANCED OPERATION Advanced sound configurations 61 Changing sound field parameter settings 61 Selecting decoders 66 Customizing this unit (MANUAL SETUP).........69 Using SET MENU 71 1 SOUND MENU 72 2 INPUT MENU 78 3 OPTION MENU 81 Remote control features 84 Using...Glossary 104 Sound field program information 106 Parametric equalizer information 107 Specifications 108 Index 110 APPENDIX (at the end of this manual for your listening room 28 Using AUTO SETUP 28 BASIC OPERATION Selecting the SCENE templates 33 Selecting the desired SCENE template 33...

MCXSP10 Manual
Page 6
...is a trademark of Apple Computer, Inc., registered in parentheses. • This manual is printed prior to get the most importantly, without annoying blaring or distortion - "SILENT CINEMA" is a trademark of YAMAHA CORPORATION. DTS-ES | NEO:6 | 96/24. In case the button names ...differ between the manual and product, the product has priority. • "1SPEAKERS" or "A DVD" (example) indicates...
...is a trademark of Apple Computer, Inc., registered in parentheses. • This manual is printed prior to get the most importantly, without annoying blaring or distortion - "SILENT CINEMA" is a trademark of YAMAHA CORPORATION. DTS-ES | NEO:6 | 96/24. In case the button names ...differ between the manual and product, the product has priority. • "1SPEAKERS" or "A DVD" (example) indicates...
MCXSP10 Manual
Page 13
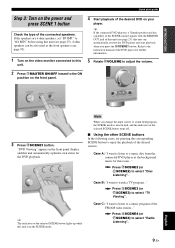
...the background music for further information. 5 Rotate 0VOLUME to adjust the volume. 2 Press BMASTER ON/OFF inward to watch a TV program..." Refer to the instruction manual of the DVD player for this unit (see page 25). 4 ohm speakers can automatically activate the DVD player and start guide Step 3: Turn on the...program of this unit (see page 93). 1 Turn on the video monitor connected to select "Radio Listening". 9 En English y If the connected DVD player is a Yamaha product and has capability of the SCENE control signals with the REMOTE OUT jack of the FM/AM radio station..."
...the background music for further information. 5 Rotate 0VOLUME to adjust the volume. 2 Press BMASTER ON/OFF inward to watch a TV program..." Refer to the instruction manual of the DVD player for this unit (see page 25). 4 ohm speakers can automatically activate the DVD player and start guide Step 3: Turn on the...program of this unit (see page 93). 1 Turn on the video monitor connected to select "Radio Listening". 9 En English y If the connected DVD player is a Yamaha product and has capability of the SCENE control signals with the REMOTE OUT jack of the FM/AM radio station..."
MCXSP10 Manual
Page 14
... TV receiver or an HDTV decoder to 52 for the tuning information. • To achieve the best possible reception, orient the connected AM loop antenna, or adjust the position of the end of this unit manually ☞ P. 71 • Setting the remote control ☞ P. 84 • Adjusting the advanced parameters ☞ ... • To use the "Radio Listening" template (Case C), you have to the standby mode. See pages 50 to this unit in order to receive infrared signals from the standby mode, press the desired FSCENE buttons (or FSCENE) or AMAIN ZONE ON/OFF on the front panel (or HPOWER on...
... TV receiver or an HDTV decoder to 52 for the tuning information. • To achieve the best possible reception, orient the connected AM loop antenna, or adjust the position of the end of this unit manually ☞ P. 71 • Setting the remote control ☞ P. 84 • Adjusting the advanced parameters ☞ ... • To use the "Radio Listening" template (Case C), you have to the standby mode. See pages 50 to this unit in order to receive infrared signals from the standby mode, press the desired FSCENE buttons (or FSCENE) or AMAIN ZONE ON/OFF on the front panel (or HPOWER on...
MCXSP10 Manual
Page 18
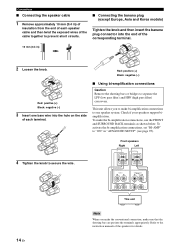
... plug (except Europe, Asia and Korea models) Tighten the knob and then insert the banana plug connector into the terminals appropriately. Refer to the instruction manuals of the speakers for details. Connections ■ Connecting the speaker cable 1 Remove approximately 10 mm (0.4 in) of insulation from the end of each terminal. ■...
... plug (except Europe, Asia and Korea models) Tighten the knob and then insert the banana plug connector into the terminals appropriately. Refer to the instruction manuals of the speakers for details. Connections ■ Connecting the speaker cable 1 Remove approximately 10 mm (0.4 in) of insulation from the end of each terminal. ■...

MCXSP10 Manual
Page 27
..., set "SCENE IR" in S V L R O S-Video output Video Audio Optical output output output Infrared signal receiver or Yamaha component Yamaha component Game console or video camera English 23 En Connections y • If the components have the capability of the transmission of the ... VIDEO VIDEO L AUDIO R OPTICAL Remote control out Remote control in the advanced setup menu to "OFF" (see page 95). Refer to the owner's manuals for details about the capability of the SCENE control signals of the components. • Connect the REMOTE OUT jack of this unit and the remote...
..., set "SCENE IR" in S V L R O S-Video output Video Audio Optical output output output Infrared signal receiver or Yamaha component Yamaha component Game console or video camera English 23 En Connections y • If the components have the capability of the transmission of the ... VIDEO VIDEO L AUDIO R OPTICAL Remote control out Remote control in the advanced setup menu to "OFF" (see page 95). Refer to the owner's manuals for details about the capability of the SCENE control signals of the components. • Connect the REMOTE OUT jack of this unit and the remote...

MCXSP10 Manual
Page 31
... sensor on the operation mode selector position. y • You can make settings for surround back speakers automatically by running "AUTO SETUP" (see page 28) or manually by adjusting settings for "EXTRA SP ASSIGN" (see page 72) and "SB L/R SP" (see page 73) in "SOUND MENU" (see page 73) in the following...
... sensor on the operation mode selector position. y • You can make settings for surround back speakers automatically by running "AUTO SETUP" (see page 28) or manually by adjusting settings for "EXTRA SP ASSIGN" (see page 72) and "SB L/R SP" (see page 73) in "SOUND MENU" (see page 73) in the following...

MCXSP10 Manual
Page 32
...actual listening environment. You can run "AUTO SETUP" using the system menu that appears in the OSD or in progress. This manual uses the OSD illustrations to explain the "AUTO SETUP" procedure. • Before performing operations, set the operation mode selector on... a tripod (etc.) to the FRONT A speaker terminals as the front speakers for your listening room This unit employs the YPAO (Yamaha Parametric Room Acoustic Optimizer) technology which lets you avoid troublesome listening-based speaker setup and achieves highly accurate sound adjustments automatically. Using AUTO...
...actual listening environment. You can run "AUTO SETUP" using the system menu that appears in the OSD or in progress. This manual uses the OSD illustrations to explain the "AUTO SETUP" procedure. • Before performing operations, set the operation mode selector on... a tripod (etc.) to the FRONT A speaker terminals as the front speakers for your listening room This unit employs the YPAO (Yamaha Parametric Room Acoustic Optimizer) technology which lets you avoid troublesome listening-based speaker setup and achieves highly accurate sound adjustments automatically. Using AUTO...
MCXSP10 Manual
Page 35
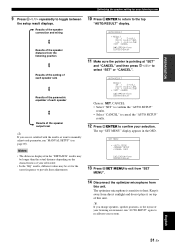
... 14.0/17.0ft LVL : -9.0/+6.5dB >SET CANCEL [ ]/[ ]:Up/Down [ENTER]:Enter 11 Make sure the pointer is sensitive to recalibrate your listening environment, run "MANUAL SETUP" (see page 69). AUTO:RESULT RESULT SP : 3/4/0.1 DIST: 14.0/17.0ft LVL : -9.0/+6.5dB . >SET CANCEL [ ]/[ ]:Up/Down [ENTER]:Enter Choices... Press DENTER to confirm your listening room 9 Press Dl / h repeatedly to toggle between the setup result displays. SET MENU . ;AUTO SETUP ;MANUAL SETUP .A;SIGNAL INFO [ ]/[ ]:Up/Down [ENTER]:Enter 13 Press NSET MENU to select "SET" or "CANCEL". English p 31 En PREPARATION ...
... 14.0/17.0ft LVL : -9.0/+6.5dB >SET CANCEL [ ]/[ ]:Up/Down [ENTER]:Enter 11 Make sure the pointer is sensitive to recalibrate your listening environment, run "MANUAL SETUP" (see page 69). AUTO:RESULT RESULT SP : 3/4/0.1 DIST: 14.0/17.0ft LVL : -9.0/+6.5dB . >SET CANCEL [ ]/[ ]:Up/Down [ENTER]:Enter Choices... Press DENTER to confirm your listening room 9 Press Dl / h repeatedly to toggle between the setup result displays. SET MENU . ;AUTO SETUP ;MANUAL SETUP .A;SIGNAL INFO [ ]/[ ]:Up/Down [ENTER]:Enter 13 Press NSET MENU to select "SET" or "CANCEL". English p 31 En PREPARATION ...
MCXSP10 Manual
Page 44
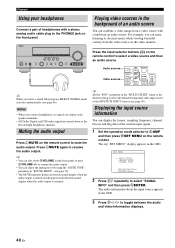
... press NSET MENU on the front panel or press JVOLUME +/- Press LMUTE again to select "SIGNAL INFO" and then press DENTER. SET MENU . ;AUTO SETUP ;MANUAL SETUP .A;SIGNAL INFO [ ]/[ ]:Up/Down [ENTER]:Enter 2 Press Dn repeatedly to resume the audio output. Playing video sources in the "MULTI CH SET" menu to...
... press NSET MENU on the front panel or press JVOLUME +/- Press LMUTE again to select "SIGNAL INFO" and then press DENTER. SET MENU . ;AUTO SETUP ;MANUAL SETUP .A;SIGNAL INFO [ ]/[ ]:Up/Down [ENTER]:Enter 2 Press Dn repeatedly to resume the audio output. Playing video sources in the "MULTI CH SET" menu to...

MCXSP10 Manual
Page 54
...in the front panel display, tuning is no interference. Automatic tuning is effective when station signals are strong and there is tuned into it manually. If the signal received from the station you want to select is weak, tune into a station, the TUNED indicator lights up AUTO A FM 88.9 MHz... preset stations with each of the received station is not possible. "FM" or "AM" appears in the front panel display, tuning is shown in the front panel display. • Press 5h to tune into a higher frequency. • Press 5l to tune into it manually. 1 Rotate the IINPUT selector on...
...in the front panel display, tuning is no interference. Automatic tuning is effective when station signals are strong and there is tuned into it manually. If the signal received from the station you want to select is weak, tune into a station, the TUNED indicator lights up AUTO A FM 88.9 MHz... preset stations with each of the received station is not possible. "FM" or "AM" appears in the front panel display, tuning is shown in the front panel display. • Press 5h to tune into a higher frequency. • Press 5l to tune into it manually. 1 Rotate the IINPUT selector on...

MCXSP10 Manual
Page 55
... higher frequencies. MEMORY Flashes 3 Press 4A/B/C/D/E repeatedly to select a preset station group (A to E8: 8 preset station numbers in each of received stations does not reach 40 (E8), automatic preset tuning automatically stops after searching for all the available stations. • Only FM stations with strong...51 En If the station you want to E8: 8 preset station numbers in the front panel display for more than 3 seconds. Manual preset tuning You can then recall any preset station easily by automatic preset tuning. The MEMORY indicator flashes in each of the last ...
... higher frequencies. MEMORY Flashes 3 Press 4A/B/C/D/E repeatedly to select a preset station group (A to E8: 8 preset station numbers in each of received stations does not reach 40 (E8), automatic preset tuning automatically stops after searching for all the available stations. • Only FM stations with strong...51 En If the station you want to E8: 8 preset station numbers in the front panel display for more than 3 seconds. Manual preset tuning You can then recall any preset station easily by automatic preset tuning. The MEMORY indicator flashes in each of the last ...

MCXSP10 Manual
Page 73
...audio delay, maximum volume level and initial volume level. B)INPUT RENAME Changes the name of the center speaker. CUSTOMIZING THIS UNIT (MANUAL SETUP) Customizing this unit (MANUAL SETUP) You can use the following parameters in bold under each parameter) to reflect the needs of your listening environment. ■... Change the initial settings (indicated in "SET MENU" to adjust a variety of system settings and customize the way this menu to manually adjust any speaker settings, alter the quality and tone of the sound output by the system or compensate for the sources connected to the...
...audio delay, maximum volume level and initial volume level. B)INPUT RENAME Changes the name of the center speaker. CUSTOMIZING THIS UNIT (MANUAL SETUP) Customizing this unit (MANUAL SETUP) You can use the following parameters in bold under each parameter) to reflect the needs of your listening environment. ■... Change the initial settings (indicated in "SET MENU" to adjust a variety of system settings and customize the way this menu to manually adjust any speaker settings, alter the quality and tone of the sound output by the system or compensate for the sources connected to the...
MCXSP10 Manual
Page 74
... the brightness of the connected iPod or not when this unit is in the standby mode. ■ Signal information SIGNAL INFO Use this feature to manually adjust the optional system parameters. Page 81 82 82 82 82 83 83 70 En Selects whether this unit charges the battery of the display... signals. Designates the default audio input jack select setting for the input sources when you turn on the power of this unit. Customizing this unit (MANUAL SETUP) Option menu 3 OPTION MENU Use this menu to check audio and video signal information (see page 40).
... the brightness of the connected iPod or not when this unit is in the standby mode. ■ Signal information SIGNAL INFO Use this feature to manually adjust the optional system parameters. Page 81 82 82 82 82 83 83 70 En Selects whether this unit charges the battery of the display... signals. Designates the default audio input jack select setting for the input sources when you turn on the power of this unit. Customizing this unit (MANUAL SETUP) Option menu 3 OPTION MENU Use this menu to check audio and video signal information (see page 40).

MCXSP10 Manual
Page 75
... Press Dk / n to select the desired parameter and then Dl / h to change the "SET MENU" parameters while this unit (MANUAL SETUP) p p p p Using SET MENU Use the remote control to exit from "SET MENU". MANUAL SETUP . 1 SOUND MENU 2 INPUT MENU 3 OPTION MENU [ ]/[ ]:Up/Down [ENTER]:Enter 3 Press Dk / n repeatedly and... ERETURN to return to the previous menu level. 1 Set the operation mode selector to KAMP and then press NSET MENU to enter "MANUAL SETUP". p p p SOUND MENU E)LFE LEVEL . A)SPEAKER SET B)SPEAKER LEVEL C)SP DISTANCE D)EQUALIZER E)LFE LEVEL [ ]/[ ]:Up/Down [ENTER]:Enter...
... Press Dk / n to select the desired parameter and then Dl / h to change the "SET MENU" parameters while this unit (MANUAL SETUP) p p p p Using SET MENU Use the remote control to exit from "SET MENU". MANUAL SETUP . 1 SOUND MENU 2 INPUT MENU 3 OPTION MENU [ ]/[ ]:Up/Down [ENTER]:Enter 3 Press Dk / n repeatedly and... ERETURN to return to the previous menu level. 1 Set the operation mode selector to KAMP and then press NSET MENU to enter "MANUAL SETUP". p p p SOUND MENU E)LFE LEVEL . A)SPEAKER SET B)SPEAKER LEVEL C)SP DISTANCE D)EQUALIZER E)LFE LEVEL [ ]/[ ]:Up/Down [ENTER]:Enter...

MCXSP10 Manual
Page 76
...video signal processing delays when using the CINEMA DSP sound field programs. Choices: PRNS, SUR. The presence channel signals are input. p p p p MANUAL SETUP 1 SOUND MENU 1/2 . Use this unit outputs sound at the FRONT B terminals only. If FRONT A is available only when you do not ...set "EXTRA SP ASSIGN" to deactivate the EXTRA SP terminals. A)SPEAKER SET B)SPEAKER LEVEL C)SP DISTANCE D)EQUALIZER E)LFE LEVEL [ ]/[ ]:Up/Down [ENTER]:Enter MANUAL SETUP 1 SOUND MENU 2/2 . SOUND MENU . Choices: FRONT B, ZONE2, PRESENCE, NONE When you run AUTO SETUP (see page 12) Select "PRESENCE" to...
...video signal processing delays when using the CINEMA DSP sound field programs. Choices: PRNS, SUR. The presence channel signals are input. p p p p MANUAL SETUP 1 SOUND MENU 1/2 . Use this unit outputs sound at the FRONT B terminals only. If FRONT A is available only when you do not ...set "EXTRA SP ASSIGN" to deactivate the EXTRA SP terminals. A)SPEAKER SET B)SPEAKER LEVEL C)SP DISTANCE D)EQUALIZER E)LFE LEVEL [ ]/[ ]:Up/Down [ENTER]:Enter MANUAL SETUP 1 SOUND MENU 2/2 . SOUND MENU . Choices: FRONT B, ZONE2, PRESENCE, NONE When you run AUTO SETUP (see page 12) Select "PRESENCE" to...
MCXSP10 Manual
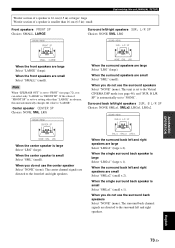
Page 77
... "LFE/BASS OUT" is set to "FRNT" (see page 46), and "SUR. If the value of a speaker is smaller than "LARGE" in advance, this unit (MANUAL SETUP) Woofer section of a speaker is 16 cm (6.5 in) or larger: large Woofer section of "FRONT SP" is set to the surround left /right speakers...
... "LFE/BASS OUT" is set to "FRNT" (see page 46), and "SUR. If the value of a speaker is smaller than "LARGE" in advance, this unit (MANUAL SETUP) Woofer section of a speaker is 16 cm (6.5 in) or larger: large Woofer section of "FRONT SP" is set to the surround left /right speakers...


