Setup Guide
Page 1
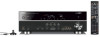
...; HDMI cable x 2 † Digital optical cable x 1 • A digital optical cable is not required when your country or region. Easy Setup Guide NATURAL SOUND AV RECEIVER RX-V471 YPAO MIC INFO MEMORY PRESET FM AM TUNING PHONES USB SILENT CINEMA iPod/iPhone INPUT BD DVD SCENE TV CD TONE CONTROL PROGRAM RADIO STRAIGHT VIDEO AUX PORTABLE VIDEO L AUDIO R DIRECT VOLUME The Easy Setup Guide explains the general procedures for setting up the 5.1channel system and how to the "Owner's Manual" contained in this guide and the "Owner's Manual" can be downloaded from...
...; HDMI cable x 2 † Digital optical cable x 1 • A digital optical cable is not required when your country or region. Easy Setup Guide NATURAL SOUND AV RECEIVER RX-V471 YPAO MIC INFO MEMORY PRESET FM AM TUNING PHONES USB SILENT CINEMA iPod/iPhone INPUT BD DVD SCENE TV CD TONE CONTROL PROGRAM RADIO STRAIGHT VIDEO AUX PORTABLE VIDEO L AUDIO R DIRECT VOLUME The Easy Setup Guide explains the general procedures for setting up the 5.1channel system and how to the "Owner's Manual" contained in this guide and the "Owner's Manual" can be downloaded from...

Setup Guide
Page 2
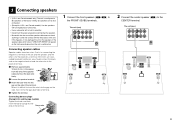
2 Placing speakers Place the speakers in the "Owner's Manual." 5.1-channel system 80° 80° Front speaker (L) Front speaker (R) Center speaker Surround speaker (L) Surround speaker (R) Subwoofer 2 Other layouts (except for 5.1-channel speaker layout) are shown in as shown below.
2 Placing speakers Place the speakers in the "Owner's Manual." 5.1-channel system 80° 80° Front speaker (L) Front speaker (R) Center speaker Surround speaker (L) Surround speaker (R) Subwoofer 2 Other layouts (except for 5.1-channel speaker layout) are shown in as shown below.
Setup Guide
Page 3
... amplifier. • Disconnect the power plug before connecting the speakers. • Be careful that the core of the terminal. Connecting banana plugs (Except U.K. Connecting speaker cables Speaker cables have two wires. The unit (rear) R FRONT L CENTER R SURROUND L ) to 8Ω speakers as the factory setting. 6Ω speakers can be also connected. • (Except for U.S.A. will appear on the front panel display when the unit is configured to the SPEAKERS SUBWOOFER 3 and Canada models only) The unit is switched...
... amplifier. • Disconnect the power plug before connecting the speakers. • Be careful that the core of the terminal. Connecting banana plugs (Except U.K. Connecting speaker cables Speaker cables have two wires. The unit (rear) R FRONT L CENTER R SURROUND L ) to 8Ω speakers as the factory setting. 6Ω speakers can be also connected. • (Except for U.S.A. will appear on the front panel display when the unit is configured to the SPEAKERS SUBWOOFER 3 and Canada models only) The unit is switched...

Setup Guide
Page 4
The unit (rear) R FRONT L CENTER R SURROUND L SPEAKERS SUBWOOFER Use a monaural pin cable to the SURROUND ( / ) terminals. 3 3 Connect the surround speakers ( / ) to connect the subwoofer. The unit (rear) R FRONT L CENTER R SURROUND L SPEAKERS SUBWOOFER 4 Connect the subwoofer ( SUBWOOFER jack. ) to the Before connecting the subwoofer, turn off the subwoofer. Monaural pin cable 4
The unit (rear) R FRONT L CENTER R SURROUND L SPEAKERS SUBWOOFER Use a monaural pin cable to the SURROUND ( / ) terminals. 3 3 Connect the surround speakers ( / ) to connect the subwoofer. The unit (rear) R FRONT L CENTER R SURROUND L SPEAKERS SUBWOOFER 4 Connect the subwoofer ( SUBWOOFER jack. ) to the Before connecting the subwoofer, turn off the subwoofer. Monaural pin cable 4
Setup Guide
Page 5
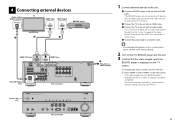
... VIDEO ARC HDMI OUT (BD/DVD) HDMI 1 ANTENNA HDMI 2 AM FM 75Ω MONITOR OUT L R OPTICAL OOPPTTIICCAALL CCOOAAXXIIAALL COAXIAL OPTICAL (AATVVV11) AAVV 22 (CD) AV 3 (TV) AV 4 AV 5 AV 6 AV 4 AV OUT AUDIO HDMI 3 HDMI 4 R FRONT L CENTER R SURROUND L SPEAKERS The unit (rear) SUBWOOFER Turn on the unit NATURAL SOUND AV RECEIVER RX-V471 YPAO MIC INFO MEMORY PRESET FM AM TUNING PHONES USB SILENT CINEMA iPod/iPhone INPUT BD DVD SCENE TV CD TONE CONTROL PROGRAM RADIO STRAIGHT The unit (front) VIDEO AUX PORTABLE VIDEO L AUDIO R DIRECT VOLUME Plug...
... VIDEO ARC HDMI OUT (BD/DVD) HDMI 1 ANTENNA HDMI 2 AM FM 75Ω MONITOR OUT L R OPTICAL OOPPTTIICCAALL CCOOAAXXIIAALL COAXIAL OPTICAL (AATVVV11) AAVV 22 (CD) AV 3 (TV) AV 4 AV 5 AV 6 AV 4 AV OUT AUDIO HDMI 3 HDMI 4 R FRONT L CENTER R SURROUND L SPEAKERS The unit (rear) SUBWOOFER Turn on the unit NATURAL SOUND AV RECEIVER RX-V471 YPAO MIC INFO MEMORY PRESET FM AM TUNING PHONES USB SILENT CINEMA iPod/iPhone INPUT BD DVD SCENE TV CD TONE CONTROL PROGRAM RADIO STRAIGHT The unit (front) VIDEO AUX PORTABLE VIDEO L AUDIO R DIRECT VOLUME Plug...
Setup Guide
Page 6
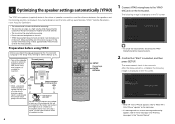
... of speaker connections and the distance between the speakers and the listening position, and adjusts the volume balance and the tone settings automatically (YPAO: Yamaha Parametric room Acoustic Optimizer). • The volume level is fixed to 0 dB while measuring. • The test tone is output at the height of your ears. If you to approximately half. The unit (front) CODE SET SOURCE RECEIVER HDMI 1 2 3 4 [ A ] 1 5 TUNER AV 2 3 V-AUX 4 6 AUDIO DOCK USB FM AM PRESET TUNING INFO...
... of speaker connections and the distance between the speakers and the listening position, and adjusts the volume balance and the tone settings automatically (YPAO: Yamaha Parametric room Acoustic Optimizer). • The volume level is fixed to 0 dB while measuring. • The test tone is output at the height of your ears. If you to approximately half. The unit (front) CODE SET SOURCE RECEIVER HDMI 1 2 3 4 [ A ] 1 5 TUNER AV 2 3 V-AUX 4 6 AUDIO DOCK USB FM AM PRESET TUNING INFO...

Setup Guide
Page 7
... microphone from AV equipment) and direct sunlight. b Confirm that "Wiring" is selected, and then press ENTER. Press RETURN, and go to heat. a Press the cursor key to check the speaker connections. Warning messages may appear depending on the left column. 3 Confirm that "Save / Exit" is selected. All the settings for the speakers are connected incorrectly: Turn off the unit and connect the speaker cables...
... microphone from AV equipment) and direct sunlight. b Confirm that "Wiring" is selected, and then press ENTER. Press RETURN, and go to heat. a Press the cursor key to check the speaker connections. Warning messages may appear depending on the left column. 3 Confirm that "Save / Exit" is selected. All the settings for the speakers are connected incorrectly: Turn off the unit and connect the speaker cables...
Setup Guide
Page 8
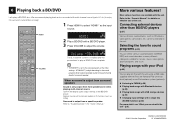
... output from a specific speaker Refer to adjust the volume. can select various sound programs (CINEMA DSP) and sound decoders in the "Owner's Manual." We recommend playing back a disc recorded with a BD/DVD player. 3 Press VOLUME to "Troubleshooting" in many different categories suitable for details on . HDMI1 SW L CR SL SR 2 Play a BD/DVD with multi-channel sound (up to 5.1-ch) to normally output on 2 channels (such as the initial settings. DECODE STRAIGHT MUSIC ENHANCER DIRECT BD DVD SETUP RADIO VOL. No sound is set...
... output from a specific speaker Refer to adjust the volume. can select various sound programs (CINEMA DSP) and sound decoders in the "Owner's Manual." We recommend playing back a disc recorded with a BD/DVD player. 3 Press VOLUME to "Troubleshooting" in many different categories suitable for details on . HDMI1 SW L CR SL SR 2 Play a BD/DVD with multi-channel sound (up to 5.1-ch) to normally output on 2 channels (such as the initial settings. DECODE STRAIGHT MUSIC ENHANCER DIRECT BD DVD SETUP RADIO VOL. No sound is set...


