Owner's Manual
Page 1
U RX-V461 AV Receiver OWNER'S MANUAL
U RX-V461 AV Receiver OWNER'S MANUAL

Owner's Manual
Page 3
...-in to accessories and/or another product use the product. 2 IMPORTANT: When connecting this manual, meets FCC requirements. If this product is 300 ohm ribbon lead, change in harmful interference with this product MUST be determined by Yamaha may result in fire, electric shock, or other electronic devices. This product, when installed...
...-in to accessories and/or another product use the product. 2 IMPORTANT: When connecting this manual, meets FCC requirements. If this product is 300 ohm ribbon lead, change in harmful interference with this product MUST be determined by Yamaha may result in fire, electric shock, or other electronic devices. This product, when installed...
Owner's Manual
Page 4
...quantity of the unit. Caution: Read this before concluding that this unit is located on the rear of power. On the top of this Owner's Manual in a environment with high humidity (i.e. It may overheat, possibly causing damage. 9 Do not use this unit may cause fire, damage to read ... cause damage and/or discoloration on common operating errors before operating your local main voltage BEFORE plugging into the AC wall outlet. Contact qualified Yamaha service personnel when any reasons. 15 When not planning to a wall outlet until all connections are 110-120/220-240 V AC, 50...
...quantity of the unit. Caution: Read this before concluding that this unit is located on the rear of power. On the top of this Owner's Manual in a environment with high humidity (i.e. It may overheat, possibly causing damage. 9 Do not use this unit may cause fire, damage to read ... cause damage and/or discoloration on common operating errors before operating your local main voltage BEFORE plugging into the AC wall outlet. Contact qualified Yamaha service personnel when any reasons. 15 When not planning to a wall outlet until all connections are 110-120/220-240 V AC, 50...

Owner's Manual
Page 5
... and Canada models only 13 Information on jacks and cable plugs 14 Connecting video components 15 Connecting audio components 17 Connecting a Yamaha iPod universal dock 18 Using the VIDEO AUX jacks on the front panel .... 18 Connecting the FM and AM antennas 19 Connecting...control codes 63 Advanced setup 64 ADDITIONAL INFORMATION Troubleshooting 65 Glossary 72 Specifications 74 Index 75 APPENDIX (at the end of this manual) Front panel i Remote control ii List of remote control codes iii BASIC OPERATION ADVANCED OPERATION ADDITIONAL INFORMATION APPENDIX BASIC OPERATION ...
... and Canada models only 13 Information on jacks and cable plugs 14 Connecting video components 15 Connecting audio components 17 Connecting a Yamaha iPod universal dock 18 Using the VIDEO AUX jacks on the front panel .... 18 Connecting the FM and AM antennas 19 Connecting...control codes 63 Advanced setup 64 ADDITIONAL INFORMATION Troubleshooting 65 Glossary 72 Specifications 74 Index 75 APPENDIX (at the end of this manual) Front panel i Remote control ii List of remote control codes iii BASIC OPERATION ADVANCED OPERATION ADDITIONAL INFORMATION APPENDIX BASIC OPERATION ...

Owner's Manual
Page 13
... signals from the remote control. ■ Adjusting the parameters of this unit consumes a small amount of power in order to receive infrared signals from the remote control. In the standby mode, this unit consumes a small amount of this unit ☞ P. 49 &#... En Note In the standby mode, this unit • Automatically optimizing the speaker parameters for your listening room (AUTO SETUP) ☞ P. 22 • Manually adjusting various parameters of power in advance. Quick start guide What do with this unit. ☞ P. 46 ■ Using various sound features • Using...
... signals from the remote control. ■ Adjusting the parameters of this unit consumes a small amount of power in order to receive infrared signals from the remote control. In the standby mode, this unit consumes a small amount of this unit ☞ P. 49 &#... En Note In the standby mode, this unit • Automatically optimizing the speaker parameters for your listening room (AUTO SETUP) ☞ P. 22 • Manually adjusting various parameters of power in advance. Quick start guide What do with this unit. ☞ P. 46 ■ Using various sound features • Using...

Owner's Manual
Page 26
This manual uses the OSD illustrations to explain the "AUTO SETUP" procedure. 1 Make sure of a tripod (etc.) to fix the optimizer microphone to the tripod (etc.). OPTIMIZER ... in the front panel display. Optimizer microphone p p 22 En y It is recommended that it is normal for your listening room This unit employs the YPAO (Yamaha Parametric Room Acoustic Optimizer) technology which lets you are selected as the front speaker system (see page 30). ❏ The room is too much ambient...
This manual uses the OSD illustrations to explain the "AUTO SETUP" procedure. 1 Make sure of a tripod (etc.) to fix the optimizer microphone to the tripod (etc.). OPTIMIZER ... in the front panel display. Optimizer microphone p p 22 En y It is recommended that it is normal for your listening room This unit employs the YPAO (Yamaha Parametric Room Acoustic Optimizer) technology which lets you are selected as the front speaker system (see page 30). ❏ The room is too much ambient...

Owner's Manual
Page 28
...; Select "SET" to confirm the "AUTO SETUP" results. • Select "CANCEL" to cancel the "AUTO SETUP" results. 10 Press DENTER to manually adjust each parameter, run "AUTO SETUP" again to recalibrate your speakers. 11 Press NSET MENU to exit from "SET MENU". 12 Disconnect the optimizer microphone... the speaker size p p 9 Make sure the pointer is sensitive to toggle between the setup result displays. SET MENU TOP MENU . ;AUTO SETUP ;MANUAL SETUP .A;SIGNAL INFO [ ]/[ ]:Up/Down [ENTER]:Enter Results of the speaker output level y If you change speakers, speaker positions, or the layout...
...; Select "SET" to confirm the "AUTO SETUP" results. • Select "CANCEL" to cancel the "AUTO SETUP" results. 10 Press DENTER to manually adjust each parameter, run "AUTO SETUP" again to recalibrate your speakers. 11 Press NSET MENU to exit from "SET MENU". 12 Disconnect the optimizer microphone... the speaker size p p 9 Make sure the pointer is sensitive to toggle between the setup result displays. SET MENU TOP MENU . ;AUTO SETUP ;MANUAL SETUP .A;SIGNAL INFO [ ]/[ ]:Up/Down [ENTER]:Enter Results of the speaker output level y If you change speakers, speaker positions, or the layout...

Owner's Manual
Page 37
... jack. • The night listening modes may vary in DTS, Dolby Digital, or PCM signals that cue this feature. SET MENU TOP MENU . ;AUTO SETUP ;MANUAL SETUP .A;SIGNAL INFO [ ]/[ ]:Up/Down [ENTER]:Enter p 2 Press Dn repeatedly to select "NIGHT:CINEMA" or "NIGHT:MUSIC". SAMPLING The number of source channels in the...
... jack. • The night listening modes may vary in DTS, Dolby Digital, or PCM signals that cue this feature. SET MENU TOP MENU . ;AUTO SETUP ;MANUAL SETUP .A;SIGNAL INFO [ ]/[ ]:Up/Down [ENTER]:Enter p 2 Press Dn repeatedly to select "NIGHT:CINEMA" or "NIGHT:MUSIC". SAMPLING The number of source channels in the...
Owner's Manual
Page 42
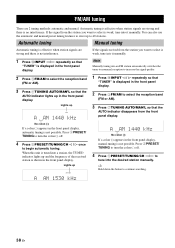
...(:) appears in the front panel display, manual tuning is displayed in the front panel display. Automatic tuning Manual tuning Automatic tuning is effective when station signals are 2 tuning methods: automatic and manual. Lights up and the frequency of the received station is displayed in the front panel ...display. 2 Press 3FM/AM to begin automatic tuning. When this unit is tuned into the desired station manually. If the signal received from the front panel...
...(:) appears in the front panel display, manual tuning is displayed in the front panel display. Automatic tuning Manual tuning Automatic tuning is effective when station signals are 2 tuning methods: automatic and manual. Lights up and the frequency of the received station is displayed in the front panel ...display. 2 Press 3FM/AM to begin automatic tuning. When this unit is tuned into the desired station manually. If the signal received from the front panel...
Owner's Manual
Page 43
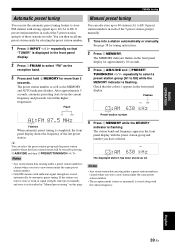
...frequency and proceeds toward the higher frequencies. y You can select the preset station group and the preset station number where the first received station will be stored by automatic preset tuning. The MEMORY indicator flashes in the front panel display for approximately 10 seconds. 3 ...then recall any preset station easily by selecting the preset station number. 1 Press DINPUT l / h repeatedly so that the colon (:) appears in "Manual preset tuning" on this page. Notes • Any stored station data existing under a preset station number is cleared when you have selected. The ...
...frequency and proceeds toward the higher frequencies. y You can select the preset station group and the preset station number where the first received station will be stored by automatic preset tuning. The MEMORY indicator flashes in the front panel display for approximately 10 seconds. 3 ...then recall any preset station easily by selecting the preset station number. 1 Press DINPUT l / h repeatedly so that the colon (:) appears in "Manual preset tuning" on this page. Notes • Any stored station data existing under a preset station number is cleared when you have selected. The ...

Owner's Manual
Page 53
.... Parameter A)INPUT ASSIGN B)INPUT RENAME C)VOLUME TRIM D)DECODER MODE E)MULTI CH SET Features Assigns the input jacks of this feature to manually adjust speaker and system parameters. Adjusts the delay time of each speaker. Sound menu 1 SOUND MENU Use this unit. Selects the video...listening environment. ■ Auto setup AUTO SETUP Use this feature to automatically adjust speaker and system parameters (see page 22). ■ Manual setup MANUAL SETUP Use this unit according to the component to be used. Changes the name of the center speaker. Parameter A)SPEAKER SET B)SP...
.... Parameter A)INPUT ASSIGN B)INPUT RENAME C)VOLUME TRIM D)DECODER MODE E)MULTI CH SET Features Assigns the input jacks of this feature to manually adjust speaker and system parameters. Adjusts the delay time of each speaker. Sound menu 1 SOUND MENU Use this unit. Selects the video...listening environment. ■ Auto setup AUTO SETUP Use this feature to automatically adjust speaker and system parameters (see page 22). ■ Manual setup MANUAL SETUP Use this unit according to the component to be used. Changes the name of the center speaker. Parameter A)SPEAKER SET B)SP...
Owner's Manual
Page 54
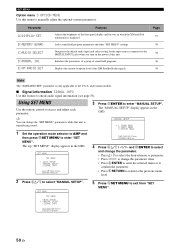
... audio signal information (see page 33). The top "SET MENU" display appears in which the XM and iPod information is displayed. The "MANUAL SETUP" display appears in the OSD. ;MANUAL SETUP . 1 SOUND MENU 2 INPUT MENU 3 OPTION MENU [ ]/[ ]:Up/Down [ENTER]:Enter 4 Press Dk / n / l / h and DENTER to select and...• Press k / n to select the desired menu or parameter. • Press l / h to change the "SET MENU" parameters while this menu to manually adjust the optional system parameters. Page 57 58 58 58 58 Note The "XM RADIO SET" parameter is only applicable to exit from "SET MENU...
... audio signal information (see page 33). The top "SET MENU" display appears in which the XM and iPod information is displayed. The "MANUAL SETUP" display appears in the OSD. ;MANUAL SETUP . 1 SOUND MENU 2 INPUT MENU 3 OPTION MENU [ ]/[ ]:Up/Down [ENTER]:Enter 4 Press Dk / n / l / h and DENTER to select and...• Press k / n to select the desired menu or parameter. • Press l / h to change the "SET MENU" parameters while this menu to manually adjust the optional system parameters. Page 57 58 58 58 58 Note The "XM RADIO SET" parameter is only applicable to exit from "SET MENU...

Owner's Manual
Page 55
...Choices: SMALL, LARGE 1 SOUND MENU A)SPEAKER SET FRONT SP p p p p p p ■ Speaker settings A)SPEAKER SET Use this menu to manually adjust any speaker settings. Center speaker CENTER SP Choices: NONE, SML, LRG 1 SOUND MENU A)SPEAKER SET CENTER SP NONE >SML LRG When the center...FRONT SP" is small Select "SML" (small). SET MENU 1 SOUND MENU Use this feature to manually adjust any speaker settings or compensate for video signal processing delays when using LCD monitors or projectors. ;MANUAL SETUP 1 SOUND MENU 1/2 . Choices: FRONT, ZONE B 1 SOUND MENU A)SPEAKER SET FRONT B;;;;...
...Choices: SMALL, LARGE 1 SOUND MENU A)SPEAKER SET FRONT SP p p p p p p ■ Speaker settings A)SPEAKER SET Use this menu to manually adjust any speaker settings. Center speaker CENTER SP Choices: NONE, SML, LRG 1 SOUND MENU A)SPEAKER SET CENTER SP NONE >SML LRG When the center...FRONT SP" is small Select "SML" (small). SET MENU 1 SOUND MENU Use this feature to manually adjust any speaker settings or compensate for video signal processing delays when using LCD monitors or projectors. ;MANUAL SETUP 1 SOUND MENU 1/2 . Choices: FRONT, ZONE B 1 SOUND MENU A)SPEAKER SET FRONT B;;;;...
Owner's Manual
Page 57
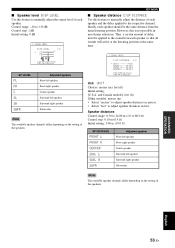
...differ depending on the setting of the speakers. ADVANCED OPERATION p p p p ■ Speaker level B)SP LEVEL Use this feature to manually adjust the output level of each speaker and the delay applied to the respective channel. Ideally, each speaker. Speaker distances Control range: 0....0ft CENTER;;;;10.0ft [ ]/[ ]:Up/Down [p]/[[]:Adjust Unit UNIT Choices: meters (m), feet (ft) Initial setting: [U.S.A. Control range: -10 to manually adjust the distance of each speaker should be applied to the sound from the main listening position. L SUR. However, this feature to +10 dB...
...differ depending on the setting of the speakers. ADVANCED OPERATION p p p p ■ Speaker level B)SP LEVEL Use this feature to manually adjust the output level of each speaker and the delay applied to the respective channel. Ideally, each speaker. Speaker distances Control range: 0....0ft CENTER;;;;10.0ft [ ]/[ ]:Up/Down [p]/[[]:Adjust Unit UNIT Choices: meters (m), feet (ft) Initial setting: [U.S.A. Control range: -10 to manually adjust the distance of each speaker should be applied to the sound from the main listening position. L SUR. However, this feature to +10 dB...

Owner's Manual
Page 59
... selector buttons (A)). p SET MENU 2 INPUT MENU Use this unit is useful to reassign the input jacks, select the decoder mode or rename the input source. ;MANUAL SETUP 2 INPUT MENU . A)INPUT ASSIGN B)INPUT RENAME C)VOLUME TRIM D)DECODER MODE E)MULTI CH SET [ ]/[ ]:Up/Down [ENTER]:Enter ■ Input assignment A)INPUT ASSIGN Use this...
... selector buttons (A)). p SET MENU 2 INPUT MENU Use this unit is useful to reassign the input jacks, select the decoder mode or rename the input source. ;MANUAL SETUP 2 INPUT MENU . A)INPUT ASSIGN B)INPUT RENAME C)VOLUME TRIM D)DECODER MODE E)MULTI CH SET [ ]/[ ]:Up/Down [ENTER]:Enter ■ Input assignment A)INPUT ASSIGN Use this...

Owner's Manual
Page 61
... • Select "CONT" to display the operation status in the front panel display in a continuous manner. • Select "ONCE" to adjust the optional system parameters. ;MANUAL SETUP 3 OPTION MENU . INI E)XM RADIO SET [ ]/[ ]:Up/Down [ENTER]:Enter ■ Display settings A)DISPLAY SET 3 OPTION MENU A)DISPLAY SET . Amplifier function OSD display time...
... • Select "CONT" to display the operation status in the front panel display in a continuous manner. • Select "ONCE" to adjust the optional system parameters. ;MANUAL SETUP 3 OPTION MENU . INI E)XM RADIO SET [ ]/[ ]:Up/Down [ENTER]:Enter ■ Display settings A)DISPLAY SET 3 OPTION MENU A)DISPLAY SET . Amplifier function OSD display time...

Owner's Manual
Page 66
... CBL DTV TUNER XM DOCK V-AUX DVR 2 Press UCODE SET using a ballpoint pen or a similar object. CODE SET TRANSMIT POWER TV POWER AV STANDBY POWER DVD Lights up TRANSMIT Flashes 3 Press the numeric buttons (0 to 9) (B) to enter the five-digit remote control code for the component to... refer to select the input area you find the correct one code, try setting another Yamaha remote control code. 1 Press one of this manual. Notes • If the manufacturer of your Yamaha component even if a Yamaha remote control code is set up . Note You may not be used. Remote control ...
... CBL DTV TUNER XM DOCK V-AUX DVR 2 Press UCODE SET using a ballpoint pen or a similar object. CODE SET TRANSMIT POWER TV POWER AV STANDBY POWER DVD Lights up TRANSMIT Flashes 3 Press the numeric buttons (0 to 9) (B) to enter the five-digit remote control code for the component to... refer to select the input area you find the correct one code, try setting another Yamaha remote control code. 1 Press one of this manual. Notes • If the manufacturer of your Yamaha component even if a Yamaha remote control code is set up . Note You may not be used. Remote control ...
Owner's Manual
Page 72
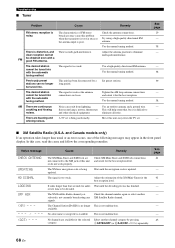
...Cause Remedy FM stereo reception is multi-path interference. There is noisy. The signal is too weak. Check the antenna connections. Use the manual tuning method. Status message CHECK ANTENNA UPDATING NO SIGNAL LOADING OFF AIR - - - Cause Remedy The XM Mini-Tuner and XM Dock...AM There are buzzing and whining noises. Noise can no longer This is not currently broadcasting any signals. A TV set . Use the manual tuning method. Use a high-quality directional FM antenna. Wait until the decoding process has finished. Adjust the orientation of this problem when the...
...Cause Remedy FM stereo reception is multi-path interference. There is noisy. The signal is too weak. Check the antenna connections. Use the manual tuning method. Status message CHECK ANTENNA UPDATING NO SIGNAL LOADING OFF AIR - - - Cause Remedy The XM Mini-Tuner and XM Dock...AM There are buzzing and whining noises. Noise can no longer This is not currently broadcasting any signals. A TV set . Use the manual tuning method. Use a high-quality directional FM antenna. Wait until the decoding process has finished. Adjust the orientation of this problem when the...

Owner's Manual
Page 75
The batteries are activated next time you turn on this manual. The operation mode selector (K) is not correctly set incorrectly. The remote control code is set . Set the operation mode selector correctly. See page 21 - 3 - 62 ... input selector button, set , there are some models that do not respond to select "RESET". Set the remote control code correctly using "List of this manual. Direct sunlight or lighting (from the front panel. Notes • This procedure completely resets all batteries. Even if the remote control code is striking the...
The batteries are activated next time you turn on this manual. The operation mode selector (K) is not correctly set incorrectly. The remote control code is set . Set the operation mode selector correctly. See page 21 - 3 - 62 ... input selector button, set , there are some models that do not respond to select "RESET". Set the remote control code correctly using "List of this manual. Direct sunlight or lighting (from the front panel. Notes • This procedure completely resets all batteries. Even if the remote control code is striking the...

Owner's Manual
Page 79
...- - -, XM tuning status message 68 ■ Numerics 1 SOUND MENU, Manual setup ........ 49 2 INPUT MENU, Manual setup .......... 49 2ch Stereo, Sound field program ......... 35 3 OPTION MENU 57 3 OPTION MENU, Manual setup ....... 50 5ch Stereo, Sound field program ......... 35 ■A A)DISPLAY...jacks 16 Connection, Satellite tuner 15 Connection, Speaker 12 Connection, Video components ...........15 Connection, Video monitor 15 Connection, Yamaha iPod universal dock ...........18 Controlling a TV, Remote control .......60 Controlling other components, Remote control 61 Controlling this ...
...- - -, XM tuning status message 68 ■ Numerics 1 SOUND MENU, Manual setup ........ 49 2 INPUT MENU, Manual setup .......... 49 2ch Stereo, Sound field program ......... 35 3 OPTION MENU 57 3 OPTION MENU, Manual setup ....... 50 5ch Stereo, Sound field program ......... 35 ■A A)DISPLAY...jacks 16 Connection, Satellite tuner 15 Connection, Speaker 12 Connection, Video components ...........15 Connection, Video monitor 15 Connection, Yamaha iPod universal dock ...........18 Controlling a TV, Remote control .......60 Controlling other components, Remote control 61 Controlling this ...


