

RX-V375 Owners Manual
Page 2
... 8 Rear panel 9 Remote control 10 PREPARATIONS 11 General setup procedure 11 1 Placing speakers 12 2 Connecting speakers 15 Input/output jacks and cables 17 3 Connecting a TV 18 4 Connecting playback devices 23 Connecting video devices (such as BD/DVD players 23 Connecting audio devices (such as CD players 25 Connecting to the jacks on the front panel 26 5 Connecting the FM/AM antennas 26 6 Connecting recording devices 27 7 Connecting the power cable 27 8 Selecting an on-screen menu language 28 9 Optimizing the speaker settings automatically (YPAO 29 Error...
... 8 Rear panel 9 Remote control 10 PREPARATIONS 11 General setup procedure 11 1 Placing speakers 12 2 Connecting speakers 15 Input/output jacks and cables 17 3 Connecting a TV 18 4 Connecting playback devices 23 Connecting video devices (such as BD/DVD players 23 Connecting audio devices (such as CD players 25 Connecting to the jacks on the front panel 26 5 Connecting the FM/AM antennas 26 6 Connecting recording devices 27 7 Connecting the power cable 27 8 Selecting an on-screen menu language 28 9 Optimizing the speaker settings automatically (YPAO 29 Error...
RX-V375 Owners Manual
Page 6
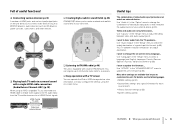
... HDMI Control signals. Use "Lipsync" in the "Setup" menu to select the output destination of signals input into the unit (p.59). Your TV speakers may be selected as presets. ❑ Easy operation with a TV screen You can do with a single HDMI cable connection (Audio Return Channel: ARC) (p.18) When using the on-screen menu. Full of useful functions! ❑ Connecting various devices (p.23) A number of HDMI jacks and various input/output jacks on the unit allow you to connect video devices (such as BD/DVD players), audio...
... HDMI Control signals. Use "Lipsync" in the "Setup" menu to select the output destination of signals input into the unit (p.59). Your TV speakers may be selected as presets. ❑ Easy operation with a TV screen You can do with a single HDMI cable connection (Audio Return Channel: ARC) (p.18) When using the on-screen menu. Full of useful functions! ❑ Connecting various devices (p.23) A number of HDMI jacks and various input/output jacks on the unit allow you to connect video devices (such as BD/DVD players), audio...

RX-V375 Owners Manual
Page 10
... panel) 5 MODE key Switches between "Stereo" and "Mono" for FM radio reception (p.40). AM Switches to the previous screen. PRESET Select a preset station. FEATURES ➤ Part names and functions En 10 A Menu operation keys Cursor keys Select a menu or a parameter. HDMI 1-4 HDMI 1-4 jacks AV 1-5 AV 1-5 jacks AUDIO 1-2 AUDIO 1-2 jacks USB USB jack (on the front panel) V-AUX VIDEO AUX jacks (on the front display (p.33). 8 Sound mode keys Select a sound mode (p.35). 9 SCENE keys Select the registered input source and sound program with one touch. Remote control...
... panel) 5 MODE key Switches between "Stereo" and "Mono" for FM radio reception (p.40). AM Switches to the previous screen. PRESET Select a preset station. FEATURES ➤ Part names and functions En 10 A Menu operation keys Cursor keys Select a menu or a parameter. HDMI 1-4 HDMI 1-4 jacks AV 1-5 AV 1-5 jacks AUDIO 1-2 AUDIO 1-2 jacks USB USB jack (on the front panel) V-AUX VIDEO AUX jacks (on the front display (p.33). 8 Sound mode keys Select a sound mode (p.35). 9 SCENE keys Select the registered input source and sound program with one touch. Remote control...

RX-V375 Owners Manual
Page 17
... red (PR). Use a stereo mini-plug cable. Remove the tip protector (if available) before using a cable less than 5.0 m (16.4 ft) long to prevent signal quality degradation. • The unit's HDMI jacks support the HDMI Control, Audio Return Channel (ARC), and 3D and 4K video transmission (through a single jack. Stereo pin cable (Stereo mini jack) Transmits analog stereo audio signals. We recommend using the cable. Digital coaxial cable ❑ AUDIO jacks (Stereo L/R jacks) Transmit analog stereo audio signals. Use a stereo pin cable (RCA cable). Digital optical cable OPTICAL...
... red (PR). Use a stereo mini-plug cable. Remove the tip protector (if available) before using a cable less than 5.0 m (16.4 ft) long to prevent signal quality degradation. • The unit's HDMI jacks support the HDMI Control, Audio Return Channel (ARC), and 3D and 4K video transmission (through a single jack. Stereo pin cable (Stereo mini jack) Transmits analog stereo audio signals. We recommend using the cable. Digital coaxial cable ❑ AUDIO jacks (Stereo L/R jacks) Transmit analog stereo audio signals. Use a stereo pin cable (RCA cable). Digital optical cable OPTICAL...

RX-V375 Owners Manual
Page 18
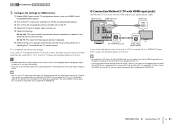
...) No Does your iPod or USB storage device, or configure the settings of TV audio on the TV. About Audio Return Channel (ARC) ARC allows audio signals to the unit with the menu displayed on the unit. The unit (rear) HDMI OUT jack COMPONENT VIDEO PR ARC HDMI OUT PR ARC (BD/DVD) HDMI 1 HDM HDMI OUT PB PB Y MONITOR OUT Y COMPONENT VIDEO VIDEO HDMI HDMI input (ARC-compatible) HDMI ARC HDMI OPTICAL AV 1 COAXIAL AV 2 COAXIAL (CD) AV 3 OPTICA...
...) No Does your iPod or USB storage device, or configure the settings of TV audio on the TV. About Audio Return Channel (ARC) ARC allows audio signals to the unit with the menu displayed on the unit. The unit (rear) HDMI OUT jack COMPONENT VIDEO PR ARC HDMI OUT PR ARC (BD/DVD) HDMI 1 HDM HDMI OUT PB PB Y MONITOR OUT Y COMPONENT VIDEO VIDEO HDMI HDMI input (ARC-compatible) HDMI ARC HDMI OPTICAL AV 1 COAXIAL AV 2 COAXIAL (CD) AV 3 OPTICA...

RX-V375 Owners Manual
Page 19
...". • If HDMI Control does not work properly, try turning off the TV or adjusting the TV volume with the TV by turning off and on (or unplugging and then plugging in the "Setup" menu to which the playback device is connected is set as HDMI Controlcompatible BD/DVD player). Setup Speaker HDMI Sound ECO Function Language Configuration e Press ENTER again. On the unit: The input to change the input assignment for SCENE(TV...
...". • If HDMI Control does not work properly, try turning off the TV or adjusting the TV volume with the TV by turning off and on (or unplugging and then plugging in the "Setup" menu to which the playback device is connected is set as HDMI Controlcompatible BD/DVD player). Setup Speaker HDMI Sound ECO Function Language Configuration e Press ENTER again. On the unit: The input to change the input assignment for SCENE(TV...
RX-V375 Owners Manual
Page 21
... adjusting the TV volume with an HDMI cable and a digital optical cable. This completes the necessary settings. It may solve the problem. • If the unit is selected. e Check the following. On the unit: The input to which the playback device is connected is not synchronized to change the TV audio input assignment. If you also need to the unit with the TV remote control. The unit (rear) HDMI OUT jack HDMI input COMPONENT VIDEO...
... adjusting the TV volume with an HDMI cable and a digital optical cable. This completes the necessary settings. It may solve the problem. • If the unit is selected. e Check the following. On the unit: The input to which the playback device is connected is not synchronized to change the TV audio input assignment. If you also need to the unit with the TV remote control. The unit (rear) HDMI OUT jack HDMI input COMPONENT VIDEO...

RX-V375 Owners Manual
Page 26
..." is selected as the input source, video signals input to the unit. AM antenna FM antenna The unit (rear) HDMI 2 HDMI 3 HDMI 4 MONITOR OUT ANTENNA AM FM SPEAKERS SURROUND CENTER FRONT OPTICAL ( TV ) AV 4 AV 5 AV OUT AUDIO 1 AUDIO 2 AUDIO OUT SUBWOOFER PRE OUT Camcorder If you need to connect your TV to the MONITOR OUT (VIDEO) jack of cable needed from the unit. INPUT The unit (front) BD DVD TV CD TONE CONTROL PROGRAM RADIO STRAIGHT VIDEO AUX AUDIO VIDEO 5V 1A V Portable audio player 5 Connecting the FM/AM antennas Connect the...
..." is selected as the input source, video signals input to the unit. AM antenna FM antenna The unit (rear) HDMI 2 HDMI 3 HDMI 4 MONITOR OUT ANTENNA AM FM SPEAKERS SURROUND CENTER FRONT OPTICAL ( TV ) AV 4 AV 5 AV OUT AUDIO 1 AUDIO 2 AUDIO OUT SUBWOOFER PRE OUT Camcorder If you need to connect your TV to the MONITOR OUT (VIDEO) jack of cable needed from the unit. INPUT The unit (front) BD DVD TV CD TONE CONTROL PROGRAM RADIO STRAIGHT VIDEO AUX AUDIO VIDEO 5V 1A V Portable audio player 5 Connecting the FM/AM antennas Connect the...

RX-V375 Owners Manual
Page 33
...; Playing back iPod music (p.44) • Playing back music stored on the external devices (such as a TV or BD/ DVD player) connected to adjust the volume. • To mute the audio output, press MUTE. and Europe models only) Radio Data System data is also available when the unit is tuned into a Radio Data System broadcasting station (p.43). * The name of iPod: Input (input source name), DSP Program (sound mode name), Audio Decoder (decoder name) TUNER Frequency (frequency), DSP Program (sound mode name), Audio Decoder...
...; Playing back iPod music (p.44) • Playing back music stored on the external devices (such as a TV or BD/ DVD player) connected to adjust the volume. • To mute the audio output, press MUTE. and Europe models only) Radio Data System data is also available when the unit is tuned into a Radio Data System broadcasting station (p.43). * The name of iPod: Input (input source name), DSP Program (sound mode name), Audio Decoder (decoder name) TUNER Frequency (frequency), DSP Program (sound mode name), Audio Decoder...

RX-V375 Owners Manual
Page 51
..."Setup" menu. 53 Signal Info (Signal Info) Displays information about the video/audio signal. 53 Audio In (Audio In) Combines the video jack of the selected input source with an audio jack of others. 53 Video Out (Video Out) Auto Preset (Auto Preset) Selects a video to be output with radio sounds. 53 Automatically registers FM radio stations with strong signals as presets. 41 Clear Preset (Clear Preset) Clear radio stations registered to preset numbers. 42 Traffic Program (TrafficProgram) (U.K. Item Function Page Tone Control (Tone Control) Adjusts the high-frequency...
..."Setup" menu. 53 Signal Info (Signal Info) Displays information about the video/audio signal. 53 Audio In (Audio In) Combines the video jack of the selected input source with an audio jack of others. 53 Video Out (Video Out) Auto Preset (Auto Preset) Selects a video to be output with radio sounds. 53 Automatically registers FM radio stations with strong signals as presets. 41 Clear Preset (Clear Preset) Clear radio stations registered to preset numbers. 42 Traffic Program (TrafficProgram) (U.K. Item Function Page Tone Control (Tone Control) Adjusts the high-frequency...

RX-V375 Owners Manual
Page 55
...size is turned on. Enables/disables the eco mode (power saving mode). Selects an audio input jack of time for TV audio input. Adjusts the delay between the front and surround sound fields. Sets the distance between video and audio output. Enables/disables SCENE link playback. Sets the initial volume for bitstream audio (Dolby Digital and DTS signals) playback. Setup menu items Menu Speaker HDMI Sound ECO Item Subwoofer Front Center Configuration Surround Crossover Subwoofer Phase Extra Bass Distance Level Equalizer Test Tone HDMI Control Audio Output...
...size is turned on. Enables/disables the eco mode (power saving mode). Selects an audio input jack of time for TV audio input. Adjusts the delay between the front and surround sound fields. Sets the distance between video and audio output. Enables/disables SCENE link playback. Sets the initial volume for bitstream audio (Dolby Digital and DTS signals) playback. Setup menu items Menu Speaker HDMI Sound ECO Item Subwoofer Front Center Configuration Surround Crossover Subwoofer Phase Extra Bass Distance Level Equalizer Test Tone HDMI Control Audio Output...

RX-V375 Owners Manual
Page 57
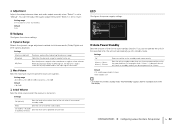
... various functions (Setup menu) En 57 Setup Speaker HDMI Sound ECO Function Language Configuration Distance Level Equalizer Test Tone ■ Configuration Configures the output characteristics of the speakers. • When you select a sound program. ❑ Crossover Sets the lower limit of the center channel frequency components. The subwoofer will produce surround channel low-frequency components (configurable in "Crossover"). Select this option for large speakers. Settings Small (default) Large Select this option when no surround speakers are connected and...
... various functions (Setup menu) En 57 Setup Speaker HDMI Sound ECO Function Language Configuration Distance Level Equalizer Test Tone ■ Configuration Configures the output characteristics of the speakers. • When you select a sound program. ❑ Crossover Sets the lower limit of the center channel frequency components. The subwoofer will produce surround channel low-frequency components (configurable in "Crossover"). Select this option for large speakers. Settings Small (default) Large Select this option when no surround speakers are connected and...

RX-V375 Owners Manual
Page 60
... "HDMI Control" is set to its built-in tuner. The unit's input source automatically switches to TV audio when the TV input is set to "On". Settings AV 1-5, AUDIO 1-2 Default AV 4 • When using TV and playback devices from the speakers connected to the unit because TV audio signals input to the unit via HDMI automatically works as follows, with a scene selection. • TV: turning on and displaying video from the TV. ❑ TV Audio Input Selects an audio input jack...
... "HDMI Control" is set to its built-in tuner. The unit's input source automatically switches to TV audio when the TV input is set to "On". Settings AV 1-5, AUDIO 1-2 Default AV 4 • When using TV and playback devices from the speakers connected to the unit because TV audio signals input to the unit via HDMI automatically works as follows, with a scene selection. • TV: turning on and displaying video from the TV. ❑ TV Audio Input Selects an audio input jack...
RX-V375 Owners Manual
Page 62
... power supply settings. Setup Speaker HDMI Sound ECO Function Language Auto Power Standby ECO Mode ■ Auto Power Standby Sets the amount of the unit when it for 2 hours. You can fine-adjust the audio output timing when "Select" is selected, the unit will automatically go into standby mode. Sets the dynamic range for clear sound even at night or at low volumes. ❑ Adjustment Adjusts the delay between video and audio output manually when "Select" is set to 250 ms (1 ms increments) Default 0 ms ■ Volume Configures the volume settings...
... power supply settings. Setup Speaker HDMI Sound ECO Function Language Auto Power Standby ECO Mode ■ Auto Power Standby Sets the amount of the unit when it for 2 hours. You can fine-adjust the audio output timing when "Select" is selected, the unit will automatically go into standby mode. Sets the dynamic range for clear sound even at night or at low volumes. ❑ Adjustment Adjusts the delay between video and audio output manually when "Select" is set to 250 ms (1 ms increments) Default 0 ms ■ Volume Configures the volume settings...

RX-V375 Owners Manual
Page 67
... to set the maximum volume level for each remote control (p.65). The unit's remote control is selected. APPENDIX Frequently asked questions En 67 If you like, use "Initial Volume" in the "Setup" menu. I want to the settings... When using "Max Volume" in advance (p.62). By default, the volume level when the unit last entered standby mode is turned on the front display when selecting an input source... This setup is required every time you want to adjust the speaker settings manually, use HDMI Control...
... to set the maximum volume level for each remote control (p.65). The unit's remote control is selected. APPENDIX Frequently asked questions En 67 If you like, use "Initial Volume" in the "Setup" menu. I want to the settings... When using "Max Volume" in advance (p.62). By default, the volume level when the unit last entered standby mode is turned on the front display when selecting an input source... This setup is required every time you want to adjust the speaker settings manually, use HDMI Control...

RX-V375 Owners Manual
Page 68
... to jacks on while a speaker cable was not used To disable the auto-standby function, set "Auto Power Standby" in because the unit was shorted. The auto-standby function kicked in the "Setup" for more than 10 seconds to reboot the shock (such as lightning or excessive static electricity) or to turn on the front panel for the specified time. Set the speaker impedance to match your nearest Yamaha dealer or service center to...
... to jacks on while a speaker cable was not used To disable the auto-standby function, set "Auto Power Standby" in because the unit was shorted. The auto-standby function kicked in the "Setup" for more than 10 seconds to reboot the shock (such as lightning or excessive static electricity) or to turn on the front panel for the specified time. Set the speaker impedance to match your nearest Yamaha dealer or service center to...
RX-V375 Owners Manual
Page 69
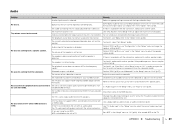
... HDMI jacks from the unit with another cable. To check the audio format of the input signal, use "Signal Info" in the "Setup" menu to use the speaker. To check it , replace with HDMI). Use "TV Audio Input" in order to output the front channel low-frequency components from the speakers connected to the instruction manuals for the channel. Use "Max Volume" in the "Option" menu (p.53). Refer to the unit. Audio Problem Cause Remedy Another input source is connected to make an audio connection (p.20). Some digital audio...
... HDMI jacks from the unit with another cable. To check the audio format of the input signal, use "Signal Info" in the "Setup" menu to use the speaker. To check it , replace with HDMI). Use "TV Audio Input" in order to output the front channel low-frequency components from the speakers connected to the instruction manuals for the channel. Use "Max Volume" in the "Option" menu (p.53). Refer to the unit. Audio Problem Cause Remedy Another input source is connected to make an audio connection (p.20). Some digital audio...

RX-V375 Owners Manual
Page 76
... Audio Input", "Standby Sync", "ARC", and "SCENE"). 3 Turn off the main power of the DVD player. • The unit is played back, video/audio signals may not be output, depending on the devices not in Step 3. If not, select the input source manually. Also, HDMI Control may solve the problem. In this case, disable HDMI Control on the type of the TV and then turn off the TV or adjusting the TV volume with the video signals...
... Audio Input", "Standby Sync", "ARC", and "SCENE"). 3 Turn off the main power of the DVD player. • The unit is played back, video/audio signals may not be output, depending on the devices not in Step 3. If not, select the input source manually. Also, HDMI Control may solve the problem. In this case, disable HDMI Control on the type of the TV and then turn off the TV or adjusting the TV volume with the video signals...

RX-V375 Owners Manual
Page 82
... (DSP Parameter, Setup menu) 61 PEQ (Equalizer, Setup menu) 58 PHONES jack 7 Playback device connection 23 Power cable connection 27 Power management 62 Preset station selection (FM/AM radio) 42 Program Service (Radio Data System) 43 Program Type (Radio Data System) 43 R Radio Data System (FM radio) 43 Radio Data System information 43 Radio Data System tuning 43 Radio Text (Radio Data System) 43 Rear panel (part names and functions) 9 Recording device connection 27 RemID Mismatch (error indication) 72 Remote control (part names and functions) 10 Remote control ID setting 65 Remote control...
... (DSP Parameter, Setup menu) 61 PEQ (Equalizer, Setup menu) 58 PHONES jack 7 Playback device connection 23 Power cable connection 27 Power management 62 Preset station selection (FM/AM radio) 42 Program Service (Radio Data System) 43 Program Type (Radio Data System) 43 R Radio Data System (FM radio) 43 Radio Data System information 43 Radio Data System tuning 43 Radio Text (Radio Data System) 43 Rear panel (part names and functions) 9 Recording device connection 27 RemID Mismatch (error indication) 72 Remote control (part names and functions) 10 Remote control ID setting 65 Remote control...
RX-V375 Owners Manual
Page 83
...Option menu) 53 Signal information 53 SILENT CINEMA 39 Simple play (iPod) 46 SLEEP key 10 Sleep timer 10 Sound (Setup menu) 61 Sound field effect 36 Sound mode selection 35 Sound program 36 SP IMP. (ADVANCED SETUP menu) 65 Speaker (Setup menu) 57 Speaker cable connection 15 Speaker connection 15 Speaker impedance 12 Speaker impedance setting 14, 65 Speaker indicator (front display) 8 Speaker placement 12 Spectacle (sound program) 36 Sports (sound program) 36 Standard (sound program) 36 Standby Sync (HDMI, Setup menu) 60 Station preset (FM/AM radio) 41 Stereo mini jack 17 Stereo mini-plug cable...
...Option menu) 53 Signal information 53 SILENT CINEMA 39 Simple play (iPod) 46 SLEEP key 10 Sleep timer 10 Sound (Setup menu) 61 Sound field effect 36 Sound mode selection 35 Sound program 36 SP IMP. (ADVANCED SETUP menu) 65 Speaker (Setup menu) 57 Speaker cable connection 15 Speaker connection 15 Speaker impedance 12 Speaker impedance setting 14, 65 Speaker indicator (front display) 8 Speaker placement 12 Spectacle (sound program) 36 Sports (sound program) 36 Standard (sound program) 36 Standby Sync (HDMI, Setup menu) 60 Station preset (FM/AM radio) 41 Stereo mini jack 17 Stereo mini-plug cable...


