
Owners Manual
Page 1
AV Receiver Owner's Manual English for North America
AV Receiver Owner's Manual English for North America
Owners Manual
Page 2
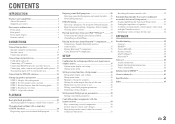
CONTENTS INTRODUCTION Features and capabilities 3 About this manual 4 Supplied accessories 4 Part names and functions 5 Front panel 5 Rear panel 6 Front panel display 7 Remote control 8 CONNECTIONS Connecting speakers 9 Speaker channels and functions 9 Speaker... Setup menu 53 Displaying/Setting the Advanced Setup menu 53 Setting the impedance of speakers 53 Avoiding crossing remote control signals when using multiple Yamaha receivers 54 Initializing various settings for this unit 54 APPENDIX Troubleshooting 55 General 55 HDMI 57 Tuner (FM/AM 58 Remote control 59 iPod™...
CONTENTS INTRODUCTION Features and capabilities 3 About this manual 4 Supplied accessories 4 Part names and functions 5 Front panel 5 Rear panel 6 Front panel display 7 Remote control 8 CONNECTIONS Connecting speakers 9 Speaker channels and functions 9 Speaker... Setup menu 53 Displaying/Setting the Advanced Setup menu 53 Setting the impedance of speakers 53 Avoiding crossing remote control signals when using multiple Yamaha receivers 54 Initializing various settings for this unit 54 APPENDIX Troubleshooting 55 General 55 HDMI 57 Tuner (FM/AM 58 Remote control 59 iPod™...
Owners Manual
Page 4
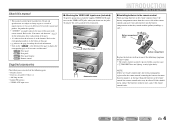
In case of differences between the manual and product, the product has priority. • "dHDMI1" (example) indicates the name of the parts on the " " at the bottom of the page to the VIDEO AUX jacks when you received all of the parts. • J1 indicates that they ...protect against dust, attach the supplied VIDEO AUX input cover to display the corresponding page in "Part names and functions." En 4 If this manual • This manual is in part as a result of the page. • ☞ indicates the page describing the related information. • Click on...
In case of differences between the manual and product, the product has priority. • "dHDMI1" (example) indicates the name of the parts on the " " at the bottom of the page to the VIDEO AUX jacks when you received all of the parts. • J1 indicates that they ...protect against dust, attach the supplied VIDEO AUX input cover to display the corresponding page in "Part names and functions." En 4 If this manual • This manual is in part as a result of the page. • ☞ indicates the page describing the related information. • Click on...

Owners Manual
Page 25
... SL SR 2 Press PROGRAM l / h to adjust the output level in those from the front left and right speakers to the instruction manuals provided with the headphones connected. 1 Press TONE CONTROL on the tuner. J 1 : You can change the input source name displayed on the... Press sMUTE to adjust the volume. Set the headphone tone control with the r external component for a few seconds. PLAYBACK SOURCE 1 1 5 TRANSMIT CODE SET SLEEP RECEIVER HDMI 2 3 4 AV 2 3 4 AUDIO 1 2 V-AUX [ A ] [ B ] DOCK TUNER FM AM PRESET TUNING INFO MEMORY MOVIE ENHANCER SUR. For...
... SL SR 2 Press PROGRAM l / h to adjust the output level in those from the front left and right speakers to the instruction manuals provided with the headphones connected. 1 Press TONE CONTROL on the tuner. J 1 : You can change the input source name displayed on the... Press sMUTE to adjust the volume. Set the headphone tone control with the r external component for a few seconds. PLAYBACK SOURCE 1 1 5 TRANSMIT CODE SET SLEEP RECEIVER HDMI 2 3 4 AV 2 3 4 AUDIO 1 2 V-AUX [ A ] [ B ] DOCK TUNER FM AM PRESET TUNING INFO MEMORY MOVIE ENHANCER SUR. For...
Owners Manual
Page 31
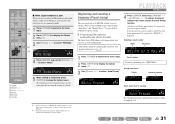
... use the jCursor D / E to the tuner input. AM stations cannot be selected automatically immediately after presetting. SOURCE 1 1 5 TRANSMIT CODE SET SLEEP RECEIVER HDMI 2 3 4 AV 2 3 4 AUDIO 1 2 ■ When signal reception is poor When you are two methods of these methods to register stations...start the Auto Preset function. J1 3 Use jCursor B / C to 40 automatically. Use one of presetting stations, "Auto Preset" and "Manual Preset." Selecting a preset number Status Frequency READY VOL. 01:FM 87.5 MHz SW L CR SL SR 1 Press dTUNER to switch to ...
... use the jCursor D / E to the tuner input. AM stations cannot be selected automatically immediately after presetting. SOURCE 1 1 5 TRANSMIT CODE SET SLEEP RECEIVER HDMI 2 3 4 AV 2 3 4 AUDIO 1 2 ■ When signal reception is poor When you are two methods of these methods to register stations...start the Auto Preset function. J1 3 Use jCursor B / C to 40 automatically. Use one of presetting stations, "Auto Preset" and "Manual Preset." Selecting a preset number Status Frequency READY VOL. 01:FM 87.5 MHz SW L CR SL SR 1 Press dTUNER to switch to ...
Owners Manual
Page 32
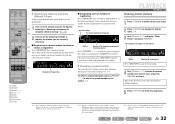
... MUTE 1 2 3 4 5 6 7 8 9 INPUT MUTE 0 10 TV TV VOL TV CH ENT ■ Registering stations manually (Manual Preset) Select stations by selecting a preset number, use the lNumeric keys to enter the preset number of the following methods to register...See the section on "Configuring the settings specific for each input source (Option menu)" for reception (Normal tuning)" (☞p. 30). SOURCE 1 1 5 TRANSMIT CODE SET SLEEP RECEIVER HDMI 2 3 4 AV 2 3 4 AUDIO 1 2 V-AUX [ A ] [ B ] DOCK TUNER FM AM PRESET TUNING INFO MEMORY MOVIE ENHANCER SUR. Press ePRESET...
... MUTE 1 2 3 4 5 6 7 8 9 INPUT MUTE 0 10 TV TV VOL TV CH ENT ■ Registering stations manually (Manual Preset) Select stations by selecting a preset number, use the lNumeric keys to enter the preset number of the following methods to register...See the section on "Configuring the settings specific for each input source (Option menu)" for reception (Normal tuning)" (☞p. 30). SOURCE 1 1 5 TRANSMIT CODE SET SLEEP RECEIVER HDMI 2 3 4 AV 2 3 4 AUDIO 1 2 V-AUX [ A ] [ B ] DOCK TUNER FM AM PRESET TUNING INFO MEMORY MOVIE ENHANCER SUR. Press ePRESET...
Owners Manual
Page 40
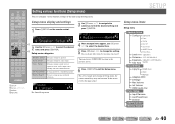
... remote control. SOUND Lipsync Ex: Sound Setup menu VOL. Setup Input Rename AutoPowerDown Dimmer DSP Parameter Memory Guard En 40 SOURCE 1 1 5 TRANSMIT CODE SET SLEEP RECEIVER HDMI 2 3 4 AV 2 3 4 AUDIO 1 2 V-AUX [ A ] [ B ] DOCK TUNER FM AM PRESET TUNING INFO MEMORY MOVIE ENHANCER SUR. ... Level (speakers) Distance (unit and speakers) Equalizer (speakers and frequency Test Tone bands) Sound Setup Lipsync HDMI Auto Auto Manual Adaptive DRC D.Range Max Volume Init.Volume HDMI Audio Out Func. DECODE MUSIC STEREO STRAIGHT BD DVD SETUP SCENE TV CD ...
... remote control. SOUND Lipsync Ex: Sound Setup menu VOL. Setup Input Rename AutoPowerDown Dimmer DSP Parameter Memory Guard En 40 SOURCE 1 1 5 TRANSMIT CODE SET SLEEP RECEIVER HDMI 2 3 4 AV 2 3 4 AUDIO 1 2 V-AUX [ A ] [ B ] DOCK TUNER FM AM PRESET TUNING INFO MEMORY MOVIE ENHANCER SUR. ... Level (speakers) Distance (unit and speakers) Equalizer (speakers and frequency Test Tone bands) Sound Setup Lipsync HDMI Auto Auto Manual Adaptive DRC D.Range Max Volume Init.Volume HDMI Audio Out Func. DECODE MUSIC STEREO STRAIGHT BD DVD SETUP SCENE TV CD ...

Owners Manual
Page 44
HDMI Auto When connecting to 240 ms Adjustment 1 ms increments Manual Manually adjusts the correction time. Off (Default) On Select this receiver is set to maximum). Auto Fine-adjust the audio output timing by entering the correction time provided when "HDMI Auto" ... Lipsync Adjusts the delay between audio and video output (Lipsync function). Set the correction time in "Auto." Select this receiver. HDMI Audio Out Selects audio signals received through the HDMI input jack. ■ Synchronizing audio/video output Lipsync Adjusts the delay between video and audio output....
HDMI Auto When connecting to 240 ms Adjustment 1 ms increments Manual Manually adjusts the correction time. Off (Default) On Select this receiver is set to maximum). Auto Fine-adjust the audio output timing by entering the correction time provided when "HDMI Auto" ... Lipsync Adjusts the delay between audio and video output (Lipsync function). Set the correction time in "Auto." Select this receiver. HDMI Audio Out Selects audio signals received through the HDMI input jack. ■ Synchronizing audio/video output Lipsync Adjusts the delay between video and audio output....
Owners Manual
Page 57
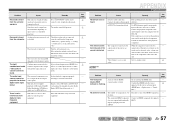
... distorted, or the volume may be found. "Max Volume" is set to its instruction manual. Set it is disabled. The number of the playback component. Remedy Try re-inserting the HDMI cable. The right combination of AV receivers. Press gSTRAIGHT (on . The subwoofer is heard. See page 27 26 41 - - 38 - - - defective...
... distorted, or the volume may be found. "Max Volume" is set to its instruction manual. Set it is disabled. The number of the playback component. Remedy Try re-inserting the HDMI cable. The right combination of AV receivers. Press gSTRAIGHT (on . The subwoofer is heard. See page 27 26 41 - - 38 - - - defective...
Owners Manual
Page 58
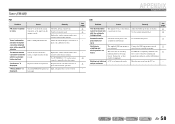
... 30 31 - The noises may be tuned into with a good FM antenna. Buzzing and whining A TV set . - You are loose. Switch to manually select the station. Replace the outdoor antenna with a more sensitive multi-element antenna. work. It is weak, or the antenna Adjust the AM loop antenna...signal is difficult to as preset stations before operation. Continuous crackling and hissing noises are registered. En 58 The desired station cannot be received. even if you wish to listen to completely eliminate noise, 21 but it in an area far from a station, or input ...
... 30 31 - The noises may be tuned into with a good FM antenna. Buzzing and whining A TV set . - You are loose. Switch to manually select the station. Replace the outdoor antenna with a more sensitive multi-element antenna. work. It is weak, or the antenna Adjust the AM loop antenna...signal is difficult to as preset stations before operation. Continuous crackling and hissing noises are registered. En 58 The desired station cannot be received. even if you wish to listen to completely eliminate noise, 21 but it in an area far from a station, or input ...
Quick Reference Guide
Page 5
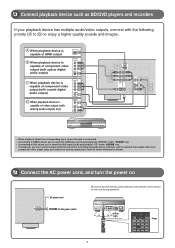
Refer to Owner's Manual for details. 4 Connect the AC power cord, and turn the power on AC power cord Be sure to enjoy a higher quality sounds and images. To ... aim the remote control directly at the remote control sensor on this unit during operation. within 30 30 20 ft SOURCE 1 1 5 TRANSMIT CODE SET SLEEP RECEIVER HDMI 2 3 4 AV 2 3 4 AUDIO 1 2 V-AUX [ A ] [ B ] DOCK Press - 5 - A When playback device is capable of HDMI output HDMI HDMI B When playback device is capable of component video output...
Refer to Owner's Manual for details. 4 Connect the AC power cord, and turn the power on AC power cord Be sure to enjoy a higher quality sounds and images. To ... aim the remote control directly at the remote control sensor on this unit during operation. within 30 30 20 ft SOURCE 1 1 5 TRANSMIT CODE SET SLEEP RECEIVER HDMI 2 3 4 AV 2 3 4 AUDIO 1 2 V-AUX [ A ] [ B ] DOCK Press - 5 - A When playback device is capable of HDMI output HDMI HDMI B When playback device is capable of component video output...


