
MCXSP10 Manual
Page 3
... service or repairs to this product MUST be determined by the interference. Modifications not expressly approved by Yamaha may cause interference harmful to the point of product. This equipment generates/uses radio frequencies and, if not installed and used according to the instructions found in fire, electric shock, or other products (including amplifiers) that is found to coaxial type cable. Utilize power...
... service or repairs to this product MUST be determined by the interference. Modifications not expressly approved by Yamaha may cause interference harmful to the point of product. This equipment generates/uses radio frequencies and, if not installed and used according to the instructions found in fire, electric shock, or other products (including amplifiers) that is found to coaxial type cable. Utilize power...

MCXSP10 Manual
Page 5
...Connecting a multi-format player or an external decoder 26 Connecting a YAMAHA iPod universal dock ........ 27 Using the VIDEO AUX jacks on the front panel .... 27 Connecting the FM and AM antennas 28 Connecting the power cable 29 Setting the speaker impedance 30 Turning on and off the power 31 AUTO SETUP 32 Using AUTO SETUP 32 BASIC OPERATION PLAYBACK 38 Basic procedure 38 Selecting audio input jacks (AUDIO SELECT)...... 40 Selecting the MULTI CH INPUT component......... 41 Using your headphones 41 Muting the audio output 41 Displaying the input source information 42 Playing video...
...Connecting a multi-format player or an external decoder 26 Connecting a YAMAHA iPod universal dock ........ 27 Using the VIDEO AUX jacks on the front panel .... 27 Connecting the FM and AM antennas 28 Connecting the power cable 29 Setting the speaker impedance 30 Turning on and off the power 31 AUTO SETUP 32 Using AUTO SETUP 32 BASIC OPERATION PLAYBACK 38 Basic procedure 38 Selecting audio input jacks (AUDIO SELECT)...... 40 Selecting the MULTI CH INPUT component......... 41 Using your headphones 41 Muting the audio output 41 Displaying the input source information 42 Playing video...
MCXSP10 Manual
Page 8
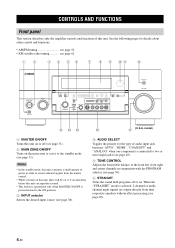
... ON/OFF ON OFF MASTER INPUT AUDIO SELECT TONE CONTROL A/B/C/D/E CATEGORY STRAIGHT EFFECT YPAO PRESET/TUNING/CH PRESET/ TUNING EDIT SEARCH MODE MULTI ZONE MEMORY TUNING FM/AM MAN'L/AUTO FM MODE DISPLAY ZONE ON/OFF ZONE CONTROLS ZONE 2 ZONE 3 SILENT CINEMA S VIDEO VIDEO L AUDIO R OPTICAL ENHANCER NIGHT PROGRAM OPTIMIZER MIC PHONES VIDEO AUX PURE DIRECT VOLUME C DE F G (U.S.A. When the "STRAIGHT" mode is connected to two or more input jacks (see page 40). 5 TONE CONTROL Adjusts the bass/treble balance of this unit. model) 1 MASTER ON/OFF Turns this unit on or off or...
... ON/OFF ON OFF MASTER INPUT AUDIO SELECT TONE CONTROL A/B/C/D/E CATEGORY STRAIGHT EFFECT YPAO PRESET/TUNING/CH PRESET/ TUNING EDIT SEARCH MODE MULTI ZONE MEMORY TUNING FM/AM MAN'L/AUTO FM MODE DISPLAY ZONE ON/OFF ZONE CONTROLS ZONE 2 ZONE 3 SILENT CINEMA S VIDEO VIDEO L AUDIO R OPTICAL ENHANCER NIGHT PROGRAM OPTIMIZER MIC PHONES VIDEO AUX PURE DIRECT VOLUME C DE F G (U.S.A. When the "STRAIGHT" mode is connected to two or more input jacks (see page 40). 5 TONE CONTROL Adjusts the bass/treble balance of this unit. model) 1 MASTER ON/OFF Turns this unit on or off or...
MCXSP10 Manual
Page 9
... of all audio channels. While the indicator is pressed inward to control between the main zone, Zone 2 and Zone 3. B PURE DIRECT Turns on or off the Compressed Music Enhancer mode (see page 52). 0 Remote control sensor Receives signals from the remote control (see page 32). D OPTIMIZER MIC jack Use to use the controls behind the front panel door, open , press gently on or off the night listening modes (see page 50). G VOLUME Controls the output level of this...
... of all audio channels. While the indicator is pressed inward to control between the main zone, Zone 2 and Zone 3. B PURE DIRECT Turns on or off the Compressed Music Enhancer mode (see page 52). 0 Remote control sensor Receives signals from the remote control (see page 32). D OPTIMIZER MIC jack Use to use the controls behind the front panel door, open , press gently on or off the night listening modes (see page 50). G VOLUME Controls the output level of this...

MCXSP10 Manual
Page 14
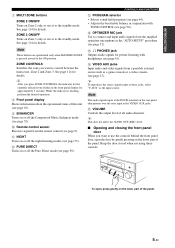
... program and other information when adjusting or changing settings. 8 96/24 indicator Lights up when a DTS 96/24 signal is input to "ON" (see page 92). CONTROLS AND FUNCTIONS Front panel display Note The XM indicator is only applicable to the number of the current digital input signal. and Europe models only 1 HDMI indicator Lights up when the signal of the selected input source is input at HDMI IN 1 or HDMI IN 2 jacks (see page 19). 2 DOCK...
... program and other information when adjusting or changing settings. 8 96/24 indicator Lights up when a DTS 96/24 signal is input to "ON" (see page 92). CONTROLS AND FUNCTIONS Front panel display Note The XM indicator is only applicable to the number of the current digital input signal. and Europe models only 1 HDMI indicator Lights up when the signal of the selected input source is input at HDMI IN 1 or HDMI IN 2 jacks (see page 19). 2 DOCK...
MCXSP10 Manual
Page 30
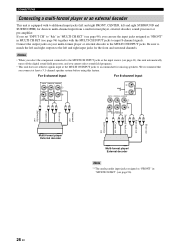
... right input jacks for the front and surround channels. We recommend that you connect at least a 5.1-channel speaker system before using this unit automatically turns off the digital sound field processor, and you can use the input jacks assigned as "FRONT" in "MULTI CH SET" (see page 96), you cannot select sound field programs. • This unit does not redirect signals input at the MULTI CH INPUT jacks to the MULTI CH INPUT jacks. Connect the output jacks on your multi-format player...
... right input jacks for the front and surround channels. We recommend that you connect at least a 5.1-channel speaker system before using this unit automatically turns off the digital sound field processor, and you can use the input jacks assigned as "FRONT" in "MULTI CH SET" (see page 96), you cannot select sound field programs. • This unit does not redirect signals input at the MULTI CH INPUT jacks to the MULTI CH INPUT jacks. Connect the output jacks on your multi-format player...
MCXSP10 Manual
Page 31
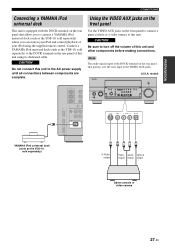
...unit. model) MAIN ZONE ON/OFF ON OFF MASTER INPUT AUDIO SELECT TONE CONTROL A/B/C/D/E CATEGORY STRAIGHT EFFECT YPAO PRESET/TUNING/CH PRESET/ TUNING EDIT SEARCH MODE MULTI ZONE MEMORY TUNING FM/AM MAN'L/AUTO FM MODE ZONE ON/OFF DISPLAY ZONE CONTROLS ZONE 2 ZONE 3 SILENT CINEMA S VIDEO VIDEO L AUDIO R OPTICAL ENHANCER NIGHT PROGRAM OPTIMIZER MIC PHONES VIDEO AUX PURE DIRECT VOLUME DOCK S VIDEO VIDEO L AUDIO R OPTICAL YAMAHA iPod universal dock (such as the YDS-10, sold separately) where you to turn off the volume of this unit using the supplied remote control...
...unit. model) MAIN ZONE ON/OFF ON OFF MASTER INPUT AUDIO SELECT TONE CONTROL A/B/C/D/E CATEGORY STRAIGHT EFFECT YPAO PRESET/TUNING/CH PRESET/ TUNING EDIT SEARCH MODE MULTI ZONE MEMORY TUNING FM/AM MAN'L/AUTO FM MODE ZONE ON/OFF DISPLAY ZONE CONTROLS ZONE 2 ZONE 3 SILENT CINEMA S VIDEO VIDEO L AUDIO R OPTICAL ENHANCER NIGHT PROGRAM OPTIMIZER MIC PHONES VIDEO AUX PURE DIRECT VOLUME DOCK S VIDEO VIDEO L AUDIO R OPTICAL YAMAHA iPod universal dock (such as the YDS-10, sold separately) where you to turn off the volume of this unit using the supplied remote control...

MCXSP10 Manual
Page 36
... or in the front panel display. y • You can run "AUTO SETUP" using the system menu that it in a suitable location in your listening room, run "AUTO SETUP" in the OSD or in the front panel display. model) AUDIO SELECT TONE CONTROL A/B/C/D/E CATEGORY STRAIGHT EFFECT YPAO PRESET/TUNING/CH PRESET/ TUNING EDIT SEARCH MODE MULTI ZONE MEMORY TUNING FM/AM MAN'L/AUTO FM MODE DISPLAY ZONE ON/OFF ZONE CONTROLS ZONE 2 ZONE 3 SILENT CINEMA S VIDEO VIDEO L AUDIO R OPTICAL ENHANCER NIGHT PROGRAM OPTIMIZER MIC PHONES VIDEO AUX Omni-directional microphone 2 Place the optimizer...
... or in the front panel display. y • You can run "AUTO SETUP" using the system menu that it in a suitable location in your listening room, run "AUTO SETUP" in the OSD or in the front panel display. model) AUDIO SELECT TONE CONTROL A/B/C/D/E CATEGORY STRAIGHT EFFECT YPAO PRESET/TUNING/CH PRESET/ TUNING EDIT SEARCH MODE MULTI ZONE MEMORY TUNING FM/AM MAN'L/AUTO FM MODE DISPLAY ZONE ON/OFF ZONE CONTROLS ZONE 2 ZONE 3 SILENT CINEMA S VIDEO VIDEO L AUDIO R OPTICAL ENHANCER NIGHT PROGRAM OPTIMIZER MIC PHONES VIDEO AUX Omni-directional microphone 2 Place the optimizer...
MCXSP10 Manual
Page 37
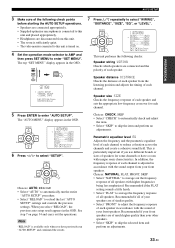
... operations. Recommended if your front speakers are connected and the polarity of each channel. 5 Press ENTER to select "WIRING", "DISTANCE", "SIZE", "EQ", or "LEVEL". AUTO SETUP PREPARATION p p p p p p 3 Make sure of the following checks: Speaker wiring WIRING Checks which speakers are of much higher quality than your other speakers. • Select "SKIP" to skip the selected item and perform no adjustments. The top "SET MENU" display appears in the OSD. PRESET/CH A-E/CAT. Speaker...
... operations. Recommended if your front speakers are connected and the polarity of each channel. 5 Press ENTER to select "WIRING", "DISTANCE", "SIZE", "EQ", or "LEVEL". AUTO SETUP PREPARATION p p p p p p 3 Make sure of the following checks: Speaker wiring WIRING Checks which speakers are of much higher quality than your other speakers. • Select "SKIP" to skip the selected item and perform no adjustments. The top "SET MENU" display appears in the OSD. PRESET/CH A-E/CAT. Speaker...
MCXSP10 Manual
Page 45
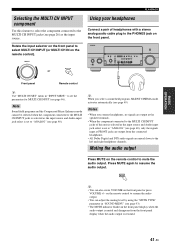
... MODE MULTI ZONE MEMORY TUNING FM/AM MAN'L/AUTO FM MODE DISPLAY ZONE ON/OFF ZONE CONTROLS ZONE 2 ZONE 3 SILENT CINEMA S VIDEO VIDEO L AUDIO R OPTICAL ENHANCER NIGHT PROGRAM OPTIMIZER MIC PHONES VIDEO AUX PURE DIRECT VOLUME Front panel Remote control y Use "MULTI CH SET" menu in "INPUT MENU" to set to the left and right headphone channels. MUTE y • You can adjust the muting level by using the "MUTE TYPE" parameter in the front panel display when the audio output is muted and disappears from the connected headphones. • All Dolby Digital and DTS audio signals...
... MODE MULTI ZONE MEMORY TUNING FM/AM MAN'L/AUTO FM MODE DISPLAY ZONE ON/OFF ZONE CONTROLS ZONE 2 ZONE 3 SILENT CINEMA S VIDEO VIDEO L AUDIO R OPTICAL ENHANCER NIGHT PROGRAM OPTIMIZER MIC PHONES VIDEO AUX PURE DIRECT VOLUME Front panel Remote control y Use "MULTI CH SET" menu in "INPUT MENU" to set to the left and right headphone channels. MUTE y • You can adjust the muting level by using the "MUTE TYPE" parameter in the front panel display when the audio output is muted and disappears from the connected headphones. • All Dolby Digital and DTS audio signals...
MCXSP10 Manual
Page 79
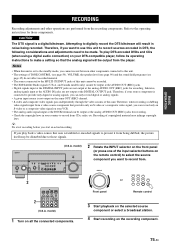
... DVD 2 POWER TV POWER AV STANDBY POWER XM AUDIO SEL SLEEP PHONO TUNER CD MULTI CH IN V-AUX/DOCK CBL/SAT MD/TAPE CD-R DTV VCR 1 DVR/VCR 2 DVD (U.S.A. model) 1 Turn on the recording component. 75 En model) MAIN ZONE ON/OFF ON OFF MASTER INPUT AUDIO SELECT TONE CONTROL A/B/C/D/E CATEGORY STRAIGHT EFFECT YPAO PRESET/TUNING/CH PRESET/ TUNING EDIT SEARCH MODE MULTI ZONE MEMORY TUNING FM/AM MAN'L/AUTO FM MODE ZONE ON/OFF DISPLAY ZONE CONTROLS ZONE 2 ZONE 3 SILENT CINEMA S VIDEO VIDEO L AUDIO R OPTICAL ENHANCER NIGHT PROGRAM OPTIMIZER MIC PHONES VIDEO...
... DVD 2 POWER TV POWER AV STANDBY POWER XM AUDIO SEL SLEEP PHONO TUNER CD MULTI CH IN V-AUX/DOCK CBL/SAT MD/TAPE CD-R DTV VCR 1 DVR/VCR 2 DVD (U.S.A. model) 1 Turn on the recording component. 75 En model) MAIN ZONE ON/OFF ON OFF MASTER INPUT AUDIO SELECT TONE CONTROL A/B/C/D/E CATEGORY STRAIGHT EFFECT YPAO PRESET/TUNING/CH PRESET/ TUNING EDIT SEARCH MODE MULTI ZONE MEMORY TUNING FM/AM MAN'L/AUTO FM MODE ZONE ON/OFF DISPLAY ZONE CONTROLS ZONE 2 ZONE 3 SILENT CINEMA S VIDEO VIDEO L AUDIO R OPTICAL ENHANCER NIGHT PROGRAM OPTIMIZER MIC PHONES VIDEO...

MCXSP10 Manual
Page 88
...delay and tone bypass settings. Page 87 90 90 91 Sound menu 2 SOUND MENU Use this unit operates. Selects the component to manually adjust any speaker settings, alter the quality and tone of system settings and customize the way this menu to play back HDMI audio signals. Change the initial settings (indicated in "SET MENU" to manually adjust basic system parameters. Parameter A)SPEAKER SET B)SP LEVEL C)SP DISTANCE D)TEST TONE Features Selects the size of each speaker. Adjusts the delay time of each speaker, the speakers for video signal processing delays when using...
...delay and tone bypass settings. Page 87 90 90 91 Sound menu 2 SOUND MENU Use this unit operates. Selects the component to manually adjust any speaker settings, alter the quality and tone of system settings and customize the way this menu to play back HDMI audio signals. Change the initial settings (indicated in "SET MENU" to manually adjust basic system parameters. Parameter A)SPEAKER SET B)SP LEVEL C)SP DISTANCE D)TEST TONE Features Selects the size of each speaker. Adjusts the delay time of each speaker, the speakers for video signal processing delays when using...
MCXSP10 Manual
Page 89
... OPERATION 85 En Selects whether this unit is in INPUT MENU. C)VOLUME TRIM Adjusts the output volume of sound field programs. Selects whether to initialize the settings or to the DIGITAL INPUT jacks on the rear panel of the input source. Initializes the parameters of a group of each jack. Parameter A)DISPLAY SET B)MEMORY GUARD C)AUDIO SELECT D)DECODER MODE E)PARAM.INI F)ZONE SET G)XM RADIO SET H)DOCK SET Features Adjusts the brightness of the signals input into the center, subwoofer, and surround channels when a source component is only applicable to check audio signal...
... OPERATION 85 En Selects whether this unit is in INPUT MENU. C)VOLUME TRIM Adjusts the output volume of sound field programs. Selects whether to initialize the settings or to the DIGITAL INPUT jacks on the rear panel of the input source. Initializes the parameters of a group of each jack. Parameter A)DISPLAY SET B)MEMORY GUARD C)AUDIO SELECT D)DECODER MODE E)PARAM.INI F)ZONE SET G)XM RADIO SET H)DOCK SET Features Adjusts the brightness of the signals input into the center, subwoofer, and surround channels when a source component is only applicable to check audio signal...

MCXSP10 Manual
Page 91
... right channels are output from the subwoofer. ENTER A-E/CAT. PRESET/CH PRESET/CH ■ Speaker settings A)SPEAKER SET Use this menu to the subwoofer. y • If you are directed to "LARGE" (or "LRG"). The low-frequency signals of any speaker settings. 2 BASIC MENU . Choices: SWFR, FRONT, BOTH LFE/BASS OUT A-E/CAT. LFE/Bass out LFE/BASS OUT Use this feature to select and enter the desired submenu. The LFE signals as well as the low-frequency signals of...
... right channels are output from the subwoofer. ENTER A-E/CAT. PRESET/CH PRESET/CH ■ Speaker settings A)SPEAKER SET Use this menu to the subwoofer. y • If you are directed to "LARGE" (or "LRG"). The low-frequency signals of any speaker settings. 2 BASIC MENU . Choices: SWFR, FRONT, BOTH LFE/BASS OUT A-E/CAT. LFE/Bass out LFE/BASS OUT Use this feature to select and enter the desired submenu. The LFE signals as well as the low-frequency signals of...
MCXSP10 Manual
Page 100
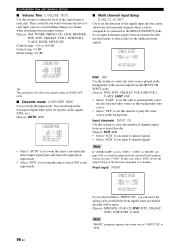
... sound is connected to the MULTI CH INPUT jacks. Choices: DVD, DTV, CBL/SAT, VCR, DVR/VCR 2, V-AUX, LAST, OFF • Select "LAST" to set this unit to automatically select the last selected video source as the input mode. Note If "ZONE2 AMP" is useful if you input 8-channel signals from the MULTI CH INPUT jacks. Front input FRONT E)MULTI CH SET BGV;;;;;;;;;LAST INPUT CH;;;;;8CH . p p p p CUSTOMIZING THIS UNIT (MANUAL SETUP) ■ Volume Trim C)VOLUME TRIM Use this feature to adjust the level...
... sound is connected to the MULTI CH INPUT jacks. Choices: DVD, DTV, CBL/SAT, VCR, DVR/VCR 2, V-AUX, LAST, OFF • Select "LAST" to set this unit to automatically select the last selected video source as the input mode. Note If "ZONE2 AMP" is useful if you input 8-channel signals from the MULTI CH INPUT jacks. Front input FRONT E)MULTI CH SET BGV;;;;;;;;;LAST INPUT CH;;;;;8CH . p p p p CUSTOMIZING THIS UNIT (MANUAL SETUP) ■ Volume Trim C)VOLUME TRIM Use this feature to adjust the level...
MCXSP10 Manual
Page 103
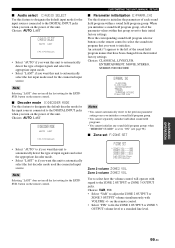
... ZONE 2 OUTPUT or ZONE 3 OUTPUT jacks. Choices: CLASSICAL, LIVE/CLUB, ENTERTAINMENT, MOVIE, STEREO, SURROUND DECODE E)PARAM. ZONE2 VOL;;;;VAR ZONE3 VOL;;;;VAR ZONE2 AMP;;;;EXT ZONE3 AMP;;;;EXT [ ]/[ ]:Up/Down [p]/[[]:Adjust Zone 2 volume ZONE2 VOL Zone 3 volume ZONE3 VOL Use to select how the volume control will operate with VOLUME +/- on the remote control. ■ Audio select C)AUDIO SELECT Use this feature to designate the default input mode for the input sources connected to the DIGITAL INPUT jacks when you want to initialize. When you initialize a sound...
... ZONE 2 OUTPUT or ZONE 3 OUTPUT jacks. Choices: CLASSICAL, LIVE/CLUB, ENTERTAINMENT, MOVIE, STEREO, SURROUND DECODE E)PARAM. ZONE2 VOL;;;;VAR ZONE3 VOL;;;;VAR ZONE2 AMP;;;;EXT ZONE3 AMP;;;;EXT [ ]/[ ]:Up/Down [p]/[[]:Adjust Zone 2 volume ZONE2 VOL Zone 3 volume ZONE3 VOL Use to select how the volume control will operate with VOLUME +/- on the remote control. ■ Audio select C)AUDIO SELECT Use this feature to designate the default input mode for the input sources connected to the DIGITAL INPUT jacks when you want to initialize. When you initialize a sound...

MCXSP10 Manual
Page 126
... on all speaker wire connections on this unit. Set Audio input jack select to "RX-V1700" in after the power is connected. Play a source whose signals can be defective. The protection circuitry has been activated. Audio input jack select is set to "OTHER" and "HDMI" audio signals are secure and that support the HDCP copy protection standards. The HDMI components connected to this unit to the standby mode, disconnect the power cable, plug it back in "MANUAL SETUP". The speaker impedance setting is muted. Turn up the volume. Connect the power cable firmly...
... on all speaker wire connections on this unit. Set Audio input jack select to "RX-V1700" in after the power is connected. Play a source whose signals can be defective. The protection circuitry has been activated. Audio input jack select is set to "OTHER" and "HDMI" audio signals are secure and that support the HDCP copy protection standards. The HDMI components connected to this unit to the standby mode, disconnect the power cable, plug it back in "MANUAL SETUP". The speaker impedance setting is muted. Turn up the volume. Connect the power cable firmly...
MCXSP10 Manual
Page 129
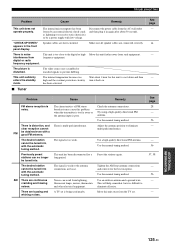
... 30 seconds. Use the manual tuning method. Adjust the antenna position to prevent dubbing. Preset the stations again. This will help somewhat, but it back on. ■ Tuner See page - 14 - - "CHECK SP WIRES" appears in again after about 1 hour for the best reception. Speaker cables are continuous crackling and hissing noises. This unit suddenly enters the standby mode. The characteristics of FM stereo broadcasts may...
... 30 seconds. Use the manual tuning method. Adjust the antenna position to prevent dubbing. Preset the stations again. This will help somewhat, but it back on. ■ Tuner See page - 14 - - "CHECK SP WIRES" appears in again after about 1 hour for the best reception. Speaker cables are continuous crackling and hissing noises. This unit suddenly enters the standby mode. The characteristics of FM stereo broadcasts may...

MCXSP10 Manual
Page 131
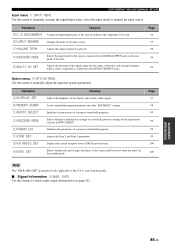
... ERROR Cause The number of this remote control. other unnecessary functions to the SOURCE position. - The remote control code was not correctly Set the remote control code correctly using "LIST OF REMOTE CONTROL CODES" at the end 103 of the Learning is not compatible - Replace all batteries. 9 The operation mode selector is full. with the the remote control ID of the connected HDMI components is Program the necessary functions independently into correctly set incorrectly. Direct sunlight or lighting (from the front panel...
... ERROR Cause The number of this remote control. other unnecessary functions to the SOURCE position. - The remote control code was not correctly Set the remote control code correctly using "LIST OF REMOTE CONTROL CODES" at the end 103 of the Learning is not compatible - Replace all batteries. 9 The operation mode selector is full. with the the remote control ID of the connected HDMI components is Program the necessary functions independently into correctly set incorrectly. Direct sunlight or lighting (from the front panel...

MCXSP10 Manual
Page 133
..., please contact a qualified YAMAHA service center. Check the speaker connections. Use speakers of the subwoofer. Notes • If the "ERROR" or "WARNING" screens appears, check the cause of volume level among speakers is not detected. Surround back speakers are connected, though surround L/R speakers are not detected. The "AUTO SETUP" procedure was unplugged during the "AUTO SETUP" procedure. Connect the surround back speaker to user activity. Connect the supplied optimizer microphone to the listening position. Run "AUTO SETUP" again. The difference...
..., please contact a qualified YAMAHA service center. Check the speaker connections. Use speakers of the subwoofer. Notes • If the "ERROR" or "WARNING" screens appears, check the cause of volume level among speakers is not detected. Surround back speakers are connected, though surround L/R speakers are not detected. The "AUTO SETUP" procedure was unplugged during the "AUTO SETUP" procedure. Connect the surround back speaker to user activity. Connect the supplied optimizer microphone to the listening position. Run "AUTO SETUP" again. The difference...


