
Owner's Manual
Page 5
... the antennas 29 Connecting the power cable 30 Turning on and off this unit 30 Setting the speaker impedance 31 AUTO SETUP 32 Introduction 32 Optimizer microphone setup 32 Using AUTO SETUP 33 BASIC OPERATION PLAYBACK 36 Basic operations 36 Additional operations 38 RECORDING 45 FM/AM TUNING 46 Automatic tuning 46...
... the antennas 29 Connecting the power cable 30 Turning on and off this unit 30 Setting the speaker impedance 31 AUTO SETUP 32 Introduction 32 Optimizer microphone setup 32 Using AUTO SETUP 33 BASIC OPERATION PLAYBACK 36 Basic operations 36 Additional operations 38 RECORDING 45 FM/AM TUNING 46 Automatic tuning 46...
Owner's Manual
Page 7
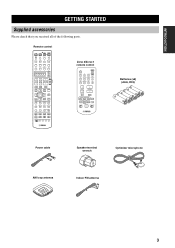
... you received all of the following parts. MUTE A-E/CAT. ID1 ID2 NUMBER ZONE 2 ZONE 3 GETTING STARTED Batteries (x6) (AAA, R03) Power cable Speaker terminal wrench Optimizer microphone AM loop antenna Indoor FM antenna 3
... you received all of the following parts. MUTE A-E/CAT. ID1 ID2 NUMBER ZONE 2 ZONE 3 GETTING STARTED Batteries (x6) (AAA, R03) Power cable Speaker terminal wrench Optimizer microphone AM loop antenna Indoor FM antenna 3

Owner's Manual
Page 11
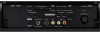
... The indicator around the button lights up when the unit is in the front panel display for private listening with TONE CONTROL. G OPTIMIZER MIC jack Use to connect the supplied optimizer microphone to the standby mode. M VOLUME Controls the volume level of the previously received station is automatically recalled. Note The frequency of...
... The indicator around the button lights up when the unit is in the front panel display for private listening with TONE CONTROL. G OPTIMIZER MIC jack Use to connect the supplied optimizer microphone to the standby mode. M VOLUME Controls the volume level of the previously received station is automatically recalled. Note The frequency of...
Owner's Manual
Page 36
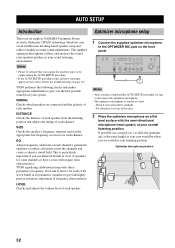
... sound field. LEVEL Checks and adjusts the volume level of speakers for each speaker. Optimizer microphone setup 1 Connect the supplied optimizer microphone to be when you the best possible sound from the listening position and adjusts the timing...Optimizer microphone position 32 YPAO equalizing calibration incorporates three parameters (frequency, level and Q factor) for loud test tones to the OPTIMIZER MIC jack on a flat level surface with unique sonic characteristics. AUTO SETUP AUTO SETUP Introduction This receiver employs YAMAHA Parametric Room Acoustic Optimizer...
... sound field. LEVEL Checks and adjusts the volume level of speakers for each speaker. Optimizer microphone setup 1 Connect the supplied optimizer microphone to be when you the best possible sound from the listening position and adjusts the timing...Optimizer microphone position 32 YPAO equalizing calibration incorporates three parameters (frequency, level and Q factor) for loud test tones to the OPTIMIZER MIC jack on a flat level surface with unique sonic characteristics. AUTO SETUP AUTO SETUP Introduction This receiver employs YAMAHA Parametric Room Acoustic Optimizer...

Owner's Manual
Page 114
... If the problem persists, the cables may be used have not been selected properly. Disconnect the optimizer microphone. OPT or ANALOG. Secure the connections. Select the front speakers by pressing SPEAKERS A or B...this unit to the standby mode, disconnect the power cable, and contact the nearest authorized YAMAHA dealer or service center. ■ General Problem Cause Remedy This unit fails to match ... is not connected or the plug is connected. The impedance setting is set to RX-V1600 in the standby mode soon after 30 seconds, then use it back in the progressive...
... If the problem persists, the cables may be used have not been selected properly. Disconnect the optimizer microphone. OPT or ANALOG. Secure the connections. Select the front speakers by pressing SPEAKERS A or B...this unit to the standby mode, disconnect the power cable, and contact the nearest authorized YAMAHA dealer or service center. ■ General Problem Cause Remedy This unit fails to match ... is not connected or the plug is connected. The impedance setting is set to RX-V1600 in the standby mode soon after 30 seconds, then use it back in the progressive...

Owner's Manual
Page 119
... (a) surround back speaker(s). Check the presence speaker connections. Turn off noisy electric equipment like air conditioners or move them away from the optimizer microphone. During AUTO SETUP Error message E-1:NO FRONT SP E-2:NO SURR.SP E-3:NO PRNS SP E-4:SBR->SBL E-5:NOISY E-6:CHECK SUR. A...quiet environment. test tones. Connect the surround back speaker to user activity. The AUTO SETUP procedure was unplugged Connect the supplied optimizer microphone to the OPTIMIZER MIC jack on the front panel. Run AUTO SETUP again. See page - 15 15 15 15 - - 15 32 ...
... (a) surround back speaker(s). Check the presence speaker connections. Turn off noisy electric equipment like air conditioners or move them away from the optimizer microphone. During AUTO SETUP Error message E-1:NO FRONT SP E-2:NO SURR.SP E-3:NO PRNS SP E-4:SBR->SBL E-5:NOISY E-6:CHECK SUR. A...quiet environment. test tones. Connect the surround back speaker to user activity. The AUTO SETUP procedure was unplugged Connect the supplied optimizer microphone to the OPTIMIZER MIC jack on the front panel. Run AUTO SETUP again. See page - 15 15 15 15 - - 15 32 ...
