
Setup Guide
Page 1
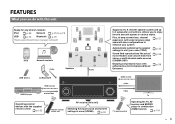
... from the following cables to build the system based on this document. ■ Speaker cables (depending on this unit. http://download.yamaha.com/ Cables necessary for U.S.A. ■ YPAO microphone Insert into the remote control in the correct polarity (+/-). ■ Power cable ...refer to "Owner 's Manual" on regions. ■ Easy Setup Guide (this document) This document explains how to set up a 5.1- AV Receiver 1 Preparations Accessories Check that the following accessories are supplied with this product. ■ Remote control ■ Batteries (AAA, R03, UM-4) (x...
... from the following cables to build the system based on this document. ■ Speaker cables (depending on this unit. http://download.yamaha.com/ Cables necessary for U.S.A. ■ YPAO microphone Insert into the remote control in the correct polarity (+/-). ■ Power cable ...refer to "Owner 's Manual" on regions. ■ Easy Setup Guide (this document) This document explains how to set up a 5.1- AV Receiver 1 Preparations Accessories Check that the following accessories are supplied with this product. ■ Remote control ■ Batteries (AAA, R03, UM-4) (x...
Setup Guide
Page 5
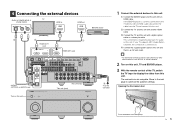
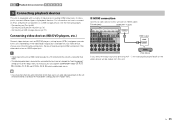
... R ANTENNA HD Radio (4 RADIO) 75Ω FM GND AM 5 OPTICAL SINGLE O AUDIO1 (OPTICAL or AUDIO) jack This unit (rear) This unit (front) NATURAL SOUND AV RECEIVER RX-A1010 Turn on this unit MAIN ZONE PURE DIRECT INPUT ON SCREEN OPTION TONE/BALANCE STRAIGHT 1 RETURN ENTER DISPLAY USB PROGRAM PHONES ZONE 2 SCENE 2 3 MULTI ZONE...
... R ANTENNA HD Radio (4 RADIO) 75Ω FM GND AM 5 OPTICAL SINGLE O AUDIO1 (OPTICAL or AUDIO) jack This unit (rear) This unit (front) NATURAL SOUND AV RECEIVER RX-A1010 Turn on this unit MAIN ZONE PURE DIRECT INPUT ON SCREEN OPTION TONE/BALANCE STRAIGHT 1 RETURN ENTER DISPLAY USB PROGRAM PHONES ZONE 2 SCENE 2 3 MULTI ZONE...
Setup Guide
Page 6
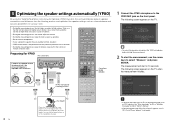
... This unit (front) Turned on the front panel. VOLUME CROSSOVER/ HIGH CUT MIN MAX MIN MAX YPAO microphone Listening position MAIN ZONE 2 CODE SET SOURCE RECEIVER AV 1 2 3 4 5 6 7 V-AUX AUDIO 1 2 3 4 MULTI PHONO DOCK TUNER SIRIUS CATEGORY FM AM INFO MEMORY NET PRESET USB TUN./CH MOVIE SLEEP SUR. The following ... to the YPAO MIC jack on the subwoofer and set it from the room. 5 Optimizing the speaker settings automatically (YPAO) By using the Yamaha Parametric room Acoustic Optimizer (YPAO) function, this function at ear height in 10 seconds.
... This unit (front) Turned on the front panel. VOLUME CROSSOVER/ HIGH CUT MIN MAX MIN MAX YPAO microphone Listening position MAIN ZONE 2 CODE SET SOURCE RECEIVER AV 1 2 3 4 5 6 7 V-AUX AUDIO 1 2 3 4 MULTI PHONO DOCK TUNER SIRIUS CATEGORY FM AM INFO MEMORY NET PRESET USB TUN./CH MOVIE SLEEP SUR. The following ... to the YPAO MIC jack on the subwoofer and set it from the room. 5 Optimizing the speaker settings automatically (YPAO) By using the Yamaha Parametric room Acoustic Optimizer (YPAO) function, this function at ear height in 10 seconds.

Setup Guide
Page 8
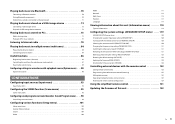
...back a BD/DVD. It may be heard from iPod (p.66) By using a USB cable supplied with iPod, an optional Yamaha iPod dock or an optional Yamaha iPod wireless system, you can enjoy iPod music on this unit. ■ Listening to FM/AM radio (p.55) ■...See "Troubleshooting" (p.126) in "Owner's Manual". If you can do with this unit" (p.6). © 2011 Yamaha Corporation YD503B0/ESEN1 Much more ) to feel surround sound produced by this unit effectively. MAIN ZONE 2 CODE SET SOURCE RECEIVER AV 1 2 3 4 5 6 7 V-AUX AUDIO 1 2 3 4 MULTI PHONO DOCK TUNER SIRIUS CATEGORY...
...back a BD/DVD. It may be heard from iPod (p.66) By using a USB cable supplied with iPod, an optional Yamaha iPod dock or an optional Yamaha iPod wireless system, you can enjoy iPod music on this unit. ■ Listening to FM/AM radio (p.55) ■...See "Troubleshooting" (p.126) in "Owner's Manual". If you can do with this unit" (p.6). © 2011 Yamaha Corporation YD503B0/ESEN1 Much more ) to feel surround sound produced by this unit effectively. MAIN ZONE 2 CODE SET SOURCE RECEIVER AV 1 2 3 4 5 6 7 V-AUX AUDIO 1 2 3 4 MULTI PHONO DOCK TUNER SIRIUS CATEGORY...

Owners Manual
Page 1
AV Receiver Owner's Manual Be sure to read "Safety Brochure" (supplied booklet) before using this unit. English for Canada, Europe, Asia, Africa, Oceania and Latin America En 1
AV Receiver Owner's Manual Be sure to read "Safety Brochure" (supplied booklet) before using this unit. English for Canada, Europe, Asia, Africa, Oceania and Latin America En 1
Owners Manual
Page 3
Playing back music via Bluetooth 70 Connecting a Bluetooth receiver 70 Pairing Bluetooth components 70 Establishing a wireless connection and playing back 71 Playing back music stored on a USB storage device 72 Connecting a USB storage device ...
Playing back music via Bluetooth 70 Connecting a Bluetooth receiver 70 Pairing Bluetooth components 70 Establishing a wireless connection and playing back 71 Playing back music stored on a USB storage device 72 Connecting a USB storage device ...
Owners Manual
Page 6
...you to enjoy favorite acoustic spaces in combination (HDMI Control) p.144 En 6 Allows you can do with the supplied remote control p.123 AV receiver (this unit) Remote control of this unit Ready for any kind of contents iPod p.65 Network p.75 to p.78 USB p.72 Bluetooth p.70... *Requires optional Bluetooth receiver for playback via Bluetooth BD/DVD player HDMI Control Audio/Video Operating external devices with this unit Selecting the input source and favorite settings ...
...you to enjoy favorite acoustic spaces in combination (HDMI Control) p.144 En 6 Allows you can do with the supplied remote control p.123 AV receiver (this unit) Remote control of this unit Ready for any kind of contents iPod p.65 Network p.75 to p.78 USB p.72 Bluetooth p.70... *Requires optional Bluetooth receiver for playback via Bluetooth BD/DVD player HDMI Control Audio/Video Operating external devices with this unit Selecting the input source and favorite settings ...

Owners Manual
Page 8
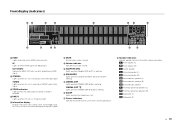
An iPod wireless system is connected (p.66) 3 Front display Displays information (p.10). 4 Remote control sensor Receives remote control signals (p.5). 5 PURE DIRECT Enables/disables Pure Direct (p.59). 6 INPUT Selects an input source. 7 7 Front panel door For protecting ... the front panel door • To use controls or jacks behind the front panel door. Part names and functions Front panel 1 2 NATURAL SOUND AV RECEIVER RX-A2010 MAIN ZONE 3 4 INPUT ON SCREEN OPTION TONE/BALANCE STRAIGHT 1 RETURN ENTER DISPLAY USB PROGRAM PHONES ZONE 2 SCENE 2 3 INFO 4 MULTI ZONE...
An iPod wireless system is connected (p.66) 3 Front display Displays information (p.10). 4 Remote control sensor Receives remote control signals (p.5). 5 PURE DIRECT Enables/disables Pure Direct (p.59). 6 INPUT Selects an input source. 7 7 Front panel door For protecting ... the front panel door • To use controls or jacks behind the front panel door. Part names and functions Front panel 1 2 NATURAL SOUND AV RECEIVER RX-A2010 MAIN ZONE 3 4 INPUT ON SCREEN OPTION TONE/BALANCE STRAIGHT 1 RETURN ENTER DISPLAY USB PROGRAM PHONES ZONE 2 SCENE 2 3 INFO 4 MULTI ZONE...
Owners Manual
Page 10
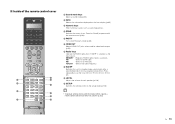
...name, sound mode name, etc). C Speaker indicators Indicate speaker terminals from which signals are being input. TUNED Lights up when this unit is receiving an FM/AM radio station signal. 3 ZONE indicators Light up when the audio output to Zone2 or Zone3 is enabled. 4 PARTY Lights up... signal. 2 STEREO Lights up when this unit is on. A SLEEP Lights up when HDMI signals are output. IN Lights up when the sleep timer is receiving a stereo FM radio signal. Front display (indicators) 12 3 4 5 67 8 STEREO TUNED ZONE ZONE IN OUT 1 OUT 2 2 3 ENHANCER SLEEP PARTY 3 9 0 AB...
...name, sound mode name, etc). C Speaker indicators Indicate speaker terminals from which signals are being input. TUNED Lights up when this unit is receiving an FM/AM radio station signal. 3 ZONE indicators Light up when the audio output to Zone2 or Zone3 is enabled. 4 PARTY Lights up... signal. 2 STEREO Lights up when this unit is on. A SLEEP Lights up when HDMI signals are output. IN Lights up when the sleep timer is receiving a stereo FM radio signal. Front display (indicators) 12 3 4 5 67 8 STEREO TUNED ZONE ZONE IN OUT 1 OUT 2 2 3 ENHANCER SLEEP PARTY 3 9 0 AB...

Owners Manual
Page 11
... support the trigger function (p.42). I PRE OUT jacks For connecting subwoofers with SCENE link playback (p.42), or connecting an infrared signal receiver/emitter to output video/audio signals (p.29). K AC IN For connecting the supplied power cable (p.43). BACK (REAR) SUBWOOFER CENTER...HI J K 1 PHONO jacks For connecting a turntable (p.37). 2 DOCK jack For connecting an optional Yamaha products such as iPod dock (p.66), iPod wireless system (p.66), and Bluetooth receiver (p.70). 3 AV1~4 jacks For connecting video/audio playback devices to input video/ audio signals (p.35...
... support the trigger function (p.42). I PRE OUT jacks For connecting subwoofers with SCENE link playback (p.42), or connecting an infrared signal receiver/emitter to output video/audio signals (p.29). K AC IN For connecting the supplied power cable (p.43). BACK (REAR) SUBWOOFER CENTER...HI J K 1 PHONO jacks For connecting a turntable (p.37). 2 DOCK jack For connecting an optional Yamaha products such as iPod dock (p.66), iPod wireless system (p.66), and Bluetooth receiver (p.70). 3 AV1~4 jacks For connecting video/audio playback devices to input video/ audio signals (p.35...
Owners Manual
Page 12
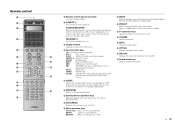
...the external device to operate with the remote control (p.125). C VOLUME Adjusts the volume. for FM radio reception. SOURCE/RECEIVER Switches the devices (this unit or external device) to operate with the remote control without switching the input source. 5 ... assigned input source, sound program, HDMI output and various settings at once. B TV operation keys Operate TV input, TV volume, etc (p.124). Remote control 1 2 3 4 5 SOURCE RECEIVER AV 1 2 3 5 6 7 AUDIO 1 2 3 PHONO MULTI USB DOCK TUNER [ A ] SCENE 1 2 3 4 V-AUX 4 NET [ B ] 4 6 7 8 9 0 7 A B PROGRAM ...
...the external device to operate with the remote control (p.125). C VOLUME Adjusts the volume. for FM radio reception. SOURCE/RECEIVER Switches the devices (this unit or external device) to operate with the remote control without switching the input source. 5 ... assigned input source, sound program, HDMI output and various settings at once. B TV operation keys Operate TV input, TV volume, etc (p.124). Remote control 1 2 3 4 5 SOURCE RECEIVER AV 1 2 3 5 6 7 AUDIO 1 2 3 PHONO MULTI USB DOCK TUNER [ A ] SCENE 1 2 3 4 V-AUX 4 NET [ B ] 4 6 7 8 9 0 7 A B PROGRAM ...
Owners Manual
Page 13
... of time has elapsed (sleep timer). O SLEEP Switches this unit to be used for each speaker (p.106). ■ Inside of the remote control cover SOURCE RECEIVER H I INFO Selects the information displayed on /off ). Q SETUP Switches the remote control to AM radio. AM Switches to the setup mode (p.123) • To operate...
... of time has elapsed (sleep timer). O SLEEP Switches this unit to be used for each speaker (p.106). ■ Inside of the remote control cover SOURCE RECEIVER H I INFO Selects the information displayed on /off ). Q SETUP Switches the remote control to AM radio. AM Switches to the setup mode (p.123) • To operate...
Owners Manual
Page 35
... AV1~7, the video/audio played back on the video device will be output to a TV connected to this unit with an HDMI cable. Connecting a Bluetooth receiver (p.70) - BACK SUBWOOFER ZONE 2 ZONE 3 FRONT SURROUND SUR. We recommend using an HDMI connection if the video device has an HDMI output jack. • Videos...
... AV1~7, the video/audio played back on the video device will be output to a TV connected to this unit with an HDMI cable. Connecting a Bluetooth receiver (p.70) - BACK SUBWOOFER ZONE 2 ZONE 3 FRONT SURROUND SUR. We recommend using an HDMI connection if the video device has an HDMI output jack. • Videos...

Owners Manual
Page 42
..., specify the device type in "Device Control" (p.96) in the "Scene" menu. • You also connect an infrared signal receiver/emitter to one of the REMOTE (OUT) jacks, you can start playback on this unit. Connecting a device compatible with the trigger ... 3/R.PRESENCE R EXTRA SP2 L CENTER R FRONT L ZONE 2/ZONE 3/F.PRESENCE/ AC BI-AMP R EXTRA SP1 L System connection input NGLE SPEAKER IMPEDANCE Yamaha subwoofer that supports a system connection • You can configure the trigger function settings in "Trigger Output1" and "Trigger Output2" (p.116) in conjunction ...
..., specify the device type in "Device Control" (p.96) in the "Scene" menu. • You also connect an infrared signal receiver/emitter to one of the REMOTE (OUT) jacks, you can start playback on this unit. Connecting a device compatible with the trigger ... 3/R.PRESENCE R EXTRA SP2 L CENTER R FRONT L ZONE 2/ZONE 3/F.PRESENCE/ AC BI-AMP R EXTRA SP1 L System connection input NGLE SPEAKER IMPEDANCE Yamaha subwoofer that supports a system connection • You can configure the trigger function settings in "Trigger Output1" and "Trigger Output2" (p.116) in conjunction ...

Owners Manual
Page 44
En 44 1 2 3 4 5 6 7 8 Language setting 9 SOURCE RECEIVER RECEIVER AV 1 2 3 5 6 7 AUDIO 1 2 3 PHONO MULTI DOCK TUNER USB [A] SCENE 1 2 3 4 V-AUX 4 NET [B] 4 PROGRAM MUTE VOLUME TOP MENU ON SCREEN POP-UP/MENU OPTION ENTER RETURN DISPLAY ON ... STRAIGHT PURE DIRECT 8 Selecting an on-screen menu language Select a desired on-screen menu language from English (default), Japanese, French, German, Spanish and Russian. 1 Press RECEIVER to turn on this unit. 2 Turn on the TV and switch the TV input to display the video from this unit. 3 Press ON SCREEN. 4 Use...
En 44 1 2 3 4 5 6 7 8 Language setting 9 SOURCE RECEIVER RECEIVER AV 1 2 3 5 6 7 AUDIO 1 2 3 PHONO MULTI DOCK TUNER USB [A] SCENE 1 2 3 4 V-AUX 4 NET [B] 4 PROGRAM MUTE VOLUME TOP MENU ON SCREEN POP-UP/MENU OPTION ENTER RETURN DISPLAY ON ... STRAIGHT PURE DIRECT 8 Selecting an on-screen menu language Select a desired on-screen menu language from English (default), Japanese, French, German, Spanish and Russian. 1 Press RECEIVER to turn on this unit. 2 Turn on the TV and switch the TV input to display the video from this unit. 3 Press ON SCREEN. 4 Use...

Owners Manual
Page 45
...at ear height in place. YPAO microphone Listening position Ear height Place the YPAO microphone at high volume. 1 2 3 4 5 6 7 8 9 Automatic speaker setup SOURCE RECEIVER RECEIVER AV 1 2 3 5 6 7 AUDIO 1 2 3 PHONO MULTI DOCK TUNER USB [A] SCENE 1 2 3 4 V-AUX 4 NET [B] 4 PROGRAM MUTE VOLUME TOP...VOL LIVE CLUB STEREO TV CH ENTERTAIN STRAIGHT PURE DIRECT 9 Optimizing the speaker settings automatically (YPAO) By using the Yamaha Parametric room Acoustic Optimizer (YPAO) function, this unit automatically detects speaker connections and distances from this unit. 3 ...
...at ear height in place. YPAO microphone Listening position Ear height Place the YPAO microphone at high volume. 1 2 3 4 5 6 7 8 9 Automatic speaker setup SOURCE RECEIVER RECEIVER AV 1 2 3 5 6 7 AUDIO 1 2 3 PHONO MULTI DOCK TUNER USB [A] SCENE 1 2 3 4 V-AUX 4 NET [B] 4 PROGRAM MUTE VOLUME TOP...VOL LIVE CLUB STEREO TV CH ENTERTAIN STRAIGHT PURE DIRECT 9 Optimizing the speaker settings automatically (YPAO) By using the Yamaha Parametric room Acoustic Optimizer (YPAO) function, this unit automatically detects speaker connections and distances from this unit. 3 ...

Owners Manual
Page 46
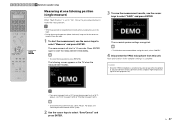
...) 1 4 5 213 Multi measure (1 listening position + 4 circumferences) Multi measure (2 listening positions + front/back) 2 315 4 3 12 4 Now all of those positions (multi measure). 1 2 3 4 5 6 7 8 9 Automatic speaker setup SOURCE RECEIVER The following page to start the measurement. When "Multi Position" is set to "No": "Measuring at one position. b Use the cursor keys to select "Multi...
...) 1 4 5 213 Multi measure (1 listening position + 4 circumferences) Multi measure (2 listening positions + front/back) 2 315 4 3 12 4 Now all of those positions (multi measure). 1 2 3 4 5 6 7 8 9 Automatic speaker setup SOURCE RECEIVER The following page to start the measurement. When "Multi Position" is set to "No": "Measuring at one position. b Use the cursor keys to select "Multi...
Owners Manual
Page 47
...; Since the YPAO microphone is sensitive to heat, do not place the microphone in any place where it from this unit. 1 2 3 4 5 6 7 8 9 Automatic speaker setup SOURCE RECEIVER AV 1 2 3 5 6 7 AUDIO 1 2 3 PHONO MULTI DOCK TUNER USB [A] SCENE 1 2 3 4 V-AUX 4 NET [B] 4 PROGRAM MUTE VOLUME TOP MENU ON SCREEN POP-UP/MENU OPTION ENTER RETURN DISPLAY Cursor...
...; Since the YPAO microphone is sensitive to heat, do not place the microphone in any place where it from this unit. 1 2 3 4 5 6 7 8 9 Automatic speaker setup SOURCE RECEIVER AV 1 2 3 5 6 7 AUDIO 1 2 3 PHONO MULTI DOCK TUNER USB [A] SCENE 1 2 3 4 V-AUX 4 NET [B] 4 PROGRAM MUTE VOLUME TOP MENU ON SCREEN POP-UP/MENU OPTION ENTER RETURN DISPLAY Cursor...

Owners Manual
Page 48
... the measurement at the first position finishes. 3 If the measurement at all listening positions (up to select "CANCEL" and press ENTER. 1 2 3 4 5 6 7 8 9 Automatic speaker setup SOURCE RECEIVER AV 1 2 3 5 6 7 AUDIO 1 2 3 PHONO MULTI DOCK TUNER USB [A] SCENE 1 2 3 4 V-AUX 4 NET [B] 4 PROGRAM MUTE VOLUME TOP MENU ON SCREEN POP-UP/MENU OPTION ENTER RETURN DISPLAY Cursor...
... the measurement at the first position finishes. 3 If the measurement at all listening positions (up to select "CANCEL" and press ENTER. 1 2 3 4 5 6 7 8 9 Automatic speaker setup SOURCE RECEIVER AV 1 2 3 5 6 7 AUDIO 1 2 3 PHONO MULTI DOCK TUNER USB [A] SCENE 1 2 3 4 V-AUX 4 NET [B] 4 PROGRAM MUTE VOLUME TOP MENU ON SCREEN POP-UP/MENU OPTION ENTER RETURN DISPLAY Cursor...

Owners Manual
Page 49
1 2 3 4 5 6 7 8 9 Automatic speaker setup SOURCE RECEIVER AV 1 2 3 5 6 7 AUDIO 1 2 3 PHONO MULTI DOCK TUNER USB [A] SCENE 1 2 3 4 V-AUX 4 NET [B] 4 PROGRAM MUTE VOLUME TOP MENU ON SCREEN POP-UP/MENU OPTION ENTER RETURN DISPLAY ON ...
1 2 3 4 5 6 7 8 9 Automatic speaker setup SOURCE RECEIVER AV 1 2 3 5 6 7 AUDIO 1 2 3 PHONO MULTI DOCK TUNER USB [A] SCENE 1 2 3 4 V-AUX 4 NET [B] 4 PROGRAM MUTE VOLUME TOP MENU ON SCREEN POP-UP/MENU OPTION ENTER RETURN DISPLAY ON ...


