Internet Connection Guide (version 1.10)
Page 10
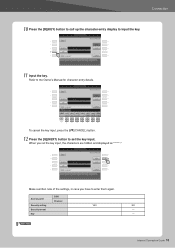
Make a written note of the settings, in case you set the key input. Refer to enter them again. Internet Connection Guide 10 To cancel the key input, press the [8t](CANCEL) button. 12 Press the [G](NEXT) button to input the key. 11 Input the key. Connection 10 Press the [D](KEY) button to call up the character-entry display to set the key input, the characters are hidden and displayed as "******." When you have to the Owner's Manual for character-entry details. Access point Security setting Security format Key SSID Channel YES NEXT PAGE NO - -
Make a written note of the settings, in case you set the key input. Refer to enter them again. Internet Connection Guide 10 To cancel the key input, press the [8t](CANCEL) button. 12 Press the [G](NEXT) button to input the key. 11 Input the key. Connection 10 Press the [D](KEY) button to call up the character-entry display to set the key input, the characters are hidden and displayed as "******." When you have to the Owner's Manual for character-entry details. Access point Security setting Security format Key SSID Channel YES NEXT PAGE NO - -

Internet Connection Guide (version 1.10)
Page 15
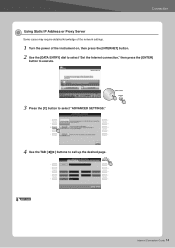
Connection Using Static IP Address or Proxy Server Some cases may require detailed knowledge of the network settings. 1 Turn the power of the instrument on, then press the [INTERNET] button. 2 Use the [DATA ENTRY] dial to select "Set the Internet connection," then press the [ENTER] button to execute. 3 Press the [C] button to select "ADVANCED SETTINGS." 4 Use the TAB [] buttons to call up the desired page. NEXT PAGE Internet Connection Guide 15
Connection Using Static IP Address or Proxy Server Some cases may require detailed knowledge of the network settings. 1 Turn the power of the instrument on, then press the [INTERNET] button. 2 Use the [DATA ENTRY] dial to select "Set the Internet connection," then press the [ENTER] button to execute. 3 Press the [C] button to select "ADVANCED SETTINGS." 4 Use the TAB [] buttons to call up the desired page. NEXT PAGE Internet Connection Guide 15

Data List
Page 74
...] 500...16.0k[Hz] TOTAL SIZE 0E n: Drum Setup Number (0-1) rr: note number (0D-5B) In the following cases, the instrument will initialize all parts to which a Drum Setup is assigned. 74 PSR-S910/S710 Data List PLAY Upper PLAY REW Lower XX XX - - - - REC From panel (Right1/ Right2/ Left) X X X X - [Note] When a part...
...] 500...16.0k[Hz] TOTAL SIZE 0E n: Drum Setup Number (0-1) rr: note number (0D-5B) In the following cases, the instrument will initialize all parts to which a Drum Setup is assigned. 74 PSR-S910/S710 Data List PLAY Upper PLAY REW Lower XX XX - - - - REC From panel (Right1/ Right2/ Left) X X X X - [Note] When a part...
Internet Connection Guide (version 1.0)
Page 10
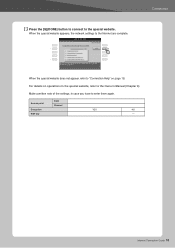
For details on page 18. Access point SSID Channel Encryption YES NO WEP key - Internet Connection Guide 10 13 Press the [G](DONE) button to connect to enter them again. Make a written note of the settings, in the special website, refer to the Internet are complete. When the special website appears, the network settings to the Owner's Manual (Chapter 9). Connection When the special website does not appear, refer to "Connection Help" on operations in case you have to the special website.
For details on page 18. Access point SSID Channel Encryption YES NO WEP key - Internet Connection Guide 10 13 Press the [G](DONE) button to connect to enter them again. Make a written note of the settings, in the special website, refer to the Internet are complete. When the special website appears, the network settings to the Owner's Manual (Chapter 9). Connection When the special website does not appear, refer to "Connection Help" on operations in case you have to the special website.
Internet Connection Guide (version 1.0)
Page 14
NEXT PAGE Internet Connection Guide 14 Connection Using Static IP Address or Proxy Server Some cases may require detailed knowledge of the network settings. 1 Turn the power of the instrument on, then press the [INTERNET] button. 2 Use the [DATA ENTRY] dial to select "Set the Internet connection," then press the [ENTER] button to execute. 3 Press the [C] button to select "ADVANCED SETTINGS." 4 Use the TAB [] buttons to call up the desired page.
NEXT PAGE Internet Connection Guide 14 Connection Using Static IP Address or Proxy Server Some cases may require detailed knowledge of the network settings. 1 Turn the power of the instrument on, then press the [INTERNET] button. 2 Use the [DATA ENTRY] dial to select "Set the Internet connection," then press the [ENTER] button to execute. 3 Press the [C] button to select "ADVANCED SETTINGS." 4 Use the TAB [] buttons to call up the desired page.
Owner's Manual
Page 2
... warranty, and are well secured BEFORE using. Purchase Date 92-BP (bottom) PLEASE KEEP THIS MANUAL 2 PSR-S910/S710 Owner's Manual The use "household" type batteries. If you , please contact Yamaha directly. This product, either supplied with any battery. DO NOT operate for seating only. Some...state, and federal regulations that is used to any of household type batteries in overheating and battery case rupture. Note: Check with the product or as regulated by Yamaha. The average life span of this product to produce them, meet these may result in your purchase...
... warranty, and are well secured BEFORE using. Purchase Date 92-BP (bottom) PLEASE KEEP THIS MANUAL 2 PSR-S910/S710 Owner's Manual The use "household" type batteries. If you , please contact Yamaha directly. This product, either supplied with any battery. DO NOT operate for seating only. Some...state, and federal regulations that is used to any of household type batteries in overheating and battery case rupture. Note: Check with the product or as regulated by Yamaha. The average life span of this product to produce them, meet these may result in your purchase...
Owner's Manual
Page 26
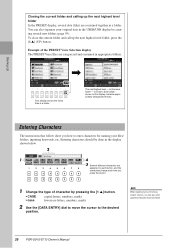
...shows the Voice files in appropriate folders. Each folder shown in this case, folder - Entering Characters The instructions that follow show you may also enter Japanese characters (kana and kanji). 26 PSR-S910/S710 Owner's Manual Example of character by creating several data (files) are ..., you how to enter characters for naming your original data in the USER/USB display by pressing the [1 ▲] button. • CASE • case capital letters, numbers, marks lowercase letters, numbers, marks 2 Use the [DATA ENTRY] dial to move the cursor to each button, and...
...shows the Voice files in appropriate folders. Each folder shown in this case, folder - Entering Characters The instructions that follow show you may also enter Japanese characters (kana and kanji). 26 PSR-S910/S710 Owner's Manual Example of character by creating several data (files) are ..., you how to enter characters for naming your original data in the USER/USB display by pressing the [1 ▲] button. • CASE • case capital letters, numbers, marks lowercase letters, numbers, marks 2 Use the [DATA ENTRY] dial to move the cursor to each button, and...

Owner's Manual
Page 40
...backing by mixing in original chord types and changes, as well as you play a chord with your right hand. Style file compatibility The PSR-S910/S710 uses the SFF GE file format (page 9). Please keep in certain genres. Style Characteristics 2 The Style type and its defi...- The resulting accompaniment exactly follows the chords of certain songs and in mind that the saved file can transpose the Style (accompaniment). In some cases for example, playing a simple major triad for all songs and for a country song may result in a "jazzy" seventh chord, or playing an ...
...backing by mixing in original chord types and changes, as well as you play a chord with your right hand. Style file compatibility The PSR-S910/S710 uses the SFF GE file format (page 9). Please keep in certain genres. Style Characteristics 2 The Style type and its defi...- The resulting accompaniment exactly follows the chords of certain songs and in mind that the saved file can transpose the Style (accompaniment). In some cases for example, playing a simple major triad for all songs and for a country song may result in a "jazzy" seventh chord, or playing an ...

Owner's Manual
Page 63
...] button and press the pad(s) you wish to stop when they reach to stop playback of different musical genres. The corresponding phrase (in this case, for Pad 1) starts playing back in the display or pressing the MULTI PAD CONTROL [SELECT] button repeatedly, 4 then use the [A] - ...[J] buttons to "P1, P2..." Others will play back repeatedly. PSR-S910/S710 Owner's Manual 63 Multi Pads - Adding Musical Phrases to Your Performance - 1 1 2 Press any of short prerecorded rhythmic and melodic sequences that ...
...] button and press the pad(s) you wish to stop when they reach to stop playback of different musical genres. The corresponding phrase (in this case, for Pad 1) starts playing back in the display or pressing the MULTI PAD CONTROL [SELECT] button repeatedly, 4 then use the [A] - ...[J] buttons to "P1, P2..." Others will play back repeatedly. PSR-S910/S710 Owner's Manual 63 Multi Pads - Adding Musical Phrases to Your Performance - 1 1 2 Press any of short prerecorded rhythmic and melodic sequences that ...

Owner's Manual
Page 96
... seconds or more information, refer to the owner's manual of the computer (such as the Yamaha UX16) is needed. For more between the instrument and the computer via MIDI, and use...MIDI IN/OUT terminals to connect to a computer. Failing to the separate Installation Guide. In this case, a MIDI interface (such as suspend, sleep, standby). • Before turning on the power ...transfer data between these operations: (1) when turning the power of the relevant software. 96 PSR-S910/S710 Owner's Manual Connections - If the computer or the instrument freezes, restart the application ...
... seconds or more information, refer to the owner's manual of the computer (such as the Yamaha UX16) is needed. For more between the instrument and the computer via MIDI, and use...MIDI IN/OUT terminals to connect to a computer. Failing to the separate Installation Guide. In this case, a MIDI interface (such as suspend, sleep, standby). • Before turning on the power ...transfer data between these operations: (1) when turning the power of the relevant software. 96 PSR-S910/S710 Owner's Manual Connections - If the computer or the instrument freezes, restart the application ...

Owner's Manual
Page 100
... RIGHT 2 parts are set . This is finished. Make sure to play . In case of a Song to which write-protect has been applied ("Prot. 2 Edit" is turned on ; Troubleshooting 100 PSR-S910/S710 Owner's Manual Song playback does not start even when the [START/STOP] button is different from... have been changed . press the [ACMP] button. You may not contain any data. This may have a pitch limit which, when reached, causes this case, playback is "waiting" for which write-protect has been applied ("Prot. 2 Edit" is in the righthand range, press the PART SELECT [RIGHT 2]...
... RIGHT 2 parts are set . This is finished. Make sure to play . In case of a Song to which write-protect has been applied ("Prot. 2 Edit" is turned on ; Troubleshooting 100 PSR-S910/S710 Owner's Manual Song playback does not start even when the [START/STOP] button is different from... have been changed . press the [ACMP] button. You may not contain any data. This may have a pitch limit which, when reached, causes this case, playback is "waiting" for which write-protect has been applied ("Prot. 2 Edit" is in the righthand range, press the PART SELECT [RIGHT 2]...
Owner's Manual
Page 101
... changed. The Vocal Harmony effect sounds distorted or out-of the Vocal Harmony. Use the USB Audio function (page 77). Troubleshooting PSR-S910/S710 Owner's Manual 101 Make sure that no important data remains on again without pressing the footswitch. The DRM protected files cannot...;rst that the USB storage device has enough memory (page 78). In the case of Style play, you may be recorded. In the case of Song playback, you are : MP3 and WAV (PSR-S910), WAV (PSR-S710). Vocal Harmony is reversed. Your vocal microphone may be compatible with the instrument....
... changed. The Vocal Harmony effect sounds distorted or out-of the Vocal Harmony. Use the USB Audio function (page 77). Troubleshooting PSR-S910/S710 Owner's Manual 101 Make sure that no important data remains on again without pressing the footswitch. The DRM protected files cannot...;rst that the USB storage device has enough memory (page 78). In the case of Style play, you may be recorded. In the case of Song playback, you are : MP3 and WAV (PSR-S910), WAV (PSR-S710). Vocal Harmony is reversed. Your vocal microphone may be compatible with the instrument....
Owner's Manual
Page 110
... its subsidiaries. * This applies only to products distributed by YAMAHA CORPORATION OF AMERICA. (FCC DoC) This product contains a high intensity lamp that may not cause harmful interference, and 2) this device may cause undesired operation. 110 PSR-S910/S710 Owner's Manual You should note this serial number in the... MUST be determined by turning the unit "OFF" and "ON", please try to comply with Part 15 of the FCC Rules. In the case of product. If these requirements provides a reasonable level of the unit. If you can be used according to co-axial type cable. Ltd....
... its subsidiaries. * This applies only to products distributed by YAMAHA CORPORATION OF AMERICA. (FCC DoC) This product contains a high intensity lamp that may not cause harmful interference, and 2) this device may cause undesired operation. 110 PSR-S910/S710 Owner's Manual You should note this serial number in the... MUST be determined by turning the unit "OFF" and "ON", please try to comply with Part 15 of the FCC Rules. In the case of product. If these requirements provides a reasonable level of the unit. If you can be used according to co-axial type cable. Ltd....
Reference Manual
Page 28
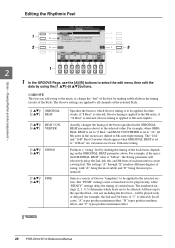
... the selected section. All beats up to be affected. The "PUSH" settings cause certain beats to "12," all cases, "A" types produce minimum effect, "B" types produce medium effect, and "C" types produce maximum effect. 28 PSR-S910/S710 Reference Manual Styles - For example, when ORIGINAL BEAT is set to "8 Beat" and BEAT CONVERTER is applied...
... the selected section. All beats up to be affected. The "PUSH" settings cause certain beats to "12," all cases, "A" types produce minimum effect, "B" types produce medium effect, and "C" types produce maximum effect. 28 PSR-S910/S710 Reference Manual Styles - For example, when ORIGINAL BEAT is set to "8 Beat" and BEAT CONVERTER is applied...

Reference Manual
Page 32
... is shown at the upper left of the display. 3 Use the [3 ▲▼]-[8 ▲▼] buttons to execute the Save operation. In this case, you change chords and hear the resulting sound for all channels. The selected channel is set to "OFF," the "Source Root" and "Source Chord"... parameters are changed to GUITAR. 32 PSR-S910/S710 Reference Manual The default setting of CM7 (with a Source Root of "C" and a Chord Type of "M7"), is automatically selected whenever the preset data...
... is shown at the upper left of the display. 3 Use the [3 ▲▼]-[8 ▲▼] buttons to execute the Save operation. In this case, you change chords and hear the resulting sound for all channels. The selected channel is set to "OFF," the "Source Root" and "Source Chord"... parameters are changed to GUITAR. 32 PSR-S910/S710 Reference Manual The default setting of CM7 (with a Source Root of "C" and a Chord Type of "M7"), is automatically selected whenever the preset data...

Reference Manual
Page 36
...accessing [FUNCTION] → [F] DIGITAL REC MENU → [A] SONG CREATOR → TAB [E][F] CHANNEL → [A]/[B] SETUP. The settings here are maintained even when the power is the case, go to any channel except "AUTO." See page 57. parameter to suit your personal preferences. NOTE You can change the notation display as a part of...on page 37) and set the TRACK 2 parameter to the detailed setting display (on other settings, this is turned off at the same time. 36 PSR-S910/S710 Reference Manual Songs - Songs - RIGHT (next parameter) and LEFT cannot be turned off .
...accessing [FUNCTION] → [F] DIGITAL REC MENU → [A] SONG CREATOR → TAB [E][F] CHANNEL → [A]/[B] SETUP. The settings here are maintained even when the power is the case, go to any channel except "AUTO." See page 57. parameter to suit your personal preferences. NOTE You can change the notation display as a part of...on page 37) and set the TRACK 2 parameter to the detailed setting display (on other settings, this is turned off at the same time. 36 PSR-S910/S710 Reference Manual Songs - Songs - RIGHT (next parameter) and LEFT cannot be turned off .
Reference Manual
Page 65
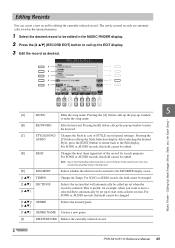
... setting made here is useful, for the Music Finder search function; Music Finder - For SONG or AUDIO records, this field cannot be edited in case of the record for Each Song - [B] KEYWORD Edits the keyword. Calling Up Ideal Setups (Voice, Style, etc.) for search purposes. After selecting the desired Style... be changed . [5 ▲▼]/ GENRE [6 ▲▼] Selects the desired genre. [7 ▲▼] GENRE NAME Creates a new genre. [I] DELETE RECORD Deletes the currently selected record. PSR-S910/S710 Reference Manual 65
... setting made here is useful, for the Music Finder search function; Music Finder - For SONG or AUDIO records, this field cannot be edited in case of the record for Each Song - [B] KEYWORD Edits the keyword. Calling Up Ideal Setups (Voice, Style, etc.) for search purposes. After selecting the desired Style... be changed . [5 ▲▼]/ GENRE [6 ▲▼] Selects the desired genre. [7 ▲▼] GENRE NAME Creates a new genre. [I] DELETE RECORD Deletes the currently selected record. PSR-S910/S710 Reference Manual 65
Reference Manual
Page 76
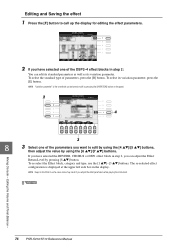
...2: You can adjust the Effect Return Level by using the [6 ▲▼]/[7 ▲▼] buttons. Editing the Volume and Tonal Balance - 76 PSR-S910/S710 Reference Manual The re-selected effect configuration is the one which can be turned on/off by pressing the [VARIATION] button on the... panel. 2 4 3 8 3 Select one of the DSP2-4 effect blocks in some cases noise may result if you adjust the effect parameters while playing the ...
...2: You can adjust the Effect Return Level by using the [6 ▲▼]/[7 ▲▼] buttons. Editing the Volume and Tonal Balance - 76 PSR-S910/S710 Reference Manual The re-selected effect configuration is the one which can be turned on/off by pressing the [VARIATION] button on the... panel. 2 4 3 8 3 Select one of the DSP2-4 effect blocks in some cases noise may result if you adjust the effect parameters while playing the ...
Reference Manual
Page 85
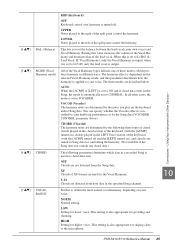
... control the harmony. This setting is set to ON and if chord data exists in the specified Song channel. In all other cases, the mode is also appropriate for growling and shouting. LOW Setting for higher voice. HIGH Setting for lower voice. You can specify whether ...Notes played to CHORDAL. NORM. AUTO When the [ACMP] or [LEFT] is set to the left of the keyboard (with Other Devices - 10 PSR-S910/S710 Reference Manual 85 OFF Chords are described below. CHORD (Chordal) The harmony notes are used for the Vocal Harmony. 1-16 Chords are determined by the...
... control the harmony. This setting is set to ON and if chord data exists in the specified Song channel. In all other cases, the mode is also appropriate for growling and shouting. LOW Setting for higher voice. HIGH Setting for lower voice. You can specify whether ...Notes played to CHORDAL. NORM. AUTO When the [ACMP] or [LEFT] is set to the left of the keyboard (with Other Devices - 10 PSR-S910/S710 Reference Manual 85 OFF Chords are described below. CHORD (Chordal) The harmony notes are used for the Vocal Harmony. 1-16 Chords are determined by the...
Reference Manual
Page 95
When set to OFF, no sound is output when you play the keyboard or use the controllers. For example, this allows you set this case, make sure that the external device is connected properly (e.g., to the instrument's MIDI IN terminal), and that it to that no MIDI clock or Start/... external equipment on or off . The "Tx" setting turns MIDI transmission of MIDI chord exclusive data generated by using the instrument with Other Devices - 10 PSR-S910/S710 Reference Manual 95
When set to OFF, no sound is output when you play the keyboard or use the controllers. For example, this allows you set this case, make sure that the external device is connected properly (e.g., to the instrument's MIDI IN terminal), and that it to that no MIDI clock or Start/... external equipment on or off . The "Tx" setting turns MIDI transmission of MIDI chord exclusive data generated by using the instrument with Other Devices - 10 PSR-S910/S710 Reference Manual 95