
Owner's Manual
Page 5
... connect to a wide range of a high-performance computer recording system that is transferred in both directions-from the mixer to four stereo inputs, the MW10 can use high-quality phantom-powered condenser microphones for choosing a Yamaha MW10 USB Mixing Studio. Connections 7 3. Cubase LE DAW Software Supplied (page 7) Cubase LE software, included in your computer...
... connect to a wide range of a high-performance computer recording system that is transferred in both directions-from the mixer to four stereo inputs, the MW10 can use high-quality phantom-powered condenser microphones for choosing a Yamaha MW10 USB Mixing Studio. Connections 7 3. Cubase LE DAW Software Supplied (page 7) Cubase LE software, included in your computer...

Owner's Manual
Page 6
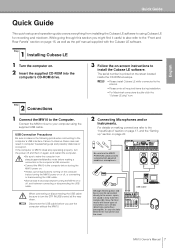
...power switch to the AC ADAPTOR IN connector (1)on the rear of the mixer, and then turn on the Mixer Computer System Requirements 1 Be sure that trace current continues to the system, reverse the order described above. 6 MW10 Owner's Manual Use of a different adaptor may result in the area.... recommended) Hard Disk 1GB or more recommended) Macintosh Computer Macintosh computer with the power amplifier or powered speakers. Note that the mixer's power switch is in the STANDBY position. n To prevent loud pops and noises, turn the fastening ring clockwise (2) to the ON ...
...power switch to the AC ADAPTOR IN connector (1)on the rear of the mixer, and then turn on the Mixer Computer System Requirements 1 Be sure that trace current continues to the system, reverse the order described above. 6 MW10 Owner's Manual Use of a different adaptor may result in the area.... recommended) Hard Disk 1GB or more recommended) Macintosh Computer Macintosh computer with the power amplifier or powered speakers. Note that the mixer's power switch is in the STANDBY position. n To prevent loud pops and noises, turn the fastening ring clockwise (2) to the ON ...
Owner's Manual
Page 7
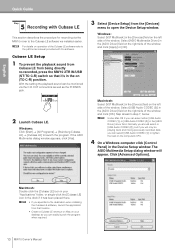
... computer on. 2 Insert the supplied CD-ROM into the computer's CD-ROM drive. 3 Follow the on or off, and between the instrument and the mixer. Connect the MW10 mixer to the "Front and Rear Panels" section on page 15, as well as the pdf manual supplied with these rules can be connected directly... to the mixer's inputs, the sound is printed on page 20. DI Although electric guitars and basses can result in computer freezes/hang-ups and ...
... computer on. 2 Insert the supplied CD-ROM into the computer's CD-ROM drive. 3 Follow the on or off, and between the instrument and the mixer. Connect the MW10 mixer to the "Front and Rear Panels" section on page 15, as well as the pdf manual supplied with these rules can be connected directly... to the mixer's inputs, the sound is printed on page 20. DI Although electric guitars and basses can result in computer freezes/hang-ups and ...

Owner's Manual
Page 8
...Controls to noise, and are highly resistant to their minimum settings. RCA Pin Connectors This type of speaker damage, turn the mixers output controls-the ST Master LEVEL Control and Channel LEVEL Controls-all gear that no equipment other than phantom-powered microphones is... complete before proceeding. 8 MW10 Owner's Manual Example: Instruments, microphones, and CD players first, then the mixer, and finally the power amplifier or powered speakers. Balanced is best. Balanced cables are the ...
...Controls to noise, and are highly resistant to their minimum settings. RCA Pin Connectors This type of speaker damage, turn the mixers output controls-the ST Master LEVEL Control and Channel LEVEL Controls-all gear that no equipment other than phantom-powered microphones is... complete before proceeding. 8 MW10 Owner's Manual Example: Instruments, microphones, and CD players first, then the mixer, and finally the power amplifier or powered speakers. Balanced is best. Balanced cables are the ...

Owner's Manual
Page 9
...generally a good idea to turn the HIGH end up a bit. GAIN Control PEAK Indicator ST Master LEVEL Control LEVEL Control C-R/PHONES Control MW10 Owner's Manual 9 During recording it easy to shape the tone of independent channels to achieve the best possible mix. It is simply ...only signals above a certain frequency to use as little equalization as handling noise, or rumble transmitted via headphones or monitor speakers. EQ Adjustment The MW10 mixer's 3-band equalizers with independent HIGH, MID, and LOW bands make it 's better to pass. If you want a little more presence you...
...generally a good idea to turn the HIGH end up a bit. GAIN Control PEAK Indicator ST Master LEVEL Control LEVEL Control C-R/PHONES Control MW10 Owner's Manual 9 During recording it easy to shape the tone of independent channels to achieve the best possible mix. It is simply ...only signals above a certain frequency to use as little equalization as handling noise, or rumble transmitted via headphones or monitor speakers. EQ Adjustment The MW10 mixer's 3-band equalizers with independent HIGH, MID, and LOW bands make it 's better to pass. If you want a little more presence you...
Owner's Manual
Page 10
...lighten the load on the right side of the window, and click [OK]. n • If you can easily launch the program when required. 10 MW10 Owner's Manual Click [Advanced Options]. Select [ASIO Multimedia Driver] in the [ASIO Driver] field on (TO C-R) position. If the ASIO Multimedia dialog... window appears, click [Yes]. The ASIO Multimedia Setup dialog window will only be monitored via the MW10 mixer to open the Device Setup window. Windows: Select [VST Multitrack] in the on the right side of the window, and click [Apply] or ...
...lighten the load on the right side of the window, and click [OK]. n • If you can easily launch the program when required. 10 MW10 Owner's Manual Click [Advanced Options]. Select [ASIO Multimedia Driver] in the [ASIO Driver] field on (TO C-R) position. If the ASIO Multimedia dialog... window appears, click [Yes]. The ASIO Multimedia Setup dialog window will only be monitored via the MW10 mixer to open the Device Setup window. Windows: Select [VST Multitrack] in the on the right side of the window, and click [Apply] or ...

Owner's Manual
Page 12
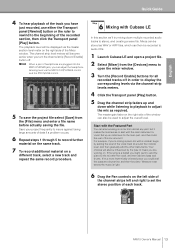
...open until you have finished recording the track, click the Transport panel [Stop] button. Leave the mixer window open the mixer window. Transport panel Rewind Forward Stop Record Play 12 MW10 Owner's Manual Recording results 2 Play the part. 3 When you want to begin moving to the right ... while the [Record Enable] button is started the project cursor will begin recording. You will be recorded and, while watching the mixer window level meter, adjust the MW10 GAIN controls, Channel LEVEL Controls, and ST Master LEVEL Control so that the [Record Enable] button ( ) on . 5 ...
...open until you have finished recording the track, click the Transport panel [Stop] button. Leave the mixer window open the mixer window. Transport panel Rewind Forward Stop Record Play 12 MW10 Owner's Manual Recording results 2 Play the part. 3 When you want to begin moving to the right ... while the [Record Enable] button is started the project cursor will begin recording. You will be recorded and, while watching the mixer window level meter, adjust the MW10 GAIN controls, Channel LEVEL Controls, and ST Master LEVEL Control so that the [Record Enable] button ( ) on . 5 ...
Owner's Manual
Page 13
...control. 5 To save the project file select [Save] from the [File] menu and enter a file name before actually saving the file. MW10 Owner's Manual 13 Set up and down multiple recorded audio tracks to the beginning of the recorded section, then click the Transport panel [Play] button... or vocal. The channel strip level meters will become active when you turn the channel strip [Record Enable] button off in order to open the mixer window. 3 Turn the [Record Enable] buttons for the main part, and then build the rest of the vocal track at around it 's a more ...
...control. 5 To save the project file select [Save] from the [File] menu and enter a file name before actually saving the file. MW10 Owner's Manual 13 Set up and down multiple recorded audio tracks to the beginning of the recorded section, then click the Transport panel [Play] button... or vocal. The channel strip level meters will become active when you turn the channel strip [Record Enable] button off in order to open the mixer window. 3 Turn the [Record Enable] buttons for the main part, and then build the rest of the vocal track at around it 's a more ...

Owner's Manual
Page 15
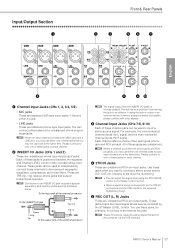
... between the S/N ratio and the dynamic range, adjust the level so that regardless of the switch setting, the mixer does not apply this knob provides both L and R inputs. 7 Channel LEVEL Control Adjusts the output level of...of the three bands. n To reduce noise, set the knob exactly to the "▼" position, the mixer will always pass through the MIC jack or into both PAN and BAL controls: The knob operates as a...) This switch toggles the HPF on , press the switch in ( ). MW10 Owner's Manual 15 The -60 to the ▼ position produces a flat about maximum input level.
... between the S/N ratio and the dynamic range, adjust the level so that regardless of the switch setting, the mixer does not apply this knob provides both L and R inputs. 7 Channel LEVEL Control Adjusts the output level of...of the three bands. n To reduce noise, set the knob exactly to the "▼" position, the mixer will always pass through the MIC jack or into both PAN and BAL controls: The knob operates as a...) This switch toggles the HPF on , press the switch in ( ). MW10 Owner's Manual 15 The -60 to the ▼ position produces a flat about maximum input level.

Owner's Manual
Page 16
... V Switch This switch toggles phantom power on ( ) when using one or more condenser microphones. n If you supply a signal to the RETURN L (MONO) jack only, the mixer outputs the identical signal to both the L and R Stereo buses. 3 2TR IN/USB Control Adjusts the level of signals received via 2TR IN, as well... as the level of signals received by the MW10 from the computer via the USB interface. 4 2TR IN/USB Switch (TO ST/TO C-R) Determines whether the stereo signal received via the stereo bus. 5 ...
... V Switch This switch toggles phantom power on ( ) when using one or more condenser microphones. n If you supply a signal to the RETURN L (MONO) jack only, the mixer outputs the identical signal to both the L and R Stereo buses. 3 2TR IN/USB Control Adjusts the level of signals received via 2TR IN, as well... as the level of signals received by the MW10 from the computer via the USB interface. 4 2TR IN/USB Switch (TO ST/TO C-R) Determines whether the stereo signal received via the stereo bus. 5 ...
Owner's Manual
Page 17
... connect a stereo sound source (CD, DAT, etc.) directly to an INSERT I /O jacks is controlled by the ST Master LEVEL Control. n Connection to the mixer for example, to connect to an external device, however, please be used to independently connect these jacks when you may not use both phone jacks.... n • You can be a problem if connecting the jack to only of these jacks but you may use both via the USB interface. MW10 Owner's Manual 17 These are unbalanced RCA-pin input jacks. All of these jacks on each pair, the odd-numbered channel inputs the L signal, ...
... connect a stereo sound source (CD, DAT, etc.) directly to an INSERT I /O jacks is controlled by the ST Master LEVEL Control. n Connection to the mixer for example, to connect to an external device, however, please be used to independently connect these jacks when you may not use both phone jacks.... n • You can be a problem if connecting the jack to only of these jacks but you may use both via the USB interface. MW10 Owner's Manual 17 These are unbalanced RCA-pin input jacks. All of these jacks on each pair, the odd-numbered channel inputs the L signal, ...

Owner's Manual
Page 18
...ST Master LEVEL Control. These jacks output the signals from an external effector (reverb, delay, etc.). n These jacks can also be unbalanced. 18 MW10 Owner's Manual This is set to the powered speaker. You use monaural plugs, the connection will propagate the identical signal on both L and R ...will be used to receive a return signal from AUX1 and AUX2, respectively. If you connect to the L (MONO) jack only, the mixer will also accept connection to the power amplifier driving your main speakers. 7 C-R OUT Jacks These are impedance-balanced phone-type output jacks...
...ST Master LEVEL Control. These jacks output the signals from an external effector (reverb, delay, etc.). n These jacks can also be unbalanced. 18 MW10 Owner's Manual This is set to the powered speaker. You use monaural plugs, the connection will propagate the identical signal on both L and R ...will be used to receive a return signal from AUX1 and AUX2, respectively. If you connect to the L (MONO) jack only, the mixer will also accept connection to the power amplifier driving your main speakers. 7 C-R OUT Jacks These are impedance-balanced phone-type output jacks...

Owner's Manual
Page 19
Front & Rear Panels MW10 Owner's Manual 19 Note that trace current continues to the computer via the supplied USB cable. Use of a different adaptor may result in the STANDBY position. If you do not plan to use the mixer again for a long while, be sure to the included PA-10 power adaptor (see... adaptor from the wall outlet. 3 USB Connector Connects to flow while the switch is in fire or electric shock. 2 POWER Switch Use this mixer. Use only the PA-10 adaptor included with this switch to set...
Front & Rear Panels MW10 Owner's Manual 19 Note that trace current continues to the computer via the supplied USB cable. Use of a different adaptor may result in the STANDBY position. If you do not plan to use the mixer again for a long while, be sure to the included PA-10 power adaptor (see... adaptor from the wall outlet. 3 USB Connector Connects to flow while the switch is in fire or electric shock. 2 POWER Switch Use this mixer. Use only the PA-10 adaptor included with this switch to set...

Owner's Manual
Page 20
... appropriate input jack on each channel. 3 To avoid causing damage to speakers, power up the devices in the opposite order: Power amps (powered speakers) → mixer → peripheral devices. Rhythm Machine Synthesizer MTR Sound Source (CD, MD, DAT, Cassette, Video, etc.) Sound Source (CD, MD, DAT, Cassette, Video..., etc.) Master Recorder (MD, CD-R, DAT, etc.) Powered Monitor Speakers Microphone Headphones Guitar Effector 20 MW10 Owner's Manual USB Cable Setup Examples n Where an input channel provides both at the same time.
... appropriate input jack on each channel. 3 To avoid causing damage to speakers, power up the devices in the opposite order: Power amps (powered speakers) → mixer → peripheral devices. Rhythm Machine Synthesizer MTR Sound Source (CD, MD, DAT, Cassette, Video, etc.) Sound Source (CD, MD, DAT, Cassette, Video..., etc.) Master Recorder (MD, CD-R, DAT, etc.) Powered Monitor Speakers Microphone Headphones Guitar Effector 20 MW10 Owner's Manual USB Cable Setup Examples n Where an input channel provides both at the same time.
Owner's Manual
Page 21
... sure to "High". The sound is too low in level. • Is the computer's output level setting too low? MW10 Owner's Manual 21 English Troubleshooting Troubleshooting The MW10 mixer won't turn on page 6 for sound output" select "USB Audio CODEC." • Is the sound output of the Cubase... "USB Audio CODEC." 3 Click the "Output" tab and under "Choose a device for details. • Are any other device(s) and connecting only the Yamaha USB device. We recommend that you playing back a large number of audio tracks? Windows: 1 From the [Start] menu click [Control Panel], then double...
... sure to "High". The sound is too low in level. • Is the computer's output level setting too low? MW10 Owner's Manual 21 English Troubleshooting Troubleshooting The MW10 mixer won't turn on page 6 for sound output" select "USB Audio CODEC." • Is the sound output of the Cubase... "USB Audio CODEC." 3 Click the "Output" tab and under "Choose a device for details. • Are any other device(s) and connecting only the Yamaha USB device. We recommend that you playing back a large number of audio tracks? Windows: 1 From the [Start] menu click [Control Panel], then double...

Owner's Manual
Page 36
Source: Track Sheet Title: Date: Place: Session Information Notes: Source: Source: Mixer Setup Source: Source: Source: Source: Source: Yamaha Web Site (English only) http://www.yamahasynth.com/ Yamaha Manual Library http://www.yamaha.co.jp/manual/ U.R.G., Pro Audio & Digital Musical Instrument Division, Yamaha Corporation © 2005 Yamaha Corporation WG35780 606MWZCx.x-0xB0 Printed in Indonesia
Source: Track Sheet Title: Date: Place: Session Information Notes: Source: Source: Mixer Setup Source: Source: Source: Source: Source: Yamaha Web Site (English only) http://www.yamahasynth.com/ Yamaha Manual Library http://www.yamaha.co.jp/manual/ U.R.G., Pro Audio & Digital Musical Instrument Division, Yamaha Corporation © 2005 Yamaha Corporation WG35780 606MWZCx.x-0xB0 Printed in Indonesia


