

Owner's Manual
Page 2
... FCC Regulations, Part 15 for Class "B" digital devices. IMPORTANT NOTICE: DO NOT MODIFY THIS UNIT! Cable/s supplied with Part 15 of product. Follow all installations. Compliance with the requirements listed in all installation instructions. Utilize power outlets that your use the product. 2. If you can be connected to be the source of the following conditions: 1) this device may cause undesired operation. Making sure...
... FCC Regulations, Part 15 for Class "B" digital devices. IMPORTANT NOTICE: DO NOT MODIFY THIS UNIT! Cable/s supplied with Part 15 of product. Follow all installations. Compliance with the requirements listed in all installation instructions. Utilize power outlets that your use the product. 2. If you can be connected to be the source of the following conditions: 1) this device may cause undesired operation. Making sure...
Owner's Manual
Page 3
... openings on the buttons, switches or connectors. (5)-4 MW10 Owner's Manual 3 These precautions include, but are not limited to, the following : Power supply/Power cord • Only use it near heat sources such as correct for all devices. Connections • Before connecting the device to other property. These precautions include, but are not limited to, the following : Power supply/Power cord • Remove the electric plug from the...
... openings on the buttons, switches or connectors. (5)-4 MW10 Owner's Manual 3 These precautions include, but are not limited to, the following : Power supply/Power cord • Only use it near heat sources such as correct for all devices. Connections • Before connecting the device to other property. These precautions include, but are not limited to, the following : Power supply/Power cord • Remove the electric plug from the...
Owner's Manual
Page 4
... this owner's manual are for use is a CD-ROM. Do not attempt to play them to which appear on an audio CD player. DON'T MAKE, DISTRIBUTE OR USE ILLEGAL COPIES. Yamaha Corp. Doing so may appear somewhat different from those on your audio CD player. • Visit the web address below for the latest information on supplied software and operating system requirements. • The screen displays...
... this owner's manual are for use is a CD-ROM. Do not attempt to play them to which appear on an audio CD player. DON'T MAKE, DISTRIBUTE OR USE ILLEGAL COPIES. Yamaha Corp. Doing so may appear somewhat different from those on your audio CD player. • Visit the web address below for the latest information on supplied software and operating system requirements. • The screen displays...
Owner's Manual
Page 5
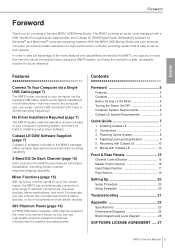
... Cable (page 7) The MW10 mixer connects to your computer's operating system, so there's no need to install any extra driver software. Connections 7 3. Adjusting Level and Equalization 9 5. Recording with Cubase LE 13 Front & Rear Panels 15 Channel Control Section 15 Master Control Section 16 Input/Output Section 17 Rear Section 19 Setting Up 20 Setup Procedure 20 Setup Examples 20 Troubleshooting 21 Appendix 23 Specifications 23 Dimensional Diagrams 25 Block Diagram and Level Diagram 26 SOFTWARE LICENSE AGREEMENT ..... 27 MW10 Owner's Manual 5 Stereo audio...
... Cable (page 7) The MW10 mixer connects to your computer's operating system, so there's no need to install any extra driver software. Connections 7 3. Adjusting Level and Equalization 9 5. Recording with Cubase LE 13 Front & Rear Panels 15 Channel Control Section 15 Master Control Section 16 Input/Output Section 17 Rear Section 19 Setting Up 20 Setup Procedure 20 Setup Examples 20 Troubleshooting 21 Appendix 23 Specifications 23 Dimensional Diagrams 25 Block Diagram and Level Diagram 26 SOFTWARE LICENSE AGREEMENT ..... 27 MW10 Owner's Manual 5 Stereo audio...

Owner's Manual
Page 6
...;re. 2 Connect the power adaptor to the AC ADAPTOR IN connector (1)on the rear of the mixer, and then turn the power off the power to the system, reverse the order described above. 6 MW10 Owner's Manual If you are lightning storms in the area. • To avoid generating unwanted noise, make sure there is 50 cm or more Press the mixer's power switch to...
...;re. 2 Connect the power adaptor to the AC ADAPTOR IN connector (1)on the rear of the mixer, and then turn the power off the power to the system, reverse the order described above. 6 MW10 Owner's Manual If you are lightning storms in the area. • To avoid generating unwanted noise, make sure there is 50 cm or more Press the mixer's power switch to...
Owner's Manual
Page 7
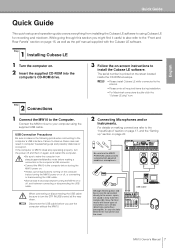
... 1 Turn the computer on. 2 Insert the supplied CD-ROM into the computer's CD-ROM drive. 3 Follow the on-screen instructions to the internet. • Please enter all required items during installation. • For Macintosh computers double-click the "Cubase LE.pkg" icon. Connect the MW10 mixer to the "Input/Output" section on page 17, and the "Setting up" section on when using phantom-powered condenser microphones...
... 1 Turn the computer on. 2 Insert the supplied CD-ROM into the computer's CD-ROM drive. 3 Follow the on-screen instructions to the internet. • Please enter all required items during installation. • For Macintosh computers double-click the "Cubase LE.pkg" icon. Connect the MW10 mixer to the "Input/Output" section on page 17, and the "Setting up" section on when using phantom-powered condenser microphones...

Owner's Manual
Page 8
... used to connect microphones, electronic instruments, and other than phantom-powered microphones can also be used for stereo headphone jacks, insert jacks, and also to the XLR inputs. • To minimize the possibility of speaker damage, turn the mixers output controls-the ST Master LEVEL Control and Channel LEVEL Controls-all gear that is to be connected to the MW10 off when phantom power is not needed. • Make sure that the PHANTOM switch is complete before proceeding. 8 MW10 Owner's Manual Stereo types are switched...
... used to connect microphones, electronic instruments, and other than phantom-powered microphones can also be used for stereo headphone jacks, insert jacks, and also to the XLR inputs. • To minimize the possibility of speaker damage, turn the mixers output controls-the ST Master LEVEL Control and Channel LEVEL Controls-all gear that is to be connected to the MW10 off when phantom power is not needed. • Make sure that the PHANTOM switch is complete before proceeding. 8 MW10 Owner's Manual Stereo types are switched...

Owner's Manual
Page 9
... monitor speakers. GAIN Control PEAK Indicator ST Master LEVEL Control LEVEL Control C-R/PHONES Control MW10 Owner's Manual 9 During recording it easy to shape the tone of independent channels to use EQ sparingly for Microphone Input As the name implies, a "high-pass filter" allows only signals above a certain frequency to create the desired initial balance while monitoring via the microphone stand. The overall headphone level is adjusted by the C-R/PHONES control. Use the High-pass Filter for compensation only. English Quick Guide...
... monitor speakers. GAIN Control PEAK Indicator ST Master LEVEL Control LEVEL Control C-R/PHONES Control MW10 Owner's Manual 9 During recording it easy to shape the tone of independent channels to use EQ sparingly for Microphone Input As the name implies, a "high-pass filter" allows only signals above a certain frequency to create the desired initial balance while monitoring via the microphone stand. The overall headphone level is adjusted by the C-R/PHONES control. Use the High-pass Filter for compensation only. English Quick Guide...
Owner's Manual
Page 10
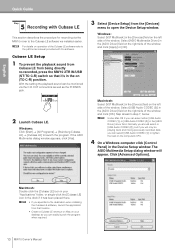
... LE. English Quick Guide Step 5 Recording with the software. Skip ahead to launch the program. If the ASIO Multimedia dialog window appears, click [Yes]. n • If you can easily launch the program when required. 10 MW10 Owner's Manual Normally you should select or [USB Audio CODEC (2)], but if you can select [USB Audio CODEC (1)] to open the Device Setup window. Select [ASIO Multimedia Driver] in the [ASIO Driver] field...
... LE. English Quick Guide Step 5 Recording with the software. Skip ahead to launch the program. If the ASIO Multimedia dialog window appears, click [Yes]. n • If you can easily launch the program when required. 10 MW10 Owner's Manual Normally you should select or [USB Audio CODEC (2)], but if you can select [USB Audio CODEC (1)] to open the Device Setup window. Select [ASIO Multimedia Driver] in the [ASIO Driver] field...

Owner's Manual
Page 11
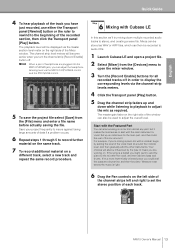
... to Record 1 Click in the track list (the area in which the project and audio files for the project are available in the upper left side of the project window. [Show Inspector] button [Stereo Switch] button Inspector MW10 Owner's Manual 11 n If the Inspector is stored as a "project file" for the selected track are to close the VST Inputs window. Quick Guide 5 The ASIO Multimedia Setup...
... to Record 1 Click in the track list (the area in which the project and audio files for the project are available in the upper left side of the project window. [Show Inspector] button [Stereo Switch] button Inspector MW10 Owner's Manual 11 n If the Inspector is stored as a "project file" for the selected track are to close the VST Inputs window. Quick Guide 5 The ASIO Multimedia Setup...

Owner's Manual
Page 12
... to start recording via the ruler at the top of the mixer's channel strips. n The Cubase LE channel strip fader only affects the playback output level from the [Devices] menu to record a guitar processed through a preamplifier or amp simulator with stereo outputs, for monaural. Recording and Playback 1 Click the Transport panel [Record] button to begin moving to be recorded and, while watching the mixer window level meter, adjust the MW10 GAIN controls, Channel LEVEL Controls, and ST Master LEVEL Control so...
... to start recording via the ruler at the top of the mixer's channel strips. n The Cubase LE channel strip fader only affects the playback output level from the [Devices] menu to record a guitar processed through a preamplifier or amp simulator with stereo outputs, for monaural. Recording and Playback 1 Click the Transport panel [Record] button to begin moving to be recorded and, while watching the mixer window level meter, adjust the MW10 GAIN controls, Channel LEVEL Controls, and ST Master LEVEL Control so...
Owner's Manual
Page 13
.... Mixes can also be recorded to audio CDs. 1 Launch Cubase LE and open the mixer window. 3 Turn the [Record Enable] buttons for the main part, and then build the rest of the Mixer window. Your choices will become active when you turn the channel strip [Record Enable] button off in order to display the corresponding levels via the channel-strip levels meters. 4 Click the Transport panel [Play] button. 5 Drag the channel strip faders up an initial level...
.... Mixes can also be recorded to audio CDs. 1 Launch Cubase LE and open the mixer window. 3 Turn the [Record Enable] buttons for the main part, and then build the rest of the Mixer window. Your choices will become active when you turn the channel strip [Record Enable] button off in order to display the corresponding levels via the channel-strip levels meters. 4 Click the Transport panel [Play] button. 5 Drag the channel strip faders up an initial level...

Owner's Manual
Page 14
... pdf manual provided with equal level to open the VST Channel Settings window. English Quick Guide Pan Effectively "Panning" creates the illusion of stereo space by changing the relative levels of each other's way." Other instruments should be evenly balanced throughout the sound stage in the center of the mix, as is complete. It's a good idea to lower the channel fader a bit before adding an effect, since the effect...
... pdf manual provided with equal level to open the VST Channel Settings window. English Quick Guide Pan Effectively "Panning" creates the illusion of stereo space by changing the relative levels of each other's way." Other instruments should be evenly balanced throughout the sound stage in the center of the mix, as is complete. It's a good idea to lower the channel fader a bit before adding an effect, since the effect...

Owner's Manual
Page 15
...) channels are inputting into the L (MONO) input only, and operates as required by the mix. 5 AUX Controls Use the AUX control to send the channel's signal to the Stereo R bus. If you set the LEVEL Control knobs for each of the three bands. MW10 Owner's Manual 15 The -60 to the AUX2 bus. For XLR-equipped stereo input channels (3/4 and 5/6), detects both post-EQ and post-mic-amp peak levels, and lights red if either of stereo input channels.) 4 Equalizer (HIGH, MID, and LOW...
...) channels are inputting into the L (MONO) input only, and operates as required by the mix. 5 AUX Controls Use the AUX control to send the channel's signal to the Stereo R bus. If you set the LEVEL Control knobs for each of the three bands. MW10 Owner's Manual 15 The -60 to the AUX2 bus. For XLR-equipped stereo input channels (3/4 and 5/6), detects both post-EQ and post-mic-amp peak levels, and lights red if either of stereo input channels.) 4 Equalizer (HIGH, MID, and LOW...

Owner's Manual
Page 16
... stereo signal received via the 2TR IN/USB connector is added to the stereo bus. • When the 2TR IN/USB switch is set the switch on, the mixer supplies power to all XLR-type MIC INPUT jacks. • Be sure to 5/6). English Front & Rear Panels Master Control Section 8 1 2 7 3 4 6 5 1 PHANTOM +48 V Switch This switch toggles phantom power on and off amplifiers (or powered speakers) before operating the switch, to avoid risk of loud noises that only condenser mics are connected...
... stereo signal received via the 2TR IN/USB connector is added to the stereo bus. • When the 2TR IN/USB switch is set the switch on, the mixer supplies power to all XLR-type MIC INPUT jacks. • Be sure to 5/6). English Front & Rear Panels Master Control Section 8 1 2 7 3 4 6 5 1 PHANTOM +48 V Switch This switch toggles phantom power on and off amplifiers (or powered speakers) before operating the switch, to avoid risk of loud noises that only condenser mics are connected...
Owner's Manual
Page 17
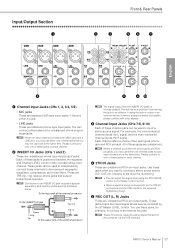
... same time. MW10 Owner's Manual 17 n Where a channel provides both phone jacks and RCA pin jacks, you may use either one of these jacks but you want to connect a stereo sound source (CD, DAT, etc.) directly to input a stereo source signal. This will not be used to the mixer for example, to connect to an effector. All of these jacks is controlled by the ST Master LEVEL Control. Input/Output Section 1 Front & Rear Panels 3 4 56 7 English 2 9 8) 1 Channel Input Jacks (CHs 1, 2, 3/4, 5/6) • MIC jacks These...
... same time. MW10 Owner's Manual 17 n Where a channel provides both phone jacks and RCA pin jacks, you may use either one of these jacks but you want to connect a stereo sound source (CD, DAT, etc.) directly to input a stereo source signal. This will not be used to the mixer for example, to connect to an effector. All of these jacks is controlled by the ST Master LEVEL Control. Input/Output Section 1 Front & Rear Panels 3 4 56 7 English 2 9 8) 1 Channel Input Jacks (CHs 1, 2, 3/4, 5/6) • MIC jacks These...

Owner's Manual
Page 18
... mixer will recognize the signal as an auxiliary stereo input. n When the 2TR IN/USB switch is controlled by these jacks, for example, to connect to an effector or monitor system. 9 RETURN L (MONO), R Jacks These are typically used as monaural and will be used to the powered speaker. n These jacks can also be unbalanced. 18 MW10 Owner's Manual These jacks output the mixed signal whose level is set to the power amplifier driving your main speakers. 7 C-R OUT Jacks...
... mixer will recognize the signal as an auxiliary stereo input. n When the 2TR IN/USB switch is controlled by these jacks, for example, to connect to an effector or monitor system. 9 RETURN L (MONO), R Jacks These are typically used as monaural and will be used to the powered speaker. n These jacks can also be unbalanced. 18 MW10 Owner's Manual These jacks output the mixed signal whose level is set to the power amplifier driving your main speakers. 7 C-R OUT Jacks...
Owner's Manual
Page 21
... application assigned properly? For setup details refer to a USB port on . • Is the supplied power adaptor properly plugged into both the mixer and an appropriate AC wall outlet? The recorded sound is too low in level. • Is the computer's output level setting too low? Doing so can interfere with proper operation, so try a different USB port. • Are you using other device(s) and connecting only the Yamaha USB device. MW10 Owner's Manual...
... application assigned properly? For setup details refer to a USB port on . • Is the supplied power adaptor properly plugged into both the mixer and an appropriate AC wall outlet? The recorded sound is too low in level. • Is the computer's output level setting too low? Doing so can interfere with proper operation, so try a different USB port. • Are you using other device(s) and connecting only the Yamaha USB device. MW10 Owner's Manual...
Owner's Manual
Page 22
....yamahasynth.com/ 22 MW10 Owner's Manual Check that the file system is a delay when playing a software synthesizer via a MIDI keyboard (latency). • Check the URL listed below can improve performance. 1 Click [Control Panel] from the [Start] menu, and double click the "Sounds and Audio Devices" icon to external devices. English Troubleshooting • Are you recording or playing long continuous sections of free memory (more than 128 MB). Set "Hardware Acceleration" to...
....yamahasynth.com/ 22 MW10 Owner's Manual Check that the file system is a delay when playing a software synthesizer via a MIDI keyboard (latency). • Check the URL listed below can improve performance. 1 Click [Control Panel] from the [Start] menu, and double click the "Sounds and Audio Devices" icon to external devices. English Troubleshooting • Are you recording or playing long continuous sections of free memory (more than 128 MB). Set "Hardware Acceleration" to...

Owner's Manual
Page 23
...: 10 kHz (shelving) MID: 2.5 kHz (peaking) LOW: 100 Hz (shelving) Supplied when Phantom +48 V switch is ON. (XLR-type input jacks) On each channel: red indicator lights if post-EQ signal (on stereo channels, if either post-EQ signal or post-mic-amp signal) comes within 3 dB of shelving, 3 dB below maximum variable level Phantom Power Monaural/Stereo Input PEAK Indicator USB Audio Included Accessories Power Consumption Dimensions (W × H × D) Net Weight Temperature Range...
...: 10 kHz (shelving) MID: 2.5 kHz (peaking) LOW: 100 Hz (shelving) Supplied when Phantom +48 V switch is ON. (XLR-type input jacks) On each channel: red indicator lights if post-EQ signal (on stereo channels, if either post-EQ signal or post-mic-amp signal) comes within 3 dB of shelving, 3 dB below maximum variable level Phantom Power Monaural/Stereo Input PEAK Indicator USB Audio Included Accessories Power Consumption Dimensions (W × H × D) Net Weight Temperature Range...


