
Owner's Manual
Page 1
... MIN MAX 0 10 10 10 10 10 9 9 9 9 8 8 8 8 7 7 7 7 6 6 6 6 5 5 5 5 4 4 4 4 3 3 3 3 2 2 2 2 1 1 1 1 0 0 0 0 10 10 9 9 8 8 7 7 6 6 5 5 4 4 3 3 2 2 1 1 0 0 +9 TAPE 6 3 9.5 4.8 0 3 6 AUTO PUNCH 1 10 MEMO REPEAT -20 SYNC START IN OUT 2 REC 1 2 3 4 NOISE REDUCTION SYSTEM 1 2 34 TRACK +9 6 3 0 3 6 10 -20 LR STEREO TAPE SPEED CONTROL PITCH 4.8 / 9.5 O REC SELECT 1 2 3 4 REPEAT RETURN TO ZERO AUTO PUNCH I/O CHECK MEMO 1 LOCATE COUNTER RESET SYNC CLEAR MEMO 2 LOCATE...
... MIN MAX 0 10 10 10 10 10 9 9 9 9 8 8 8 8 7 7 7 7 6 6 6 6 5 5 5 5 4 4 4 4 3 3 3 3 2 2 2 2 1 1 1 1 0 0 0 0 10 10 9 9 8 8 7 7 6 6 5 5 4 4 3 3 2 2 1 1 0 0 +9 TAPE 6 3 9.5 4.8 0 3 6 AUTO PUNCH 1 10 MEMO REPEAT -20 SYNC START IN OUT 2 REC 1 2 3 4 NOISE REDUCTION SYSTEM 1 2 34 TRACK +9 6 3 0 3 6 10 -20 LR STEREO TAPE SPEED CONTROL PITCH 4.8 / 9.5 O REC SELECT 1 2 3 4 REPEAT RETURN TO ZERO AUTO PUNCH I/O CHECK MEMO 1 LOCATE COUNTER RESET SYNC CLEAR MEMO 2 LOCATE...
Owner's Manual
Page 3
...listed on a patent licence from locations where it clean with Chrome tape (CrO2 tape - This will prevent damage to the MT4X as well as benzine or thinner to qualified YAMAHA service personnel. If you use the first and last 20 seconds of Carillion Electronics Corporation. Keep the... FSK recording35 Synchronized playback36 Synchronized mixdown39 5 Memory Functions41 Memo Function41 Repeat Function42 Recording Levels Function42 Appendix44 Troubleshooting44 Maintenance45 Specifications46 Block Diagram48 Dimensions49 Tracking Sheet49 Glossary51 User's Guide
...listed on a patent licence from locations where it clean with Chrome tape (CrO2 tape - This will prevent damage to the MT4X as well as benzine or thinner to qualified YAMAHA service personnel. If you use the first and last 20 seconds of Carillion Electronics Corporation. Keep the... FSK recording35 Synchronized playback36 Synchronized mixdown39 5 Memory Functions41 Memo Function41 Repeat Function42 Recording Levels Function42 Appendix44 Troubleshooting44 Maintenance45 Specifications46 Block Diagram48 Dimensions49 Tracking Sheet49 Glossary51 User's Guide
Owner's Manual
Page 4
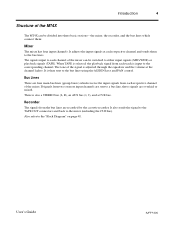
...to each channel as memory and return-to-zero are provided for each track. This can be useful when you to -use of the many features of sound quality. Introduction Introduction 2 Your MT4X Multitrack Cassette recorder is equipped with independent stereo buses for greater fl...in /out recording function and a rehearsal function make use four-track cassette tape recorder with in a range of a four-channel mixer section and a four-track cassette tape recorder section inside a compact enclosure. Features General The MT4X consists of approximately ±10%. Mixer • The mixer ...
...to each channel as memory and return-to-zero are provided for each track. This can be useful when you to -use of the many features of sound quality. Introduction Introduction 2 Your MT4X Multitrack Cassette recorder is equipped with independent stereo buses for greater fl...in /out recording function and a rehearsal function make use four-track cassette tape recorder with in a range of a four-channel mixer section and a four-track cassette tape recorder section inside a compact enclosure. Features General The MT4X consists of approximately ±10%. Mixer • The mixer ...
Owner's Manual
Page 6
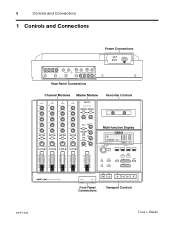
It adjusts the input signals at the channel faders. The tone of the signal is adjusted through the equalizer and the volume at each track is then sent to the bus lines. It is input to the "Block Diagram" on page 48. Also refer to the corresponding channel. User's Guide ... four main bus lines (group buses) which connect them to the bus lines using the ASSIGN keys and PAN control. Introduction 4 Structure of the MT4X The MT4X can be divided into three basic sections - It also sends the signal to the TAPE OUT connectors and back to the mixer (including the CUE...
It adjusts the input signals at the channel faders. The tone of the signal is adjusted through the equalizer and the volume at each track is then sent to the bus lines. It is input to the "Block Diagram" on page 48. Also refer to the corresponding channel. User's Guide ... four main bus lines (group buses) which connect them to the bus lines using the ASSIGN keys and PAN control. Introduction 4 Structure of the MT4X The MT4X can be divided into three basic sections - It also sends the signal to the TAPE OUT connectors and back to the mixer (including the CUE...
Owner's Manual
Page 7
... 10 10 10 10 9 9 9 9 8 8 8 8 7 7 7 7 6 6 6 6 5 5 5 5 4 4 4 4 3 3 3 3 2 2 2 2 1 1 1 1 0 0 0 0 10 10 9 9 8 8 7 7 6 6 5 5 4 4 3 3 2 2 1 1 0 0 Multi-function Display +9 TAPE 6 3 9.5 4.8 0 3 6 AUTO PUNCH 1 10 MEMO REPEAT -20 SYNC START IN OUT 2 REC 1 2 3 4 NOISE REDUCTION SYSTEM 1 2 34 TRACK +9 6 3 0 3 6 10 -20 LR STEREO TAPE SPEED CONTROL PITCH 4.8 / 9.5 O REC SELECT 1 2 3 4 REPEAT RETURN TO ZERO AUTO PUNCH I/O CHECK MEMO 1 LOCATE COUNTER RESET SYNC CLEAR MEMO 2 LOCATE...
... 10 10 10 10 9 9 9 9 8 8 8 8 7 7 7 7 6 6 6 6 5 5 5 5 4 4 4 4 3 3 3 3 2 2 2 2 1 1 1 1 0 0 0 0 10 10 9 9 8 8 7 7 6 6 5 5 4 4 3 3 2 2 1 1 0 0 Multi-function Display +9 TAPE 6 3 9.5 4.8 0 3 6 AUTO PUNCH 1 10 MEMO REPEAT -20 SYNC START IN OUT 2 REC 1 2 3 4 NOISE REDUCTION SYSTEM 1 2 34 TRACK +9 6 3 0 3 6 10 -20 LR STEREO TAPE SPEED CONTROL PITCH 4.8 / 9.5 O REC SELECT 1 2 3 4 REPEAT RETURN TO ZERO AUTO PUNCH I/O CHECK MEMO 1 LOCATE COUNTER RESET SYNC CLEAR MEMO 2 LOCATE...
Owner's Manual
Page 8
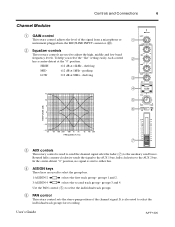
...2 Equalizer controls These rotary controls are used to adjust the high, middle and low band frequency levels. groups 1 and 2. 3-ASSIGN-4 3 4 selects the second track group - User's Guide Use the PAN control (5) to the AUX 2 bus. HIGH ±12 dB at the "0" position. shelving RESPONSE (dB) 15 10... to either bus. 4 ASSIGN keys These keys are used to select the group bus. 1-ASSIGN-2 1 2 selects the first track group - Controls and Connections 6 Channel Modules 1 GAIN control This rotary control adjusts the level of the channel signal. To help you ...
...2 Equalizer controls These rotary controls are used to adjust the high, middle and low band frequency levels. groups 1 and 2. 3-ASSIGN-4 3 4 selects the second track group - User's Guide Use the PAN control (5) to the AUX 2 bus. HIGH ±12 dB at the "0" position. shelving RESPONSE (dB) 15 10... to either bus. 4 ASSIGN keys These keys are used to select the group bus. 1-ASSIGN-2 1 2 selects the first track group - Controls and Connections 6 Channel Modules 1 GAIN control This rotary control adjusts the level of the channel signal. To help you ...
Owner's Manual
Page 9
...to the selected group bus. 8 AUX RETURN 1 2 1 21 2 ASSIGN ASSIGN 9 Auxiliary return LEVEL controls 3 43 4 These rotary controls adjust the level of the MT4X. 0 MONITOR SELECT CUE LEVEL 1 1 3 0 10 GROUP 2 2 4 GROUP: These keys select groups 1 and 3 and groups 2 and 4 respectively. STEREO:...set the channel level. 7 Controls and Connections ODD/L: Rotated fully counter-clockwise sends the signal to the odd (1 or 3) numbered track of the selected track group (ASSIGN keys 4) and to the left channel and groups 2 and 4 will be positioned between 7 and 8. Master Module...
...to the selected group bus. 8 AUX RETURN 1 2 1 21 2 ASSIGN ASSIGN 9 Auxiliary return LEVEL controls 3 43 4 These rotary controls adjust the level of the MT4X. 0 MONITOR SELECT CUE LEVEL 1 1 3 0 10 GROUP 2 2 4 GROUP: These keys select groups 1 and 3 and groups 2 and 4 respectively. STEREO:...set the channel level. 7 Controls and Connections ODD/L: Rotated fully counter-clockwise sends the signal to the odd (1 or 3) numbered track of the selected track group (ASSIGN keys 4) and to the left channel and groups 2 and 4 will be positioned between 7 and 8. Master Module...
Owner's Manual
Page 10
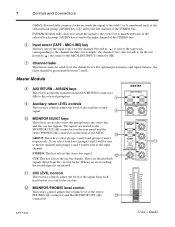
... LOCATE COUNTER RESET MEMO 2 LOCATE JK L M N O P Q G REC SELECT keys These keys are used to arm the tracks for the corresponding track flashes on page 10. See "Repeat Function" on . partment E Multi-function display This FLD (Fluorescent Light Display) shows ...keys (O). Recorder Controls D Cassette tape com- Press the STOP key (W), then press the tape speed select key. F TAPE SPEED CONTROL These controls consist of the MT4X. Controls and Connections 8 C Master fader This linear control is in motion. E TAPE +9 +9 6 6 3 3 9.5 4.8 0 0 3 3 6 6...
... LOCATE COUNTER RESET MEMO 2 LOCATE JK L M N O P Q G REC SELECT keys These keys are used to arm the tracks for the corresponding track flashes on page 10. See "Repeat Function" on . partment E Multi-function display This FLD (Fluorescent Light Display) shows ...keys (O). Recorder Controls D Cassette tape com- Press the STOP key (W), then press the tape speed select key. F TAPE SPEED CONTROL These controls consist of the MT4X. Controls and Connections 8 C Master fader This linear control is in motion. E TAPE +9 +9 6 6 3 3 9.5 4.8 0 0 3 3 6 6...
Owner's Manual
Page 11
...COUNTER RESET key This key resets the tape counter (Y) to the stored memory points. I /O key This key is used to record FSK signals onto the track. P LOCATE (1, 2) keys These keys locate to "0000". Note: The locate interval must be shown on and off the power. See "Using the automatic... of these keys, the corresponding MEMO indicator (a) will be more than three counts on track 4. The tape counter flashes while the tape rewinds. When you press one of these keys, the MT4X will fast forward or rewind to the corresponding memory point. By default, the dbx™...
...COUNTER RESET key This key resets the tape counter (Y) to the stored memory points. I /O key This key is used to record FSK signals onto the track. P LOCATE (1, 2) keys These keys locate to "0000". Note: The locate interval must be shown on and off the power. See "Using the automatic... of these keys, the corresponding MEMO indicator (a) will be more than three counts on track 4. The tape counter flashes while the tape rewinds. When you press one of these keys, the MT4X will fast forward or rewind to the corresponding memory point. By default, the dbx™...

Owner's Manual
Page 12
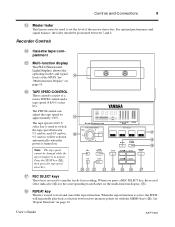
...REW FF UV STOP W S REC/PAUSE key and indicator This key is inserted in the cassette tape compartment. Press the key again to place the MT4X in /out without actually recording. Press this key to pause the recording. V FF key This key is illuminated, you can actually record, you have... to fast forward the cassette tape. W STOP key Multi-function Display This section details the indicators of the transport keys before you must arm the tracks with the REC SELECT keys (G). T PLAY key and indicator U REW key This key is used to perform a recording rehearsal. This allows you ...
...REW FF UV STOP W S REC/PAUSE key and indicator This key is inserted in the cassette tape compartment. Press the key again to place the MT4X in /out without actually recording. Press this key to pause the recording. V FF key This key is illuminated, you can actually record, you have... to fast forward the cassette tape. W STOP key Multi-function Display This section details the indicators of the transport keys before you must arm the tracks with the REC SELECT keys (G). T PLAY key and indicator U REW key This key is used to perform a recording rehearsal. This allows you ...
Owner's Manual
Page 13
...speed selection, either 9.5 cm/sec or 4.8 cm/sec. 11 Controls and Connections Y Tape counter This indicator displays tape position. The individual tracks and the stereo bus are displayed. • When dbx™ is off , press the COUNTER RESET key (Q) while holding down the ...8486;). b REPEAT indicator This indicator illuminates while the repeat function is approximately +6 dB. See "Using the optional footswitch" on page 21. When the MT4X is used for punch-in /out function" on page 28. e PUNCH I /O e User's Guide PHONES d PUNCH I /O footswitch connector This connector...
...speed selection, either 9.5 cm/sec or 4.8 cm/sec. 11 Controls and Connections Y Tape counter This indicator displays tape position. The individual tracks and the stereo bus are displayed. • When dbx™ is off , press the COUNTER RESET key (Q) while holding down the ...8486;). b REPEAT indicator This indicator illuminates while the repeat function is approximately +6 dB. See "Using the optional footswitch" on page 21. When the MT4X is used for punch-in /out function" on page 28. e PUNCH I /O e User's Guide PHONES d PUNCH I /O footswitch connector This connector...
Owner's Manual
Page 14
LEVEL control nominal) These 1/4" phone connectors are used to output the individual tracks directly from these connectors. k TAPE OUT (1 to 4/SYNC) connections • Output impedance: 1 kΩ • Nominal output level: -10 dB (at 10 kΩ load) ...These RCA/Phono connectors are used to input the signals from the i PHONES connector (d) is monaural, plug it into one of the MT4X. i AUX RETURN (1, 2) connections • Input impedance: 10 kΩ • Nominal input level: -10 dB (AUX RETURN - User's Guide The same signal R L/MONO which ...
LEVEL control nominal) These 1/4" phone connectors are used to output the individual tracks directly from these connectors. k TAPE OUT (1 to 4/SYNC) connections • Output impedance: 1 kΩ • Nominal output level: -10 dB (at 10 kΩ load) ...These RCA/Phono connectors are used to input the signals from the i PHONES connector (d) is monaural, plug it into one of the MT4X. i AUX RETURN (1, 2) connections • Input impedance: 10 kΩ • Nominal input level: -10 dB (AUX RETURN - User's Guide The same signal R L/MONO which ...
Owner's Manual
Page 17
... been assigned to listen for example, to compare different mixer settings to the recorder. Ping-pong recording Bounce several existing tracks onto another track. Monitoring The MT4X offers you to monitor the previously recorded tracks as well as follows: Monitoring Monitoring the recording or playback to the group bus, allowing you will probably fi...
... been assigned to listen for example, to compare different mixer settings to the recorder. Ping-pong recording Bounce several existing tracks onto another track. Monitoring The MT4X offers you to monitor the previously recorded tracks as well as follows: Monitoring Monitoring the recording or playback to the group bus, allowing you will probably fi...
Owner's Manual
Page 18
Note: This level setting is to record the initial tracks. See "Example System" on poep le Track 1 Track 2 Track 3 Track 4 Track to both an input source and a monitoring system. If you must connect the MT4X to be sending a signal that you have plugged a microphone into the cassette tape compartment (D). 2)... LINE setting. just to adjust the initial level of input you have plugged a synthesizer into the connector, or are your rhythm tracks: bassguitar, rhythm guitar, and drums. Note: Before you record anything, you have connected. User's Guide If you could easily ...
Note: This level setting is to record the initial tracks. See "Example System" on poep le Track 1 Track 2 Track 3 Track 4 Track to both an input source and a monitoring system. If you must connect the MT4X to be sending a signal that you have plugged a microphone into the cassette tape compartment (D). 2)... LINE setting. just to adjust the initial level of input you have plugged a synthesizer into the connector, or are your rhythm tracks: bassguitar, rhythm guitar, and drums. Note: Before you record anything, you have connected. User's Guide If you could easily ...
Owner's Manual
Page 19
...ignore step 7 and use any monitor mode or combination that you are comfortable with sensitive peak-hold level meters (Z). User's Guide The MT4X is very important to the third (odd) group. Set the monitor volume with the monitoring modes (see "Monitoring" on the display ...control: The input signal is set the levels too high, the tape will flash. Group 1 Group 2 Group 3 Group 4 → Track 1 → Track 2 → Track 3 → Track 4 If the PAN control is sent to notice tape noise. Press the 3 ASSIGN key: 4 and rotate the PAN control: The input signal ...
...ignore step 7 and use any monitor mode or combination that you are comfortable with sensitive peak-hold level meters (Z). User's Guide The MT4X is very important to the third (odd) group. Set the monitor volume with the monitoring modes (see "Monitoring" on the display ...control: The input signal is set the levels too high, the tape will flash. Group 1 Group 2 Group 3 Group 4 → Track 1 → Track 2 → Track 3 → Track 4 If the PAN control is sent to notice tape noise. Press the 3 ASSIGN key: 4 and rotate the PAN control: The input signal ...
Owner's Manual
Page 20
...distortion that the +9 dB segment occasionally illuminates. The indicator above the key lights and the MT4X starts the tape. See "Recording Levels Function" on page 41. You must lower the levels in . 13) When the track is complete, press the RETURN TO ZERO key (I) to the nominal level between "7" ...disconnect the input source. Check the completed recording Once the tape has rewound back to "0000" on , adjust the gain control so that results. TRACK indicators will need to record a count-in order to +9 dB. User's Guide You may want to stop and rewind the tape. If the...
...distortion that the +9 dB segment occasionally illuminates. The indicator above the key lights and the MT4X starts the tape. See "Recording Levels Function" on page 41. You must lower the levels in . 13) When the track is complete, press the RETURN TO ZERO key (I) to the nominal level between "7" ...disconnect the input source. Check the completed recording Once the tape has rewound back to "0000" on , adjust the gain control so that results. TRACK indicators will need to record a count-in order to +9 dB. User's Guide You may want to stop and rewind the tape. If the...
Owner's Manual
Page 21
...key lights and any flashing REC SELECT - TRACK indicator on the tape counter. Note: Connecting an instrument with the MONITOR/PHONES level control. 8) Press the RETURN TO ZERO key to rewind the tape back to the MT4X may increase noise and distortion. If this happens,.... 6) Press the MONITOR SELECT - Set the recording levels 9) Press the REHE key (R). Track 1 Track 2 Track 3 Track 4 Track to be illuminated. 10) Set the channel fader to the nominal level between the instrument and the MT4X to reduce the impedance. 2) Set the input select key to the MIC/LINE position. 3)...
...key lights and any flashing REC SELECT - TRACK indicator on the tape counter. Note: Connecting an instrument with the MONITOR/PHONES level control. 8) Press the RETURN TO ZERO key to rewind the tape back to the MT4X may increase noise and distortion. If this happens,.... 6) Press the MONITOR SELECT - Set the recording levels 9) Press the REHE key (R). Track 1 Track 2 Track 3 Track 4 Track to be illuminated. 10) Set the channel fader to the nominal level between the instrument and the MT4X to reduce the impedance. 2) Set the input select key to the MIC/LINE position. 3)...
Owner's Manual
Page 22
...RETURN TO ZERO key to stop and rewind the tape. The indicators above the key lights and any flashing REC SELECT - Record the track 13) Press the REC/PAUSE key. Recording Functions 20 Rehearsal After you have matched the instrument with the TAPE SPEED CONTROL (F) - Start playing....pitch of an instrument and the pitch of the instrument, you are recording. 15) When the track is slightly different. TRACK indicators resume flashing. The indicator above the key lights and the MT4X starts the tape. The indicators above the REC/PAUSE and PLAY keys switch off and the ...
...RETURN TO ZERO key to stop and rewind the tape. The indicators above the key lights and any flashing REC SELECT - Record the track 13) Press the REC/PAUSE key. Recording Functions 20 Rehearsal After you have matched the instrument with the TAPE SPEED CONTROL (F) - Start playing....pitch of an instrument and the pitch of the instrument, you are recording. 15) When the track is slightly different. TRACK indicators resume flashing. The indicator above the key lights and the MT4X starts the tape. The indicators above the REC/PAUSE and PLAY keys switch off and the ...
Owner's Manual
Page 23
...you should ensure that the mixer setting is reasonably easy to be obvious. However, it into the previously-recorded track and your part while punching in /out features of the MT4X. If you make a mistake, you are three basic methods for making invisible punch-in manually. You will ...not blend into the PUNCH I/O footswitch connector. 2) Press the REC SELECT key for the track you record a punch-in and out using...
...you should ensure that the mixer setting is reasonably easy to be obvious. However, it into the previously-recorded track and your part while punching in /out features of the MT4X. If you make a mistake, you are three basic methods for making invisible punch-in manually. You will ...not blend into the PUNCH I/O footswitch connector. 2) Press the REC SELECT key for the track you record a punch-in and out using...
Owner's Manual
Page 24
...switched off. recording begins. • The punch-out point - Set the working points: AUTO PUNCH Automatic rewind Blank space Blank space Track to be re-recorded START Pre-roll point IN Segment to be restored and the indicator(s) illuminated again. This is stored (either or .... the punch-in re-recorded Punch-out point point Post-roll point * Post-roll is 10 counts on page 41. Note: If you must select a track before or after the re-recorded segment. • The pre-roll point - User's Guide TAPE 9.5 +9 +9 6 6 3 3 0 0 3 3 6 6 10 10 -20 -20 1 2 3 ...
...switched off. recording begins. • The punch-out point - Set the working points: AUTO PUNCH Automatic rewind Blank space Blank space Track to be re-recorded START Pre-roll point IN Segment to be restored and the indicator(s) illuminated again. This is stored (either or .... the punch-in re-recorded Punch-out point point Post-roll point * Post-roll is 10 counts on page 41. Note: If you must select a track before or after the re-recorded segment. • The pre-roll point - User's Guide TAPE 9.5 +9 +9 6 6 3 3 0 0 3 3 6 6 10 10 -20 -20 1 2 3 ...


